TL;DR at the bottom if you know what Ritalin is.
I got my Mac Pro 4,1 about a year ago by happenstance. I wasn't looking for a desktop anything, being perfectly happy with my 2012 MBA 13" + 23" monitor combo. But a graphic artist friend called, said the company was moving to all nMP's and was about to sell off all their remaining cMP's.
Here's what I originally purchased:
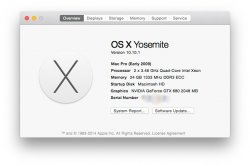
2009 Mac Pro 8-core 2.66GHz
16GB RAM, Radeon 4870, two 1TB 7200rpm HD's plus a 30" Apple Cinema Display with a couple of stuck pixels.
Well that was a year ago, and since then I added a regular Sata SSD for my boot drive, got a used GTX 680 and flashed it to the Mac version, added an Inatek usb 3.0 card, and put in a bootcamp drive for gaming. It's been fun. But I wanted something a little more in part to extend the usage life of this machine, and admittedly in part just because.")
My needs aren't overly complex. Mostly I use the cMP for just general computing, a little bit of Light Room, mass media storage and some gaming. Doing this upgrade without spending too much "play" money seemed to be the order of the day. And then there's my skill level, or lack there of. I can follow instructions, but I'm not exactly Mr. Fixit. In fact, due to the complications of upgrading the dual-CPU 2009 Mac Pro, I was tempted to not upgrade it at all, instead buying a complete quad-core 4,1 tray, upgrade that to a single hex W3690 or X5690 and sell off the original 8-core tray to recoup the cost. But while that was very tempting, I felt like I would be giving up too much in terms of future flexibility and value.
So while still contemplating and watching eBay for a super-affordable 4,1 quad tray, I came across an ad from a seller Box185 advertising a CPU de-lidding service. Promising to make any compatible CPU a drop-in affair on the 8-core 2009 cMP. My interest was tweaked. I had heard of this process on Pindelski's blog, and after a eBay message to Paul (Box185) I found out this was the very electrical engineer Pindelski mentioned. So off I went.
CPU Selection
There are of course two ways to upgrade your current CPU. Higher clock speed and/or more total cores. Not being an actual pro, I felt I really didn't need to go to 12 CPU cores. Following Flowriders advice on CPUs, I started looking at X5677s for the upgrade. While they only possess four cores each, the X5677 has the maximum clock speed for the cMP at 3.46GHz just like the 6-Core X5690 but costs 1/3rd as much. Decent multicore with maxed out single core all within my budget.
A side note about "matched pair" processors. I purchased my CPUs from two different eBay vendors, thinking that as Long as the model number was the same,that I would have what constitutes a matched pair. After doing a little research on the subject, I found out that the two processors needed to be both the same model number and have the same stepping version, contained in the Sspec. Luckily, both of the processors I ordered had the same Sspec of SLBV9. So after the CPUs arrived from eBay, I hit the buy button and sent them off to Box185 for modification.
By this point I had my 1333MHz RAM from another vendor, so I went ahead and installed it, (it ran @ 1066MHz) did a PRAM reset (no change to speed) and after a couple days, flashed my firmware from 4,1 to 5,1 and PRAM reset again. RAM still ran @ 1066MHz with my stock X5550's)
Tip: If you'll change only one thing at a time, you'll have an easier time should something get weird. Change everything all at once, good luck finding out what's causing the issue.
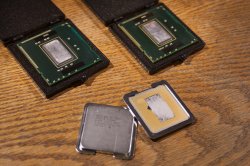
Turn around time for the CPUs was over a single weekend, and after a short shipping delay (the U.S. post office apparently believes "two-day priority mail" should include three workdays sitting in a sorting facility) I received the freshly delidded CPUs. They looked better than I expected, with only minor marks on the top surfaces from the delidding process. The bare processor die looked nice and smooth but not shiny like the stock CPU.
There's a Tech Manual for that.
After receiving my now de-lidded CPUs, a long 3mm hex and some Arctic Silver 5, I pulled my CPU tray and got started. For installation, I referenced the 2009 Mac Pro technicians guide, pages 155-160, and pages 166-170. You can download the guide if you don't have it already BY SEARCHING GOOGLE for: "apple technician guide mac pro 2009" (not supposed to post the link)
In a nutshell, unscrew the four screws on the heatsink, pull it straight up and off, twist off the old CPU from the heatsink and clean the bottom of the heatsink.
Place the new CPU in the socket and fit the plastic retaining plate on top of that.
Drop a super small bit of thermal paste on top of the metal processor die and replace the heatsink, being careful to connect the heat sensor.
Tighten the screws two turns at a time until all are finger tight, then 1/4 turn more using the handle. Done.
Tips:
The Heatsink looks strong. It is not. Do not press down from the top. Paper thin aluminum my friend.
Cheap paper towels will scratch the copper plate on the underside of the heatsink. Use a lintless cloth (sunglasses cloth) if you've got one.
Use an even smaller drop of thermal paste than normal. That processor die is small!
Use a non-magnetic hex key. I believe that's better for the sensitive bits as well as being less of a PITA to get it slotted in the screw head by feel.
Finger Tight means (as far as I know) finger tight holding the shaft of the hex key, not using the handle at the top.
When tightened, you can look in from the sides of the heatsink and see that the screws have brought the heatsink flush against the top of the posts as designed. No gap.
Now just replace your RAM and reinstall the CPU tray. Doublecheck everything, grab an age appropriate cold beverage and power it up.
No counting turns.
No extra strips of thermal pads.
No modding heat sensor connector.
Just RTFM. That's it.
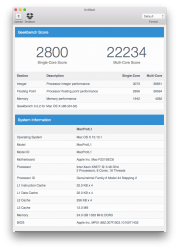
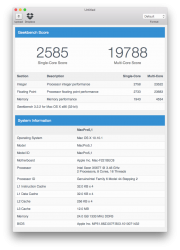
Firing it up after the install, she booted just fine. My 1333MHz RAM now ran at full speed. Ran a few benchmarks to heat it up and my CPU temps were good. Switched to Windows to run benchmarks and see what my favorite games felt like. All went well, except that Windows, being Windows, thinks I'm a dirty pirate and wants me to enter a product code or call to re-activate. Argh!
To finish up, I'd say I'm really happy with doing the upgrade this way. Parts dropped right in without hassle. Nothing out of the ordinary for me to do. No stopping early to see if "this" is enough, nor pulling parts and tightening some more to see if "that's" enough. No clipping off plastic bits. Nothing that can't be reassembled to true factory unmodified form. Just flash the firmware to 5,1 and then follow the 2009 technician's manual as printed. Well, follow the manual and pay $200 for a vendor to mod the CPUs first.
And that brings me to when you might or might not want to do it this way. For some, saving cash is paramount. Either selling off your 8-core tray and going to a quad/hex instead, or just going with the DIY method with the octo-core is simply the only way they can afford to do it.
On the other extreme are those who spend mega money on new CPUs. If I've just spent $1500 on new X5690's with a 3-year warranty, I'm not sure if I'd let anyone, regardless of their qualifications, go and mod my CPUs, removing all possible hope of warranty replacement. Of course, if I had that kind of money to throw at an upgrade, I'd probably sell my 4,1 and buy a 5,1 so those $$$ new CPUs would drop right in anyway.
For me, two X5677's ($100 each) + $200 de-lidding for a total CPU upgrade cost of ~$400 was just perfect. Add appropriate amounts of 1333MHz RAM, a long 3mm hex key and a tube of thermal paste + about 15-20 minutes of actual install work (not counting time lost with my stupid magnetic-head hex key) and your good to go.
So would I do it again?
Heck yes.
-
TL;DR: I successfully upgraded my 2009 cMP 8-core using X5677's and the de-lidding services of Box185 on eBay.
I got my Mac Pro 4,1 about a year ago by happenstance. I wasn't looking for a desktop anything, being perfectly happy with my 2012 MBA 13" + 23" monitor combo. But a graphic artist friend called, said the company was moving to all nMP's and was about to sell off all their remaining cMP's.
Here's what I originally purchased:
2009 Mac Pro 8-core 2.66GHz
16GB RAM, Radeon 4870, two 1TB 7200rpm HD's plus a 30" Apple Cinema Display with a couple of stuck pixels.
Well that was a year ago, and since then I added a regular Sata SSD for my boot drive, got a used GTX 680 and flashed it to the Mac version, added an Inatek usb 3.0 card, and put in a bootcamp drive for gaming. It's been fun. But I wanted something a little more in part to extend the usage life of this machine, and admittedly in part just because.
My needs aren't overly complex. Mostly I use the cMP for just general computing, a little bit of Light Room, mass media storage and some gaming. Doing this upgrade without spending too much "play" money seemed to be the order of the day. And then there's my skill level, or lack there of. I can follow instructions, but I'm not exactly Mr. Fixit. In fact, due to the complications of upgrading the dual-CPU 2009 Mac Pro, I was tempted to not upgrade it at all, instead buying a complete quad-core 4,1 tray, upgrade that to a single hex W3690 or X5690 and sell off the original 8-core tray to recoup the cost. But while that was very tempting, I felt like I would be giving up too much in terms of future flexibility and value.
So while still contemplating and watching eBay for a super-affordable 4,1 quad tray, I came across an ad from a seller Box185 advertising a CPU de-lidding service. Promising to make any compatible CPU a drop-in affair on the 8-core 2009 cMP. My interest was tweaked. I had heard of this process on Pindelski's blog, and after a eBay message to Paul (Box185) I found out this was the very electrical engineer Pindelski mentioned. So off I went.
CPU Selection
There are of course two ways to upgrade your current CPU. Higher clock speed and/or more total cores. Not being an actual pro, I felt I really didn't need to go to 12 CPU cores. Following Flowriders advice on CPUs, I started looking at X5677s for the upgrade. While they only possess four cores each, the X5677 has the maximum clock speed for the cMP at 3.46GHz just like the 6-Core X5690 but costs 1/3rd as much. Decent multicore with maxed out single core all within my budget.
A side note about "matched pair" processors. I purchased my CPUs from two different eBay vendors, thinking that as Long as the model number was the same,that I would have what constitutes a matched pair. After doing a little research on the subject, I found out that the two processors needed to be both the same model number and have the same stepping version, contained in the Sspec. Luckily, both of the processors I ordered had the same Sspec of SLBV9. So after the CPUs arrived from eBay, I hit the buy button and sent them off to Box185 for modification.
By this point I had my 1333MHz RAM from another vendor, so I went ahead and installed it, (it ran @ 1066MHz) did a PRAM reset (no change to speed) and after a couple days, flashed my firmware from 4,1 to 5,1 and PRAM reset again. RAM still ran @ 1066MHz with my stock X5550's)
Tip: If you'll change only one thing at a time, you'll have an easier time should something get weird. Change everything all at once, good luck finding out what's causing the issue.
Turn around time for the CPUs was over a single weekend, and after a short shipping delay (the U.S. post office apparently believes "two-day priority mail" should include three workdays sitting in a sorting facility) I received the freshly delidded CPUs. They looked better than I expected, with only minor marks on the top surfaces from the delidding process. The bare processor die looked nice and smooth but not shiny like the stock CPU.
There's a Tech Manual for that.
After receiving my now de-lidded CPUs, a long 3mm hex and some Arctic Silver 5, I pulled my CPU tray and got started. For installation, I referenced the 2009 Mac Pro technicians guide, pages 155-160, and pages 166-170. You can download the guide if you don't have it already BY SEARCHING GOOGLE for: "apple technician guide mac pro 2009" (not supposed to post the link)
In a nutshell, unscrew the four screws on the heatsink, pull it straight up and off, twist off the old CPU from the heatsink and clean the bottom of the heatsink.
Place the new CPU in the socket and fit the plastic retaining plate on top of that.
Drop a super small bit of thermal paste on top of the metal processor die and replace the heatsink, being careful to connect the heat sensor.
Tighten the screws two turns at a time until all are finger tight, then 1/4 turn more using the handle. Done.
Tips:
The Heatsink looks strong. It is not. Do not press down from the top. Paper thin aluminum my friend.
Cheap paper towels will scratch the copper plate on the underside of the heatsink. Use a lintless cloth (sunglasses cloth) if you've got one.
Use an even smaller drop of thermal paste than normal. That processor die is small!
Use a non-magnetic hex key. I believe that's better for the sensitive bits as well as being less of a PITA to get it slotted in the screw head by feel.
Finger Tight means (as far as I know) finger tight holding the shaft of the hex key, not using the handle at the top.
When tightened, you can look in from the sides of the heatsink and see that the screws have brought the heatsink flush against the top of the posts as designed. No gap.
Now just replace your RAM and reinstall the CPU tray. Doublecheck everything, grab an age appropriate cold beverage and power it up.
No counting turns.
No extra strips of thermal pads.
No modding heat sensor connector.
Just RTFM. That's it.
Firing it up after the install, she booted just fine. My 1333MHz RAM now ran at full speed. Ran a few benchmarks to heat it up and my CPU temps were good. Switched to Windows to run benchmarks and see what my favorite games felt like. All went well, except that Windows, being Windows, thinks I'm a dirty pirate and wants me to enter a product code or call to re-activate. Argh!
To finish up, I'd say I'm really happy with doing the upgrade this way. Parts dropped right in without hassle. Nothing out of the ordinary for me to do. No stopping early to see if "this" is enough, nor pulling parts and tightening some more to see if "that's" enough. No clipping off plastic bits. Nothing that can't be reassembled to true factory unmodified form. Just flash the firmware to 5,1 and then follow the 2009 technician's manual as printed. Well, follow the manual and pay $200 for a vendor to mod the CPUs first.
And that brings me to when you might or might not want to do it this way. For some, saving cash is paramount. Either selling off your 8-core tray and going to a quad/hex instead, or just going with the DIY method with the octo-core is simply the only way they can afford to do it.
On the other extreme are those who spend mega money on new CPUs. If I've just spent $1500 on new X5690's with a 3-year warranty, I'm not sure if I'd let anyone, regardless of their qualifications, go and mod my CPUs, removing all possible hope of warranty replacement. Of course, if I had that kind of money to throw at an upgrade, I'd probably sell my 4,1 and buy a 5,1 so those $$$ new CPUs would drop right in anyway.
For me, two X5677's ($100 each) + $200 de-lidding for a total CPU upgrade cost of ~$400 was just perfect. Add appropriate amounts of 1333MHz RAM, a long 3mm hex key and a tube of thermal paste + about 15-20 minutes of actual install work (not counting time lost with my stupid magnetic-head hex key) and your good to go.
So would I do it again?
Heck yes.
-
TL;DR: I successfully upgraded my 2009 cMP 8-core using X5677's and the de-lidding services of Box185 on eBay.
Attachments
Last edited: