Become a MacRumors Supporter for $50/year with no ads, ability to filter front page stories, and private forums.

MacRumors

macrumors bot
Original poster
Apr 12, 2001
67,464
37,702


Apple's iPhones include several headline camera features that are worth using, such as Portrait Mode and Photographic Styles. But if all you want to use is the standard photo mode, there are still several tools and settings that can improve the composition of your pictures and help you capture the perfect shot using more traditional techniques.

iPhone-15-Blue-Three-Quarters-Perspective-Camera-Closeup-Feature.jpg

Whether you are the owner of a new iPhone or a longtime user looking to up your iPhone photography game, here are six camera tools and settings in iOS that are worth checking out and experimenting with.

1. Use the Rule of Thirds

For a while now, Apple's Camera app has included a few optional settings that can help you line up your shots. Foremost in these settings is the Grid tool, which should be used when applying the rule of thirds. It divides the frame of your photo into a grid with two horizontal lines and two vertical lines, creating nine equal parts.

grid-camera-tool.jpg

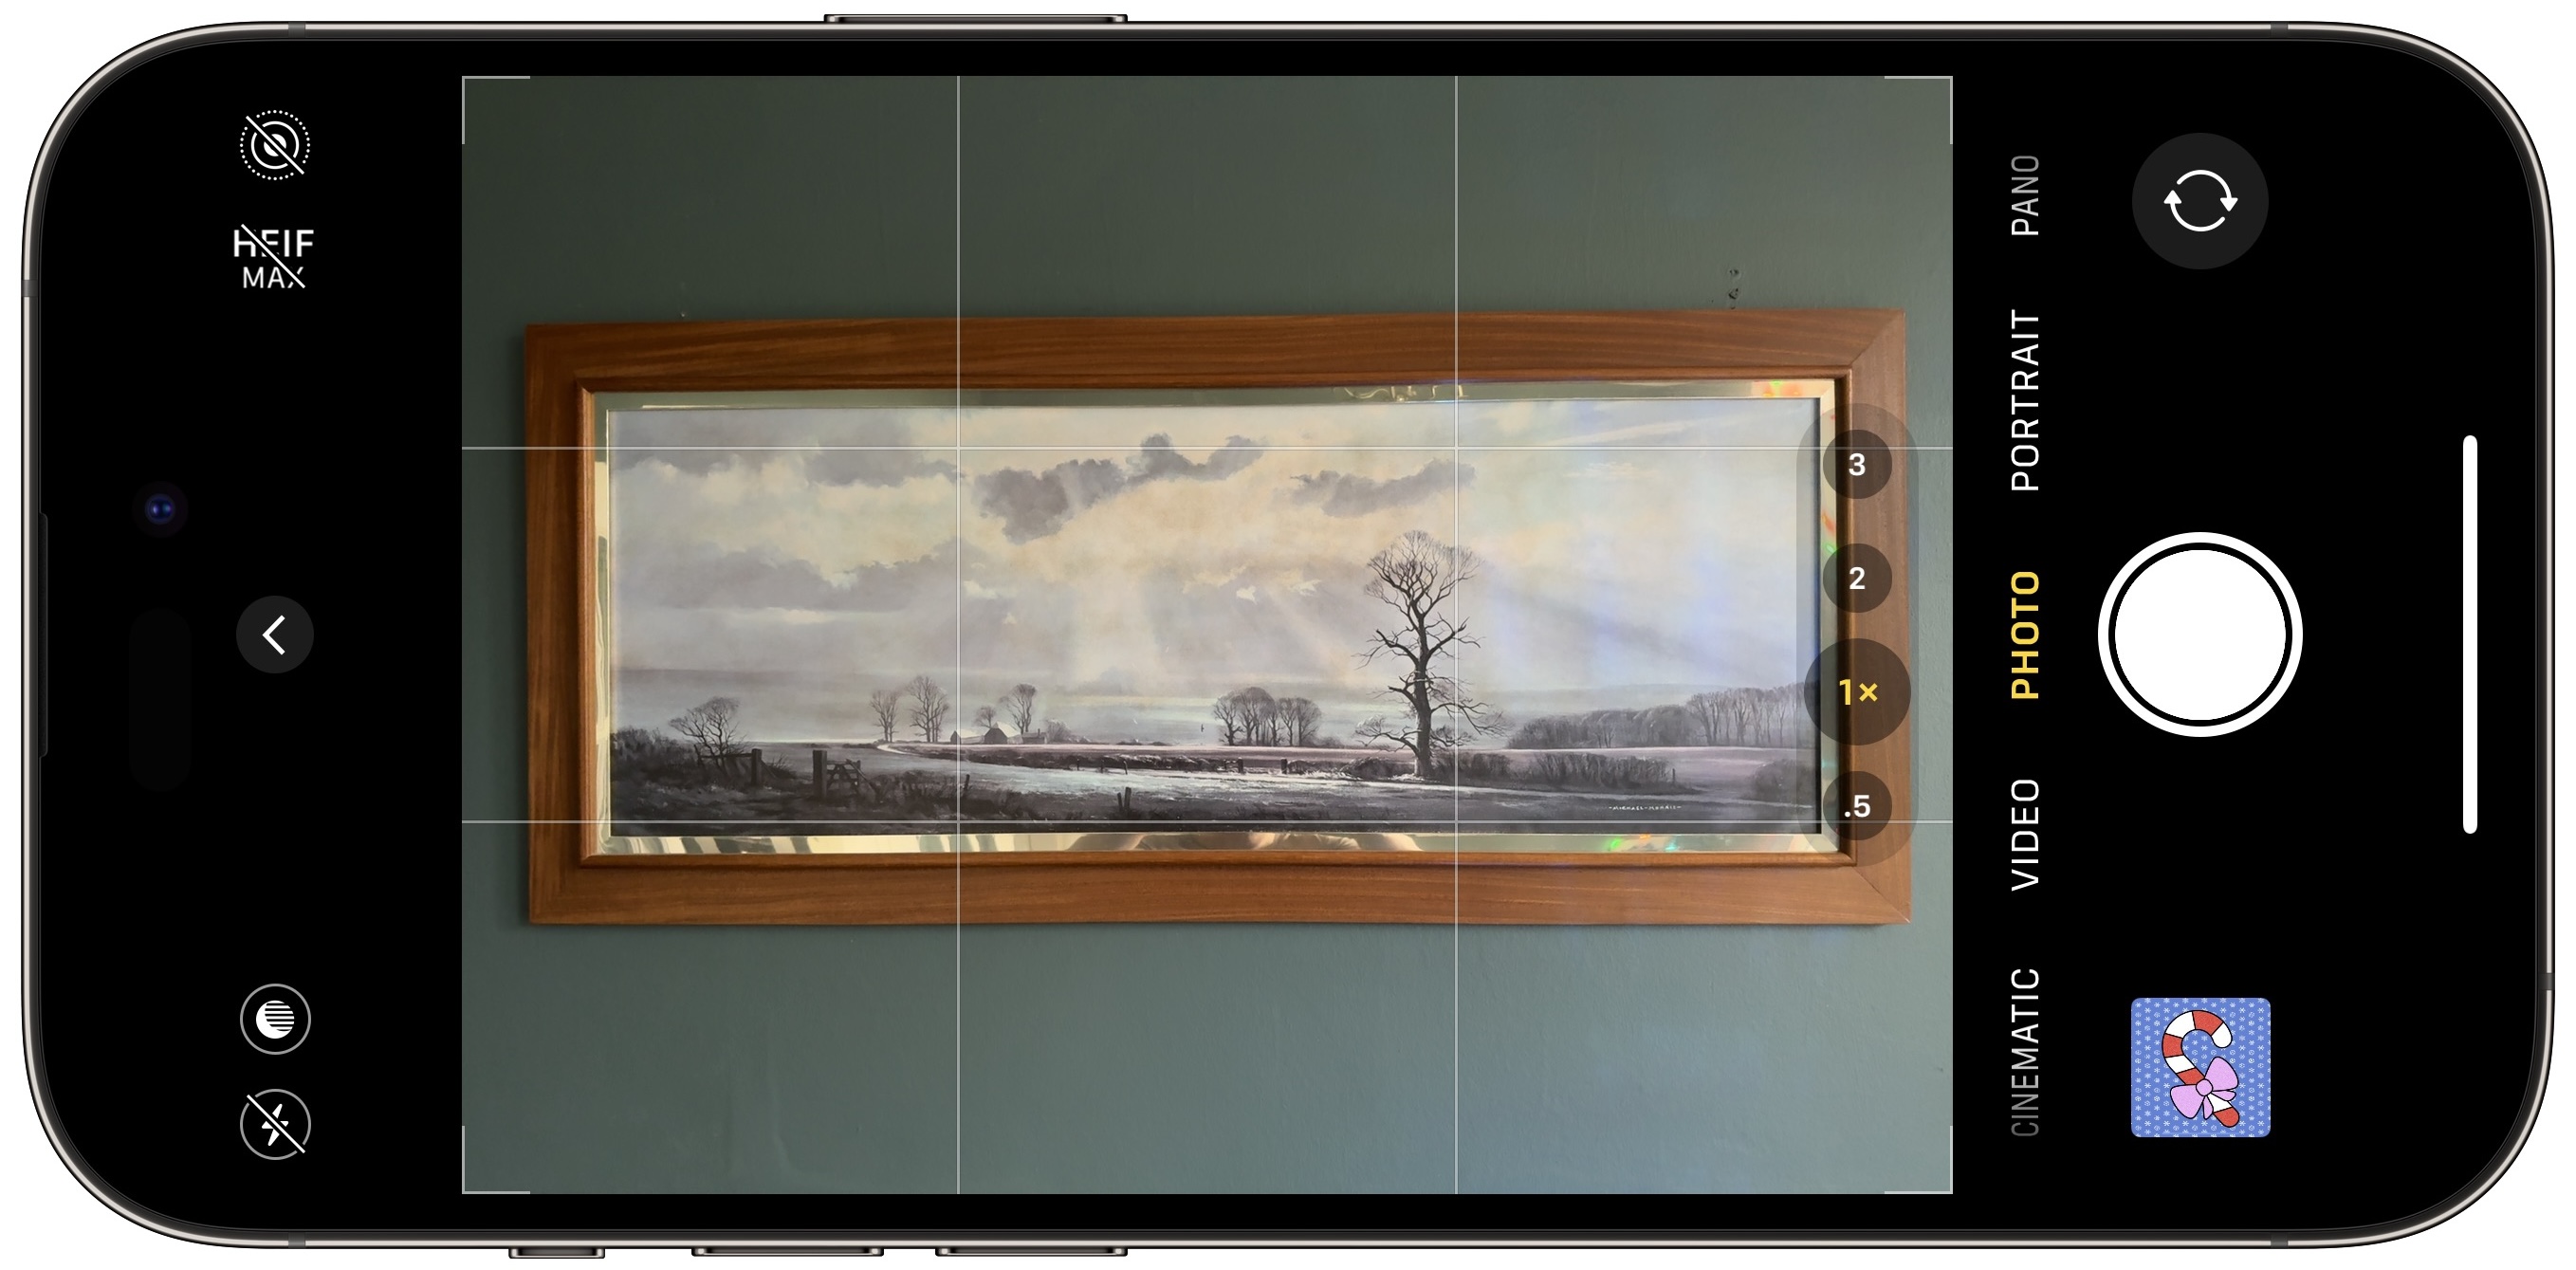
The rule of thirds helps guide the viewer's eye to the most important parts of your photo and creates a more harmonious composition. Here's how to overlay a grid on the viewfinder.
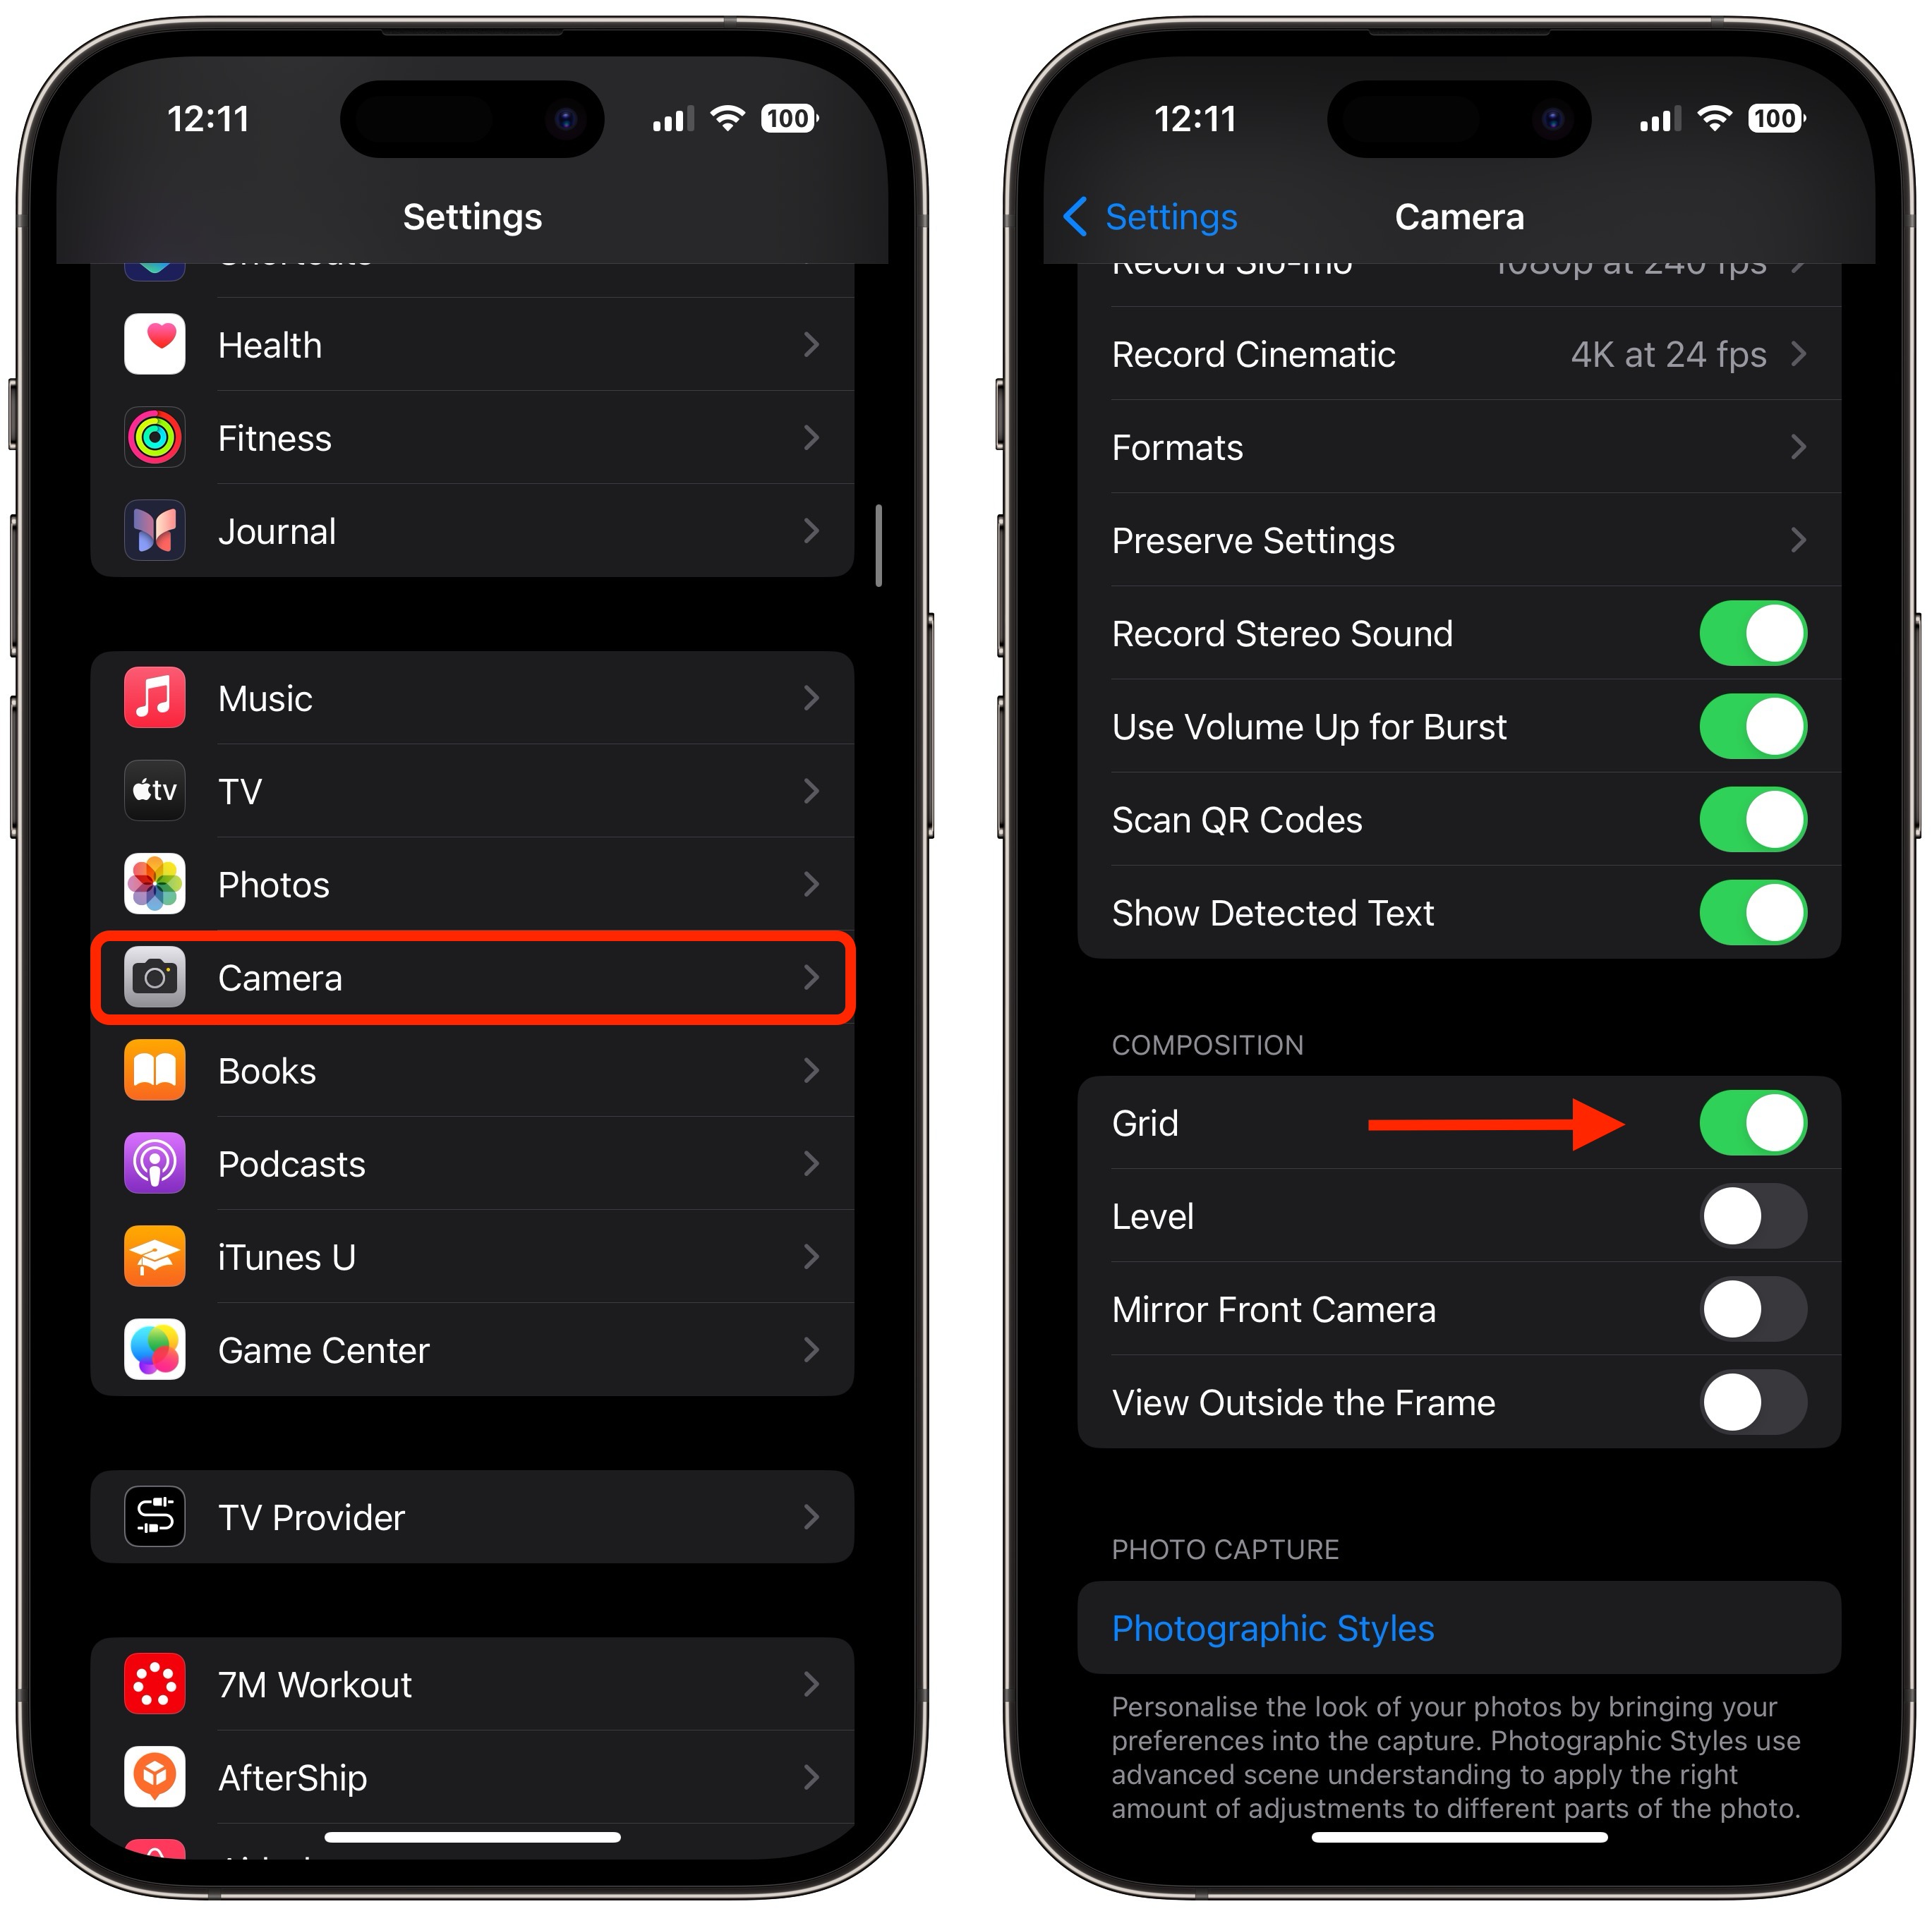
  1. Open the Settings app on your iPhone.
  2. Scroll down and tap Camera.
  3. In the "Composition" section, toggle on the switch next to Grid.
camera-grid-setting.jpg


Here are five things to keep in mind when using the grid to apple the rule of thirds.
  • Identify the Key Elements: First, identify the main subjects or elements in the scene you want to photograph. These could be a person, a building, a tree, or any focal point.
  • Positioning the Subjects: Place these key elements along the lines or at the points where the lines intersect. For instance, if you're taking a photo of a person, you might position them along one of the vertical lines, rather than in the center of the frame.
  • Horizontal Elements: For horizontal elements like the horizon in a landscape, align them with one of the horizontal lines. For a more dramatic sky, place the horizon on the lower line. For more emphasis on the land or sea, place it on the upper line.
  • Balancing the Image: Use the rule of thirds to balance your photo. If you place a subject on the left, consider having something of lesser importance on the right to create a sense of balance.
  • Experimentation: While the rule of thirds is a guideline, it's not a strict rule. Feel free to experiment with it and see how shifting elements in your frame changes the photo's impact.

2. Straighten Top-Down Shots

If you're taking a picture of something from above like a plate of food or an ornament on the ground, consider using the camera level, as it helps you capture a balanced shot without having to use a tripod arm or mount. It's also useful for taking a shot of something directly above you, like an object on the ceiling or in the sky.

level-camera-tool-setting.jpg

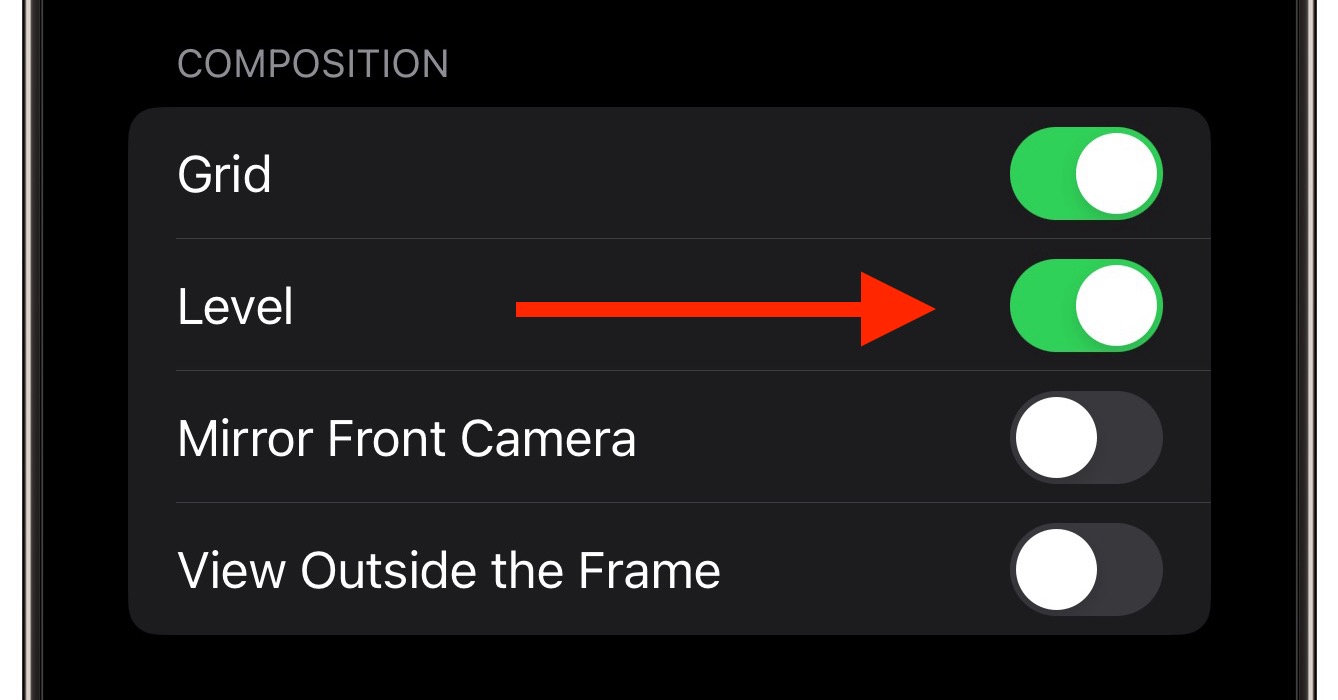
The camera level tool used to be part of the Grid overlay, but Apple separated out the function in iOS 17, and it now has its own switch: Open the Settings app on your iPhone, select Camera, then toggle on the switch next to Level. Now you are ready to use it.
  1. Open the Camera app, and set the capture mode to Photo, Portrait, Square, or Time Lapse, using the sliding menu above the shutter button.
  2. Point the camera straight down above your subject (or straight up if the subject/scene you want to capture is above you).
  3. Line up the floating crosshair with the fixed crosshair in the center of the screen by adjusting the angle of your phone's camera. The crosshairs will both glow yellow when in perfect alignment.
    Tap the shutter button to capture the shot.
camera-level-tool-in-action.jpg
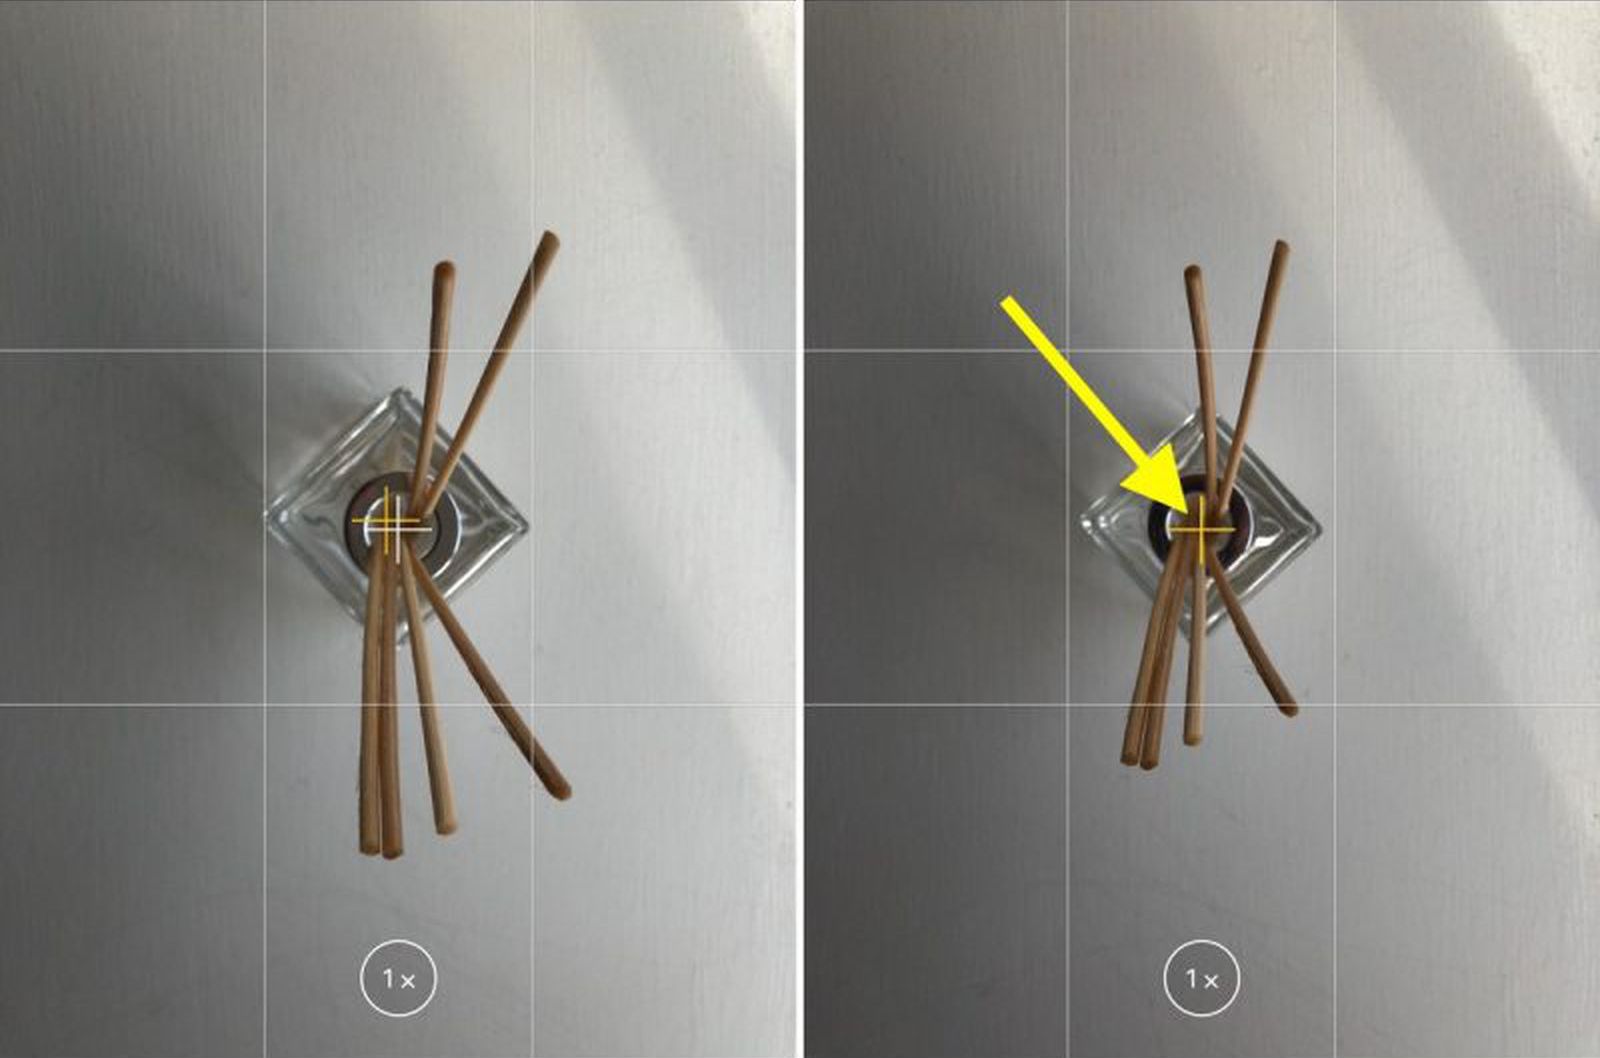
The aligned crosshairs turn yellow (right), indicating the lens is parallel with the ground.


3. Straighten Your Horizontal Shots

By making the Level tool an individual option in iOS 17, Apple has also included an additional horizontal level for more traditional straight-on photos.

ios-17-camera-level-no.jpg

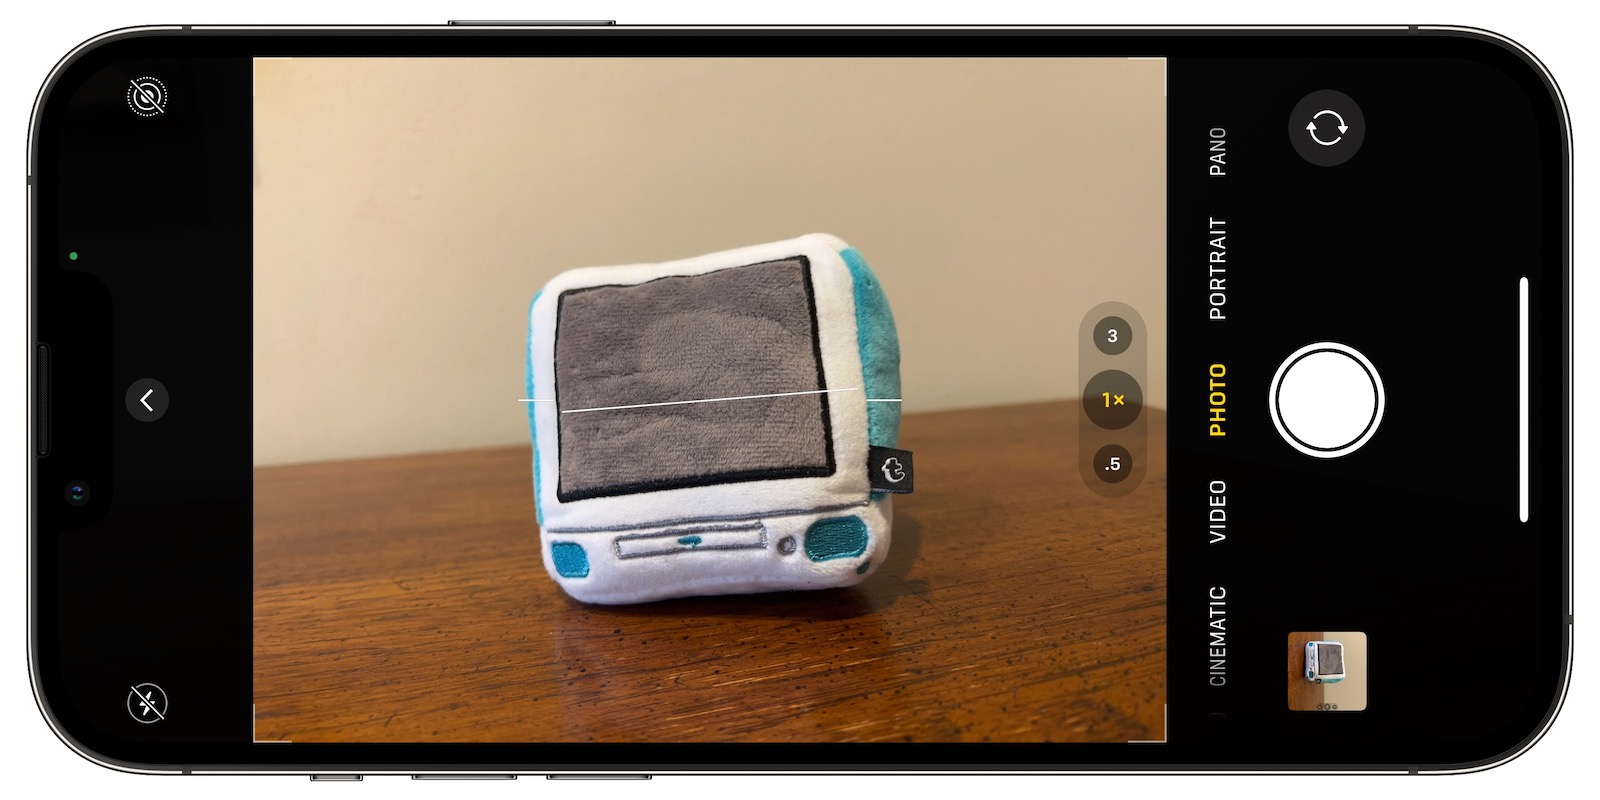
Turning the Level option on makes a broken horizontal line appear on the screen when your iPhone senses that you're lining up for a straight-on shot and you tilt your device slightly out of horizontal. The line appears white while your phone is out of level and then turns yellow once you achieve a level orientation to indicate success.

ios-17-camera-level.jpg

With the Level setting enabled (Settings ➝ Camera ➝ Level), try it for yourself. Open the Camera app and try shooting a subject at a straight angle, and you should see the broken horizontal lines in the center of the viewfinder. Straighten your angle up to connect the lines and make a single yellow line.

The leveling pop-up only appears briefly and only within a narrow range of angles close to horizontal (in either portrait or landscape orientation), so it won't intrusively pop up when you're intentionally trying to take a photo at an angle.

4. Take Burst Photos

Burst Mode refers to when the camera on your iPhone captures a series of photos in rapid succession, at a rate of ten frames per second. It's a great way to shoot an action scene or an unexpected event, since you're always more likely to end up with the picture you were aiming for.

burstmode.jpg

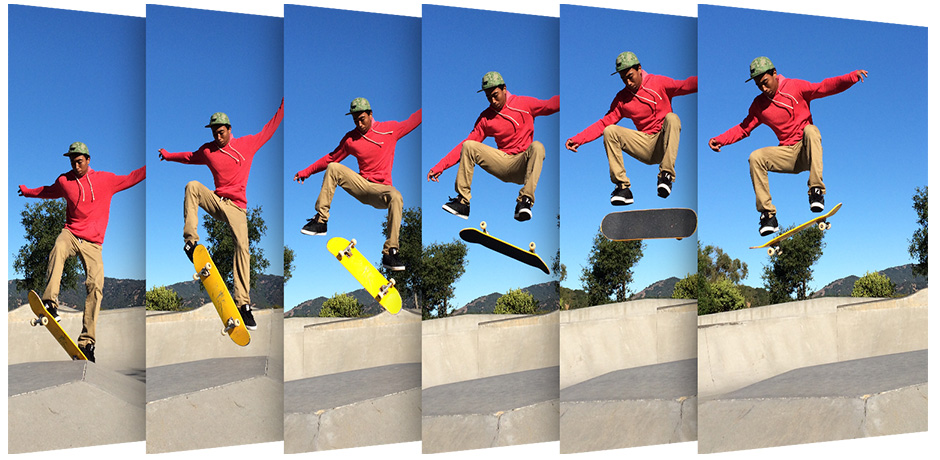
To shoot in Burst Mode, simply long press on the Volume Up button and your iPhone will take a series of photos in quick succession. Notice that a counter increases inside the on-screen shutter button for as long as you ho... Click here to read rest of article

Article Link: 6 Essential iPhone Camera Tips for Taking Great Photos
 
Is there any option to disable the burst shots? Maybe it's just me, but I do occasionally get accidental burst shots and my brain has a bit of an "oh wait, what's happening here?!" delay, leaving me with 20 shots I have to delete afterwards...:eek:o_O
 
Unfortunately burst mode is really behind the times, it doesn't focus track and it doesn't lock exposure and 10fps is slow.

But advantage of burst shots is in the handheld low light environment when you are shooting a subject against the background. You can slow down the shutter speed to get more light and less noise and burst into oblivion, few images out of the bunch will have to come out super clean.
 
  • Like
Reactions: spcopsmac21
I thought iPhone cameras are taking great pictures all by themselves nowadays? Why would it be essential to follow half a dozen tips?
It’s not about taking the photos but more about the technique. Leveling and composition are two of them and you need to take care about by yourself.
And it is nothing wrong with making those techniques better with time.
 
What i would like to know is why my 15 Plus is taking such awful selfies. I hardly take any but yesterday I wanted to take some with my sisters over Christmas and wanted to highlight how nice the camera in my new iPhone is and it somehow sucks?

I don’t know what happened but it looked crystal clear and colorful before taking the shot but once the photo was taken, everything looked so washed out? I thought it was a bug at first and even rebooted the phone.

Like look at my shirt or my skin.

I miss my 12 PM selfies
 

Attachments

  • IMG_1163.jpeg
    IMG_1163.jpeg
    239.4 KB · Views: 157
Last edited:
So how do I create burst shots with a timer? My iPhone 13 was able to do so, but the new iPhone 15 is unable to do this?
 
What I would really love to have visual assistance with beyond the horizontal and vertical lines is assistance with the Z-axis. Turning on the grid feature, I am pretty much able to easily align the horizontal and vertical axis. However, because of primarily seeing out of one eye, depth perception is a challenge and therefore so is alignment on the z-axis. When taking pictures, it's not uncommon for my phone to have one end closer to the scene than the other (imagine say the left side of your phone tilted towards the shot while the right side is tilted away. I usually cannot detect this until after the picture is taken and even then when I go to re-take it, it's very difficult to get the alignment correctly. Difficult for my eyes.
 
  • Like
Reactions: psac
It’s not about taking the photos but more about the technique. Leveling and composition are two of them and you need to take care about by yourself.
And it is nothing wrong with making those techniques better with time.
I was harping about the characterization of them being “essential for taking great photos”. It implies that you can only take great photos if you apply those six tips. And, incidentally, this is in stark contrast to the marketing about smartphone cameras. So, I was tongue-in-cheek criticizing the clickbait headline here. If they’d replace “essential” by “useful”, I’d have no qualms.
 
Last edited:
I was harping about the characterization of them being “essential for taking great photos”. It implies that you can only take great photos if you apply those six tips. And, incidentally, this is in stark contrast to the marketing about smartphone cameras. So, I was tongue-in-cheek criticizing the clickbait headline here. If they’d replace “essential” by “useful”, I’d have no qualms.
Dude, chill out.
 
I thought iPhone cameras are taking great pictures all by themselves nowadays? Why would it be essential to follow half a dozen tips?

Because it's the person/photographer behind the camera who *makes* strong/compelling photographs.

And never the camera - it's just a tool.
 
Those are good tips.

I'd also add that when looking at photographs, a viewer's eye will instinctively first find and look at the brightest element in the frame. Often those objects are in both the foreground/background, and many times unnecessary. And are a distraction to your subject, which is what should first connect with viewers.

Ideally, it's best to compose so they're either not in the frame, or if that can't be accomplished, they can be burned down later in post.
 
Last edited:
  • Like
Reactions: I7guy
These tips apply to any camera.

The horizonal shots is more guideline than rule of thumb. Often times, I prefer the Dutch angle to boring horizontal. The only time I prefer horizontal is landscape photography. The tilt is disorienting in landscape shots.😬

Burst shots are useful for action shots or when the timing is tricky. For everyday photography, it's a waste of time (you have to go back and erase a bunch of pics) and resources.
 
  • Like
Reactions: CarAnalogy
Grid is a great tip, I’ve had more than one person shocked when I show it to them, and their pictures instantly get a lot better.

Even without knowing much about photography people just naturally frame their shots better. I know why it’s not on by default but people would take better pictures if it was.
 
  • Like
Reactions: psac
On ‌iPhone‌ 11 and later models, there is an optional camera setting that allows you to see what is outside the bounds of your photo's frame, so you can correct the alignment of photos (and videos) without having to resort to cropping.

The feature that let you straighten photos without cropping only lasted a year with iOS 13 and is long gone! Nowadays you can view outside the frame while using the camera, but the wider view is not saved with the photo anymore.
 
I thought iPhone cameras are taking great pictures all by themselves nowadays? Why would it be essential to follow half a dozen tips?

That’s the pixel you’re thinking of. The one that forces everyone to smile.
 
I don't agree with turning on the Mirror Front Camera setting. While turning it on does make the final photo look identical to the preview, it does so at the expense of mirroring the output. For instance, if you take a selfie against Hollywood sign, the word Hollywood will be flipped like a mirror.
 
I don't agree with turning on the Mirror Front Camera setting. While turning it on does make the final photo look identical to the preview, it does so at the expense of mirroring the output. For instance, if you take a selfie against Hollywood sign, the word Hollywood will be flipped like a mirror.
Agreed. There’s only one correct left-right alignment of a photo and that’s how it looks when someone else is looking at you. I guess it’s a sign of our times when people want the image that looks like them looking at themselves in a mirror or viewing the world/themselves through their phone.
 
Register on MacRumors! This sidebar will go away, and you'll see fewer ads.