Just finished upgrading my 20" Core Duo with a 750Gb Drive.
I now have lots of media space and a clean install of Leopard...
I now have lots of media space and a clean install of Leopard...
It was actually quite simple, took about 15 mins ( + the time it took to drive out to buy some long torx screwdrivers )
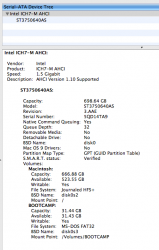
I installed the Seagate Barracuda 750GB SATA Hard Disk Drive ST3750640AS.
There were a couple of gotchas on the way, but having previously been a systems builder there was nothing to it.
Did you have to jumper the drive for 1.5 GHz, or can a Core Duo handle SATA II @ 3.0 GHz?I installed the Seagate Barracuda 750GB SATA Hard Disk Drive ST3750640AS.
Did you have to jumper the drive for 1.5 GHz, or can a Core Duo handle SATA II @ 3.0 GHz?
LK


Could you be a little more specific on the "afaik" part?The C2D iMac does 3Gb/s SATA-II afaik.
Could you be a little more specific on the "afaik" part?
Apple Developer Connection indicates that the internal bus is SATA I -- but I was
fishin' for a confirmation or correction based on direct first-hand experience.
ioreg -l | grep -i sata
| | +-o SATA@1F,2 <class IOPCIDevice, registered, matched, active, busy 0, retain 11>
| | | | "acpi-path" = "IOACPIPlane:/_SB/PCI0/SATA@1f0002"
| | | | "AHCI Port ESATA" = No
| | | | "acpi-path" = "IOACPIPlane:/_SB/PCI0/SATA@1f0002/PRT0@ffff"
| | | | "Protocol Characteristics" = {"Physical Interconnect"="SATA","Physical Interconnect Location"="Internal/External"}
| | | | "Protocol Characteristics" = {"Physical Interconnect"="SATA","AHCI Port Number"=0,"Physical Interconnect Location"="Internal","Port Speed"="3.0 Gigabit"}
| | | | "SATA Features" = 14
| | | | "Device Characteristics" = {"Product Revision Level"="12.01B03","SATA Features"=14,"Product Name"="WDC WD3200AAJS-40RYA0 ","Physical $
| | | | "Protocol Characteristics" = {"Physical Interconnect"="SATA","Physical Interconnect Location"="Internal"}
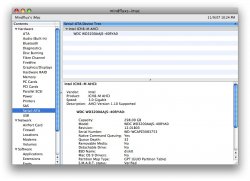
Thanks, but that profile appears to be an ALU iMac (the 320 GB HD is the tip-off).Oh I don't know.
If you don't trust profiler.
Thanks, but that profile appears to be an ALU iMac (the 320 GB HD is the tip-off).
There's no question as to what they use -- it's right there on the spec sheet.
My question to the OP was regarding pre-aluminum_and_glare models.
The profiler tells me what's currently installed, but I was asking the OP
whether he had to jumper his upgrade HD for SATA I.
...afaik, trusting shoot-form-the-hip net.factoids is risky business,
LK
Thanks, markfc, that's interesting. I notice System Profiler is showing it as 1.5 GB/s.Nope I didn't need to do anything to jumper the drive.