Anyone know of a Mojave compatible alternative to the broken and completely useless pile of garbage that is Disk Utility? I'm tired of having to hook up a Windows or Linux system whenever I need to repartition (or even just reformat in some cases) a drive.
Got a tip for us?
Let us know
Become a MacRumors Supporter for $50/year with no ads, ability to filter front page stories, and private forums.
Alternatives to Disk Utility
- Thread starter 1madman1
- Start date
- Sort by reaction score
You are using an out of date browser. It may not display this or other websites correctly.
You should upgrade or use an alternative browser.
You should upgrade or use an alternative browser.
There aren’t many alternatives. I use the partitioning tools in Windows via Parallels. Sometimes disk utility won’t even format partitions properly to get back default storage space because it can’t “see” them, which is frustrating. If you don’t want to go through all that trouble, I’ve had some success with Paragon Disk Manager: https://www.paragon-software.com/home/hdm-mac/
I agree that Disk Utility can certainly be a pain in the ass at times, and youre not the only one that sometimes just bite the bullet and uses Windows to clean drives!
If you're willing to pay for it DiskWarrior is the one.
If you dont want to spend ay money, then use diskutil which is available in Terminal and heres some instructions on how to use it:
http://www.theinstructional.com/guides/disk-management-from-the-command-line-part-1
http://www.theinstructional.com/guides/disk-management-from-the-command-line-part-2
Do be extremely careful and never rush it when formatting using the Terminal, it is incredibly easy to type one letter or number wrong and erase things you dont want to erase. I've seen it far too many times in my career and would be irresponsible of me not give you that disclaimer!
What are you trying to do that Disk Utility can’t do? It does everything necessary to manage Mac disks, including formatting and partitioning. Instead of trashing it, let us help you.
My most recent two issues were:
Disk Utility refused to let me do anything to the partition table on an externally attached hard drive - partition option was just greyed out so you could do literally nothing. I needed to change it from MBR with 2 partitions to a single with GPT.
Second was attempting to reformat a FAT12 (not a typo, was emulating a floppy) formatted flash drive, Disk Utility refused to touch it in any way, partition option was greyed out, everything else just spat out an error stating that it "failed".
Both were solved in about 10 seconds using diskpart from the Windows command line - after spending 7 minutes digging the Windows system out of it's cubby, plugging it in, and booting it up.
I bought Diskwarror years ago, back in the late Powermac era. I ran into some kind of an issue with it after a year that had me ditch it. Disk Utility was far less horrible back then so there was less need for it anyway.
I have used the diskutil terminal command before, last time being when Fusion debuted I tried making a hybrid RAID 0 + Fusion startup drive (it worked!). It keeps slipping my mind, I'll need to give it a go.
I also just recalled I have Acronis Disk Director 12 which I think is a bootable disk. I'm not sure if it's new enough to work with GPT, but if it is it could be an option.
I think Apple changed the default view in the left column. It no longer shows devices (drives) by default, only volumes. You need to see the device itself to partition it, but the UI is confusing when the Partition option is grayed out. Go to the View Menu and select Show Drives. Then you can partition anything.Disk Utility refused to let me do anything to the partition table on an externally attached hard drive - partition option was just greyed out so you could do literally nothing. I needed to change it from MBR with 2 partitions to a single with GPT.
For those who may not be aware of it…the Disk Utility App is Apple’s GUI front end for the diskutil command in the terminal. Apple keeps fiddling with this GUI. As chabig says, the most recent changes make tasks like partitioning more obscure but still possible.
GetRealBro
GetRealBro
I'll echo that of @Spoon! and the choice of Paragon Hard Disk Manager for Mac. It's been a good utility for me when fiddling around with Windows partitions on my current setup. I don't use BootCamp Assistant. I create and format the NTFS partition using Paragon's Hard Disk Manager needed for the Windows 10 installation then uses the 'diskpart' utility as a double check and insurance before actually installing Windows 10 onto hardware. BootCamp Assistant and I have a bone to pick with each other.
I can only recommend Paragon's app for the purpose of replacing functions that are present in Disk Utility. There's a trial download available that is fully functional for some 7 days or there abouts. The user might have to reboot once after installation of said app.
I can only recommend Paragon's app for the purpose of replacing functions that are present in Disk Utility. There's a trial download available that is fully functional for some 7 days or there abouts. The user might have to reboot once after installation of said app.
I keep several small shell scripts to use diskutil for my most common needs. This one is for partitioning a new disk with one partition. The diskID is starred out (to force me to get the correct one) and the NAME must be changed to whatever you want the disk to be named. And of course uncomment the command line and save before running it. That way I don't use it accidentally. I call it:
Part-NewDisk-OnePartition-GetDeviceIDFirst
And having these shell script all ready, I don't have to consult the man pages for diskutil every time.
Part-NewDisk-OnePartition-GetDeviceIDFirst
Code:
#!/bin/sh
# /usr/bin/sudo /usr/sbin/diskutil partitionDisk /dev/disk** 1 GPT jhfs+ NAME 100%
/usr/bin/sudo /usr/sbin/diskutil list
And having these shell script all ready, I don't have to consult the man pages for diskutil every time.
I'm in the camp that believes Disk Utility is unfit for purpose. It's a half-baked effort, and a disgrace considering Apple is the world's largest corporation (or is it second now?). I could rant on about how Apple stupidly wastes precious resources solving problems that exist only in the minds of teen-aged girls, and therefore skimps on important things... but that would be off-topic ")
Even more off-topic would be to speculate that Apple's technical machismo complex has put corporate pride ahead of their customer's best interests (and ultimately their own) by the ill-considered development of APFS. In other words, why didn't Apple adopt a proven filesystem like ext4, save boatloads of cash AND do their customers a real service?
OK - enough of that... My question is this: "Doesn't `diskutil` share the same code base with `Disk Utility`?" And if that's true, why would one expect `diskutil` to perform any more reliably than `Disk Utility`?
I agree that Disk Utility can certainly be a pain in the ass at times, and youre not the only one that sometimes just bite the bullet and uses Windows to clean drives!
If you're willing to pay for it DiskWarrior is the one.
If you dont want to spend ay money, then use diskutil which is available in Terminal and heres some instructions on how to use it:
http://www.theinstructional.com/guides/disk-management-from-the-command-line-part-1
http://www.theinstructional.com/guides/disk-management-from-the-command-line-part-2
Do be extremely careful and never rush it when formatting using the Terminal, it is incredibly easy to type one letter or number wrong and erase things you dont want to erase. I've seen it far too many times in my career and would be irresponsible of me not give you that disclaimer!
^ EXCELLENT links I was just using these a few hours ago in order to work on partitioning an external USB into 2 partitions.
@HenryAZ you should reference this.
@1madman1 when going the route of Terminal ... first use
diskutil list
(this will help identify all disks internal and external as noted in the 2 links I've quoted from another helper in this thread).
diskutil list disk2
(this'll show the first connected USB or external drive, usually begins with disk2 or disk2s1 /s2 for partitions)
diskutil listFilesystems
(this will show file systems you can use: MS-DOS FAT32 was one you where after)
I keep several small shell scripts to use diskutil for my most common needs. This one is for partitioning a new disk with one partition. The diskID is starred out (to force me to get the correct one) and the NAME must be changed to whatever you want the disk to be named. And of course uncomment the command line and save before running it. That way I don't use it accidentally. I call it:
Part-NewDisk-OnePartition-GetDeviceIDFirst
Code:#!/bin/sh # /usr/bin/sudo /usr/sbin/diskutil partitionDisk /dev/disk** 1 GPT jhfs+ NAME 100% /usr/bin/sudo /usr/sbin/diskutil list
And having these shell script all ready, I don't have to consult the man pages for diskutil every time.
seems your code is a bit lengthy you don't have to invoke diskutil from it's location to use it within terminal "sudo /usr/sbin/diskutil"
Code:
diskutil partitionDisk /dev/disk2 GPT JHFS+ New 0bThe first three parts of the command are self explanatory, there's the actual diskutil command followed by the option partitionDisk and the disk's identifier /dev/disk(n). You'll also recognise JHFS+ as the filesystem, followed by the label to give the newly-created volume. "GPT" is of course the GUID Partition Table
the guide in the second link quoted above for 'multiple partitioning' did not work for me in High Sierra and had me confused for about 30mins (while drinking
) my solution was:
Code:
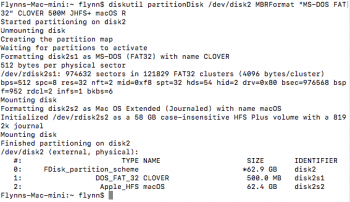
diskutil partitionDisk /dev/disk2 MBRFormat "MS-DOS FAT32" CLOVER 500M JHFS+ macOS RFirst partition called "CLOVER" in MasterBootRecord (MBR Format) this forces the need for UpperCase letters for the first partition (lowercase in FAT32 is not accepted). This also forced 500 Megabytes for this partition.
Second partition called "macOS" using HFS+ Journaled (non case sensitive) to use the rest of the free disk space of my external 64GB USB stick.
result in screenshot attached.
end of line, Dilinger.
Attachments
You know that to partition a disk in Disk Utility you need to go to the View menu and enable "View all devices" and then select the device and not the partition, right?
Because I can partition everything just fine in Disk Utility.
Not all disks will be available for Partition - some, even depending on the version of OSX may have this option greyed out.
CMDLine always rules ... "Without knowing what MORE is, LESS doesn't make sense" (jk I'm learning more ~ or is it less ~ about cmd line in Bsh Bourne Again shell. Next will be Catalina's new Zsh default shell but I can't run Catalina yet).
Not all functions of diskutil are available via Disk Utility.My question is this: "Doesn't `diskutil` share the same code base with `Disk Utility`?" And if that's true, why would one expect `diskutil` to perform any more reliably than `Disk Utility`?
diskutil does not have the GUI burden so it does not suffer if things get even more complicated if Disk Utility runs into problems (and big time freezing).
No need to run Recovery if you need to do an offline check of a disk on boot (or actually doing an offline check).
I was looking for an alternative just today and saw this thread. Wanted to leave this link here for some Disk Utility alternatives.
Register on MacRumors! This sidebar will go away, and you'll see fewer ads.