Got a tip for us?
Let us know
Become a MacRumors Supporter for $50/year with no ads, ability to filter front page stories, and private forums.
Aperture Advice - How do I do this?
- Thread starter pigbat
- Start date
- Sort by reaction score
You are using an out of date browser. It may not display this or other websites correctly.
You should upgrade or use an alternative browser.
You should upgrade or use an alternative browser.

If it's RAW you might be able to just play around with the levels until it's gone. Or you can use the dodge and burn tool to burn it darker.
If it's RAW you might be able to just play around with the levels until it's gone. Or you can use the dodge and burn tool to burn it darker.
It's RAW and I played with it quite a bit but this was as good as I could get it. Drat! Dodge and burn was what I was looking for but couldn't find the tool. I'll keep looking.
It's my opinion that the kind of spot retouching you need to do is done through perhaps Photoshop elements, Photoshop, paint shop pro, gimp, or like applications. Aperture will fix the exposure issue though.
Thanks, I was thinking about pulling it into elements but I've been playing with Aperture trying to learn the tool. I was hoping I could do it all in one.
See, this is the problem with Aperture... aside from the Dodge and Burn tools (which are destructive edits that require the creation of a huge TIFF file, btw), there is no localized editing possible. Which is why Lightroom is a huge step up from Aperture.
Oops, didn't mean to start another Aperture vs Lightroom thread")
Oops, didn't mean to start another Aperture vs Lightroom thread
It's RAW and I played with it quite a bit but this was as good as I could get it. Drat! Dodge and burn was what I was looking for but couldn't find the tool. I'll keep looking.
"Dodge and burn" will at best turn the white spot grey. Better, but maybe not what you want. You need to clone the skin tone into the spot, not just make it darker. Photoshop Elements has the several tools for this.
Photoshop Elements has the several tools for this.
So does Aperture.
checkout the plug-ins from Nik, ColorEfex Pro for Aperture. Should do the trick!
Mark
I just looked at the NIK stuff and it looks pretty impressive. I'm going to download a trial tonight. Thanks for the advice.
common problem... slightly tricky to solve, but there is an easy way
Pigbat (love the handle, lol). Stay FAR away from the dodge and burn tools, they will never be your friend in this situation. Levels and curves will not help either, even if you "select" the affected area it will be tough to equalize in a natural manner to avoid drawing even more attention to the area.
If you also have pshop.... try this.
Using the clone tool, select an area left or right to use as source/clone material. Using a SOFT brush, not so small that it will take a million clone/stamps (we don't want to experiment in pointillism)... and not so large that you can fill the whole area in 3-4 stamps...
Now here is the key trick, change the kind of cloning to "darken only", then ALSO drop down the opacity to 40-60% opacity. Between the soft brush, the darken only, and the lowered opacity you are softening the fix and building it in a more gradual manner.
If you are using Aperture I would HIGHLY recommend checking out the NIK plug-ins from Nikon. I have been using pshop professionally since 1.0, and have taught it to other professionals (designers, photographers, etc.). That being said I have been moving large amounts of my imaging away from pshop into Aperture over the last few years. Last year I started using the NIK suite and the results are amazing. Search my ID and you can find some other posts on NIK.
NIK has an extremely easy, and unique approach to making "selections" as compared to pshop. Using Viveza one can fix this issue in seconds with ease. One can buy the entire suite for around $299, which is a little more than one of the aps alone. Sometimes you can find specials which drop the cost down another $50 or so. You can download a fully functional demo for 15 days... so, you can try it on your issue at hand and see if it works for you.
I work on 1000's of images each year, and Aperture + NIK has been a revolutionary shift in work flow for me, and I love the change. Unless I have to deal with compositing layers, rendering type etc, I hardly even need to venture into pshop at all... and I haven't looked back. Hopefully Aperture will see a 3.0 release soon that brings even greater speed & stability to it.
cheers,
michael
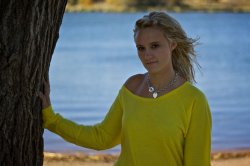
I'm far from an Aperture pro and just can't seem to figure this one out. What can I do to take some glare off the forehead when you catch it. I'm attaching a sample picture. There is slight glare on the upper left side of the forehead.
Pigbat (love the handle, lol). Stay FAR away from the dodge and burn tools, they will never be your friend in this situation. Levels and curves will not help either, even if you "select" the affected area it will be tough to equalize in a natural manner to avoid drawing even more attention to the area.
If you also have pshop.... try this.
Using the clone tool, select an area left or right to use as source/clone material. Using a SOFT brush, not so small that it will take a million clone/stamps (we don't want to experiment in pointillism)... and not so large that you can fill the whole area in 3-4 stamps...
Now here is the key trick, change the kind of cloning to "darken only", then ALSO drop down the opacity to 40-60% opacity. Between the soft brush, the darken only, and the lowered opacity you are softening the fix and building it in a more gradual manner.
If you are using Aperture I would HIGHLY recommend checking out the NIK plug-ins from Nikon. I have been using pshop professionally since 1.0, and have taught it to other professionals (designers, photographers, etc.). That being said I have been moving large amounts of my imaging away from pshop into Aperture over the last few years. Last year I started using the NIK suite and the results are amazing. Search my ID and you can find some other posts on NIK.
NIK has an extremely easy, and unique approach to making "selections" as compared to pshop. Using Viveza one can fix this issue in seconds with ease. One can buy the entire suite for around $299, which is a little more than one of the aps alone. Sometimes you can find specials which drop the cost down another $50 or so. You can download a fully functional demo for 15 days... so, you can try it on your issue at hand and see if it works for you.
I work on 1000's of images each year, and Aperture + NIK has been a revolutionary shift in work flow for me, and I love the change. Unless I have to deal with compositing layers, rendering type etc, I hardly even need to venture into pshop at all... and I haven't looked back. Hopefully Aperture will see a 3.0 release soon that brings even greater speed & stability to it.
cheers,
michael
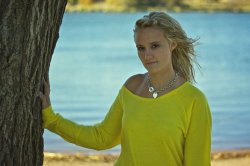
How about this
All done in Aperture - original plus adjusted as follows
1 - Select Highlight Hot & Cold Area's under the View menu - this will show hot area's in Red and Cold in Blue - i.e. blown area's in Red and blacked shadow in blue
Interestingly the patch on her forehead does not show as blown - just a bit of back/side lighting
2 - Select AutoLevels as a starting point - this brightens things up a bit
3 - Drag the recovery tool under the exposure brick to the right until all the red disappears and drag the black point to the left slightly until all the black disappears.
4. Now go to the Highlight & Shadows brick and drag the Shadow slider to the right a bit just to lighten the shadow area
5. Now to deal with her forehead - select the Retouch tool - I chose the Repair option with a small radius (13), softness and opacity high (83), de-selected Automatically Select Source (as I wanted to do that)
This is a bit tricky on the image due to the image size - but works absolutely
fine
Often people will go to PS because they are more familiar with how it works - personally I don't use PS unless I really have to nowadays - but, I have spent hours with Aperture since release 1.1
Cheers
Andy
Attachments
I agree with Andy....
"Often people will go to PS because they are more familiar with how it works - personally I don't use PS unless I really have to nowadays - but, I have spent hours with Aperture since release 1.1"
Like Andy I have moved large chunks of my imaging workflow away from pshop. Like yourself, I too had mixed results using the clone tool (at first). However once you realize the Aperture tools work in a slightly different manner, you will get the feel for how they work fairly quickly. My first forays using Aperture's cloning tool were not very pretty. Retouching, at least when well done, is much like a trip into the wilderness... where the goal is in the end to "leave no trace". After using it for a bit I could match my skill in pshop, and these days I actually prefer to clone out imperfections using Aperture (as long as there is no multi-layer compositing needed).
Try Andy's tips and see if they work for you. One of the nice thing about Aperture, is that the auto levels (you have a choice of two types) actually works better than pshops (even if you custom tune the settings in pshop, auto-levels can create more tonality issues than solve them). I have tried using the recovery tool, but with mixed results. Much like pshops dodge/burn tool the effect can easily just grey down the area.
NIK's selection approach is really a bit novel, and the softness of the selection approach easily leads to a natural effect (where no trace remains of your handiwork). Download the demos, they are free, and fully functioning for 15 days. You can also see some video demos here: http://www.niksoftware.com/learnmore/usa/entry.php or some really long & detailed webcasts here: http://www.niksoftware.com/learnmore/usa/entry.php?view=webinars/archive.shtml
I know they are releasing an upgrade to Vizeza in December... but I think they are offering free upgrades for recent purchases (I already trashed the email announcement that came last week, so the details are fuzzy there, sorry).
Also, one of my favorite tools in the suite set in the "Reflector" tool within Color Efex Pro. This tool lets you shine light and illuminate the darkened shadow areas, much as if you were holding a silver or gold reflector on sight while shooting. I noticed your subject was a bit dark in her face (at least judging by the screenshots)... this tool would do wonders on this image. It sounds a bit hokey and filter-riffic... but it really works quite well.
Aperture was wonderful in streamlining and speeding up my workflow. Images that were similar in tone/lighting/composition can be QUICKLY color tweaked by simply copying the adjustments from one image and "stamping" the others with the enhanced settings. Huge time saver there. While NIK did not add speed to my workflow, it added speed when one is taking the time to really finely craft any one image. The speed savings is there (when compared to coming to the same end in pshop), and the techniques are much less arcane and WAY easier to grasp within NIK. I do wish I could "task-build" and do successive tweaks/rotations without leaving the NIK interface... as it is now you need to apply your filter and save out your results, and then go back into NIK again for your next filter. It gets a mite annoying if you are using 5-6 filters, especially so if one is in the same filter suite (like Color Efex).
cheers, michael
PS: these are only screenshots, and your sample was a bit on the low-res side (which had some jpeg artifacting. Some color cast issues still remain, face needs work and sweater is a bit acidy, but without the full-res to start I won't sweat that for now).
ORIGINAL

Click for full size - Uploaded with plasq's Skitch
REVISED ONE

Click for full size - Uploaded with plasq's Skitch
REVISED VERSION TWO (darkened down edges, brightened face/center
...much as I used to do in the darkroom back when I was shooting with Matthew Brady)

Click for full size - Uploaded with plasq's Skitch
"Often people will go to PS because they are more familiar with how it works - personally I don't use PS unless I really have to nowadays - but, I have spent hours with Aperture since release 1.1"
Like Andy I have moved large chunks of my imaging workflow away from pshop. Like yourself, I too had mixed results using the clone tool (at first). However once you realize the Aperture tools work in a slightly different manner, you will get the feel for how they work fairly quickly. My first forays using Aperture's cloning tool were not very pretty. Retouching, at least when well done, is much like a trip into the wilderness... where the goal is in the end to "leave no trace". After using it for a bit I could match my skill in pshop, and these days I actually prefer to clone out imperfections using Aperture (as long as there is no multi-layer compositing needed).
Try Andy's tips and see if they work for you. One of the nice thing about Aperture, is that the auto levels (you have a choice of two types) actually works better than pshops (even if you custom tune the settings in pshop, auto-levels can create more tonality issues than solve them). I have tried using the recovery tool, but with mixed results. Much like pshops dodge/burn tool the effect can easily just grey down the area.
NIK's selection approach is really a bit novel, and the softness of the selection approach easily leads to a natural effect (where no trace remains of your handiwork). Download the demos, they are free, and fully functioning for 15 days. You can also see some video demos here: http://www.niksoftware.com/learnmore/usa/entry.php or some really long & detailed webcasts here: http://www.niksoftware.com/learnmore/usa/entry.php?view=webinars/archive.shtml
I know they are releasing an upgrade to Vizeza in December... but I think they are offering free upgrades for recent purchases (I already trashed the email announcement that came last week, so the details are fuzzy there, sorry).
Also, one of my favorite tools in the suite set in the "Reflector" tool within Color Efex Pro. This tool lets you shine light and illuminate the darkened shadow areas, much as if you were holding a silver or gold reflector on sight while shooting. I noticed your subject was a bit dark in her face (at least judging by the screenshots)... this tool would do wonders on this image. It sounds a bit hokey and filter-riffic... but it really works quite well.
Aperture was wonderful in streamlining and speeding up my workflow. Images that were similar in tone/lighting/composition can be QUICKLY color tweaked by simply copying the adjustments from one image and "stamping" the others with the enhanced settings. Huge time saver there. While NIK did not add speed to my workflow, it added speed when one is taking the time to really finely craft any one image. The speed savings is there (when compared to coming to the same end in pshop), and the techniques are much less arcane and WAY easier to grasp within NIK. I do wish I could "task-build" and do successive tweaks/rotations without leaving the NIK interface... as it is now you need to apply your filter and save out your results, and then go back into NIK again for your next filter. It gets a mite annoying if you are using 5-6 filters, especially so if one is in the same filter suite (like Color Efex).
cheers, michael
PS: these are only screenshots, and your sample was a bit on the low-res side (which had some jpeg artifacting. Some color cast issues still remain, face needs work and sweater is a bit acidy, but without the full-res to start I won't sweat that for now).
ORIGINAL
Click for full size - Uploaded with plasq's Skitch
REVISED ONE
Click for full size - Uploaded with plasq's Skitch
REVISED VERSION TWO (darkened down edges, brightened face/center
...much as I used to do in the darkroom back when I was shooting with Matthew Brady)
Click for full size - Uploaded with plasq's Skitch
Register on MacRumors! This sidebar will go away, and you'll see fewer ads.