Become a MacRumors Supporter for $50/year with no ads, ability to filter front page stories, and private forums.
Status
The first post of this thread is a WikiPost and can be edited by anyone with the appropiate permissions. Your edits will be public.

startergo

macrumors 603
Original poster
Sep 20, 2018
5,100
2,293
Here is a list I collected for all macOS installer links from Lion to Ventura on the App Store (former iTunes Store). Most of the Installers can be installed with mas-cli. Some of them will require previous download from the App Store with that store account. For macOS's Lion to Ventura Apple provides only stub installers, so use Mist for full installers from Lion to Sequoia (without Mavericks), @bogdanw script for for macOS 11.5.2 to 13.2 or Mr. Macintosh site.

All the official installers from Lion to Ventura (except Mavericks) come in the form of Install Mac OS.dmg containing InstallMacOSX.pkg installer, which by design is supposed to unarchive the installer app into the Applications folder. Here is the catch though, you can only do this on the same or earlier version of macOS. The good thing is that you can always create Lion or Mountain Lion installers in your Applications folder fairly easy and create a virtual machine in Parallels. From there you can download and install in the Applications folder any of the macOS full Installers from Lion to Sierra:

For Lion:
Code:
open -W ~/Downloads/InstallMacOSX.dmg
pkgutil --expand /Volumes/Install\ Mac\ OS\ X/InstallMacOSX.pkg  ~/Lion
cd ~/Lion/InstallMacOSX.pkg
tar -xvf Payload
mv ~/Lion/InstallMacOSX.pkg/InstallESD.dmg ~/Lion/InstallMacOSX.pkg/Install\ Mac\ OS\ X\ Lion.app/Contents/SharedSupport
mv ~/Lion/InstallMacOSX.pkg/Install\ Mac\ OS\ X\ Lion.app /Applications
rm -rf ~/Lion


For Mountain Lion:
Code:
open -W ~/Downloads/InstallMacOSX.dmg
pkgutil --expand /Volumes/Install\ Mac\ OS\ X/InstallMacOSX.pkg ~/Mountain\ Lion
cd ~/Mountain\ Lion/InstallMacOSX.pkg
tar -xvf Payload
mv ~/Mountain\ Lion/InstallMacOSX.pkg/InstallESD.dmg ~/Mountain\ Lion/InstallMacOSX.pkg/Install\ OS\ X\ Mountain\ Lion.app/Contents/SharedSupport
mv ~/Mountain\ Lion/InstallMacOSX.pkg/Install\ OS\ X\ Mountain\ Lion.app /Applications
rm -rf ~/Mountain\ Lion


Although these installers work fine for creating a Parallels virtual machine you still might have an issue with a "broken installer" message on a real machine. For instance upgrading Snow Leopard to Mountain Lion might not be possible unless you do the following:
Code:
open -W /Applications/Install\ OS\ X\ Mountain\ Lion.app/Contents/SharedSupport/InstallESD.dmg
Double click:
screen-shot-2023-03-25-at-10-28-49-am-png.2178541

You can also do:
Code:
installer -pkg  /Applications/Install\ OS\ X\ Mountain Lion.app/Contents/SharedSupport/OSInstall.mpkg -target /Volumes/"XXX" -verboseR

where XXX is the name of the disk you're installing to.

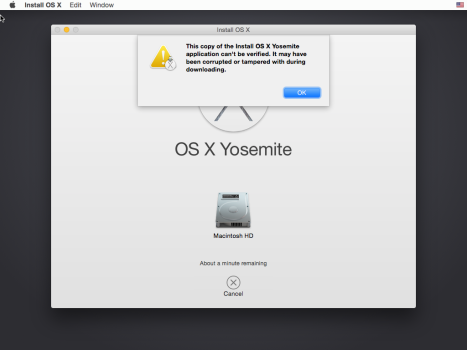
You CANNOT use the above procedure for later than Mountain Lion DMG's. You can create the USB, but It will just miserably fail during installation process with the following message:
1675353770960.png


You can use @Dayo script for creation of USB installers from Lion to Monterey (excluding Mavericks) (and here with Mavericks) dowloaded from Apple or as applications in the Applications folder with the help of Balena Etcher.
This script creates a bootable disk image in the current directory from the given macOS or OS X installer app and supports Lion through Sonoma (and beyond, probably).
This script Creates a bootable ISO of OS X / macOS, from the installation app file from Mavericks to Sonoma. You can install it with Homebrew or just download the osxiso.command file and make it executable (chmod +x osxiso.command).
After ISO creation you can restore the ISO to an USB using Balena Etcher. You can also use dd just note it is extremely slow. Find the USB device with diskutil list, unmount the USB:
Code:
diskutil unmountDisk /dev/disk3
And restore the contents of the ISO to the USB:
Code:
sudo dd if=~/Desktop/Mavericks.iso of=/dev/rdisk3 bs=1m
Track the progress of the command dd:
  • Progress can track progress of data transfer processes. Install with:
brew install progress

  • Then launch dd, get its PID with:
ps aux | grep "dd"

  • Or with pidof
brew install pidof

  • And use the tool to track progress:
sudo progress -mp 87370

  • Result:
[87370] dd ~/Desktop/Mavericks.iso
60.9% (4.4 GiB / 7.1 GiB) 5.3 MiB/s remaining 0:09:01
If not using this script all the other installers after Mountain Lion contain the createinstallmedia program for bootable USB creation but you MUST install them in the Applications folder by double clicking or following the below procedure for Mavericks. Bare in mind that the old installers have expired certificates and you might need to change the date from recovery.

The only black sheep here is Mavericks. Apple for some unknown reason decided to skip Mavericks from the list of the available installers. So now if you want to officially install Mavericks there is only one solution. You must have "purchased" it at some point in the past to be able to redownload Mavericks from the App Store on Mavericks macOS or earlier, or using mas-cli from newer macOS's. It gets even deeper. Say you have created a regular USB installer and boot from it. It will require files update and it will force you to log in to your account verifying your "purchase" from within Recovery. Let's assume you qualify for redownload and get your copy from the App Store. So, can you reinstall it or create a working bootable USB? Not without some extra work.

You can restore this DMG to an HFS+ partition. This is a never booted image of Mavericks.
For a Mavericks USB installer creation follow this :

Format an 8GB USB drive with HFS+ GUID Partition scheme and label it Untitled.
Execute these commands:

Code:
pkgutil --expand /Applications/Install\ OS\ X\ Mavericks.app/Contents/SharedSupport/InstallESD.dmg ~/Mavericks


Show the Hidden files. Execute this command:
Code:
defaults write com.apple.finder AppleShowAllFiles TRUE && killall Finder
In newer macOS's hold SHIFT+COMMAND+.

Execute these commands:

Code:
cd ~/Mavericks/InstallMacOSX.pkg && hdiutil attach InstallESD.dmg
cd /Volumes/OS\ X\ Install\ ESD && cp BaseSystem.dmg ~/Mavericks/
asr imagescan --source ~/Mavericks/BaseSystem.dmg

Find your USB device and the Apple_HFS partition on it:

Code:
diskutil list
/dev/disk19 (external, physical):
   #:                       TYPE NAME                    SIZE       IDENTIFIER
   0:      GUID_partition_scheme                        *8.0 GB     disk19
   1:                        EFI EFI                     209.7 MB   disk19s1
   2:                  Apple_HFS Untitled                7.7 GB     disk19s2

Execute these commands:

Code:
sudo asr restore --source ~/Mavericks/BaseSystem.dmg --target /dev/disk19s2 --erase
sudo unlink /Volumes/OS\ X\ Base\ System/System/Installation/Packages
cp -Rpv /Volumes/OS\ X\ Install\ ESD/Packages  /Volumes/OS\ X\ Base\ System/System/Installation
diskutil rename OS\ X\ Base\ System Install\ Mavericks
sudo bless --folder /Volumes/Install\ Mavericks/System/Library/CoreServices --label Install\ Mavericks
cp /Volumes/Install\ Mavericks/Install\ OS\ X\ Mavericks.app/Contents/Resources/InstallAssistant.icns /Volumes/Install\ Mavericks/.VolumeIcon.icns
cd "$HOME"
rm -r ~/Mavericks

Take a coffee break as this command takes time. Watch the cursor at the termianl to indicate that the copy command is done.

Execute the following commands:

Code:
cp -Rpv /Volumes/OS\ X\ Install\ ESD/BaseSystem.dmg  /Volumes/Install\ Mavericks
cp -Rpv /Volumes/OS\ X\ Install\ ESD/BaseSystem.chunklist  /Volumes/Install\ Mavericks
diskutil eject Install\ Mavericks

Boot the Install Mavericks USB by holding OPTION key at boot time and install Mavericks. No messing with the date is needed.
 

Attachments

  • Screen Shot 2023-02-02 at 4.52.53 PM.png
    Screen Shot 2023-02-02 at 4.52.53 PM.png
    139.1 KB · Views: 126
Last edited:
Great work, thank you!
Some notes, consider removing the country from the links (us) and it might be worth mentioning that some OSX versions (Sierra 10.12, El Capitan 10.11, Yosemite 10.10, Mountain Lion 10.8, Lion 10.7) are available as DMGs from Apple. https://support.apple.com/HT211683
 
Added free download links for Lion and Mountain Lion from the App Store from MrMacintosh article.
 
USB creator
Updated the script to create bootable USB from Installer Apps for Yosemite to Monterey.
Installer Apps optional for Yosemite to Sierra as probably easier to just mount DMG for these.
Put Installer App under Applications or the folder with the script.
 
  • Like
Reactions: startergo
Updated the script to create bootable USB from Installer Apps for Yosemite to Monterey.
Installer Apps optional for Yosemite to Sierra as probably easier to just mount DMG for these.
Put Installer App under Applications or the folder with the script.
Enabled Wiki post so it can be edited if needed.
 
  • Like
Reactions: Dayo
Based on @startergo’s examples from the first post, extracting Install OS X El Capitan.app from the InstallMacOSX.dmg provided by Apple (http://updates-http.cdn-apple.com/2019/cert/061-41424-20191024-218af9ec-cf50-4516-9011-228c78eda3d2/InstallMacOSX.dmg):

Code:
hdiutil attach ~/Downloads/InstallMacOSX.dmg -noverify -nobrowse
pkgutil --expand /Volumes/Install\ OS\ X/InstallMacOSX.pkg ~/ElCap
hdiutil detach /Volumes/Install\ OS\ X
cd ~/ElCap/InstallMacOSX.pkg 
tar -xvf Payload
mv ./InstallESD.dmg ./Install\ OS\ X\ El\ Capitan.app/Contents/SharedSupport
chmod -R 0755 ./Install\ OS\ X\ El\ Capitan.app/Contents/SharedSupport
sudo chown -R root:wheel ./Install\ OS\ X\ El\ Capitan.app/Contents/SharedSupport
mv ./Install\ OS\ X\ El\ Capitan.app /Applications/Install\ OS\ X\ El\ Capitan.app
cd
rm -r ~/ElCap

The chmod & chown commands might not be necessary, but they are included in InstallMacOSX.pkg’s the post install script.

I installed El Capitan in a virtual machine and I kept getting the dreaded “This copy of the Install OS X El Capitan application can't be verified”. The only solution that worked was to start the installation from Terminal: installer -pkg /Volumes/Mac\ OS\ X\ Install\ DVD/Packages/OSInstall.mpkg -target /Volumes/Macintosh\ HD
https://apple.stackexchange.com/a/232016
 
  • Like
Reactions: startergo
Yes best of all one should avoid the regular createinstallmedia on older macOS's due to various issues. Instead use the method below. This was in response to the error when reinstalling macOS Sierra from internet recovery:
Code:
 osishelperd[547]: mountDiskImageWithPath: /Volumes/Untitled/macOS Install Data/InstallESD.dmg
 osishelperd[547]: Couldn't mount base system dmg! (error code 110)
 osishelperd[547]: IATOOL: Failed to mount outer dmg
The issue with Sierra as with most of the old installers re-downloaded from the App Store (apparently from the recovery too) is that the downloaded InstallESD.dmg is not in a UDZO format, but a XAR archive or rather a XAR wrapper and within it is the real InstallESD.dmg in UDZO format.
the XAR wrapper needs to be removed to access the inner package. You can use pkgutil or XAR command. The XAR tool is a product of the defunct OpenDarwin project. It is a command-line tool, like pkgutil. But while pkgutil works on flat packages and the new receipts database, XAR works exclusively on flat packages.More info about different Apple archives you can find here and here.
So that installer needs conversion. I used a USB stick labeled Untitled to install macOS Sierra from Recovery. Apple creates a folder named macOS Install Data in the root of the USB volume with the required files:
Code:
pkgutil --expand /Volumes/Untitled/macOS\ Install\ Data/InstallESD.dmg  /Volumes/Untitled/Sierra
mv /Volumes/Untitled/Sierra/InstallOS.pkg/InstallESD.dmg /Volumes/Untitled/macOS\ Install\ Data/InstallESD.dmg
rm -r /Volumes/Untitled/Sierra
After that you can use another USB to create the installer:
- Attach InstallESD.dmg:
Code:
hdiutil attach /Volumes/Untitled/macOS\ Install\ Data/InstallESD.dmg
- Attach BaseSystem.dmg
Code:
hdiutil attach /Volumes/OS\ X\ Install\ ESD/BaseSystem.dmg
- Get the disk name of the BaseSystem.dmg:
Code:
diskutil list virtual | grep "OS X Base System"
  1:                  Apple_HFS OS X Base System        2.0 GB     disk9s1
- Find the USB number with diskutil list
- Format the USB:
Code:
diskutil partitionDisk disk7 HFS+ USBSTICK 100%
- Get the details of the USBSTICK:
Code:
diskutil list
/dev/disk7 (external, physical):
   #:                       TYPE NAME                    SIZE       IDENTIFIER
   0:      GUID_partition_scheme                        *15.7 GB    disk7
   1:                        EFI EFI                     209.7 MB   disk7s1
   2:                  Apple_HFS USBSTICK                15.4 GB    disk7s2
- Restore "OS X Base System" onto Apple_HFS USBSTICK
Code:
asr restore --source /dev/disk9s1 --target /dev/rdisk7s2 --erase --noprompt --noverify
- Remove the symlink for Packages folder:
Code:
rm -r /Volumes/OS\ X\ Base\ System/System/Installation/Packages
- Copy the Packages folder to "OS X Base System" Volume inside /System/Installation/ subfolder:
Code:
cp -rpv /Volumes/OS\ X\ Install\ ESD/Packages /Volumes/OS\ X\ Base\ System/System/Installation/Packages
- Copy BaseSystem.chunklist and BaseSystem.dmg to the root of the USB installer:
Code:
cp /Volumes/OS\ X\ Install\ ESD/BaseSystem.chunklist "/Volumes/OS X Base System"
cp /Volumes/OS\ X\ Install\ ESD/BaseSystem.dmg "/Volumes/OS X Base System"
- Rename the USB:
Code:
diskutil rename OS\ X\ Base\ System Install\ Sierra
sudo bless --folder /Volumes/Install\ Sierra/System/Library/CoreServices --label Install\ Sierra
cp -v /Volumes/Install\ Sierra/Install\ macOS\ Sierra.app/Contents/Resources/InstallAssistant.icns /Volumes/Install\ Sierra/.VolumeIcon.icns

- Detach the mounted images:
Code:
hdiutil detach /Volumes/OS\ X\ Install\ ESD
hdiutil detach /Volumes/OS\ X\ Base\ System

Enjoy your USB installer for Sierra!
 
Last edited:
  • Like
Reactions: bogdanw
I know this is about App Store installers but if you downloaded Sierra DMG from Apple website and you encounter an error creating bootable flash drive, then you can use the solution from Mr. Macintosh [FIXED] macOS Sierra “An error occurred while preparing the installation.” Error. Sierra Recovery is Broken!

Even though Apple reissued the Sierra installer to fix the Certificate issue in 2019, it has another problem.

The Info.plist CFBundleShortVersionString has an incorrect entry of 12.6.06 when it needs to be 12.6.03
To fix it we can run this command to edit the new entry in.

plutil -replace CFBundleShortVersionString -string "12.6.03" /Volumes/Macintosh\ HD/Applications/Install\ macOS\ Sierra.app/Contents/Info.plist

Now we can create the macOS Sierra USB Installer!
/Volumes/Macintosh\ HD/Applications/Install\ macOS\ Sierra.app/Contents/Resources/createinstallmedia --volume /Volumes/Untitled --applicationpath /Volumes/Macintosh\ HD/Applications/Install\ macOS\ Sierra.app
 
You CANNOT use the above procedure for later than Mountain Lion DMG's. You can create the USB, but It will just miserably fail during installation process with the following message:
View attachment 2152350
That's usually resolved by changing the system date in System Preferences - it gives that message because the certificate is out of date. Just change the date to sometime in the 12 months following the release of the OS, do the install, then change the date back.
 
Due to changes made by Apple in the Info.plist file associated to the InstallAssistant.pkg link, the previous script doesn’t work for Sequoia.
New script to get Sequoia InstallAssistant.pkg links from Apple:
Code:
for file in $(curl -s https://swscan.apple.com/content/catalogs/others/index-15-14-13-12-10.16-10.15-10.14-10.13-10.12-10.11-10.10-10.9-mountainlion-lion-snowleopard-leopard.merged-1.sucatalog | grep com_apple_MobileAsset_MacSoftwareUpdate.plist | grep -Evw '(com_apple_MobileAsset_MacSoftwareUpdate.plist.integrityDataV1)' | sed -e s/"<string>"//g -e s/"<\/string>"//g -e s/\ //g); do
    curl -s $file | egrep -A 1 -m 2 '(>Build<|OSVersion)' | sed -e s/"<string>"//g -e s/"<\/string>"//g -e s/\ //g | sed -e s/"<key>"//g -e s/"<\/key>"//g -e s/\ //g
    echo $file | sed -e "s/com_apple_MobileAsset_MacSoftwareUpdate.plist/InstallAssistant.pkg/g"
done

Get-Sequoia-InstallAssistant-pkg-links-from-Apple.sh https://gist.github.com/b0gdanw/44fd5bbe391b4e1db102b7c29ecc59e2
Will that include the dyld_shared_cache for non AVX2 macs?
 
Lion (and I believe also Mountain Lion) are extremely challenging to make a USB installer for. I opened a topic about this here. I've created USB installers for more than 12 versions of macOS but these 2 are absolutely killing me. I'm basically cloning a functional Lion USB installer volume to a another USB drive using disk utility restore and the new USB drive boots up to the prohibited icon. This left me wondering how I made that first Lion USB installer years ago, that has been working flawlessly. I've been struggling with this for a week now. Any ideas?
 
Coincidentially, I am also trying to make a Lion installer.

I followed the instructions and ran Dayo script on my Mac Mini (M4, Sequoia).

Very nice script. It failed in the middle though.

The other script is asking for an "app" file - where do I find it?

I have access to OSX 10.4 (PPC), would it help?

Code:
STEP 02 of 04: Reconstituting ESD...
NB: Patience ... This takes a while to complete
Type password and press "Enter" if prompted
Your password is not displayed while typing
/Volumes/Install_Lion/System/Installation/Packages
/Volumes/TMP_ESD/BaseSystem.dmg -> /Volumes/Install_Lion/BaseSystem.dmg
/Volumes/TMP_ESD/BaseSystem.chunklist -> /Volumes/Install_Lion/BaseSystem.chunklist

/Volumes/TMP_ESD/Packages -> /Volumes/Install_Lion/System/Installation/Packages
/Volumes/TMP_ESD/Packages/AdditionalEssentials.pkg -> /Volumes/Install_Lion/System/Installation/Packages/AdditionalEssentials.pkg
/Volumes/TMP_ESD/Packages/AdditionalSpeechVoices.pkg -> /Volumes/Install_Lion/System/Installation/Packages/AdditionalSpeechVoices.pkg
/Volumes/TMP_ESD/Packages/AddressBook.pkg -> /Volumes/Install_Lion/System/Installation/Packages/AddressBook.pkg
/Volumes/TMP_ESD/Packages/Arabic.pkg -> /Volumes/Install_Lion/System/Installation/Packages/Arabic.pkg
/Volumes/TMP_ESD/Packages/AsianLanguagesSupport.pkg -> /Volumes/Install_Lion/System/Installation/Packages/AsianLanguagesSupport.pkg
/Volumes/TMP_ESD/Packages/Automator.pkg -> /Volumes/Install_Lion/System/Installation/Packages/Automator.pkg
/Volumes/TMP_ESD/Packages/BaseSystemBinaries.pkg -> /Volumes/Install_Lion/System/Installation/Packages/BaseSystemBinaries.pkg
/Volumes/TMP_ESD/Packages/BaseSystemResources.pkg -> /Volumes/Install_Lion/System/Installation/Packages/BaseSystemResources.pkg
/Volumes/TMP_ESD/Packages/BootCamp.pkg -> /Volumes/Install_Lion/System/Installation/Packages/BootCamp.pkg
/Volumes/TMP_ESD/Packages/BrazilianPortuguese.pkg -> /Volumes/Install_Lion/System/Installation/Packages/BrazilianPortuguese.pkg
/Volumes/TMP_ESD/Packages/BSD.pkg -> /Volumes/Install_Lion/System/Installation/Packages/BSD.pkg
/Volumes/TMP_ESD/Packages/Catalan.pkg -> /Volumes/Install_Lion/System/Installation/Packages/Catalan.pkg
/Volumes/TMP_ESD/Packages/Croatian.pkg -> /Volumes/Install_Lion/System/Installation/Packages/Croatian.pkg
/Volumes/TMP_ESD/Packages/Czech.pkg -> /Volumes/Install_Lion/System/Installation/Packages/Czech.pkg
/Volumes/TMP_ESD/Packages/Danish.pkg -> /Volumes/Install_Lion/System/Installation/Packages/Danish.pkg
/Volumes/TMP_ESD/Packages/Dutch.pkg -> /Volumes/Install_Lion/System/Installation/Packages/Dutch.pkg
/Volumes/TMP_ESD/Packages/DVDPlayer.pkg -> /Volumes/Install_Lion/System/Installation/Packages/DVDPlayer.pkg
cp: /Volumes/Install_Lion/System/Installation/Packages/Essentials.pkg: fcopyfile failed: Input/output error
cp: /Volumes/Install_Lion/System/Installation/Packages/Essentials.pkg: fchmod failed: No such file or directory
cp: utimensat: /Volumes/Install_Lion/System/Installation/Packages/Essentials.pkg: No such file or directory
cp: fchown: /Volumes/Install_Lion/System/Installation/Packages/Essentials.pkg: Bad file descriptor
cp: fchmod: /Volumes/Install_Lion/System/Installation/Packages/Essentials.pkg: No such file or directory
cp: chflags: /Volumes/Install_Lion/System/Installation/Packages/Essentials.pkg: No such file or directory
cp: /Volumes/TMP_ESD/Packages/Essentials.pkg: could not copy ACL to /Volumes/Install_Lion/System/Installation/Packages/Essentials.pkg: Bad file descriptor
cp: /Volumes/Install_Lion/System/Installation/Packages/Finnish.pkg: No such file or directory
cp: /Volumes/Install_Lion/System/Installation/Packages/French.pkg: No such file or directory
cp: /Volumes/Install_Lion/System/Installation/Packages/German.pkg: No such file or directory
cp: /Volumes/Install_Lion/System/Installation/Packages/Greek.pkg: No such file or directory
cp: /Volumes/Install_Lion/System/Installation/Packages/Hebrew.pkg: No such file or directory
cp: /Volumes/Install_Lion/System/Installation/Packages/Hungarian.pkg: No such file or directory
cp: /Volumes/Install_Lion/System/Installation/Packages/iCal.pkg: No such file or directory
cp: /Volumes/Install_Lion/System/Installation/Packages/iChat.pkg: No such file or directory
cp: /Volumes/Install_Lion/System/Installation/Packages/Italian.pkg: No such file or directory
cp: /Volumes/Install_Lion/System/Installation/Packages/iTunes.pkg: No such file or directory
cp: /Volumes/Install_Lion/System/Installation/Packages/Japanese.pkg: No such file or directory
cp: /Volumes/Install_Lion/System/Installation/Packages/JavaEssentials.pkg: No such file or directory
cp: /Volumes/Install_Lion/System/Installation/Packages/JavaTools.pkg: No such file or directory
cp: /Volumes/Install_Lion/System/Installation/Packages/Korean.pkg: No such file or directory
cp: /Volumes/Install_Lion/System/Installation/Packages/Mail.pkg: No such file or directory
cp: /Volumes/Install_Lion/System/Installation/Packages/MediaFiles.pkg: No such file or directory
cp: /Volumes/Install_Lion/System/Installation/Packages/MigrationAssistant.pkg: No such file or directory
cp: /Volumes/Install_Lion/System/Installation/Packages/Norwegian.pkg: No such file or directory
cp: /Volumes/Install_Lion/System/Installation/Packages/OSInstall.mpkg: No such file or directory
cp: /Volumes/Install_Lion/System/Installation/Packages/OSInstall.pkg: No such file or directory
cp: /Volumes/Install_Lion/System/Installation/Packages/OSUpgrade.pkg: No such file or directory
cp: /Volumes/Install_Lion/System/Installation/Packages/OxfordDictionaries.pkg: No such file or directory
cp: /Volumes/Install_Lion/System/Installation/Packages/PodcastCapture.pkg: No such file or directory
cp: /Volumes/Install_Lion/System/Installation/Packages/Polish.pkg: No such file or directory
cp: /Volumes/Install_Lion/System/Installation/Packages/Portuguese.pkg: No such file or directory
cp: /Volumes/Install_Lion/System/Installation/Packages/RemoteDesktop.pkg: No such file or directory
cp: /Volumes/Install_Lion/System/Installation/Packages/Romanian.pkg: No such file or directory
cp: /Volumes/Install_Lion/System/Installation/Packages/Russian.pkg: No such file or directory
cp: /Volumes/Install_Lion/System/Installation/Packages/Safari.pkg: No such file or directory
cp: /Volumes/Install_Lion/System/Installation/Packages/SimplifiedChinese.pkg: No such file or directory
cp: /Volumes/Install_Lion/System/Installation/Packages/SIUResources.pkg: No such file or directory
cp: /Volumes/Install_Lion/System/Installation/Packages/Slovak.pkg: No such file or directory
cp: /Volumes/Install_Lion/System/Installation/Packages/Spanish.pkg: No such file or directory
cp: /Volumes/Install_Lion/System/Installation/Packages/Swedish.pkg: No such file or directory
cp: /Volumes/Install_Lion/System/Installation/Packages/Thai.pkg: No such file or directory
cp: /Volumes/Install_Lion/System/Installation/Packages/TraditionalChinese.pkg: No such file or directory
cp: /Volumes/Install_Lion/System/Installation/Packages/Turkish.pkg: No such file or directory
cp: /Volumes/Install_Lion/System/Installation/Packages/Ukrainian.pkg: No such file or directory
cp: /Volumes/Install_Lion/System/Installation/Packages/X11User.pkg: No such file or directory
cp: utimensat: /Volumes/Install_Lion/System/Installation/Packages: No such file or directory
cp: chown: /Volumes/Install_Lion/System/Installation/Packages: No such file or directory
cp: chmod: /Volumes/Install_Lion/System/Installation/Packages: No such file or directory
cp: chflags: /Volumes/Install_Lion/System/Installation/Packages: No such file or directory
cp: /Volumes/TMP_ESD/Packages: unable to copy ACL to /Volumes/Install_Lion/System/Installation/Packages: No such file or directory
Password:

Runtime Error!!
Could Not Create USB Installer

tony@Mac USB script %
 
Code:
cp: /Volumes/Install_Lion/System/Installation/Packages/Essentials.pkg: fcopyfile failed: Input/output error
cp: /Volumes/Install_Lion/System/Installation/Packages/Essentials.pkg: fchmod failed: No such file or directory
An I/O error happened which caused /Volumes/Install_Lion to be ejected? Is there something wrong with your disk? Otherwise, I would modify the script to output more progress or status information.
 
is that the USB stick? I cannot be sure 100% - and it goes via a series of USB adaptors, so no ideal. I can try again and see if it stops in the same spot. I can remove one (dodgy) adaptor from the equation and plug it straight into the dock.
 
Register on MacRumors! This sidebar will go away, and you'll see fewer ads.