Become a MacRumors Supporter for $50/year with no ads, ability to filter front page stories, and private forums.

Gravydog316

macrumors 6502a
Original poster
May 17, 2016
564
200
Canada
Hi does anyone know how to use Automator?

I want to convert image files like .PNG, .WEBP, .BMP, .etc... to .JPG @ 100%,
in the Finder

& change the Label of the converted .jpg file to Orange

& the extension from Automator's .jpeg to just .jpg

===
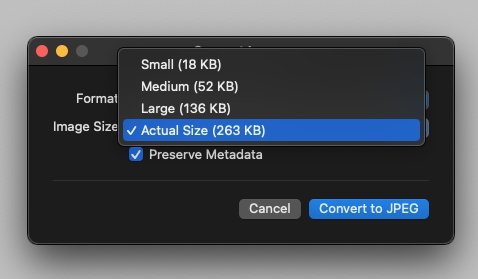
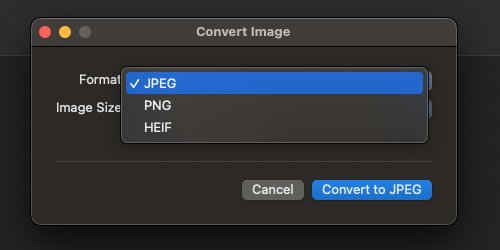
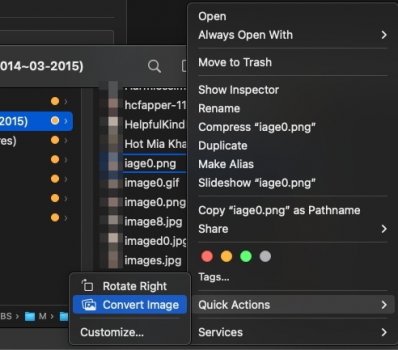
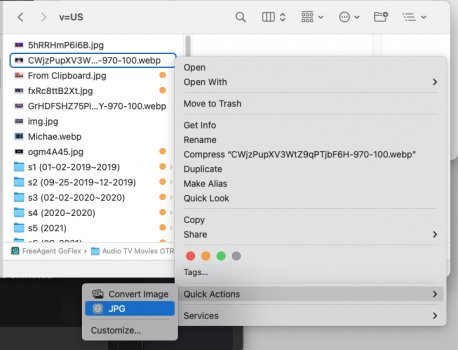
Quick Actions in the Finder does the job, but i want to make it easier.
It gives me the option to choose the converted file size,
but i want to leave it @ 100%,
& it only gives the option to change the converted file to ".JPEG",
& I want to change it to ".jpg",
then change the Label to Orange (which is what i use for files i want to keep)

can anyone help me??
 

Attachments

  • 2.jpg
    2.jpg
    69.8 KB · Views: 198
  • 3.jpg
    3.jpg
    51.8 KB · Views: 112
  • 1.jpg
    1.jpg
    53.5 KB · Views: 134
That is a system quick action and I don't think you can modify it. But you can create your own based on it. The workflow should be in /System/Library/Services/
 
I don’t have that Quick Action in Big Sur and I don’t know what Apple uses to convert the images, but a simple way would be like this:
Convert_image.jpg
The Shell Script

Code:
for f in "$@"
do
sips -s format jpeg -s formatOptions high $f -o $f.jpg
xattr -wx com.apple.FinderInfo "0000000000000000000E00000000000000000000000000000000000000000000" $f.jpg
done

How to Create a Quick Action workflow
https://support.apple.com/guide/automator/aut73234890a/2.10/mac/12.0
 
If you have Monterey, the Shortcuts app makes this kind of thing fairly easy.
Interesting, what's the code behind the Convert action? What it actually uses to convert images?

Here is a more refined Quick Action that uses AppleScript to convert to JPG using Image Events and sets the Label to Orange for the converted file(s)
AppleScript.jpg


The AppleScript

Code:
on run {input, parameters}
    tell application "Finder"
        set theFiles to input
        repeat with currentFile in theFiles
            set extension hidden of currentFile to true
            set theName to displayed name of currentFile
            set theOutputFolder to POSIX path of ((container of currentFile) as text)
            tell application "Image Events"
                launch
                set theImage to open currentFile as string
                save theImage as JPEG in (theOutputFolder & theName & ".jpg" as string)
                close theImage
            end tell
            set theJPG to POSIX file (theOutputFolder & theName & ".jpg" as string) as alias
            set label index of theJPG to 1
        end repeat
    end tell
end run
 
If you have Monterey, the Shortcuts app makes this kind of thing fairly easy.
I was trying to use Automator. I never tried Shortcuts... You give me too much credit omg. OK, I'm stuck now... where do I find "Saved File" to put in Label & in Rename?
 

Attachments

  • From Clipboard 2.jpg
    From Clipboard 2.jpg
    321.8 KB · Views: 133
Ctrl-click/two-finger tap/right-mouse the "files" box next to "Label", click on "Select Magic Variable", click on the "Saved File" icon coming off the Save action.
 

Attachments

  • Magic_Var.png
    Magic_Var.png
    50.2 KB · Views: 124
  • Like
Reactions: Spacetime Anomaly
I was trying to use Automator. I never tried Shortcuts... You give me too much credit omg. OK, I'm stuck now... where do I find "Saved File" to put in Label & in Rename?

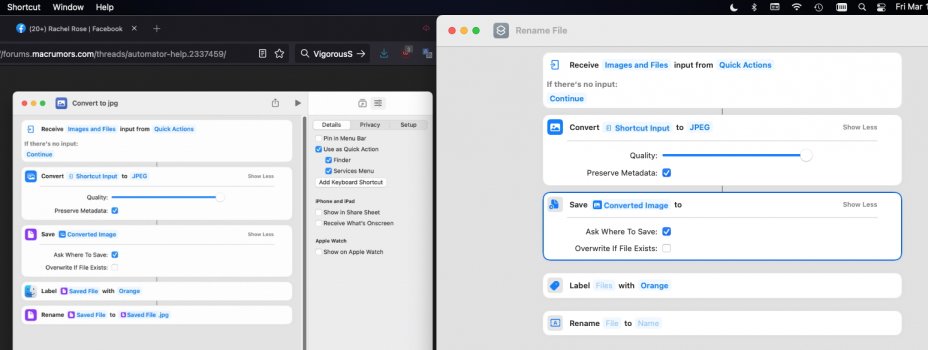
I don’t know why your Save widget has a different icon to mine (it also has a ‘to’ option that mine doesn’t have). Just to make sure you have the right one, use the search function to find it and drag it into place.

Screenshot 1.png


Now add the Label widget. ‘Saved file’ should come up automatically when you add it. If not, right click where it says ‘files’ and choose ‘Select Magic Variable’, then you can click on the ‘Saved file’ option that pops up.

Screenshot 2.png


Do the same with the Rename widget if it doesn't add 'Saved File' automatically.

Lastly, under the ‘Name’ option, click to get the cursor to input text, but instead of writing something - Left click, choose ‘Saved File’, then add .jpg to the end of the name (giving you the same filename as the original, plus the jpg extension)

Screenshot 3.png
 
Last edited:
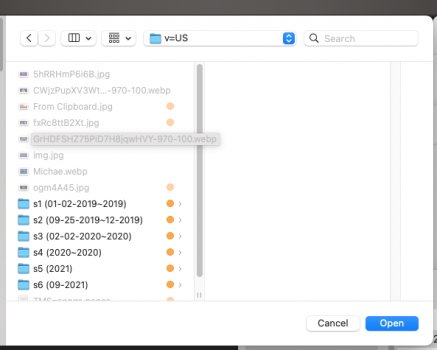
okay... did it all... showing in Finder menu, now Finder is asking me to choose a file in the Documents' Open window, instead of just converting my .webp right-clicked file... & .png & other files are grey & un-choosable...
 

Attachments

  • From Clipboard 3.jpg
    From Clipboard 3.jpg
    97 KB · Views: 103
  • From Clipboard 4.jpg
    From Clipboard 4.jpg
    169.1 KB · Views: 100
  • 0.jpg
    0.jpg
    138.5 KB · Views: 105
thanks for helping me, everyone... you'd think this would be a simple task, but of course it's impossible when i want to do it haha
 
okay... did it all... showing in Finder menu, now Finder is asking me to choose a file in the Documents' Open window, instead of just converting my .webp right-clicked file... & .png & other files are grey & un-choosable...

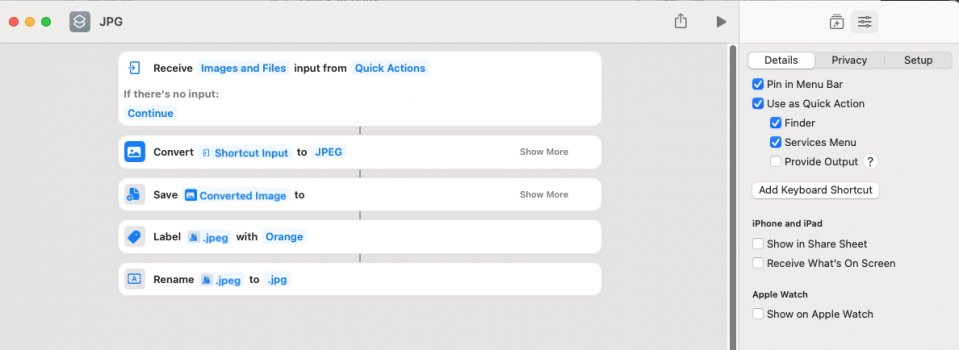
Click 'Show More' on the Save widget then tick the box 'Ask where to save'. Also, click 'Show More' on the Convert widget (to make sure the quality slider is at max). See the image below:

Screenshot.png


After that, make sure the following widgets are set to 'Saved File' (yours say .JPEG for some reason). It should look like this:

Screenshot-1.png


If your shortcut looks exactly like the screenshot I first posted in this thread, it will work. Works like a charm for me. It'll ask for permission on first run, then after that it'll only ask where to save the converted file.
 
Last edited:
I think I see your problem. Click 'Show More' on the Save widget then tick the box 'Ask where to save'. Also, click 'Show More' on the Convert widget (to make sure the quality slider is at max). See the image below:

View attachment 1971867

After that, make sure the following widgets are set to 'Saved File' (yours say .JPEG for some reason). It should look like this:

View attachment 1971868

If your shortcut looks exactly like the screenshot I first posted in this thread, it will work. Works like a charm for me. It'll ask for permission on first run, then after that it'll only ask where to save the converted file.
Yup i had that Ask Where ticked, but Saved File isn't showing under Label anywhere... now i keep getting a bug report LOL ...is it easier for me to try Automator again? or something else? I asked for help on Apple's forums & it got declined & deleted for some reason.
 

Attachments

  • From Clipboard 3.jpg
    From Clipboard 3.jpg
    213.5 KB · Views: 99
Last edited:
It takes 1 minute in Automator, see the attached video


New code used in copy-paste

Code:
on run {input, parameters}
    tell application "Finder"
        set theFiles to input
        repeat with currentFile in theFiles
            set extension hidden of currentFile to true
            set theName to displayed name of currentFile
            set theOutputFolder to POSIX path of ((container of currentFile) as text)
            tell application "Image Events"
                launch
                set theImage to open currentFile as string
                save theImage as JPEG in (theOutputFolder & theName & ".jpg" as string)
                close theImage
            end tell
            set theJPG to POSIX file (theOutputFolder & theName & ".jpg" as string) as alias
            set label index of theJPG to 1
    set extension hidden of currentFile to false
        end repeat
    end tell
end run
 
It takes 1 minute in Automator, see the attached video
View attachment 1972135

New code used in copy-paste

Code:
on run {input, parameters}
    tell application "Finder"
        set theFiles to input
        repeat with currentFile in theFiles
            set extension hidden of currentFile to true
            set theName to displayed name of currentFile
            set theOutputFolder to POSIX path of ((container of currentFile) as text)
            tell application "Image Events"
                launch
                set theImage to open currentFile as string
                save theImage as JPEG in (theOutputFolder & theName & ".jpg" as string)
                close theImage
            end tell
            set theJPG to POSIX file (theOutputFolder & theName & ".jpg" as string) as alias
            set label index of theJPG to 1
    set extension hidden of currentFile to false
        end repeat
    end tell
end run
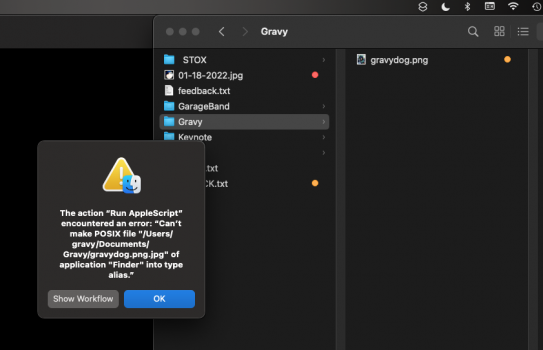
get an Error:


(also, can i automatically Trash the original file after converting?)
 

Attachments

  • From Clipboard 2.png
    From Clipboard 2.png
    72.3 KB · Views: 107
get an Error:
(also, can i automatically Trash the original file after converting?)
Try this one, it should fix the error and move the original file to trash. Do not use it on files with the extension .jpg, it would just delete them.

Code:
on run {input, parameters}
    tell application "Finder"
        set theFiles to input
        repeat with currentFile in theFiles
            set extension hidden of currentFile to true
            set theName to displayed name of currentFile
            set theOutputFolder to POSIX path of ((container of currentFile) as text)
            tell application "Image Events"
                launch
                set theImage to open currentFile as string
                set theJPG to (theOutputFolder & theName & ".jpg" as string)
                save theImage as JPEG in theJPG
                close theImage
            end tell
            set label index of ((POSIX file theJPG) as alias) to 1
            delete currentFile
        end repeat
    end tell
end run
 
  • Like
Reactions: Gravydog316
Try this one, it should fix the error and move the original file to trash. Do not use it on files with the extension .jpg, it would just delete them.

Code:
on run {input, parameters}
    tell application "Finder"
        set theFiles to input
        repeat with currentFile in theFiles
            set extension hidden of currentFile to true
            set theName to displayed name of currentFile
            set theOutputFolder to POSIX path of ((container of currentFile) as text)
            tell application "Image Events"
                launch
                set theImage to open currentFile as string
                set theJPG to (theOutputFolder & theName & ".jpg" as string)
                save theImage as JPEG in theJPG
                close theImage
            end tell
            set label index of ((POSIX file theJPG) as alias) to 1
            delete currentFile
        end repeat
    end tell
end run
Nope, same error popped up.
 
Nope, same error popped up.
Probably the conversion is not complete, here is one with a 0.5 second delay before that action.
jpg files are not processed even if selected. Extensions that are converted: "bmp", "heic", "heif", "jp2", "jpeg", "png", "psd", "tif", "tif", "webp"

Code:
on run {input, parameters}
    tell application "Finder"
        set theFiles to input
        repeat with currentFile in theFiles
            if name extension of currentFile is in {"bmp", "heic", "heif", "jp2", "jpeg", "png", "psd", "tif", "tif", "webp"} then
                set extension hidden of currentFile to true
                set theName to displayed name of currentFile
                set theOutputFolder to POSIX path of ((container of currentFile) as string)
                tell application "Image Events"
                    launch
                    set theImage to open currentFile as string
                    set theJPG to (theOutputFolder & theName & ".jpg")
                    save theImage as JPEG in theJPG
                    close theImage
                end tell
                delay 0.5
                set label index of ((POSIX file theJPG) as alias) to 1
                delete currentFile
            end if
        end repeat
    end tell
end run

Documentation for using Image Events in AppleScript https://developer.apple.com/library...utomationScriptingGuide/ManipulateImages.html
 
ok, just tried on 2 .webp files, first time nothing happened, & second time got the error again.
 
Try this :

AppleScript:
use AppleScript version "2.4" -- Yosemite (10.10) or later
use framework "Foundation"
use scripting additions

property NSURL : a reference to current application's NSURL

on run {input, parameters}
    repeat with an_item in input
        set file_url to (NSURL's fileURLWithPath:(POSIX path of an_item))
        if (file_url's pathExtension() as string) is in {"bmp", "heic", "heif", "jp2", "jpeg", "png", "psd", "tif", "tiff", "webp"} then
            set file_url_no_ext to file_url's URLByDeletingPathExtension()
            set file_url_jpg_ext to (file_url_no_ext's URLByAppendingPathExtension:"jpg")
            set file_path to POSIX path of (file_url_jpg_ext as «class furl»)
            tell application "Image Events"
                -- your Image Events.app code goes here
                set the_image to open an_item
                save the_image as JPEG in file_path
                close the_image
            end tell
            tell application "Finder"
                if exists (file_url_jpg_ext as alias) then
                    set label index of (file_url_jpg_ext as alias) to 1
                    --delete an_item
                end if
            end tell
        end if
    end repeat
    --return input
end run

Tested on Mojave with some small files. YMMV
 
ok,
Try this :

AppleScript:
use AppleScript version "2.4" -- Yosemite (10.10) or later
use framework "Foundation"
use scripting additions

property NSURL : a reference to current application's NSURL

on run {input, parameters}
    repeat with an_item in input
        set file_url to (NSURL's fileURLWithPath:(POSIX path of an_item))
        if (file_url's pathExtension() as string) is in {"bmp", "heic", "heif", "jp2", "jpeg", "png", "psd", "tif", "tiff", "webp"} then
            set file_url_no_ext to file_url's URLByDeletingPathExtension()
            set file_url_jpg_ext to (file_url_no_ext's URLByAppendingPathExtension:"jpg")
            set file_path to POSIX path of (file_url_jpg_ext as «class furl»)
            tell application "Image Events"
                -- your Image Events.app code goes here
                set the_image to open an_item
                save the_image as JPEG in file_path
                close the_image
            end tell
            tell application "Finder"
                if exists (file_url_jpg_ext as alias) then
                    set label index of (file_url_jpg_ext as alias) to 1
                    --delete an_item
                end if
            end tell
        end if
    end repeat
    --return input
end run

Tested on Mojave with some small files. YMMV
i think i found a possible reason it's not working??

i did everything you posted in the video & above,
& saved as "convert2JPG".workflow,
but it's not showing in the Finder's Quick Action menu...
it's still named the old "renametoJPG".workflow that i made the other day...

so maybe there's some kind of conflict between the Automator & Workflows I created?
do you know where these are saved?
I will delete them all & start over!

i have Apple's original "Convert Image," my "JPG" workflow & my Automator's "RenameToJPG" that I made the other day,
but only "convert2JPG" that i just made now is showing in Library > Services..

1647564726896.png
 
Last edited:
You can always search for those files with either the Finder or Spotlight.
Did you try the script? Did it work?
 
Register on MacRumors! This sidebar will go away, and you'll see fewer ads.