Become a MacRumors Supporter for $50/year with no ads, ability to filter front page stories, and private forums.

i-rui

macrumors member
Original poster
Feb 11, 2010
94
3
So I just picked up a Mac Pro on the weekend. I tested it prior to purchase with the ASD S3132 diagnostic. It passed everything EXCEPT the TNOD test, where it gave an error that the IOH sensor was above operating temp. Knowing this i purchased the unit at a reduced rate in hopes of fixing it.

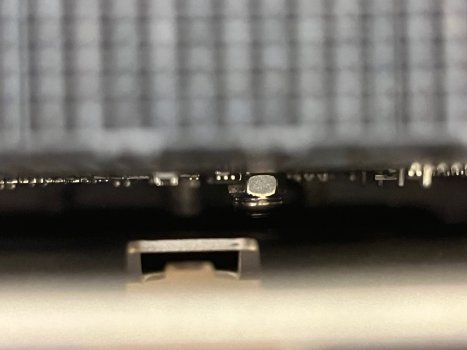
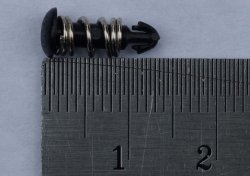
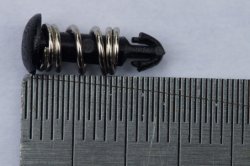
So researching this it seems the Northbridge heatsink and thermal sensor is not properly seated. There is a small plastic clip that is supposed to hold down the Northbridge heatsink that is gone, so it is not flush against the board.

this thread has a picture of the processor board stripped down, and the Northbridge missing the 2 clips that secure it to the processor board :

https://discussions.apple.com/thread/4501912?start=0&tstart=0

i think i'm only missing the one clip, as the processor heatsink is holding it down on one side already. Searching the web it seems that Apple does not sell just the clips, and the route most people are going seems to be to buy a whole new processor board. This seems like ridiculous overkill to me since the clip surely must be a 25 cent part. This thread has someone suggesting using glue to hold down the heatsink :

https://discussions.apple.com/thread/3099476?start=0&tstart=0

I'm not crazy about this solution, but may try it as a last resort.

I was thinking that a simple nut and bolt solution would work, but i'm not sure if using a metal part here could short something on the processor board. There might be a reason apple went with a plastic clip (although looking at my other 2009 mac pro processor board there does seem to be a spring mechanism on the clip, but i doubt this extends past the heatsink to make contact with the actual board....)

I could also try to find a plastic nut/bolt combination, but trying to find the right size may be more difficult because of the limited selection for plastic nuts & bolts.

Has anyone else run into this same problem? were you able to find a solution other than replacing the entire board?

Any other thoughts on a possible solution? I'm all ears...
 
Last edited:
After reading this thread, I bacame worried about the snap rivets on my two 2009 and 2012 mac pro breaking...

At work, we had a customer bring in a 2009 single cpu, that had a dead cpu board, caused by a snap rivet breaking.

That made me paranoid, so I decided to fix it immediately.

I refuse to use the plastic rivets I got from china, I just dont trust them.
The plastic is flimsy, and the springs are about half as strong as the original Apple ones.
I went to the local ACE Hardware, and picked up a set of 6-32 stainless screws.
They were too big by a hair, dont use 6-32!
Then picked up a set of 4-40 stainless Allen cap screws, 1/2" long. These are a PERFECT fit.
Also got a set of "stop nuts" for them, these are the kind with the hard plastic ring embedded that keeps them from unscrewing.
I used the original Apple springs, which perfectly fit the 4-40 cap screws.
Tighten them down until you get about half a thread showing past the nut, almost nothing.
Remember when tightening the nuts to keep pressure on both screws! you dont want the thermal paste squeezed out one side because your pressing down the other side.
This will give about 2-3mm of up/down movement on the spring/screw, which is more than enough for heat expansion.

Problem solved, permanently.

EDIT: Added pictures.
Pinfix-1.JPG Pinfix-2.JPG Pinfix-3.JPG

gM8Vj6
mR6i46
ctxqj6
 
Last edited:
Just my 46 cents, here. I have just finished completely refurbishing 2 Mac Pro (5,1 - 2010-2012) CPU trays (and am about to do a third) and have had to deal with this problem. In both cases, the original plastic rivets and springs were intact but, after reading numerous reports of failure over time, I sought a more permanent, reliable and (hopefully) elegant solution. The following approach solved the problem for less than $0.50:

1) I carefully used pliers to squeeze the barbed end of the original rivets and coaxed them through the PCB holes. Then carefully removed the springs, without ruining the barbs, and set the rivets aside for possible future emergency use (although, with the solution I arrived at, I cannot imagine when I would ever use them - "waste-not, want-not", I guess).

2) Replaced each spring-rivet with an M3-.5mm x 14mm stainless steel button-head screw and an M3-.5mm stainless steel nylon-insert locking nut, re-using the original spring. A length of 14mm is perfect; a 12mm length will compress the springs to (or past) their limits; a 16mm length will contact the CPU tray.

IMG_4152.jpg

(NOTE: I read this how-to article on ifixit.com in which the author used 16mm screws and had to drill a hole in the tray to accommodate the excess screw length but the excess length is just that: excess. I avoid invasive operations unless there's an excellent reason to perform them. The author also used normal cap-head screws and used washers under the screw heads to properly retain the springs; a button-head screw has a very flat, larger-diameter head that is perfect for the spring, obviating the need for washers (looks more elegant, too). Also, he used a nylon washer on the bottom of the PCB but, as tsialex pointed out, the bottom is a ground plane anyway and requires no such insulation.)

3) Cleaned and applied thermal compound to the Northbridge chip (of course).

4) Assembled, adjusting the tension to close-to-original by ensuring that the distance from the bottom of the button-head of the screw to the PCB surface was equal to that of the original spring-rivet (about 9/32") This resulted in a spring pressure that approximates that of the original quite closely.

IMG_4153.jpg

As you can see, the fix is permanent, trouble-proof, easy to disassemble/reassemble, if necessary, and elegant. The next illustration shows the nuts under the PCB in the assembled CPU tray; as can be seen, the 14mm screw length results in full engagement of the nylon locking insert with a minimum of protruding thread and plenty of clearance between the screws and the tray itself.

IMG_4155.jpg

Here are the parts labels with complete specs for those who may find this approach desirable:

IMG_4160.jpg

There are, of course, many ways to solve almost any problem; this one works and works well and is very economical (the total cost of the project was $0.46).
 

Attachments

  • IMG_4154.jpg
    IMG_4154.jpg
    156 KB · Views: 205
Last edited:

Thanks very much to everyone who posted information in this thread - it helped me survive my own "Northbridge moment" on my 4,1->5,1. I was just web browsing a few nights ago when I heard a loud pop/crack and the machine went dark except for a solid red light inside the case. I thought it was curtains and that I would probably need to start searching eBay for logic boards or power supplies.

HOWEVER, I soon found that the machine would power up just fine, so no issue with the power supply. The nVidia 980 was illuminated and its fans were running. Saw that the CPU-A red LED was illuminated on the logic board, and also down on the CPU tray just as others had experienced (mine is a single-CPU model with an X5690). Everything seemed to be in order except for the lack of a boot sequence. Hoped fervently that it was "just" the Northbridge rivet because I had laid up a bag of the Chinese ebay rivets and a spare tube of Arctic Silver 5 for this very eventuality after reading this thread about a year ago.

When I removed the CPU tray and tilted it to get a better look, pieces of plastic rivet fell out the bottom. Mystery solved. I ended up pulling the CPU heatsink and Northbridge heatsink, cleaned off all the old thermal paste on the heatsinks, CPU, and Northbridge chip, and reapplying fresh Arctic Silver 5. Popped down the Northbridge heatsink with the Chinese rivets (I replaced both rivets), new paste on CPU, reassembled the whole thing, and fired it up, hoping that the exploding rivet didn't do any collateral damage. And we are back up and running.

One thing I noticed with the temps (which I may have forgotten from when I installed the X5690 CPU back in 2015). For the first 5-10 minutes the MP seemed to be running much hotter than before - over 60 degrees C at the CPU diode at idle, when it used to be about 40 C at idle. Fans were running to compensate, but it was not "normal." I was panicking slightly thinking I would need to re-do all the thermal paste. After about 10 minutes though, I noticed the temps dropping. It was sitting around 42 C at the CPU diode last I checked. Northbridge slightly hotter as expected. Maybe the paste had to heat up in order to completely spread itself around. If I have time tonight I will edit this post and report back on the temps (which will be 5-6 hours later instead of just 10 minutes).

Edit: It has been about 5 hours since I first started up the MP with its new Northbridge rivets and Arctic Silver 5 thermal compound. Idle temps are looking good! 36-40 C on the CPU core and 58 C on the Northbridge (IOH) diode, which is right what they were before.
 
Last edited:
I just want to chime in with how we fix it on the tech team that I'm on. Zip ties. These break all the time.

Get two small zipties, put one down through the board so the lock end of the ziptie is on the top of the board. Put another zip through the first. and it get as tight as you can. Then clip both of the ends. So you have the locks of two zipties on each side of the board.

it won't be perfect, but it works just fine and we have many that have this fix and continue to run for years after.

Those spring rivets are an embarrassment to apple. I do not know for the life of me why they use them. Garbage.

But, if you have a lot of machines running 24/7 or for long hours at high load, you'll see this in 15-20% of your machines. That's been my experience so far. All the mac pros have this problem. I haven't used the trashcan one yet.
 
I also have no problem with the Chinese rivets which I had purchased from eBay; they snapped in firmly and have been holding fine ever since. The only problem I had with them is that their necks were higher than those of the original rivets, so I had to cut to size the one which sits partially underneath one of the heatsinks on the dual-CPU model (because, by a hair, it wouldn't fit). I simply shaved the top in half with a Dremel and then cut in half the cylindrical piece which sits around the body of the rivet/spring.

I fixed this machine without any hassle or need for hunting down screws. If anyone has any questions, I suggest they PM me. The process isn't difficult. In fact, I even wrote instructions in some post (although, I think I need to re-write them).
 
I just want to chime in with how we fix it on the tech team that I'm on. Zip ties. These break all the time.
Of all the ideas in this thread, this seemed the most likely to end up with a broken logic board. So naturally I had to try it!

First, for anyone new to mucking about with the Mac Pro heatsink, you need a long 2.5mm Allen key. Use it to loosen the five screws holding down the heatsink (you can't lose the screws, so just go until it stops spinning easily):
IMG_2188.jpg

The IOH/chipset heatsink sits under the main heatsink, so you can see why the BOOSTA fan setting can greatly affect the chipset temperature:
IMG_2196.jpg

The spring rivets in question are circled here:
IMG_2189.jpg

First remove the standoff screws:
IMG_2192.jpg
and you can see the backside of the logic board where the rivets stick out:
IMG_2193.jpg
Now, I may have gotten some later-manufactured model or the original owner wasn't too hard on the Mac Pro, but my rivets were actually in great shape. I had to clip them with scissors for the purpose of this tutorial/my curiosity.

Wipe off the grease from the CPU and chipset heatsinks, and from the CPU and IOH chipset. I know some people use industrial degreasers and fancy arctic silver removal whatevers, but I've used a paper towel, Q-tips, and rubbing alcohol since I was mucking around with lidless AMD Athlons and Slot I Pentium IIs so it'll be fine here. Anyway, it should look kinda like this when you're done:

IMG_2200.jpg

Then apply new heatsink grease to both the IOH chipset and the CPU. You do NOT need to apply it to the actual heatsinks.

Now stick one zip tie through one hole and another through the second hole, and lock them together. It'll look stupid and like it couldn't possibly work, but don't knock it till you try it...
IMG_2202.jpg
(clip the excess zip tie like twerpin said)

Here's the funny thing - all this malarkey actually lowered my CPU/IOH temperatures. My CPU diode usually hovers around 70-80C under load (this is after already changing the CPU heatsink grease once), and the IOH diode anywhere from 70C-90C depending on how aggressively I set the BOOSTA fan.

Here's the temperatures under load (handbrake x265 encode), and all automatic fan control:
autofan.png
Setting the exhaust/intake/boostA profiles more aggressively (CPU diode, min/max 50C/90C) only lowers the temps a few more degrees:
aggressivefan.png

So I'm guessing most of the benefit is cleaning out the 10-year-old heatsink grease that the Mac Pro originally shipped with. Anyway, wouldn't recommend doing this unless you absolutely have to. Even 70-80C is well within the tolerances for the chipset.

That said, I was able to turn down all of the fan settings in Mac Fan Control, so my Mac is even quieter than before!
 
Last edited:
If I were to use zip ties to mount a heatsink, I would have used this method:
View attachment 773726

Use two zip ties for each mounting hole.

Earlier this year I was able to temporarily resurrect a 2009 Mac Pro with snapped northbridge heatsink clip using zip ties in that cleaner arrangement. After replacing all the crusty dried thermal paste with some fresh Arctic MX-2 non-metallic thermal paste, the Mac Pro ran without issue for about 6 months. Then, recently, the same symptoms started happening again - shutting down just a few seconds after powering up.

This time I ordered the Chinese plastic spring rivets from ebay, they took about two weeks to arrive, I've just installed them and with some fresh thermal paste the system is running normally again. I used a diagonal cutter to snip off the top of the rivet that lives underneath the CPU heatsink, the plastic was fairly soft.

I notice that the plastic rivets hold the heatsink more tightly against the northbridge chip than the zip ties did. With the zip tie method I could wiggle the heatsink around slightly even when it was zipped as tightly as possible. The problem with zip ties is they are stepped, you can only zip them as tight as the nearest notch. By contrast, the spring rivets don't seem to allow the heatsink any wiggle room when installed, it sits tightly. I'm guessing the tiny bit of extra space allowed by the zip ties led to the thermal paste drying out and losing its effectiveness.

My advice would be to avoid zip ties, except as a temporary patch until you can get proper spring rivets as the designers intended.
 
You could do, sure, but the chipset die is so small that it probably won't keep it fixated for long. My personal preference is to use rivets again, with adhesives and exposed dies you risk damage when you want to remove the heatsink to clean up. I already damage a PC motherboard because of this.
I agree. In addition, adhesive thermal compound has worse thermal conductivity than regular paste. Either go with quality long life thermal paste or an IC carbon thermal pad coupled with plastic or metal push pins or rivets.
 
Of all the ideas in this thread, this seemed the most likely to end up with a broken logic board. So naturally I had to try it!

First, for anyone new to mucking about with the Mac Pro heatsink, you need a long 2.5mm Allen key. Use it to loosen the five screws holding down the heatsink (you can't lose the screws, so just go until it stops spinning easily):
View attachment 773471

The IOH/chipset heatsink sits under the main heatsink, so you can see why the BOOSTA fan setting can greatly affect the chipset temperature:
View attachment 773476

The spring rivets in question are circled here:
View attachment 773472

First remove the standoff screws:
View attachment 773474
and you can see the backside of the logic board where the rivets stick out:
View attachment 773475
Now, I may have gotten some later-manufactured model or the original owner wasn't too hard on the Mac Pro, but my rivets were actually in great shape. I had to clip them with scissors for the purpose of this tutorial/my curiosity.

Wipe off the grease from the CPU and chipset heatsinks, and from the CPU and IOH chipset. I know some people use industrial degreasers and fancy arctic silver removal whatevers, but I've used a paper towel, Q-tips, and rubbing alcohol since I was mucking around with lidless AMD Athlons and Slot I Pentium IIs so it'll be fine here. Anyway, it should look kinda like this when you're done:

View attachment 773477

Then apply new heatsink grease to both the IOH chipset and the CPU. You do NOT need to apply it to the actual heatsinks.

Now stick one zip tie through one hole and another through the second hole, and lock them together. It'll look stupid and like it couldn't possibly work, but don't knock it till you try it...
View attachment 773478
(clip the excess zip tie like twerpin said)

Here's the funny thing - all this malarkey actually lowered my CPU/IOH temperatures. My CPU diode usually hovers around 70-80C under load (this is after already changing the CPU heatsink grease once), and the IOH diode anywhere from 70C-90C depending on how aggressively I set the BOOSTA fan.

Here's the temperatures under load (handbrake x265 encode), and all automatic fan control:
View attachment 773470
Setting the exhaust/intake/boostA profiles more aggressively (CPU diode, min/max 50C/90C) only lowers the temps a few more degrees:
View attachment 773469

So I'm guessing most of the benefit is cleaning out the 10-year-old heatsink grease that the Mac Pro originally shipped with. Anyway, wouldn't recommend doing this unless you absolutely have to. Even 70-80C is well within the tolerances for the chipset.

That said, I was able to turn down all of the fan settings in Mac Fan Control, so my Mac is even quieter than before!

If I were to use zip ties to mount a heatsink, I would have used this method:
zip-ties-6.jpg

Use two zip ties for each mounting hole.
 
I have this same issue with my 2009 early MacPro and after reading this whole thread as well as any and all links I ordered everything I need to repair including a 2.5mm 9" long hex key only to find out that 2.5 is not the correct size and seems to be too small. Does anyone know what the actual size of the heads are on the bolts? Mine just spins inside the bolt head and not loosening anything.

Screen Shot 2018-09-08 at 16.37.40.png

It's 3mm. Page 172 http://tim.id.au/laptops/apple/macpro/macpro_mid2010.pdf
 
I have recently had a Blackmagic decklink 4k card in my hands and noticed the extremely nice rivets it uses for its heatsink, and wondered whether they can be found loose.

I don’t have a picture of the other side, but they look super functional and sleek.
706C63EC-6642-4EF9-939F-F0C5527D1097.jpeg
 
I removed the CPU heatsinks and then the processor board from the tray. Initially i had thought that the only way to remove the nothbridge heatsink would be by cutting away the clip, but looking at the bottom of the board it became apparent that that clip was in fact a snap rivet that i could remove using needle-nose pliers. I was able to rescue the 1 remaining rivet and have photographed it against a ruler to get accurate measurements. I'll try to include the pics in this post:


I was actually able to find what seems to be an exact match online here :

http://www.alibaba.com/product-gs/512818021/Fan_Plastic_Snap_Rivet.html

they even have a diagram, and the measurements match the same used in the 2009 mac pro.
The bad news is their minimum order is 10,000 pieces. :mad:
I contacted them to see if it would be possible to buy a sample pack or do a much lower run. Hopefully i'll get a reply.

I actually just happened to meet someone who designs parts for the aerospace industry yesterday (talk about serendipity!) and i was lucky enough to share this dilemma with him. I mentioned my idea of simply using a nylon nut & bolt solution and he said that it would only work if i somehow wound a spring between the top of the bolt and the heatsink. The spring is important because there will be a lot of movement in the heatsink as the temperatures fluctuate.

Also, now knowing that the snap rivet can fairly easily be removed from the processor board i'm wondering if i could track down someone with a broken processor board and buy the rivet from them. I know there are a few unfortunate souls who have bungled a processor upgrade job. Would i be able to post a "wanted" ad in this forum or would that be frowned upon?
 

Attachments

  • 2009 MP Northbridge snap rivit.jpg
    2009 MP Northbridge snap rivit.jpg
    85.3 KB · Views: 1,651
  • 2009 MP Northbridge snap rivit close up.jpg
    2009 MP Northbridge snap rivit close up.jpg
    108.1 KB · Views: 3,431
  • Like
Reactions: Synchro3
Are the plastic sprung clips shown in this old NB Zalman cooler about the right size? http://www.frostytech.com/articleview.cfm?articleID=2235

I still feel that thermal epoxy is the solution here.

Here is a scan of the plug clips from the Zalman ZM-NBF47 cooler.
I ordered the cooler and a pack of thermal pads to hopefully be ready for
the problem if it ever happens.
I can't tell if it's right. The ruler comparisons confuse me.
vmyxzp.jpg
 
Last edited:
  • Like
Reactions: adam9c1
Mine just broke by itself 2days ago cause my machine to freeze and i notice it from i-stat that my IOH T-diode temp was stay at 128'C.
I remove 2 of the pin form an only PC mono and replace the pin and hit another problem.
My Booster B fan was spinning at Max speed and i notice i-status shoe Booster B 0RPM i guess while i remove the heatsink it might had either damage the fan sensor or broken wire. damn.. ! i've hunt for a replacement CPU-B heatsink and notice the heatsink was at USD380 at Applecomponent. :eek: Any guru might be able to help here be nice. :confused:
IMG_0955.jpg

IMG_0956.jpg

IMG_0959.jpg
 
Last edited:
  • Like
Reactions: Matty_TypeR
UPDATE WITH WORKING SOLUTION: (Credit to this guy for the solution: https://forums.macrumors.com/threads/mac-pro-heatsink-northbridge-rivet-loud-fan.1755982/)

Sorry that I never put out an update here! Near the end of November, I ended up ordering typical Chinese rivets from eBay (which you get by searching heat sink pins/rivets - they're opaque white-ish), since someone in another thread posted their success story with such rivets. This ended up being a huge relief, because I didn't have to go out and buy a kit just for its two little rivets; the Chinese ones worked! I'm on my 2009 Mac Pro right now, and it has been running strong - even after a 32GB upgrade where all slots are filled. Both rivets snapped in and stayed in without any problems.

NOTE: I did have to modify the rivet that sits underneath one of the CPU heat sinks. These Chinese rivets were a bit tall, so I had to take a Dremel and just shave that rivet down a bit; it was no big deal at all. Anyone with a knife or Dremel could easily do it. I started with the top of the peg itself, and then I also shaved down the cylindrical piece that's wrapped around the spring itself. I sort of, uh, circumcised it...? I guess you could say that. I simply cut around the cylindrical piece so that it would end up being equal with the new size of the peg itself. If not, the cylindrical part would have poked up past the peg itself and hindered the CPU heat sink from screwing down properly. So, remember, if you do this, to shave down the size of the peg AND the cylindrical piece that's around the spring.

Other than that, I had zero issues, and I was surprised that the springs worked, in spite of their very dissimilar shape to the Apple ones. I highly recommend going with this solution, as my temps and such are all back to normal, and the machine (obviously) works fine again. Just put new thermal paste on everything before you put it all back together (I did my CPUs too), and you're good to go! I believe I used my leftover Gelid thermal paste. Get high-end. Do NOT cheap out. In total, I spent about $10 fixing the machine (bought some Arctic but didn't need it in the end). That's cheap to begin with.
 
  • Like
Reactions: Magee Miller

If you were ever wondering what is the performance between a Mac Pro 2009 with dual 2.26Ghz processors versus a single processor X5690 3.46Ghz, and dual processor X5690 3.46Ghz, here are the geek bench numbers.


2009 Mac Pro E5520 8 Core with 48GB RAM (4,1 to 5,1)

Single-core 2,083

Multi-core 10,705


2009 Mac Pro X5690 6 Core with 48GB RAM (4,1 to 5,1)

Single-core 3,113

Multi-core 13,645


Upgrading to Dual CPU


2009 Mac Pro X5690 12 Core with 48GB RAM (4,1 to 5,1)

Single-core 2,937

Multi-core 18,402


These are the real scores of my system. The ratios can vary depending on how many background apps and such. I am using 3qty OWC 16GB Dimms for RAM and booting from OWC PCI storage.

#
Name Platform Architecture Single-core Score Multi-core Score
2741773 MacPro5,1Intel Xeon X5690 3460 MHz (12 cores) Mac OS X 64 x86_64 2937 18402
2729627 MacPro5,1Intel Xeon X5690 3460 MHz (6 cores) Mac OS X 64 x86_64 3113 13634
2723427 MacPro5,1Intel Xeon E5520 2260 MHz (8 cores) Mac OS X 64 x86_64 2083 10705
 
  • Like
Reactions: martyr
There is no washer, the nuts are resting against the metal pads on the pcb.
I wouldnt worry about a warm spot there, the underside of the i/o hub would heat the pcb more than those two screws ever could.
 
  • Like
Reactions: Hot-Mac
My NB was at 75˚C during most of the time so i've removed the heatsink to find that thermal paste was all dried out.
I've replaced the paste with MX-4 and put those white rivets on just to see that the temperatures stayed the same.

So i've wiggled the NB heatsink just a bit (thinking it would spread the paste) but the temperatures went to 80˚C after that. Now i have the fan profile set to keep it at 70˚C, haha... :D

I don't know what to make of it, the white rivets seemed to have very weak springs compared to original ones, so it might be that, or should i go with the some less "fluid" paste, like AS5 instead of MX4 (which works great on CPU's)?

I know that dual CPU 4,1/5,1 have hotter NB that single CPU ones, but i would really like to keep it under 70˚C with stock fan speeds if possible.


Which exact rivets did you get? The ones I used (which I bought from eBay) were perfectly fine. You're supposed to push the nub of the rivet until you hear a fairly loud *snap* and have felt the rivet click into place. At that point, the spring should be fully compressed and the rivet should be tight. The rivets I used were very cheap, but they held on just fine.
 
  • Like
Reactions: Synchro3
Which exact rivets did you get? The ones I used (which I bought from eBay) were perfectly fine. You're supposed to push the nub of the rivet until you hear a fairly loud *snap* and have felt the rivet click into place. At that point, the spring should be fully compressed and the rivet should be tight. The rivets I used were very cheap, but they held on just fine.
I've bought the ones that AFAIK everyone has :) (cant remember did you first post the link to eBay auction, or was it DrStealth...?)
Screen Shot 2018-01-16 at 11.17.34 AM.png

The rivets are in place and the one below the heatsink is shortened as it should be.
They are doing their job just fine, i was just wondering what could be the reason for the same and then worse temperatures after paste change, and how could i approach it?
Since you and the other guys using the same plastic rivets are saying that all is ok i'm willing to try different thermal paste. The MX-4 is very soft and i don't think it is the right application for NB heatsink that can easily be moved millimeter either way.

Sorry for crappy picture, my mac is working at t he moment so i cannot move it or take the better one, but i think that you can see that there is a little more push left on the head of the rivet. Not quite fully compressed.
IMG_0255.jpg
 
  • Like
Reactions: PowerMac G4 MDD
Register on MacRumors! This sidebar will go away, and you'll see fewer ads.