Become a MacRumors Supporter for $50/year with no ads, ability to filter front page stories, and private forums.

acearchie

macrumors 68040
Original poster
Jan 15, 2006
3,264
104
Hi guys,

I am totally new to illustrator and I have been just messing around to try and make my way around the software as it is something I would like to get into.

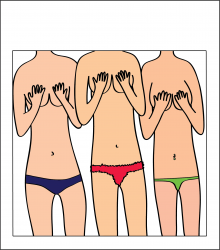
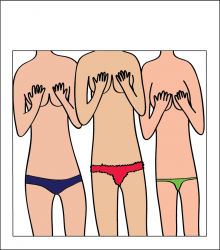
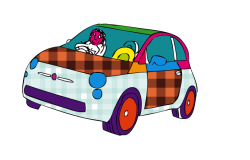
I have uploaded a basic drawing that you can see. But I want to know how to colour it in? The drawing is made up of multiple paths and currently I'm not 100% how to turn it into a correct shape that I can then "fill in".

I have also created another drawing of some people without heads and therefore it is not a closed object. So I am at even more of a loss as how to colour this in!

Any help or links would be greatly appreciated.
 

Attachments

  • Nina.png
    Nina.png
    25.3 KB · Views: 160
Last edited:
Without the picture it is a little difficult to assess your problem.

Where is it? A link would help.

AI can apply a fill to a non-closed object.

Sorry guys, feel a little bit of a fool for forgetting the picture! Anyway its a very basic picture...

I just wanted to know how I would go about colouring it in!

Thanks
 
I wouldn't even attempt to add fills to the linework. I'd make sure all your linework is on one layer and lock it, so you can't accidentally select it, and then I'd create coloured objects without strokes underneath the linework.

Cheers!

Jim
 
I agree. Either you create the shapes with coloured fills at the time or use the drawing as a guide for coloured shapes (with a transparent outline) afterwards.
 
Thanks for the help guys.

I really am a complete novice so you are saying that with pictures fine tune the path the create a layer underneath... but then how would I colour in do I have to redraw with the pen tool (making sure it's a clear stroke?)

All the tools are new to me you see and therefore it all seems like a bit of a foreign language at the moment!

Thanks!
 
Basically, yes. You have a fair bit of work ahead of you.

Cheers for the help. So for my next drawings is there a different way I should go about it or is it just always quite difficult to create a picture?

Thanks for the help!
 
Thanks for the information, so even with objects that don't really conform to a shape (for example; the roofline of the car) i should attempt to make these using shapes and the pathfinder tools?

On a side note does anyone know of any sites that would help me guide myself through these learning processes?

Thanks

EDIT: ...and sorry whats a stroke as opposed to a path?
 
Thanks for the information, so even with objects that don't really conform to a shape (for example; the roofline of the car) i should attempt to make these using shapes and the pathfinder tools?
The pen tool is easiest for irregular shapes. Make a roughly correct shape and fine-tune it using the "handles" on the Bezier curves.
...and sorry whats a stroke as opposed to a path?
A stroke is either a simple line, text, or the outline of a shape.

I don't know of any good resources for learning, as I just taught myself through experimentation. I'm sure others are far more clued-up.
 
The pen tool is easiest for irregular shapes. Make a roughly correct shape and fine-tune it using the "handles" on the Bezier curves.
A stroke is either a simple line, text, or the outline of a shape.

Sorry now you mention it I know exactly what you mean. And the pen tool is what I have been using mostly so far for all my drawings mixed with the brush tool.

Is there someway I can create closed shapes that I can then fill with entire colours. For example the bonnet of the car looks like an entire closed shape however, the outside line is the entire roofline and the lights are separate shapes etc. Is there a way to select certain paths or group things together so that I can make the bonnet one colour, the lights another and the wheels another again. Or is it best to create the layer underneath and fill with the pen?

Thanks again for the help. I know it must seem tedious!
 
Or is it best to create the layer underneath and fill with the pen?

This. Use the pen tool to create a filled shape beneath the linework.

Colouring/illustration work is (ironically) quite hard to grasp conceptually in Illustrator because you have to abandon the canvas/brush/paint metaphor the Photoshop and Painter use and wrap your brain around objects.

Try to think of the process of colouring --certainly the laying down of basic areas of colour-- as being one of using pieces of coloured paper that you have to cut to shape and can stack one on top of the other. Thus you could colour the whole of the bodywork with one object that was, say, green, and then the headlights by adding new objects in pale yellow that are the same shape as the headlights…

Cheers

Jim
 
Right thanks everyone for the tips.

They have been more than useful and I have been able to nurture my Illustrator skills.

I now have been able to create a full image and added colour. I was wondering if anyone had any tips for improvement.

I'm sorry if this example is not to everybody's tastes (changed the title just incase, you had your warning!) but it is an image that a friend had requested!

What would you suggest about the skin tones and possibly two toning the skin etc? Any suggestions on the realism of the drawing would be good to. I might add some finger nails as just a small addition.

Thanks
 

Attachments

  • Illustrator.png
    Illustrator.png
    69.4 KB · Views: 88
You could always try a gradient or two: with careful manipulation of linear, radial and path gradients you could add a lot more depth - but of course you might prefer it flat.
 
You could always try a gradient or two: with careful manipulation of linear, radial and path gradients you could add a lot more depth - but of course you might prefer it flat.

Good idea. Could you elaborate slightly? I haven't used the gradient tools yet and from an drawing point of view I'm not really sure where gradients would work and why?

On a side note I would really like to say thank you skunk as you have pretty much single handedly helped me with this!
 
Good idea. Could you elaborate slightly? I haven't used the gradient tools yet and from an drawing point of view I'm not really sure where gradients would work and why?
I'm no expert at gradients on paths, but to do it with radial and linear gradients you'd have to separate the various elements (forearms, upper arms, torsos, etc) and apply linear gradients to each at appropriate angles, and play around with them until you got a satisfactory blending at the joins. Drawing a path to shape the gradients would probably be a lot more satisfactory, but I haven't really explored this method enough to explain it. Illustrator Help might explain the technique well enough, though.
 
dont have time to write proper instructions im afraid sorry, but just select all your paths, click OBJECT > EXPAND, then you need to OBJECT > LIVE PAINT

Live paint basically converts 'areas' within paths into selectable/paintable areas. JUst google Live PAint for full instructions, its real easy and simplest way to colour. Just make sure before you expand, that paths fully enclose areas you want to have coloured different.

good luck
 

Attachments

  • Screen shot 2011-01-17 at 17.51.13.png
    Screen shot 2011-01-17 at 17.51.13.png
    56.8 KB · Views: 69
Last edited by a moderator:
dont have time to write proper instructions im afraid sorry, but just select all your paths, click OBJECT > EXPAND, then you need to OBJECT > LIVE PAINT

Live paint basically converts 'areas' within paths into selectable/paintable areas. JUst google Live PAint for full instructions, its real easy and simplest way to colour. Just make sure before you expand, that paths fully enclose areas you want to have coloured different.

good luck

Wow! Thanks a bunch for this useful tip. I will try this out tomorrow!
 
Wow! Thanks a bunch for this useful tip. I will try this out tomorrow!

No problem

By the way, I like your graphic above - wouldnt change it (with gradients etc) it works well in flat colour, dont over complicate!

The style of drawing reminds me of British illustrator Quentin Blake - have a google!

Enjoy your creativity!

(P.S - dont forget bellybuttons :)
 
The style of drawing reminds me of British illustrator Quentin Blake - have a google!

Enjoy your creativity!

(P.S - dont forget bellybuttons :)

Thanks very much for the feedback!

Thanks also for the bellybutton advice! Probably would have forgotten them along with the finger nails! After those two I hope that will be it!
 
Here is the final piece i suppose (unless i can think of a background) It's essentially a polaroid setup for a photographer friend of mine so he can look for models. He was going to then draw the heads on the top (bottom of polaroid) as simple stick figure heads! Call it arty I suppose!

Added in bellybuttons but finger nails didn't look good with the thickness of the stroke I had used with the rest of the body.

You have to click to see it with its proper resolution.
 

Attachments

  • Illustrator.png
    Illustrator.png
    158.8 KB · Views: 86
Last edited:
Register on MacRumors! This sidebar will go away, and you'll see fewer ads.