Become a MacRumors Supporter for $50/year with no ads, ability to filter front page stories, and private forums.

tezr

macrumors newbie
Original poster
Apr 25, 2014
1
0
Hi,

I'm new to both Mac (having bought a Mac book a few weeks ago) and this forum.

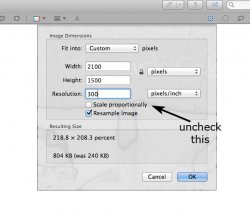
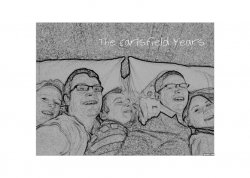
I'm having real trouble trying to print a photograph (attached) at the size I want. I'm printing on 5 x 7 paper and want a custom size border to give me an image size of exactly 11.8cm x 16.7cm (or as near to).

There doesn't seem to be any option in either Preview of iPhoto for me to set a custom size border which means that when I mount the photo it's either too big (and the faces are cut off) or too small and you can see the border of the photo once mounted.

Any help much appreciated as to whether there's a way to customise the border in iPhoto. I'd rather not pay for Aperture (where I'm sure you could do this) given how rarely I use it.

Thanks,
Terry.
 

Attachments

  • The Earslfield Years 2.jpg
    The Earslfield Years 2.jpg
    130.7 KB · Views: 343
I would suggest using Pixelmator. It will do what you're trying to do and a whole lot more. You can easily resize images, add a border (using layers), etc.

It's versatile and inexpensive. Last I looked, it was $15.00 from the Mac App Store. You can also try it free for 30 days from the developer's site: Pixelmator

~ Peter
 
You can do this in Preview, which you already have on your Mac.

First of all you need a white (or whatever colour background you want) document. You can create one by taking a screenshot of a white part of the screen (cmd-shift-4) and opening it in Preview, or opening any file in Preview and select 'Adjust Color...' from the 'Tools' menu and set the sliders as in figure 1.

To size your document for printing, select 'Adjust Size...' from the 'Tools' menu, and select the sizes as in figure 2 (I am presuming you are using a print resolution of 300dpi - if not, you can adjust these values).

You should now have a 7x5 white document.

Open 'The Earlsfield Years' in Preview.
Select all (cmd-a) then copy (cmd-c).
Switch to the 7x5 white document and paste (cmd-v).

The Earlsfield years should now be centred in the white document, which you can save and print (figure 3).
 

Attachments

  • Adjust Color.jpg
    Adjust Color.jpg
    102.9 KB · Views: 287
  • AdjustSize.jpg
    AdjustSize.jpg
    117 KB · Views: 265
  • TEYB.jpg
    TEYB.jpg
    208.6 KB · Views: 270
You can also do this from the print dialog in iPhoto.
After you select the picture you want to print and click on the share button and then Print, under where you select the printer you want to use, change it to 5X7 Borderless, then select Custom from thumbnail previews. When you select Custon new controls will show up at the bottom of the sidebar. In Aspect Ratio be sure Custom is showing, then in Photo Size Change it to 5" and 7", this will give you a picture without borders, if you want a narrow border, change it sizes to something like 4.75" and 6.75". This will give you a 1/8" space all the away around the picture. Click on the picture preview in the main part and another control will show where you can zoom in if you want and you can drag the picture around to better fit the frame.
 
Register on MacRumors! This sidebar will go away, and you'll see fewer ads.