Become a MacRumors Supporter for $50/year with no ads, ability to filter front page stories, and private forums.

cellularmitosis

macrumors regular
Original poster
Mar 6, 2010
152
246
I thought I'd start a thread about how to develop applications for PowerPC Macs running Tiger and Leopard, as I learn to do so.

(I know there is a programming-specific sub-forum here, but that's really oriented towards modern macOS / iOS development, so I figured this sub-forum is a better fit for PowerPC-specific retrodev.)

We'll use Leopard and Xcode 3.1.4 as our development environment, but modify the project settings to ensure compatibility with Tiger.

License​


Note: regardless of the "All rights reserved" notices which Xcode automatically inserts into each file, I hereby release all of the code posted in this thread under the MIT license. (MIT is basically "public domain but you can't sue me").

Install Xcode​


The first step, of course is installing Xcode 3.1.4. This is available via https://macintoshgarden.org/apps/apple-xcode (download #10), and surprisingly is still available via Apple at https://developer.apple.com/service...eveloper_tools/xcode314_2809_developerdvd.dmg (by way of xcodereleases.com), but requires signing in to your Apple ID account.

(or, if you have leopard.sh installed, you can leopard.sh xcode-3.1.4)

Hello, world!​


As a first program, we'll use NSLog to write a command-line "Hello, world" program, but we don't need to create an Xcode project for this.

Create a main.m file:

Objective-C:
#import <Foundation/Foundation.h>

int main(int argc, char** argv) {
    NSLog(@"Hello, world!");
    return 0;
}

This program simply imports Foundation (needed for NSLog), logs "Hello, world!", and exits.

To compile this program run gcc -framework Foundation main.m.

However, to make a "run anywhere" binary, we will build for G3 processors and target the 10.4 SDK:

Code:
gcc -Wall -framework Foundation -mmacosx-version-min=10.4 -mcpu=750 main.m

The resulting binary will be called a.out and can be run in the terminal via ./a.out

Code:
$ ./a.out
2023-03-15 23:41:51.204 a.out[53570:10b] Hello, world!

We'll create a Makefile to capture this build process:

Code:
run: a.out
    ./a.out
.PHONY: run

a.out: main.m
    gcc -Wall -framework Foundation -mmacosx-version-min=10.4 -mcpu=750 main.m

clean:
    rm -f a.out
.PHONY: clean

(note: the indentation in Makefiles needs to be actual tab characters, this forum substitutes four spaces in the above code snippet.).

Now we can run make a.out, make run and make clean. Or if you just type make it will build and run.
 

Attachments

  • nslog-no-xcode.zip
    4.3 KB · Views: 98
Last edited:

f54da

macrumors 6502a
Dec 22, 2021
504
186
One nice trick if you're trying to compile objective-c apps that make user of newer SDK headers is that you can make use of categories to effectively implement a polyfill similar to how you would for JS. This works well for things like some NSString operations that were only added in 10.10 sdk.

Also you probably can use ever newer SDKs, so long as you set mmacosx-version-min xcode should warn against any functions that are only available on newer versions. With newer sdks you might have to fiddle around a bit more to disable features like ARC though, since I understand that's only available on 10.6 onward.
 
  • Like
Reactions: cellularmitosis

cellularmitosis

macrumors regular
Original poster
Mar 6, 2010
152
246

A First Xcode Project​


Now we'll make the same "Hello, world" program as an Xcode project.

In Xcode, select File -> New Project, and create a new "Foundation Tool" from the "Command Line Utility" section:

Picture 2.png


After creating the Xcode project, go Project -> Edit Project Settings:
  • Under "General", change the project format to "Xcode 2.4-compatible"
  • Under "General", change the Base SDK to "Mac OS X 10.4"
Picture 9.png

Optionally, you can remove the Intel targets from "Valid Architectures" under the "Build" tab:

Picture 5.png


Picture 6.png


Under "Implementation Files", find the sole .m file in this project, which contains the main function:

Picture 10.png

In this case, Xcode has already filled in a "Hello, world" call to NSLog for us, so we don't need to write any additional code.

Click "Build and Go" and observe the output in the Console:

Picture 11.png

If the console doesn't come up automatically, go Run -> Console.

Running the CLI app from Terminal​


The compiled command-line application will be under the build/Debug/ directory, with the same name as the project.

We can run it directly from Terminal:

Code:
$ ./build/Debug/NSLogCLIDemo
2023-03-16 00:44:41.284 NSLogCLIDemo[54172:10b] Hello, World!

Using xcodebuild​


We can build the app from the command-line using xcodebuild:

Code:
$ cd NSLogCLIDemo
$ xcodebuild build

To target G3 processors running 10.4, we would run:

Code:
xcodebuild -configuration Release build SDKROOT="macosx10.4" ARCHS="ppc"

The resulting binary will end up in build/Release/.

We can capture this in a Makefile:

Code:
demo=NSLogCLIDemo

run: build_tiger_g3
    ./$(demo)/build/Release/$(demo)
.PHONY: run

build_tiger_g3:
    cd $(demo) && xcodebuild -configuration Release build SDKROOT="macosx10.4" ARCHS="ppc"
.PHONY: build_tiger_g3

clean:
    cd $(demo) && xcodebuild clean
.PHONY: clean

Docs:
 

Attachments

  • nslog-cli.zip
    43.1 KB · Views: 92
Last edited:

cellularmitosis

macrumors regular
Original poster
Mar 6, 2010
152
246

The Apple Developer Connection Reference Library​


Apple produced a monumental amount of developer documentation, but resurrecting it from internet bitrot takes a bit of effort.

I've taken a copy of the reference library from the last ADC DVD set before the library was re-oriented towards Snow Leopard, put it up on github (with all of the sample code .zip files expanded for online browsing) and made it browseable via plain HTTP at http://leopard-adc.pepas.com/

I've also corrected all of the "Featured Article" links (which are all long-since defunct links to developer.apple.com) to point to copies from the Internet Archive via the Wayback machine.

Picture 12.png
 
Last edited:

barracuda156

macrumors 68020
Sep 3, 2021
2,322
1,534
Also you probably can use ever newer SDKs, so long as you set mmacosx-version-min xcode should warn against any functions that are only available on newer versions. With newer sdks you might have to fiddle around a bit more to disable features like ARC though, since I understand that's only available on 10.6 onward.

An immediate problem is that the last SDK to support PPC is 10.6.x. Nothing newer would work, unless you do some extensive modifications.
 

f54da

macrumors 6502a
Dec 22, 2021
504
186
@barracuda156
>Immediate problem is that the last SDK to support PPC is 10.6.x

That's interesting, latest clang should still support ppc though right? (maybe if not the xcode copy, then the one built from source yourself). Although I do remember there was a switch from gcc to clang somewhere around snow-leopard days (and hence switch of c++ stdlib) so maybe it's more hassle to get it working than it's worth with a newer sdk.
 

barracuda156

macrumors 68020
Sep 3, 2021
2,322
1,534
@barracuda156
>Immediate problem is that the last SDK to support PPC is 10.6.x

That's interesting, latest clang should still support ppc though right? (maybe if not the xcode copy, then the one built from source yourself). Although I do remember there was a switch from gcc to clang somewhere around snow-leopard days (and hence switch of c++ stdlib) so maybe it's more hassle to get it working than it's worth with a newer sdk.

Clangs are totally broken for PPC, they won’t work even with a correct SDK.
libcxx might be possible to fix for PPC – but to use it with GCC.
 
  • Like
Reactions: f54da

joevt

macrumors 604
Jun 21, 2012
6,969
4,262
An immediate problem is that the last SDK to support PPC is 10.6.x. Nothing newer would work, unless you do some extensive modifications.
I think you need to use 10.5 SDK if you want to target ppc64. Rosetta (Intel Mac 10.4 - 10.6) only supports ppc.

I've been working on forks of pciutils, directhw, flashrom, AllRez (command line utils and kext) to try to get them compilable and working in all versions of Mac OS X from 10.4 to 13 and for all architectures (ppc, ppc64, i386, x86_64, arm64 or arm64e). I still need to check-in the changes for AllRez, and update an issue with flashrom.

pciutils is pretty simple. I think the version compiled in Xcode for 10.6 works in all Intel/PPC macOS versions. The version compiled in Xcode for macOS 11 or later can work for any version of Intel/Arm. Something in the directhw kext makes pciutils lspci/setpci unusable on Apple Silicon. Hopefully it's just a bug or it can be fixed with a workaround or modification. Or it could be that what I want it to do is not possible on Apple Silicon.

AllRez uses C++ and the lowest working macOS target is 10.9 for the latest Xcode for macOS 13 because of std c++. I still need to test 10.6 to 10.9.

I have a header MacOSMacros.h to determine what SDK is being compiled. It has warnings to show what SDK and architecture are being compiled - it makes it easier to determine what build other warnings are referring to. You need to know what SDK you are compiling with if you want to use functions or constants or whatever that might not exist in all the SDKs you want to compile with. Unless there's a better way?

To target G3 processors running 10.4, we would run:

Code:
xcodebuild -configuration Release build SDKROOT="macosx10.4" ARCHS="ppc"
I like that you can specify all that in the xcodebuild command. I've been creating Xcode projects for each version of macOS I want to build with but maybe that's not necessary with the xcodebuild command... Is it safe to use an Xcode project created in macOS 13 with Xcode for 10.5? Settings that old Xcode doesn't understand are not removed so maybe it's ok. But settings that Xcode does know about that have values that Xcode doesn't understand might be a problem. Is the xcodebuild command able to override any project setting or just some of them?
 

cellularmitosis

macrumors regular
Original poster
Mar 6, 2010
152
246

A First GUI Application​


Create a new Xcode project, this time a "Cocoa Application" from the "Application" menu:

Picture 13.png

Perform the same project settings adjustments from the last project (Xcode-2.4 project format, 10.4 as the Base SDK). In fact, just assume should do that for every project from here forward.

Edit main.m to look like this:

Objective-C:
#import <Cocoa/Cocoa.h>

@interface BlueView: NSView
@end

@implementation BlueView
- (void)drawRect:(NSRect)rect {
    [[NSColor blueColor] setFill];
    NSRectFill(rect);
    [super drawRect:rect];
}
@end

@interface AppDelegate: NSObject
- (void)applicationWillBecomeActive:(NSNotification *)aNotification;
@end

@implementation AppDelegate
- (void)applicationWillBecomeActive:(NSNotification *)aNotification {
    NSLog(@"%@", NSStringFromSelector(_cmd));
    NSWindow* window = [[NSApplication sharedApplication] keyWindow];
    if ([[window contentView] isKindOfClass:[BlueView class]] == NO) {
        NSView* blueView = [[[BlueView alloc] init] autorelease];
        [window setContentView:blueView];
    }
}
@end

int main(int argc, char *argv[])
{
    NSAutoreleasePool* pool = [[NSAutoreleasePool alloc] init];
    AppDelegate* delegate = [[AppDelegate alloc] init];
    [[NSApplication sharedApplication] setDelegate:delegate];
    int ret = NSApplicationMain(argc,  (const char **) argv);
    [pool release];
    return ret;
}

Click "Build and Go" and you should see a blue window:

Picture 14.png

Programmatic GUI Construction​


In this code, we:
  • Define BlueView (a subclass of NSView), which paints its entire contents blue.
  • Define AppDelegate, which listens for the applicationWillBecomeActive delegate callback from NSApplication.
  • Use applicationWillBecomeActive as a hook to programmatically setup our GUI. This is a theme I'll be following through this devlog -- constructing the views in code rather than using Interface Builder whenever possible.
  • In main(), setup an NSAutoreleasePool, create and connect the AppDelegate, and start the main runLoop by calling NSApplicationMain().
We'll use a Makefile similar to the previous project. Note that this time we use open to run the application.

Code:
demo=BlueViewDemo

run: build_tiger_g3
    open $(demo)/build/Release/$(demo).app
.PHONY: run

build_tiger_g3:
    cd $(demo) && xcodebuild -configuration Release build SDKROOT="macosx10.4" ARCHS="ppc"
.PHONY: build_tiger_g3

clean:
    cd $(demo) && xcodebuild clean
.PHONY: clean

Docs:
 

Attachments

  • blue-view-demo.zip
    53.9 KB · Views: 92
Last edited:
  • Like
Reactions: G4fanboy

f54da

macrumors 6502a
Dec 22, 2021
504
186
>constructing the views in code rather than using Interface Builder whenever possible.

Whenever I try using interface builder to do some gui programming I'm reminded why I don't do any GUI programming. There are so many hidden settings you have to set in order to simply connect a gui widget to the code (outlet? nib? file owner?), and whose idea was it to store these bindings in an inscrutable binary format. Say what you will about the state of web programming, at least basic binding between DOM and JS is trivial. I really wish there was a similar model for coca (there's already an implicit object hierarchy for the gui widgets as I understand, it's just not exposed to code in a clean manner). Probably some of the newer swift stuff (storyboards?) goes with this approach but none of that works on older OSs.

I will say that autolayout/constraint solving is way better than CSS though.
 
  • Like
Reactions: mmphosis

barracuda156

macrumors 68020
Sep 3, 2021
2,322
1,534
I think you need to use 10.5 SDK if you want to target ppc64. Rosetta (Intel Mac 10.4 - 10.6) only supports ppc.

This is unfortunately correct. Neither native 10.6 PPC nor 10.6.x Rosetta have needed ppc64 slices.

P. S. It would be a tremendous breakthrough if someone could eventually restore ppc64 into 10.6. As often, only Iain could do that, but he has no time to :(
 

AphoticD

macrumors 68020
Feb 17, 2017
2,283
3,467
Great thread! Thank you for taking the time to document this.

There are going to be lots of things to consider when working across such a wide stretch of OS X versions, and often developers are not writing interfaces programmatically.

So, in some cases it will be possible to backport an xcodeproj (such as from a github repo or your own macOS/OS X projects) into an earlier version of Xcode (like v2.5 in Tiger) to build and run on PowerPC.

You can take the time to refactor the ObjC-2.0 style @Property, @synthesize, etc syntax, and manually write out accessors in the old ObjC-1.0 style, replace dot syntax with brackets, etc, setup NSEnumerators in place of for enumeration syntax.

You'll work out ways to achieve functionality and methods that didn't exist in the older SDKs through compiler ifdefs, polyfills as previously mentioned and testing objects for respondsToSelector: to determine special cases for the older OSes. But, when it comes to porting a XIB/NIB from a later format, you need to find a way to convert it down to the older OS.

You'll want to use a chain of Xcode/Interface Builder versions to step down the version compatibility. I have a few Mac minis with different version of the OS, but you could also use VMs to achieve the same thing.

  1. Catalina Xcode 12.4 and High Sierra Xcode 10.1 can both save XIB formats to open in Xcode 8.x.
  2. El Capitan Xcode 8.2.1 can save a XIB in an Xcode 7.x compatible format.
  3. El Capitan can also run Xcode 7.3.1 which can save in an Xcode 5.1 format. [modified step]
  4. Mountain Lion can run Xcode 5.1.1 which can save in an Xcode 4.6 format. [added step]
  5. Lion can run Xcode 4.6.3 which can save in any Xcode 4.x format, in addition to Interface Builder 3.2 (Snow) format, and IB 3.1 or 3.0 (Leopard) formats. [added step]
  6. Snow Leopard can run Xcode 4.2 which will allow you to save the XIB in the IB 3.2.x format. [step not needed]
  7. Snow Leopard can also run Xcode 3.2.6 (and Interface Builder 3.2.6) which will allow you to save the XIB in the IB 3.1 format (compatible with Leopard). [step not needed]
  8. Leopard runs Xcode 3.1.4 (and Interface Builder 3.1.4) which allows you to save the XIB as a NIB in the IB 2.x format
  9. Tiger runs Xcode 2.5 and (and Interface Builder 2.5) which can compile for Panther, and also save in the "Legacy 10.2" NIB format, which can then potentially build and run on Jaguar or Puma.
(Note: Xcode 4.6.3 can also perform a "Save As..." to convert between the XIB (default) and NIB formats in addition to saving for Xcode 3.1)

This is not going to work 100% of the time, but even if you only need to partially rebuild/reconnect things it might be more helpful than trying to manually rebuild a nib on Tiger while referencing a xib in El Cap (I've done that).

Tiger's Interface Builder 2.5 has a "Compatibility Checking" feature which you can use to see what will break specifically on Panther, Jaguar, etc in your interfaces and allow you to change the specifics to make it more compatible.

Keep the tips and tricks coming!

EDIT (22 March, 2023): I was tackling some conversions and came across the need to run both Lion and Mountain Lion as bridges between El Cap and Snow Leopard/Leopard Xcode / XIB formats. So I have added and modified the steps above.
 
Last edited:

barracuda156

macrumors 68020
Sep 3, 2021
2,322
1,534
Great thread! Thank you for taking the time to document this.

There are going to be lots of things to consider when working across such a wide stretch of OS X versions, and often developers are not writing interfaces programmatically.

So, in some cases it will be possible to backport an xcodeproj (such as from a github repo or your own macOS/OS X projects) into an earlier version of Xcode (like v2.5 in Tiger) to build and run on PowerPC.

You can take the time to refactor the ObjC-2.0 style @Property, @synthesize, etc syntax, and manually write out accessors in the old ObjC-1.0 style, replace dot syntax with brackets, etc, setup NSEnumerators in place of for enumeration syntax.

You'll work out ways to achieve functionality and methods that didn't exist in the older SDKs through compiler ifdefs, polyfills as previously mentioned and testing objects for respondsToSelector: to determine special cases for the older OSes. But, when it comes to porting a XIB/NIB from a later format, you need to find a way to convert it down to the older OS.

You'll want to use a chain of Xcode/Interface Builder versions to step down the version compatibility. I have a few Mac minis with different version of the OS, but you could also use VMs to achieve the same thing.

  1. Catalina Xcode 12.4 and High Sierra Xcode 10.1 can both save XIB formats to open in Xcode 8.x.
  2. El Capitan Xcode 8.2.1 can save a XIB in an Xcode 7.x compatible format.
  3. El Capitan can also run Xcode 7.3.1 which can save in an Xcode 4.x format.
  4. Snow Leopard can run Xcode 4.2 which will allow you to save the XIB in the IB 3.2.x format.
  5. Snow Leopard can also run Xcode 3.2.6 (and Interface Builder 3.2.6) which will allow you to save the XIB in the IB 3.x format (compatible with Leopard).
  6. Leopard runs Xcode 3.1.4 (and Interface Builder 3.1.4) which allows you to save the XIB as a NIB in the IB 2.x format
  7. Tiger runs Xcode 2.5 and (and Interface Builder 2.5) which can compile for Panther, and also save in the "Legacy 10.2" NIB format, which can then potentially build and run on Jaguar or Puma.
This is not going to work 100% of the time, but even if you only need to partially rebuild/reconnect things it might be more helpful than trying to manually rebuild a nib on Tiger while referencing a xib in El Cap (I've done that).

Tiger's Interface Builder 2.5 has a "Compatibility Checking" feature which you can use to see what will break specifically on Panther, Jaguar, etc in your interfaces and allow you to change the specifics to make it more compatible.

Keep the tips and tricks coming!

Could you help with backporting XIBs from R-app (R GUI) to Xcode 3.1.4?
Otherwise now we need to replace them with older ones: https://github.com/macports/macports-ports/blob/master/math/R-app/Portfile
Source is here: Mac-GUI-1.78.tar.gz
 
  • Like
Reactions: AphoticD

cellularmitosis

macrumors regular
Original poster
Mar 6, 2010
152
246

Performing an HTTP GET Request​


Network requests are fundamental to modern applications. In Cocoa we can do this with NSURLConnection.

The dumb-simple place to start is with a synchronous request via sendSynchronousRequest.

For this, we don't even need an Xcode project. Create main.m:

Objective-C:
#import <Foundation/Foundation.h>
#include <stdio.h>

// GET the contents of an HTTP URL and print it to stdout.

int main(int argc, char** argv) {
    NSAutoreleasePool* pool = [[NSAutoreleasePool alloc] init];

    NSString* urlString = @"http://leopard.sh/README.txt";
    if (argc > 1) {
        urlString = [NSString stringWithCString:argv[1]
                                       encoding:NSASCIIStringEncoding];
    }
    NSURL* url = [NSURL URLWithString:urlString];
    NSURLRequest* request = [NSURLRequest requestWithURL:url];

    NSURLResponse* response = nil;
    NSError* error = nil;
    NSData* data = [NSURLConnection sendSynchronousRequest:request
                                         returningResponse:&response
                                                     error:&error];

    int exitStatus = 0;
    if (error != nil) {
        NSLog(@"Error: %@", error);
        exitStatus = 1;
    } else if (data != nil) {
        NSString* string = [[NSString alloc] initWithData:data
                                                 encoding:NSASCIIStringEncoding];
        printf([string UTF8String]);
        [string release];
    }

    [pool release];
    return exitStatus;
}

and a Makefile:

Code:
run: a.out
    ./a.out

a.out: main.m
    gcc -Wall -framework Foundation -mmacosx-version-min=10.4 -mcpu=750 main.m

clean:
    rm -f a.out
.PHONY: clean

You can run ./a.out to fetch and print the leopard.sh README, or pass it a (non-HTTPS) URL, i.e. ./a.out http://frogfind.com:

Code:
$ ./a.out http://frogfind.com
<!DOCTYPE HTML PUBLIC "-//W3C//DTD HTML 2.0//EN">
<meta http-equiv="Content-Type" content="text/html; charset=utf-8">

<html>
<head>
    <title>FrogFind!</title>
</head>
<body>

    <br><br><center><h1><font size=7><font color="#008000">Frog</font>Find!</font></h1></center>
    <center><img src="/img/frogfind.gif" width="174" height="80" alt="a pixelated cartoon graphic of a fat, lazy, unamused frog with a keyboard in front of them, awaiting your search query"></center>
    <center><h3>The Search Engine for Vintage Computers</h3></center>
    <br><br>
    <center>
    <form action="/" method="get">
    Leap to: <input type="text" size="30" name="q"><br>
    <input type="submit" value="Ribbbit!">
    </center>
    <br><br><br>
    <small><center>Built by <b><a href="https://youtube.com/ActionRetro" target="_blank" rel="noopener">Action Retro</a></b> on YouTube | Logo by <b><a href="https://www.youtube.com/mac84"  target="_blank" rel="noopener">Mac84</a></b> | <a href="about.php">Why build such a thing?</a></center><br>
    <small><center>Powered by DuckDuckGo</center></small>
</form>

</body>
</html>
 

Attachments

  • nsurlconnection-sync-no-xcode.zip
    1.8 KB · Views: 144
Last edited:

cellularmitosis

macrumors regular
Original poster
Mar 6, 2010
152
246

An Asynchronous HTTP GET Request​


While the above example is simple, making synchronous requests isn't acceptable in the context of Cocoa because if we block the main thread, the application becomes unresponsive during the request.

Instead, we use an asynchronous request, which requires creating a NSURLConnection delegate.

As before, in Xcode, select File -> New Project, and create a new "Foundation Tool" from the "Command Line Utility" section.

Edit the implementation .m file to look like this:

Objective-C:
#import <Foundation/Foundation.h>
#include <stdio.h>

BOOL g_running = YES;
int g_exitStatus = 0;

@interface URLDelegate: NSObject
- (void)connection:(NSURLConnection *)connection didFailWithError:(NSError *)error;
- (void)connection:(NSURLConnection *)connection didReceiveData:(NSData *)data;
- (void)connection:(NSURLConnection *)connection didReceiveResponse:(NSURLResponse *)response;
- (void)connectionDidFinishLoading:(NSURLConnection *)connection;
@end

@implementation URLDelegate

- (void)connection:(NSURLConnection *)connection didReceiveResponse:(NSURLResponse *)response {
//    NSLog(@"didReceiveResponse: %@", response);
}

- (void)connection:(NSURLConnection *)connection didReceiveData:(NSData *)data {
    NSString* string = [[NSString alloc] initWithData:data
                                             encoding:NSASCIIStringEncoding];
//    NSLog(@"didReceiveData: %u bytes:\n", [data length]);
    printf([string UTF8String]);
    [string release];
}

- (void)connection:(NSURLConnection *)connection didFailWithError:(NSError *)error {
    NSLog(@"didFailWithError: %@", error);
    g_exitStatus = 1;
    g_running = NO;
}

- (void)connectionDidFinishLoading:(NSURLConnection *)connection {
//    NSLog(@"connectionDidFinishLoading");
    g_running = NO;
}

@end

int main(int argc, char *argv[]) {
    NSAutoreleasePool* pool = [[NSAutoreleasePool alloc] init];
   
    NSString* urlString = @"http://leopard.sh/README.txt";
    if (argc > 1) {
        urlString = [NSString stringWithCString:argv[1]
                                       encoding:NSASCIIStringEncoding];
    }
    NSURL* url = [NSURL URLWithString:urlString];
    NSURLRequest* request = [NSURLRequest requestWithURL:url];
   
    URLDelegate* delegate = [[URLDelegate alloc] init];
    [NSURLConnection connectionWithRequest:request delegate:delegate];
   
    while (g_running) {
        [[NSRunLoop currentRunLoop] runMode:NSDefaultRunLoopMode
                                 beforeDate:[NSDate distantFuture]];
    }
    [pool release];
    return g_exitStatus;
}

and a Makefile:

Code:
demo=NSURLConnectionDemo

run: build_tiger_g3
    ./$(demo)/build/Release/$(demo)
.PHONY: run

build_tiger_g3:
    cd $(demo) && xcodebuild -configuration Release build SDKROOT="macosx10.4" ARCHS="ppc"
.PHONY: build_tiger_g3

clean:
    cd $(demo) && xcodebuild clean
.PHONY: clean

We can run this version in the same way as the synchronous example, e.g. $ ./build/Release/NSURLConnectionDemo http://frogfind.com.

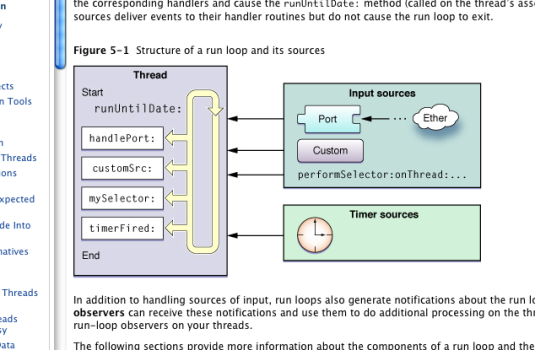
This program behaves differently than the synchronous version:
  • The call to connectionWithRequest starts the request and returns immediately, so the program execution continues into the while loop before the request has finished.
  • Because of this, we need to listen for callbacks via the delegate interface of NSURLConnection in order to get the results of the request. The connection calls into our code as the request progresses.
  • However, the connection is executing in the context of a runLoop, and in the case of a CLI application, we need to pump the loop manually via calls to runMode. In a GUI application, this would be handled for us by a call to NSApplicationMain.
runloop.jpg
 

Attachments

  • Picture 15.png
    Picture 15.png
    93.9 KB · Views: 83
  • nsurlconnection-cli-get.zip
    46.2 KB · Views: 84
Last edited:

Slix

macrumors 68000
Mar 24, 2010
1,600
2,413
While I have nothing to contribute to this thread currently, I wanted to say thanks for helping us along in this journey of Tiger/Leopard development! I have always wondered how actually difficult it would be to create some simple apps, but never really tried anything, so this is cool to read.

Any chance you're able to dig into making iPhone apps for vintage iOS versions too someday? :) It would be cool to make a companion app in some situations probably.
 
  • Like
Reactions: cellularmitosis

cellularmitosis

macrumors regular
Original poster
Mar 6, 2010
152
246
Any chance you're able to dig into making iPhone apps for vintage iOS versions too someday?
Ah, if I'm being honest I'd say the chances are low. I'd be happy to make a companion app for modern iPhones though!
 
  • Like
Reactions: Slix

cellularmitosis

macrumors regular
Original poster
Mar 6, 2010
152
246

Basic Layout with AutoresizingMask​


Now let's do some basic layout.

We'll create an app which:
  • Has a main NSWindow.
  • Has a blue ColorView which should always be the same size as the window.
  • Has a green ColorView which stays inset by 16px within the blue view.
Create a new Cocoa application, and edit main.m:

Objective-C:
#import <Cocoa/Cocoa.h>


NSRect Bounds(NSRect rect) {
    return NSMakeRect(0, 0, rect.size.width, rect.size.height);
}


// MARK: - ColorView

@interface ColorView: NSView {
    NSColor* _color;
}
- (NSColor*)color;
- (void)setColor:(NSColor*)color;
@end

@implementation ColorView
- (id)initWithFrame:(NSRect)frame {
    self = [super initWithFrame:frame];
    if (self == nil) {
        return nil;
    }
    [self setColor:[NSColor whiteColor]];
    return self;
}

- (NSColor*)color {
    return _color;
}

- (void)setColor:(NSColor*)newColor {
    [_color release];
    _color = newColor;
    [_color retain];
    [self setNeedsDisplay:YES];
}

- (void)drawRect:(NSRect)rect {
    [_color setFill];
    NSRectFill(rect);
    [super drawRect:rect];
}
@end


// MARK: - MainView

@interface MainView: NSView {
    ColorView* _blueView;
    ColorView* _greenView;
}
@end

@implementation MainView
- (id)initWithFrame:(NSRect)frame {
    NSLog(@"%@", NSStringFromSelector(_cmd));
    self = [super initWithFrame:frame];
    if (self == nil) {
        return nil;
    }

    _blueView = [[ColorView alloc] initWithFrame:Bounds(frame)];
    [_blueView setColor:[NSColor blueColor]];
    [self addSubview:_blueView];
    [_blueView setAutoresizingMask:NSViewWidthSizable|NSViewHeightSizable];

    NSRect greenFrame = NSInsetRect(Bounds(frame), 16, 16);
    _greenView = [[ColorView alloc] initWithFrame:greenFrame];
    [_greenView setColor:[NSColor greenColor]];
    [self addSubview:_greenView];
    [_greenView setAutoresizingMask:NSViewWidthSizable|NSViewHeightSizable];

    return self;
}
@end


// MARK: - AppDelegate

@interface AppDelegate: NSObject
- (void)applicationWillBecomeActive:(NSNotification *)aNotification;
@end

@implementation AppDelegate
- (void)applicationWillBecomeActive:(NSNotification *)aNotification {
    NSLog(@"%@", NSStringFromSelector(_cmd));
    NSWindow* window = [[[NSApplication sharedApplication] windows] objectAtIndex:0];
    if ([[window contentView] isKindOfClass:[MainView class]] == NO) {
        MainView* mainView = [[MainView alloc] initWithFrame:[[window contentView] frame]];
        [window setContentView:mainView];
    }
}
@end


// MARK: - main

int main(int argc, char *argv[]) {
    NSAutoreleasePool* pool = [[NSAutoreleasePool alloc] init];
    AppDelegate* delegate = [[AppDelegate alloc] init];
    [[NSApplication sharedApplication] setDelegate:delegate];
    int exitStatus = NSApplicationMain(argc, (const char **)argv);
    [pool release];
    return exitStatus;
}

and a Makefile:

Code:
demo=LayoutDemo1

run: build_tiger_g3
    open $(demo)/build/Release/$(demo).app
.PHONY: run

build_tiger_g3:
    cd $(demo) && xcodebuild -configuration Release build SDKROOT="macosx10.4" ARCHS="ppc"
.PHONY: build_tiger_g3

clean:
    cd $(demo) && xcodebuild clean
.PHONY: clean

Click "Build and Go" and you should see this:

Picture 16.png

Now, we can resize the window and the green view stays inset by 16px:

Picture 17.png


Picture 18.png


The Code​


First, notice that we abstracted the BlueView from our previous example as ColorView, which can be set to any color.

Next, note that we define a MainView, which owns the blue and green views and encapsulates all of our layout logic.

A concept fundamental to Cocoa layout is the difference between a view's frame and its bounds:

nsview_framebounds1.jpg


Here, we've defined a convenience Bounds function which returns a copy of a frame with a zero'ed origin using NSMakeRect. For the blue view, we want it to take up the entire area of MainView, so we give it a frame of Bounds(frame). For the green view, because we want it to be inset, we give it a frame of NSInsetRect(Bounds(frame), 16, 16) (docs).

The key to the resizing behavior are the calls to setAutoresizingMask with a mask value of NSViewWidthSizable|NSViewHeightSizable.

Finally, as before, we use an AppDelegate as a hook to programmatically construct our views.
 

Attachments

  • layout1.zip
    54 KB · Views: 93
Last edited:

cellularmitosis

macrumors regular
Original poster
Mar 6, 2010
152
246

Advanced Layout​


Now we're going to develop some extensions to NSView which allow for a layout mechanism similar to the modern Autolayout system of setting up constraints using "Anchor" points, but which actually relies on frame adjustments and NSAutoresizingMask under the hood.

We'll end up with this demo application:

Picture 22.png

As the window is resized:
  • The green view maintains a constant inset margin from the blue view
  • The red views maintain a constant size and stay pinned near each corner
  • The yellow views change their height
  • the cyan views change their width
  • the magenta view changes its width and height
Picture 23.png

Picture 24.png


Like last time, create a new Cocoa application, and put all of the following code snippets into main.m.

(Note that the completed Xcode project, main.m and Makefile are attached as a .zip file).

Objective-C:
#import <Cocoa/Cocoa.h>

#define ViewLeftMargin (NSViewMinXMargin)
#define ViewRightMargin (NSViewMaxXMargin)
#define ViewBottomMargin (NSViewMinYMargin)
#define ViewTopMargin (NSViewMaxYMargin)

const NSRect RectZero = { 0, 0, 0, 0 };
const NSPoint PointZero = { 0, 0 };

NSRect Bounds(NSRect rect) {
    return NSMakeRect(0, 0, rect.size.width, rect.size.height);
}

Above, we set up a few defines, constants, etc for convenience.

Objective-C:
enum {
    YAnchorTop=100,
    YAnchorCenter,
    YAnchorBottom,
};
typedef int YAnchor;

enum {
    XAnchorLeft=200,
    XAnchorCenter,
    XAnchorRight,
};
typedef int XAnchor;

@interface NSView (Layout)
- (void)yAlign:(YAnchor)anchor to:(YAnchor)otherAnchor of:(NSView*)otherView margin:(float)margin;
- (void)xAlign:(XAnchor)anchor to:(XAnchor)otherAnchor of:(NSView*)otherView margin:(float)margin;
- (void)yStretch:(YAnchor)anchor to:(YAnchor)otherAnchor of:(NSView*)otherView margin:(float)margin;
- (void)xStretch:(XAnchor)anchor to:(XAnchor)otherAnchor of:(NSView*)otherView margin:(float)margin;
@end

@implementation NSView (Layout)

- (void)yAlign:(YAnchor)anchor to:(YAnchor)otherAnchor of:(NSView*)otherView margin:(float)margin {
    NSPoint relativeOffset = [[self superview] convertPoint:PointZero fromView:otherView];
    float newY = 0 + relativeOffset.y;
    if (anchor == YAnchorBottom) {
        newY += margin;
    } else if (anchor == YAnchorTop) {
        newY -= [self bounds].size.height;
        newY -= margin;
    } else if (anchor == YAnchorCenter) {
        newY -= [self bounds].size.height / 2;
        newY -= margin;
    }
    if (otherAnchor == YAnchorTop) {
        newY += [otherView bounds].size.height;
    } else if (otherAnchor == YAnchorCenter) {
        newY += [otherView bounds].size.height / 2;
    }
    [self setFrameOrigin:NSMakePoint([self frame].origin.x, newY)];
}

- (void)xAlign:(XAnchor)anchor to:(XAnchor)otherAnchor of:(NSView*)otherView margin:(float)margin {
    NSPoint relativeOffset = [[self superview] convertPoint:PointZero fromView:otherView];
    float newX = 0 + relativeOffset.x;
    if (anchor == XAnchorLeft) {
        newX += margin;
    } else if (anchor == XAnchorRight) {
        newX -= [self bounds].size.width;
        newX -= margin;
    } else if (anchor == XAnchorCenter) {
        newX -= [self bounds].size.width / 2;
        newX -= margin;
    }
    if (otherAnchor == XAnchorRight) {
        newX += [otherView bounds].size.width;
    } else if (otherAnchor == XAnchorCenter) {
        newX += [otherView bounds].size.width / 2;
    }
    [self setFrameOrigin:NSMakePoint(newX, [self frame].origin.y)];
}

- (void)yStretch:(YAnchor)anchor to:(YAnchor)otherAnchor of:(NSView*)otherView margin:(float)margin {
    if (anchor == YAnchorBottom) {
        float oldY = [self frame].origin.y;
        [self yAlign:anchor to:otherAnchor of:otherView margin:margin];
        float newY = [self frame].origin.y;
        float deltaHeight = oldY - newY;
        float newHeight = [self bounds].size.height + deltaHeight;
        [self setFrameSize:NSMakeSize([self bounds].size.width, newHeight)];
    } else if (anchor == YAnchorCenter) {
        [[NSException exceptionWithName:@"NotImplemented" reason:@"yStretch using YAnchorCenter has not been implemented" userInfo:nil] raise];
    } else if (anchor == YAnchorTop) {
        NSPoint relativeOffset = [self convertPoint:PointZero fromView:otherView];
        float newHeight = relativeOffset.y;
        newHeight -= margin;
        if (otherAnchor == YAnchorTop) {
            newHeight += [otherView bounds].size.height;
        } else if (otherAnchor == YAnchorCenter) {
            newHeight += [otherView bounds].size.height / 2;
        }
        [self setFrameSize:NSMakeSize([self bounds].size.width, newHeight)];
    }
}

- (void)xStretch:(XAnchor)anchor to:(XAnchor)otherAnchor of:(NSView*)otherView margin:(float)margin {
    if (anchor == XAnchorLeft) {
        float oldX = [self frame].origin.x;
        [self xAlign:anchor to:otherAnchor of:otherView margin:margin];
        float newX = [self frame].origin.x;
        float deltaWidth = oldX - newX;
        float newWidth = [self bounds].size.width + deltaWidth;
        [self setFrameSize:NSMakeSize(newWidth, [self bounds].size.height)];
    } else if (anchor == XAnchorCenter) {
        [[NSException exceptionWithName:@"NotImplemented" reason:@"xStretch using XAnchorCenter has not been implemented" userInfo:nil] raise];
    } else if (anchor == XAnchorRight) {
        NSPoint relativeOffset = [self convertPoint:PointZero fromView:otherView];
        float newWidth = relativeOffset.x;
        newWidth -= margin;
        if (otherAnchor == XAnchorRight) {
            newWidth += [otherView bounds].size.width;
        } else if (otherAnchor == XAnchorCenter) {
            newWidth += [otherView bounds].size.width / 2;
        }
        [self setFrameSize:NSMakeSize(newWidth, [self bounds].size.height)];
    }
}

@end

Above is our layout implementation, which consists of:
  • Two enums: YAnchor and XAnchor, which define the "anchor" points we will use to describe the geometry of each layout operation.
  • Two methods for positioning views: xAlign:to:of:margin and yAlign:to:of:margin.
  • Two methods for resizing views: xStretch:to:of:margin and yStretch:to:of:margin.
Ultimately, these all boil down to calls to setFrameOrigin and setFrameSize, but all of the math is done for you :)

Objective-C:
// MARK: - ColorView

@interface ColorView: NSView {
    NSColor* _color;
}
- (NSColor*)color;
- (void)setColor:(NSColor*)color;
@end

@implementation ColorView
- (id)initWithFrame:(NSRect)frame {
    self = [super initWithFrame:frame];
    if (self == nil) {
        return nil;
    }
    [self setColor:[NSColor whiteColor]];
    return self;
}

- (NSColor*)color {
    return _color;
}

- (void)setColor:(NSColor*)newColor {
    [_color release];
    _color = newColor;
    [_color retain];
    [self setNeedsDisplay:YES];
}

- (void)drawRect:(NSRect)rect {
    [_color setFill];
    NSRectFill(rect);
    [super drawRect:rect];
}
@end

Above is our ColorView, unmodified from last time.

Objective-C:
// MARK: - MainView

@interface MainView: NSView {
    ColorView* _blueView;
    ColorView* _greenView;
    ColorView* _ulView; // upper-left
    ColorView* _clView; // center-left
    ColorView* _llView; // lower-left
    ColorView* _ucView; // upper-center
    ColorView* _ccView; // center-center
    ColorView* _lcView; // lower-center
    ColorView* _urView; // upper-right
    ColorView* _crView; // center-right
    ColorView* _lrView; // lower-right
}
@end

@implementation MainView
- (id)initWithFrame:(NSRect)frame {
    NSLog(@"%@, frame: %@", NSStringFromSelector(_cmd), NSStringFromRect(frame));
    self = [super initWithFrame:frame];
    if (self == nil) {
        return nil;
    }

    _blueView = [[ColorView alloc] initWithFrame:Bounds(frame)];
    [_blueView setColor:[NSColor blueColor]];
    [self addSubview:_blueView];
    [_blueView setAutoresizingMask:NSViewWidthSizable|NSViewHeightSizable];
 
    NSRect greenFrame = NSInsetRect(Bounds(frame), 32, 32);
    _greenView = [[ColorView alloc] initWithFrame:greenFrame];
    [_greenView setColor:[NSColor greenColor]];
    [self addSubview:_greenView];
    [_greenView setAutoresizingMask:NSViewWidthSizable|NSViewHeightSizable];

    _ulView = [[ColorView alloc] initWithFrame:NSMakeRect(0, 0, 32, 32)];
    [_ulView setColor:[NSColor redColor]];
    [self addSubview:_ulView];
    [_ulView yAlign:YAnchorTop to:YAnchorTop of:_greenView margin:16];
    [_ulView xAlign:XAnchorLeft to:XAnchorLeft of:_greenView margin:16];
    [_ulView setAutoresizingMask:ViewBottomMargin];

    _urView = [[ColorView alloc] initWithFrame:NSMakeRect(0, 0, 32, 32)];
    [_urView setColor:[NSColor redColor]];
    [self addSubview:_urView];
    [_urView yAlign:YAnchorTop to:YAnchorTop of:_greenView margin:16];
    [_urView xAlign:XAnchorRight to:XAnchorRight of:_greenView margin:16];
    [_urView setAutoresizingMask:ViewBottomMargin|ViewLeftMargin];
 
    _llView = [[ColorView alloc] initWithFrame:NSMakeRect(0, 0, 32, 32)];
    [_llView setColor:[NSColor redColor]];
    [self addSubview:_llView];
    [_llView yAlign:YAnchorBottom to:YAnchorBottom of:_greenView margin:16];
    [_llView xAlign:XAnchorLeft to:XAnchorLeft of:_greenView margin:16];
    [_llView setAutoresizingMask:ViewTopMargin];

    _lrView = [[ColorView alloc] initWithFrame:NSMakeRect(0, 0, 32, 32)];
    [_lrView setColor:[NSColor redColor]];
    [self addSubview:_lrView];
    [_lrView yAlign:YAnchorBottom to:YAnchorBottom of:_greenView margin:16];
    [_lrView xAlign:XAnchorRight to:XAnchorRight of:_greenView margin:16];
    [_lrView setAutoresizingMask:ViewTopMargin|ViewLeftMargin];
 
    _clView = [[ColorView alloc] initWithFrame:NSMakeRect(0, 0, 32, 32)];
    [_clView setColor:[NSColor yellowColor]];
    [self addSubview:_clView];
    [_clView yAlign:YAnchorTop to:YAnchorBottom of:_ulView margin:16];
    [_clView yStretch:YAnchorBottom to:YAnchorTop of:_llView margin:16];
    [_clView xAlign:XAnchorLeft to:XAnchorLeft of:_greenView margin:16];
    [_clView setAutoresizingMask:NSViewHeightSizable];

    _crView = [[ColorView alloc] initWithFrame:NSMakeRect(0, 0, 32, 32)];
    [_crView setColor:[NSColor yellowColor]];
    [self addSubview:_crView];
    [_crView yAlign:YAnchorTop to:YAnchorBottom of:_urView margin:16];
    [_crView yStretch:YAnchorBottom to:YAnchorTop of:_lrView margin:16];
    [_crView xAlign:XAnchorRight to:XAnchorRight of:_greenView margin:16];
    [_crView setAutoresizingMask:NSViewHeightSizable|ViewLeftMargin];
 
    _ucView = [[ColorView alloc] initWithFrame:NSMakeRect(0, 0, 32, 32)];
    [_ucView setColor:[NSColor cyanColor]];
    [self addSubview:_ucView];
    [_ucView yAlign:YAnchorTop to:YAnchorTop of:_greenView margin:16];
    [_ucView xAlign:XAnchorLeft to:XAnchorRight of:_ulView margin:16];
    [_ucView xStretch:XAnchorRight to:XAnchorLeft of:_urView margin:16];
    [_ucView setAutoresizingMask:ViewBottomMargin|NSViewWidthSizable];

    _lcView = [[ColorView alloc] initWithFrame:NSMakeRect(0, 0, 32, 32)];
    [_lcView setColor:[NSColor cyanColor]];
    [self addSubview:_lcView];
    [_lcView yAlign:YAnchorBottom to:YAnchorBottom of:_greenView margin:16];
    [_lcView xAlign:XAnchorLeft to:XAnchorRight of:_llView margin:16];
    [_lcView xStretch:XAnchorRight to:XAnchorLeft of:_lrView margin:16];
    [_lcView setAutoresizingMask:NSViewWidthSizable];

    _ccView = [[ColorView alloc] initWithFrame:NSMakeRect(0, 0, 32, 32)];
    [_ccView setColor:[NSColor magentaColor]];
    [self addSubview:_ccView];
    [_ccView yAlign:YAnchorTop to:YAnchorBottom of:_ucView margin:16];
    [_ccView yStretch:YAnchorBottom to:YAnchorTop of:_lcView margin:16];
    [_ccView xAlign:XAnchorLeft to:XAnchorRight of:_clView margin:16];
    [_ccView xStretch:XAnchorRight to:XAnchorLeft of:_crView margin:16];
    [_ccView setAutoresizingMask:NSViewWidthSizable|NSViewHeightSizable];

    return self;
}
@end

Above is our MainView.

I'll focus in on a few pieces in particular:

Objective-C:
    _ulView = [[ColorView alloc] initWithFrame:NSMakeRect(0, 0, 32, 32)];
    [_ulView setColor:[NSColor redColor]];
    [self addSubview:_ulView];
    [_ulView yAlign:YAnchorTop to:YAnchorTop of:_greenView margin:16];
    [_ulView xAlign:XAnchorLeft to:XAnchorLeft of:_greenView margin:16];
    [_ulView setAutoresizingMask:ViewBottomMargin];

Above is the "ul" view (the red view in the "upper-left" corner). This example is pretty straight-forward:
  • We use yAlign to move the top edge of _ulView to the top edge of _greenView, inset by 16px.
  • We use xAlign to move the left edge of _ulView to the left edge of _greenView, inset by 16px.
  • Finally, we set an AutoresizingMask of ViewBottomMargin to keep it pinned to the upper left corner
Objective-C:
    _ccView = [[ColorView alloc] initWithFrame:NSMakeRect(0, 0, 32, 32)];
    [_ccView setColor:[NSColor magentaColor]];
    [self addSubview:_ccView];
    [_ccView yAlign:YAnchorTop to:YAnchorBottom of:_ucView margin:16];
    [_ccView yStretch:YAnchorBottom to:YAnchorTop of:_lcView margin:16];
    [_ccView xAlign:XAnchorLeft to:XAnchorRight of:_clView margin:16];
    [_ccView xStretch:XAnchorRight to:XAnchorLeft of:_crView margin:16];
    [_ccView setAutoresizingMask:NSViewWidthSizable|NSViewHeightSizable];

Above is the "cc" view (the magenta view in the "center-center"). This is slightly more complex.
  • We use yAlign to move the top edge of _ccView to the bottom edge of _ucView (the "upper-center" cyan view), inset by 16px.
    We use yStretch to resize _ccView by pulling its bottom edge to the top edge of _lcView (the "lower-center" cyan view), inset by 16px.
  • Similarly, we use xAlign and xStretch to move and resize _ccView based on the left and right yellow views.
  • Finally, we use a resizing mask of NSViewWidthSizable | NSViewHeightSizable, causing the magenta view to resize as the window resizes.
Objective-C:
// MARK: - AppDelegate

@interface AppDelegate: NSObject
- (void)applicationWillBecomeActive:(NSNotification *)aNotification;
@end

@implementation AppDelegate
- (void)applicationWillBecomeActive:(NSNotification *)aNotification {
    NSLog(@"%@", NSStringFromSelector(_cmd));
    NSWindow* window = [[[NSApplication sharedApplication] windows] objectAtIndex:0];
    if ([[window contentView] isKindOfClass:[MainView class]] == NO) {
        MainView* mainView = [[MainView alloc] initWithFrame:[[window contentView] frame]];
        [window setContentView:mainView];
    }
}
@end


// MARK: - main

int main(int argc, char *argv[]) {
    NSAutoreleasePool* pool = [[NSAutoreleasePool alloc] init];
    AppDelegate* delegate = [[AppDelegate alloc] init];
    [[NSApplication sharedApplication] setDelegate:delegate];
    int exitStatus = NSApplicationMain(argc, (const char **)argv);
    [pool release];
    return exitStatus;
}

Above is our boilerplate for starting the application and putting MainView into the window.

Next time, we'll use our layout code and networking code together with some real AppKit widgets to make a simple application which actually does something!
 

Attachments

  • layout2.zip
    118.1 KB · Views: 95
Last edited:

cellularmitosis

macrumors regular
Original poster
Mar 6, 2010
152
246
Test of bbcode syntax highlighting:

Does it work for C?

C:
#include <stdio.h>
int main(int argc, char** argv) {
    printf("Hello, world!\n");
    return 0;
}

Does it work for Objective-C?

Objective-C:
#import <Cocoa/Cocoa.h>
int main(int argc, char *argv[]) {
    NSAutoreleasePool* pool = [[NSAutoreleasePool alloc] init];
    AppDelegate* delegate = [[AppDelegate alloc] init];
    [[NSApplication sharedApplication] setDelegate:delegate];
    int exitStatus = NSApplicationMain(argc, (const char **)argv);
    [pool release];
    return exitStatus;
}
 
  • Like
Reactions: G4fanboy
Register on MacRumors! This sidebar will go away, and you'll see fewer ads.