Become a MacRumors Supporter for $50/year with no ads, ability to filter front page stories, and private forums.

ModernGnome

macrumors newbie
Original poster
Nov 11, 2018
13
4
So, I recently purchased a second 980Ti hybrid to put in my mac pro 5,1. I have been running a single 980Ti for about a year now and I found a good deal on a second one so I picked it up to put in my system. I chose to go this route over purchasing a single 1080TI primarily for the cost. This option is much cheaper and offers similar results. The only downside is that this is far from plug and play and it required quite a bit of work to get everything working correctly.
[doublepost=1554608558][/doublepost]After a lot of research, I decided to go with a second PSU to power the graphics rather than tapping off the main PSU. I did this for two reasons: I did not want to overload the main PSU and after looking at the specs for it I realized that it is very inefficient, so adding an efficient PSU for the graphics card should reduce the overall heat output of the computer.

For the PSU I chose a 750w 80+ Platinum power supply because it seemed to be a very high-end PSU and it was only around $17. ebay link - https://www.ebay.com/itm/656363-B21...ply-660183-001-643955-201-Pulled/223222559512

I also had to purchase some cables to run to the graphics cards, and after hours of searching on ebay I ran across a guy selling nice looking braided cables for a great price so I purchased 4. ebay link - https://www.ebay.com/itm/pci-e-Power-Cable-Type-3-Individually-Sleeved/323597481385

Aside from these two items I only had to purchase some connectors to make the power supply removal (this is completely optional), and some screws to mount the power supply. I purchased these from Home Depot because I needed them quick.

Everything I purchased totaled about $35 which is much better than any drive bay power supply I found. It is also much better quality.
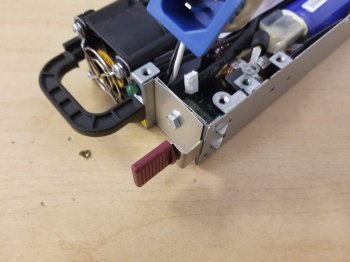
[doublepost=1554608857][/doublepost]To begin I found an old computer cable and cut the end off. I then remove the stock PSU from the computer and soldered the stripped end to the 120v side of the PSU. After I did this I realized it was going to be tricky to route the cable inside the power supply without pinching it, but it can be done.
20190309_134817.jpg
20190309_200754.jpg

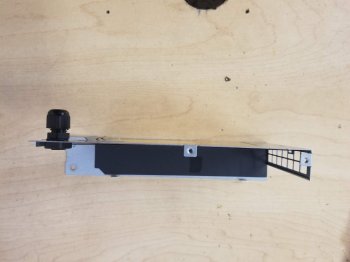
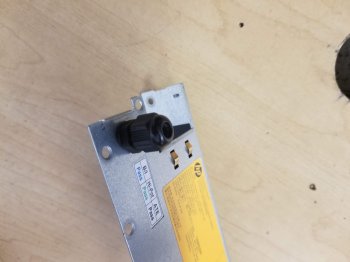
[doublepost=1554609154][/doublepost]I then began work on the HP PSU. From my research, I thought I had to jump two pins with a 500-ohm resistor, but after a lot of trial and error, I realized that on this PSU the pins only had to be shorter out to make it work. To power on the PSU I decided to get a sata power adapter and attach to 12v outputs from it to a relay that would short out the pins on the secondary PSU when I turned the computer on. I tested this and it seemed to work well.
20190309_204303.jpg
 
Last edited:

velocityg4

macrumors 604
Dec 19, 2004
7,330
4,721
Georgia
Neat mod. Would certainly be interested in seeing more pics of the build. How are you going to handle turning them on and off in sync? Are you just going to use a Dual PSU adapter cable, sync/starter board or something else?
 

ModernGnome

macrumors newbie
Original poster
Nov 11, 2018
13
4
I then began modifying the HP PSU to fit inside the case. Since the PSU was would only barely fit longways in the drive bay I had to remove the handle at the end. It still did not want to fit with the power connector inserted, so I had to move it. I drilled a hole in the top of the PSU case and put a compression grommet in it. I cut the end off a computer extension cable and soldered the leads to the 120v AC input of HP PSU. To cover up the hole I bolted two pieces of flashing together. I did not expect this to work well, but it worked amazingly well. I also cut off the latch that was sticking out form the end of the PSU.
20190310_101150.jpg
20190310_201955.jpg
20190310_203304.jpg
20190310_101157.jpg
20190310_101115 (1).jpg
 

Attachments

  • 20190310_101204.jpg
    20190310_101204.jpg
    404.7 KB · Views: 185
  • 20190310_101150.jpg
    20190310_101150.jpg
    437.1 KB · Views: 242
  • 20190310_101115.jpg
    20190310_101115.jpg
    326 KB · Views: 226
  • 20190310_201955.jpg
    20190310_201955.jpg
    455 KB · Views: 257
  • 20190310_101150.jpg
    20190310_101150.jpg
    437.1 KB · Views: 230

ModernGnome

macrumors newbie
Original poster
Nov 11, 2018
13
4
I then turned my focus to the radiator mounts. Ever since I got my first 980Ti I wanted to have the radiator mounted from the first drive bay so that it would be secure, but still removable. I never did it with one card because the radiator just kinda fit in the front of the case, but with two radiators they had to be mounted. I purchased two pieces of angled aluminum from Home Depot and cut them to length. I then marked the out the holes where the screws would go. I made sure to stagger the radiators so the hoses would not interfere with each other. I put the angle between the fan and radiator on each unit and attached each one to two of the hard drive mount screws. To make everything fit flush I had to countersink the screws in the fans so they would no longer stick out. The whole unit ended up being just barely wider than one drive bay, but there was enough room for everything to fit and still have three hard drives. You will also notice that there is no pcie fan. I removed this early on and the computer runs just fine without it.
20190310_122002.jpg
20190310_121940.jpg
20190310_121449.jpg
20190310_112805.jpg
20190310_112757.jpg
 

Attachments

  • 20190310_122002.jpg
    20190310_122002.jpg
    378.1 KB · Views: 236
  • 20190310_122002.jpg
    20190310_122002.jpg
    378.1 KB · Views: 211
  • 20190310_121940.jpg
    20190310_121940.jpg
    463.2 KB · Views: 238
  • 20190310_112805.jpg
    20190310_112805.jpg
    344.8 KB · Views: 282
  • 20190310_112757.jpg
    20190310_112757.jpg
    469.1 KB · Views: 225

ModernGnome

macrumors newbie
Original poster
Nov 11, 2018
13
4
Cable management became my next priority. There is a small hole in the back corner of the case that connects the drive bay compartment to the mid-section of the computer. Since my cables had a thick branding on them I had to strip this back to fit all the cables through. I paired the cables into positive and negative groups. With this done I could barely fit the cables through the hole, so cards with dual 8-pin connectors may have problems. I then soldered the cables into larger conductors so they would be more manageable and easier to connect to the PSU. I used a pair of 12 gauge wires for each of the 8-pin connectors and I used a pair of 14 gauge wires for each of the 6-pin connectors. I ran the cables through the hole in the case and did some brief cable management before soldering on the spade connectors.
20190311_205303.jpg
20190311_205300.jpg
20190311_203443.jpg
20190310_213948.jpg

[doublepost=1554612715][/doublepost]Next, I had to mount the PSU. I feel that I could have done this and retained one of the drive bays since the PSU is thin enough, but the way I ended up going with was simple and it allowed for ample airflow for both PSUs. The best way I could find to mount the PSU was to remove the screws that secured the motherboard and purchase longer ones that extended out the rear of the case. I then drilled three holes in the back side of the drive cage and mounted the power supply to it. It is sturdy and it allows for airflow and cable management. After finalizing the PSU mount I refined the relay placement and secured it with double-sided tape. Afterward, I soldered leads onto the PSU that would connect it to the graphics card cables. I ended up putting electrical tape around the open connections at the end of the PSU to prevent a short and I put heat shrink on the unused ends of the SATA power connector.
20190312_202451.jpg
20190312_202038.jpg
20190310_203309.jpg
20190310_203304 (1).jpg
20190310_185706.jpg
 
Last edited:

ModernGnome

macrumors newbie
Original poster
Nov 11, 2018
13
4
Once everything was finished I had to wrap everything up and make it look nice. I remove the blue tape from the radiator and arranged the cables. The biggest problem was making all the tubes look nice. I ended up switching the radiators around so that the front radiator was for the top card. This also hid the part of one of the tubes where the branding had been pulled back. There is a gap between the front lip of the drive tray and the drive itself I used this space to neatly tuck away the tubing. I like this because it looks nice while also being easily removable. After installing my GT120 and checking over everything it was ready to power on.
20190403_175810.jpg
20190312_220426.jpg

[doublepost=1554614083][/doublepost]Now all I had to do was turn on my computer. This was the hardest part of the project by far because if you read anything on the subject of dual PSUs in a single system everyone will tell you not to do it, so in doing this project I checked every connection and wire multiple times. I was also EXTREMELY cautious when powering the system on for the first time. I removed all my drives and only used one graphics card. Once I heard the chime I powered it off and installed my boot drive. To make sure there was no current going back through the card I download a program called iStart menu. This program allowed me to view how many amps were being drawn through the pcie slot along with the voltage at each slot. The voltage and current draw at the slot were identical to the voltage and current draw that were present when the graphics card was running off a singular PSU. This was the best result I could hope for so I installed the second card and it worked flawlessly as well. I began stress testing the system and it performed about double what it did with only one card. I was very relieved when everything finally worked because this is my main system and I use it on a daily basis. I was also able to put the pcie slot current draw in the top bar of my computer and it acts as a way to tell how much load each graphics card is under. (the left two are the 980TIs and right one is the GT120)
20190407_001244.jpg

[doublepost=1554614768][/doublepost]Conclusion! I would not have recommended doing this to your computer before, but now knowing that everything works seamlessly, I would say that if you don't mind risking your computer and spending a weekend working on it is a good project; otherwise, I think it would be better to save up of a 1080Ti. I do think it is cool to have one of the only macs with dual water-cooled graphics cards and it does look very clean on the inside. Everything works extremely well and the secondary PSU turns on and off with the main PSU. The system also stays quiet. This is also significantly cheaper than purchasing a 1080Ti and it yields (in most cases) better performance. I purchased the second graphics card for $180 and all the supplies were about $35, so if you were to do this starting without a graphics card you could do this for under $400.
 
Register on MacRumors! This sidebar will go away, and you'll see fewer ads.