Become a MacRumors Supporter for $50/year with no ads, ability to filter front page stories, and private forums.

MartinSk

macrumors member
Original poster
May 3, 2015
47
43
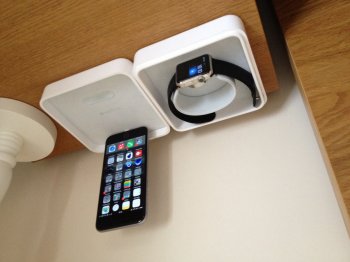
I decided that even though I liked the previous stand I'd made, the standard box that comes with the watch deserves to be used as it is such a nice simple design.

After plenty of fiddling I now have a box that charges both my iPhone and watch with a built in female lightning connector for the iPhone charger and the watch cable exiting at the rear of the case so it can sit flush.

I can take this away with me if needed and there are no unsightly bits of tape or feet to manage the cables. I'm quite pleased with it although if I'd have took more time I could have made it even better.
 

Attachments

  • image.jpg
    image.jpg
    492.4 KB · Views: 268

AZhappyjack

Suspended
Jul 3, 2011
10,184
23,659
Happy Jack, AZ
I decided that even though I liked the previous stand I'd made, the standard box that comes with the watch deserves to be used as it is such a nice simple design.

After plenty of fiddling I now have a box that charges both my iPhone and watch with a built in female lightning connector for the iPhone charger and the watch cable exiting at the rear of the case so it can sit flush.

I can take this away with me if needed and there are no unsightly bits of tape or feet to manage the cables. I'm quite pleased with it although if I'd have took more time I could have made it even better.

Cool. And even works upside down! :)
 
Last edited:

AZhappyjack

Suspended
Jul 3, 2011
10,184
23,659
Happy Jack, AZ
:D I'm using an iPad mini and it seems this site doesn't like it!

Sorry, wasn't trying to be snarky or critical. It's a bit annoying when that happens - and can't really determine why photos get flipped upside down at times.

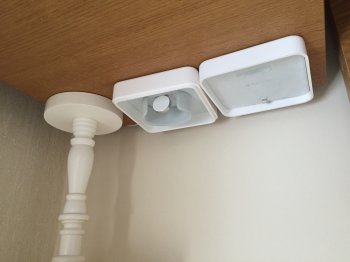
Would like to see shots of the details - the "no ... tape or feet" thing is interesting. Would like to see how you did it.

Thanks for sharing.
 

MartinSk

macrumors member
Original poster
May 3, 2015
47
43
Sorry, wasn't trying to be snarky or critical. It's a bit annoying when that happens - and can't really determine why photos get flipped upside down at times.

Would like to see shots of the details - the "no ... tape or feet" thing is interesting. Would like to see how you did it.

Thanks for sharing.

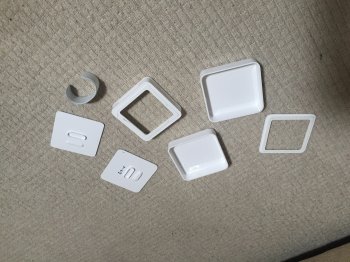
I don't have many pics but I discovered the entire thing comes apart...which makes it easier :)
 

Attachments

  • image.jpg
    image.jpg
    2.3 MB · Views: 234

JT2002TJ

macrumors 68020
Nov 7, 2013
2,057
1,386
Sorry, wasn't trying to be snarky or critical. It's a bit annoying when that happens - and can't really determine why photos get flipped upside down at times.

If you want pictures to always show the correct way, you have to take them with the volume buttons down. If you put the volume buttons up, windows based (and hosting sites) will post them upside down.

I HATE taking pictures this way, because of old days habit of having a camera button on the top right.
 

AZhappyjack

Suspended
Jul 3, 2011
10,184
23,659
Happy Jack, AZ
If you want pictures to always show the correct way, you have to take them with the volume buttons down. If you put the volume buttons up, windows based (and hosting sites) will post them upside down.

I HATE taking pictures this way, because of old days habit of having a camera button on the top right.

Interestingly, when you click on either of the first two upside down photos, the larger version opens with the correct orientation. No so, for the third photo (disassembled box photo).
 

MartinSk

macrumors member
Original poster
May 3, 2015
47
43
Great deconstruction photos. Do you have any of the process you went through to build in the chargers?

Unfortunately not sorry. The biggest problem was trying to fit a 1m lightning cable underneath where the felt lined base sits.

Aside from that it was just a case of drilling holes just big enough to fit the various connectors through.

It was one of those spur of the moment things where I just dived straight In without any prep. It turned out ok though and works a treat so I'm happy.

I could probably do a step by step if somebody wanted me to but it'd be without pics.
 

irentamac

macrumors regular
Mar 10, 2014
240
3
Tempe, AZ
Looks good. I'm waiting on a few parts to come in the mail, but I've got a neat idea for the sport case.

How did you secure the charging puck? Did you use glue or anything or does it just sit in that position freely?
 

MartinSk

macrumors member
Original poster
May 3, 2015
47
43
Looks good. I'm waiting on a few parts to come in the mail, but I've got a neat idea for the sport case.

How did you secure the charging puck? Did you use glue or anything or does it just sit in that position freely?

By good fortune, once I'd secured the cable and placed it where it is, it was a good fit. I didn't want to glue it as I'm likely to change my mind in the future so made sure I could undo any changes bar the obvious drilling of holes.
 

JonHimself

macrumors 68000
Nov 3, 2004
1,553
5
Toronto, Ontario
What was the process for pulling everything apart? Pliers? Knives? Hopefully you can provide a bit more detail on that part as it's the main reason why I haven't try to take my box apart yet.

----------

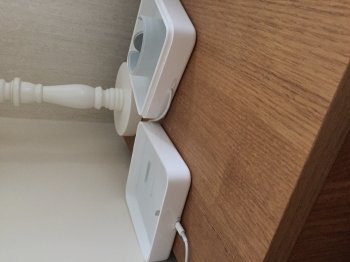
Follow-up: Where did you get the female lightning adapter from and can you post any pictures of the back of the cases?
 

MartinSk

macrumors member
Original poster
May 3, 2015
47
43
The different sections are glued in, so best bet would be to use a hairdryer/heatgun to soften the glue and then from underneath you can squeeze on the outside of the box and flex it a little until you hear some movement of the felt lined piece. I used a very fine butter knife and slid it down the edge and then carefully applied force until it came unstuck. Once you have the 2 felt sections out you can then repeat for the stepped section underneath but you can be a little more forceful here as it's not going to be visible if you nick it at all.

The section that's used to seat the two halves together needed plenty of careful manipulation but eventually it does come out.

I would advise covering the whole thing in some tape or similar so that you don't scratch or mark it at all. Being white it's easy to spot any discoloured gouging.

Hope that helps a little
 

MartinSk

macrumors member
Original poster
May 3, 2015
47
43
What was the process for pulling everything apart? Pliers? Knives? Hopefully you can provide a bit more detail on that part as it's the main reason why I haven't try to take my box apart yet.

----------

Follow-up: Where did you get the female lightning adapter from and can you post any pictures of the back of the cases?

Ebay for the adapter, was about £5 from memory.

Pics attached - as you can see it's a little rough, one section needs a final layer of filler and smoothing over. If I were to do it again it would be much simpler and neater I'm sure but I got carried away...
 

Attachments

  • image.jpg
    image.jpg
    1.4 MB · Views: 133

MartinSk

macrumors member
Original poster
May 3, 2015
47
43
Nice idea. Would be nice if both were in the watch side

That was the original plan but there just isn't enough room under the felt to hide the wiring unless you cut it right down to 20cm lengths. I originally wanted to splice together the magnetic charger cable and lightning cable and just have one power source at the back but my home insurance wouldn't be too happy with that I expect #
 

GrindedDown

macrumors 6502a
Jun 4, 2009
718
270
Las Vegas
Honestly I think this is one of the better DIYs I have seen especially from a traveling and functionality perspective. I am certain if you did a step by step guide with pics, it would be a hit here.

I would love to have something like this and would be perfect for traveling with.
 
Register on MacRumors! This sidebar will go away, and you'll see fewer ads.