The hard drive in my '09 Mini died, and since I'd failed to get Applecare on it and needed to crack the thing open anyway, I figured it would be a good time to do some eSATA modifications--reroute the boot drive port to an external in case the replacement dies, and ditch the optical drive to change the connection on my data drive from FW800 to eSATA. What I didn't like, though, was that most of the how-tos I found involved buying a passthrough plate and cutting it apart to get the male SATA connector to mate with the Mini's SATA backplane.
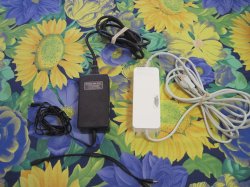
Fortunately, I found one forum thread elsewhere (that I'm not seeing the equivalent of here with a search) suggesting CPUStuff as a source for relatively exotic eSATA cables with oddball combinations of genders and connectors. It also happens that most of these are DIRT CHEAP. Heck, most are cheaper than a stock SATA cable from a lot of places.
After ordering some parts (came surprisingly fast, even though I picked the cheapest USPS shipping--ordered Wed night, arrived Saturday), cracking my mini open, and cutting a hole in the case, I can vouch that they work perfectly, and are a heck of a lot easier than some of the alternate methods I dug up.
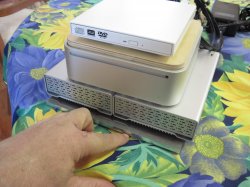
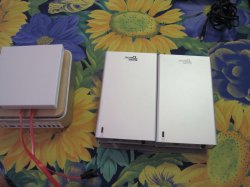
I ended up using a couple of these--male SATA to mate with the backplane, regular female eSATA to plug into the external drive. Working perfectly with two different eSATA enclosures (one cheap Rosewill dock, one expensive MiniStack v3), with the Rosewill even registering 3Gbit speeds (I assume the MiniStack is what's limiting the other port to 1.5Gbit speeds, but it doesn't matter with a Green drive anyway). Both ports are, according to system profiler, 3Gbit.
I also bought a couple of shorter male SATA to eSATA panel mount cables, which could be used to put eSATA ports right on the outside of the Mini, but I decided to stick with the single-cable option to minimize the potential for signal loss. I expect that would have worked fine as well, but since the maximum length for an internal SATA cable is only 1 meter it seemed to be pushing my luck since I didn't actually need the ability to swap eSATA cables (eSATA, I learned from Wikipedia, can handle 2m, but since they're internal ports being re-routed it's entirely possible that a 2-meter cable wouldn't work properly--I would have had to use 0.5m eSATA cables to pair with the 8-inch converter cables, which I didn't have any of on hand).
A few things I learned:
- If you're pulling the optical drive out as well, there's lots of room in the case to route cables, but due to the relative inflexibility of SATA cables, I still needed a pretty generous bend radius to route them to the lock slot on the back, where I cut the hole. 18" turned out to be just enough to go from the port to the outside and into a drive right next to the mini; I'd probably buy longer ones if I did it again, if I didn't go with the panel mount version.
- I chose to keep the top case intact, but if you didn't mind cutting it up, you could probably route out the optical drive slot into a mount point for eSATA panel mount connectors and have it look very slick.
- Since the drives are what hold the SATA riser board in place, if you're plugging cables into it it's not in the slot all that well; I used some hot melt glue to stick it to the drive/fan frame, for extra stability.
- As others have noted, the male SATA connectors are VERY loose when plugging into the riser board. I gobbed on some hot melt glue to hold them in place, which seems to have worked fine, but there's no way you'd be able to get the case back on without knocking them loose otherwise. I also used a zip tie to glue the cables to the fan housing, to act as strain relief when I was moving the cables around outside the case to swap drive cases.
- For the above reason, if I were going the panel-mount route, I'd recommend getting one of these for the hard drive externalization; it has a dummy power connector on the male internal SATA end, which should provide a little extra stability and reduce the chances of it coming loose. They also sell adapters that will route SATA power as well, but unless you're just laying a bare hard drive on top of the mini, that's not much use.
- The above part wouldn't work for the optical drive SATA, since it uses the slim optical drive-style power connector, so you'd be stuck using just the male data connector on that one, anyway. Additionally, the little retaining flange on the male port was long enough that the connector didn't plug quite all the way into the optical drive port, so I needed to shave a little of it off for a flush fit.
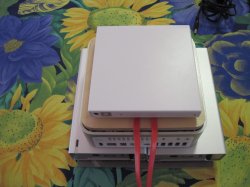
- I am so forgetful that after thinking "I'll take pictures of the process to share!" I completely spaced on it until the case was back together.
Last thing: It turns out that the best part of the whole hack was that, when connected via eSATA, the MiniStack v3 does NOT have the random hard drive sleep issue that plagued it for many people, myself included. Given that I was shopping for a replacement FW800 case because I'd gotten so sick of my drive spinning down after 60 seconds of not-enough-activity, the hack actually saved me quite a bit of money.
Final cost: $23.85, shipping and CA tax included, and that's including the $7 of panel mount cables I didn't even use.
Fortunately, I found one forum thread elsewhere (that I'm not seeing the equivalent of here with a search) suggesting CPUStuff as a source for relatively exotic eSATA cables with oddball combinations of genders and connectors. It also happens that most of these are DIRT CHEAP. Heck, most are cheaper than a stock SATA cable from a lot of places.
After ordering some parts (came surprisingly fast, even though I picked the cheapest USPS shipping--ordered Wed night, arrived Saturday), cracking my mini open, and cutting a hole in the case, I can vouch that they work perfectly, and are a heck of a lot easier than some of the alternate methods I dug up.
I ended up using a couple of these--male SATA to mate with the backplane, regular female eSATA to plug into the external drive. Working perfectly with two different eSATA enclosures (one cheap Rosewill dock, one expensive MiniStack v3), with the Rosewill even registering 3Gbit speeds (I assume the MiniStack is what's limiting the other port to 1.5Gbit speeds, but it doesn't matter with a Green drive anyway). Both ports are, according to system profiler, 3Gbit.
I also bought a couple of shorter male SATA to eSATA panel mount cables, which could be used to put eSATA ports right on the outside of the Mini, but I decided to stick with the single-cable option to minimize the potential for signal loss. I expect that would have worked fine as well, but since the maximum length for an internal SATA cable is only 1 meter it seemed to be pushing my luck since I didn't actually need the ability to swap eSATA cables (eSATA, I learned from Wikipedia, can handle 2m, but since they're internal ports being re-routed it's entirely possible that a 2-meter cable wouldn't work properly--I would have had to use 0.5m eSATA cables to pair with the 8-inch converter cables, which I didn't have any of on hand).
A few things I learned:
- If you're pulling the optical drive out as well, there's lots of room in the case to route cables, but due to the relative inflexibility of SATA cables, I still needed a pretty generous bend radius to route them to the lock slot on the back, where I cut the hole. 18" turned out to be just enough to go from the port to the outside and into a drive right next to the mini; I'd probably buy longer ones if I did it again, if I didn't go with the panel mount version.
- I chose to keep the top case intact, but if you didn't mind cutting it up, you could probably route out the optical drive slot into a mount point for eSATA panel mount connectors and have it look very slick.
- Since the drives are what hold the SATA riser board in place, if you're plugging cables into it it's not in the slot all that well; I used some hot melt glue to stick it to the drive/fan frame, for extra stability.
- As others have noted, the male SATA connectors are VERY loose when plugging into the riser board. I gobbed on some hot melt glue to hold them in place, which seems to have worked fine, but there's no way you'd be able to get the case back on without knocking them loose otherwise. I also used a zip tie to glue the cables to the fan housing, to act as strain relief when I was moving the cables around outside the case to swap drive cases.
- For the above reason, if I were going the panel-mount route, I'd recommend getting one of these for the hard drive externalization; it has a dummy power connector on the male internal SATA end, which should provide a little extra stability and reduce the chances of it coming loose. They also sell adapters that will route SATA power as well, but unless you're just laying a bare hard drive on top of the mini, that's not much use.
- The above part wouldn't work for the optical drive SATA, since it uses the slim optical drive-style power connector, so you'd be stuck using just the male data connector on that one, anyway. Additionally, the little retaining flange on the male port was long enough that the connector didn't plug quite all the way into the optical drive port, so I needed to shave a little of it off for a flush fit.
- I am so forgetful that after thinking "I'll take pictures of the process to share!" I completely spaced on it until the case was back together.
Last thing: It turns out that the best part of the whole hack was that, when connected via eSATA, the MiniStack v3 does NOT have the random hard drive sleep issue that plagued it for many people, myself included. Given that I was shopping for a replacement FW800 case because I'd gotten so sick of my drive spinning down after 60 seconds of not-enough-activity, the hack actually saved me quite a bit of money.
Final cost: $23.85, shipping and CA tax included, and that's including the $7 of panel mount cables I didn't even use.