Got a tip for us?
Let us know
Become a MacRumors Supporter for $50/year with no ads, ability to filter front page stories, and private forums.
Going to give a charging stand a shot on the Makerbot
- Thread starter Johnny-Don
- Start date
- Sort by reaction score
You are using an out of date browser. It may not display this or other websites correctly.
You should upgrade or use an alternative browser.
You should upgrade or use an alternative browser.

Ok now you may start your own legitimate MacRumors business. I'm in if you start selling those. #
Thanks!
Let me see how it works out, the 3 inch square foot print may be a little light and it may fall over easy. I'll print it and see if it needs any tweaks, if not, I'll be more than happy to share the model. Unfortunately, I don't own a Makerbot, it's at work so I really can't get into printing bunches, but I'll sure share what I can!")
----------
Funny, you typed this just as I was replying with possible concerns with the base. I will be printing it out of ABS, I think weights would definitely help. I think I will add a void to the underside to allow for weights to be glued in.
Let me see how it works out, the 3 inch square foot print may be a little light and it may fall over easy. I'll print it and see if it needs any tweaks, if not, I'll be more than happy to share the model. Unfortunately, I don't own a Makerbot, it's at work so I really can't get into printing bunches, but I'll sure share what I can!
----------
Looks nice! Is the base weighted?
Funny, you typed this just as I was replying with possible concerns with the base. I will be printing it out of ABS, I think weights would definitely help. I think I will add a void to the underside to allow for weights to be glued in.
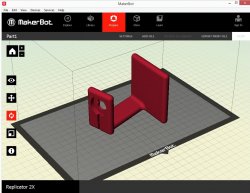
It's ready to print! I will start printing this evening. It's about a 5 hour build. It should be waiting for me when I get back into work tomorrow morning, I'll take a pic before I start post processing it, and of the final product sometime this weekend after I paint it.
Attachments
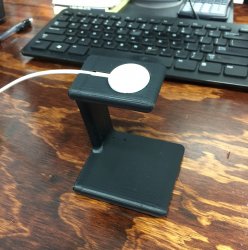
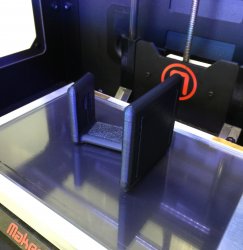
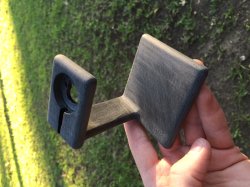
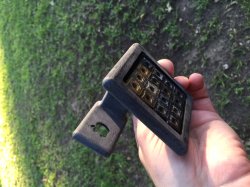
It works! It lifted from the build table last night and I don't like the way that area looks, so I'm printing another one, but I test fit everything on this one to make sure. Even without the weights it stays still, some rubber feet on it would do wonders though. I will probably still add weight to the bottom just to give it a more quality feel. These pics are straight off the printer, the latter ones with the supports removed. There is still considerable post processing to be done to make it look nice.
Attachments

Last edited:
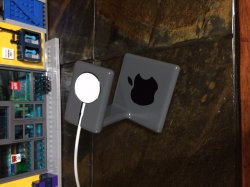
Nice job! The Apple logo is a nice touch, but it gets concealed by the charger. Perhaps you can move it to the neck or the base? Someone with some electronic skills could embed a small LED and make the logo glow.
Would you be willing to let others use the template, can they simply upload it to a website that offers 3D printing of files, or go to their local 3D print shop and use it?
Would you be willing to let others use the template, can they simply upload it to a website that offers 3D printing of files, or go to their local 3D print shop and use it?
Thanks! I wish I had a makerbot of my very own, I would certainly take orders, but this one is at my work and I can't do that unfortunately.
Yea that started as just a hole behind the charger because I wanted to be able to pop it out from the back instead of tugging the cord to get it out, but I figured a logo would look better. Yea the logo can be put anywhere, in hindsight I would have added one that was always visible, but I'll save that for V2.0
And led you be a nice touch, and I could do it, I'll have to play with some different designs.
Here is a 3D printable solid (.STL) file for anyone else to print if they'd like. Any 3D print shop/service should be able to print it, however for the price point most of these are going for from Griffin and the like (around $20-$30), it's probably cheaper to buy theirs than having it printed, it's really probably only worth it if you can do it yourself, or know someone.
https://www.dropbox.com/s/gehqy7dzyqgo6z7/JDJ_Apple_Watch_Stand_1.0.stl?dl=0
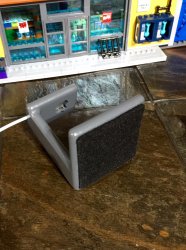
I've got the second model sanded up ready to paint. I glued bits of tungsten carbide scrap (spent lathe inserts) to the bottom for weight and it feels very nice, weighs about 7oz now, up from 2.
I'll post photos later of the final product.
Yea that started as just a hole behind the charger because I wanted to be able to pop it out from the back instead of tugging the cord to get it out, but I figured a logo would look better. Yea the logo can be put anywhere, in hindsight I would have added one that was always visible, but I'll save that for V2.0
And led you be a nice touch, and I could do it, I'll have to play with some different designs.
Here is a 3D printable solid (.STL) file for anyone else to print if they'd like. Any 3D print shop/service should be able to print it, however for the price point most of these are going for from Griffin and the like (around $20-$30), it's probably cheaper to buy theirs than having it printed, it's really probably only worth it if you can do it yourself, or know someone.
https://www.dropbox.com/s/gehqy7dzyqgo6z7/JDJ_Apple_Watch_Stand_1.0.stl?dl=0
I've got the second model sanded up ready to paint. I glued bits of tungsten carbide scrap (spent lathe inserts) to the bottom for weight and it feels very nice, weighs about 7oz now, up from 2.
I'll post photos later of the final product.
Last edited:
Here is a 3D printable solid (.STL) file for anyone else to print if they'd like. ...
https://www.dropbox.com/s/gehqy7dzyqgo6z7/JDJ_Apple_Watch_Stand_1.0.stl?dl=0
You should consider uploading it to thingiverse (if you have not already) so that people who are not members of the forum can grab a copy
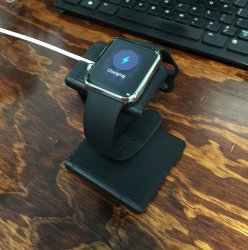
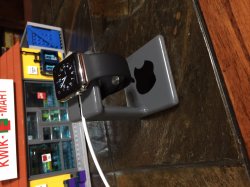
Looks great btw!Finished, the paint took forever to dry, and waiting was like watching... paint dry. It needed something, so I added a vinyl Apple sticker I made on my Cameo Silhouette, I think it really finished it nicely. I added a couple of Pre-painting pics too, I sanded the heck out of it. Thanks everyone for the comments. I will probably be uploading this to the thingiverse when I get a chance... or maybe I'll keep it a "Macrumors member" exclusive
Attachments
Well I thought I would try to get one of these printed for me. A UPS store here does that sort of stuff. I sent them the STL file and asked for an estimate. I will not be getting it done from them, the estimate was $147!! Wow, I had no idea that 3D printing was so expensive.
How much is the total weight of the stand. My local library has a 3D printer and they charge 15 cents a gram to print.
Thanks Everyone, it's working nicely!
That's awesome. Weight really depends on build settings. Mine weighs 35-40g, I don't know exactly what print weight was, I only had the first print that I scrapped to weigh, and I had already removed the supports. I think they would have to print with supports because there are some unsupported bridges in the build, but I'd say it shouldn't be anything over 40g with settings similar to mine:
(mm)
Layer height: 0.11
Shells: 2
Supports: Yes
Raft: No
Floor thickness: 1.0
Roof thickness: 1.5
Infill Pattern: Hexagonal
Infill Density: .15 (15%)
How much is the total weight of the stand. My local library has a 3D printer and they charge 15 cents a gram to print.
That's awesome. Weight really depends on build settings. Mine weighs 35-40g, I don't know exactly what print weight was, I only had the first print that I scrapped to weigh, and I had already removed the supports. I think they would have to print with supports because there are some unsupported bridges in the build, but I'd say it shouldn't be anything over 40g with settings similar to mine:
(mm)
Layer height: 0.11
Shells: 2
Supports: Yes
Raft: No
Floor thickness: 1.0
Roof thickness: 1.5
Infill Pattern: Hexagonal
Infill Density: .15 (15%)
Register on MacRumors! This sidebar will go away, and you'll see fewer ads.