Hello,
i want to show a way how to rebuild or update the bootrom of Mac Pro 4.1 and 5.1 on your own, using complete pre-build bootrom templates without individual data.
Some users reported succesfully the conversion of XServe 3.1 to Mac Pro 5.1 the same way, but this will lead to issues related to the different hardware and improper bootrom.
Some members won’t be happy bunnies about that and may try to delete the topic, but i’ll publish it on other platforms. I’m not interested in gatekeeping, now it is open to public.
Disclaimer: I am not responsible for any damages or bricks of your machine. If you have difficulties or doubts, contact a member with experience. Double- and triple check your work before flashing the generated bootrom file.
What you need:
- Any hexeditor
- Some experience and skills with UEFITool and hexeditor. For offsets or lenghts i’ll use the hexadecimal format. Be careful: Overwriting means replacing, not adding! The file lenght MUST not change
- A romdump of your machine
- E.g. done with this tools: https://dosdude1.com/apps/ROMTool.zip or https://github.com/Macschrauber/Macschrauber-s-Rom-Dump/ (much better and safer)
- Also a complete SPI-dump can be edited this way
- UEFITool_NE for analyzing (in my examples i used A_65): https://github.com/LongSoft/UEFITool/releases
- UEFITool for editing: https://github.com/LongSoft/UEFITool/releases/tag/0.28.0
- The three template files inside zipped attachment to this posting
- The templates contain the latest bootrom version 144.0.0.0.0, you’re able to update your Mac Pro 4.1 or 5.1 in one step without need of netkas-tool, installing High Sierra, Mojave, a Metal-supportet card or bootscreen capability.
- This will also avoid the common VSS-problem of crossflashed 4.1, NVRAM is empty, you have to set your preferred bootvolume after flashing the bootrom.
- Firmware-password will be deleted also, so this is also a way to unlock soft-bricked machines.
- I attached 2 bootrom-templates, one modded with latest EnableGOP 1.4. Decide what you need. Topic: https://forums.macrumors.com/thread...mac-pros.2378942/?post=31924217#post-31924217
- The templates contain the latest known hardware descriptor overrides (Base_21) and Fsys-/Gaid-version 0x0D; with UEFITool_NE_A70 and later the parts are named "SysF" and "Diag": This is due to a wrongly parsed string, anymore i'll use the wrong terms "Fsys" and "Gaid" regarding the practice last years and many users will also know them.
- If your bootrom lacks data or has serious corruption, this guide may not help you
- This guide is only valid for Mac Pro 4.1 and 5.1
- All data seen on screenshots are public or invented
- I won’t support any builds faking serial no
- Transferring individual data inside Fsys- and Gaid-store from your own dump to the bootrom-template. Unfortunately, no UEFITool is able recognize NVRAM, Fsys- and Gaid-store (UEFITool_NE_A70 and later: SysF- and Diag-store), so we have to do this manually with hexeditor
- Correcting both checksums in Fsys- and Gaid-store
- Transferring individual data from last volume (MAC address, LBSN and build date) to raw-template
- Exchange Section_Raw_Volume_Top_File_Volume_Top_File inside the (!pre-) modified bootrom-template with the raw-template, using UEFITool 0.28
- Check if all mods are correct and succesfull with UEFITool_NE
- Open your bootrom-dump and one of the bootrom-templates (v144.0.0.0.0_template_EnableGop_v14.bin or v144.0.0.0.0_template.bin) with hexeditor
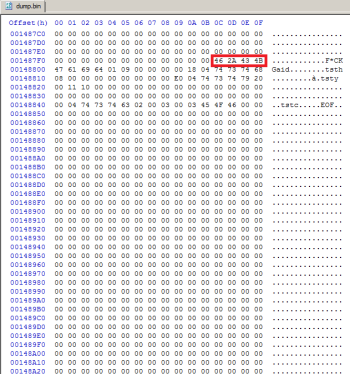
- Search in your bootrom-dump inside the Fsys-stream containing ssn, hwc and son (maybe more); unfortunately the position is not fixed and depends from the lenght of previous content. You can generally try to search for textstring „ssn“, most editors will show the code converted to ANSI on the right.
- Check if ssn, hwc and son are present and the order matches: All values are human-readable in ANSI.
- Copy the string, including 03 (before ssn), ending with 46 (last digit of „EOF“). The lenght may also vary, in my example it has 0x2C lenght (donor right, template left):
- In bootrom-template navigate to offset 0x1486A5, this is the position you’ll put in the string.
- Overwrite (NOT insert!) in bootrom-template:
- Now navigate in your dump to position 0x14880B (Gaid-entries). This position is fixed:
- Copy the string including 04 (before „tsth“ begins), ending with 46 (last digit of „EOF“). It has 0x43 lenght and yet i did’t saw dumps with more or less entries.
- Navigate in template to position 0x14880B and overwrite (NOT insert!) the string:
- Save the template file.
- Open modified template with UEFITool_NE and navigate to „EFISystemNvDataFvGuid“, „Fsys store“ and „Gaid store“: On the right window it will identify both CRC32-checksums as invalid. For luck, UEFITool_NE will show us the correct checksum, you have to write them manually in hexeditor.
- Open the template in hexeditor: The checksums are 4 bytes long and located at fixed offsets 0x1487FC (for Fsys store) and 0x149FFC (Gaid store). Pay attention: The bytes are swapped, a suggested checksum e.g. 732FD5CB has to be written in hexeditor as CBD52F73. Thats why you can’t simply copy the checksum from UEFITool_NE and insert it directly with hexeditor, leave both apps open and type by hand. Checksum position Fsys store seen here:
- And here for Gaid store:
- Save the template file, open again with UEFITool_NE and navigate to „EFISystemNvDataFvGuid“, „Fsys store“ and „Gaid store“: Both CRC32-checksums should now recognized as valid:
- Open your bootrom-dump and Section_Raw_Volume_Top_File_Volume_Top_File.sct with hexeditor
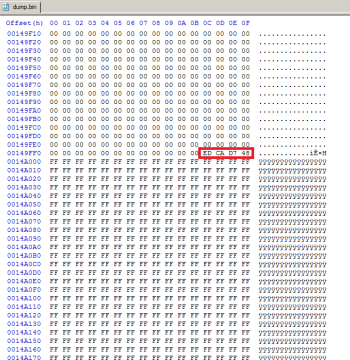
- In bootrom-dump navigate to offset 0x3FFF00 and copy the whole block with lenght 0x80. Check if it contains valid data; you can easy identify the LBSN (in example: J50324H3FBH9A) and build date (here: 100811100811=11 Aug. 2010) in ANSI in the pictures (right donor, left empty raw_volume).
- In Section_Raw_Volume_Top_File_Volume_Top_File.sct navigate to offset 0x10 and overwrite (NOT insert!) the block.
- Save the Section_Raw_Volume_Top_File_Volume_Top_File.sct.
- Open the modified template with UEFITool 0.28 and navigate to last volume „04ADEEAD-61FF-4D31-B6BA-64F8BF901F5A“, last file „1BA0062E-C779-4582-8566-336AE8F78F09“, last section „Raw section“.
- Select „Replace as is“ (not any other command!) and choose your modified Section_Raw_Volume_Top_File_Volume_Top_File.sct.
- Save image file. UEFITool will correct ZeroVector and checksum, no manual editing needed.
- Open the modified template with UEFITool_NE and check:
- If all checksums are valid
- All entries in Fsys- and Gaid-store are present
- Last volume is marked as „AppleCRC“, this indicates a corrected ZeroVector (CRC32-checksum of body).
- example of a non-corrected ZeroVector, seen on many dumps, "AppleCRC" missing:
- For analyzing and flashing i recommend the linked dumper tool from „Macschrauber“: It is a handy tool with GUI and easy to use.
Attachments

Last edited:


