I wish to offer huge thanks to Concorde Rules for posting his **GUIDE: Bootable Mac Pro 2009-10 SATA III + eSATA Guide + TRIM** in the forum back in November 2012. He has been kind enough to keep the guide up to date and even posted recently to say that there was an improved firmware for the SATA III card he used.
I followed his guide when I installed my Highpoint Rocket 640L card to enable two bootable SATA III SSDs but since my specific installation differed from his, I thought some new pictures might inspire other folks to try the same thing.
I would also like to thank the folks at Mac-Upgrade.co.uk for ordering an OWC Multi-Mount from the States for me.
For the purpose of this guide I will be installing two non-RAID SATA III SSDs in the Optical drive bay.
What you will need
Host Card : Highpoint Rocket 640L Lite (£56) (or the RocketRAID 640L Lite if you need more RAID options)
SATA Cable : 100cm SATA III cable (£5.70 ea) (one for each SSD)
Power splitter : 30cm SATA Power Splitter (£3)
Drive Bay Adapter : OWC Multi-Mount 2xSSD (£39)
There are several much cheaper mounting kits available such as the Silverstone PC Drive Bay Adapter that Concorde Rules listed but I had the spare cash so decided to treat myself. Note that OWC have recently updated the Multi-Mount to include better SSD trays and the stock at Mac-Upgrade is the new stock.
NOTE : The specific SATA Power Splitter that I listed there has two small plastic clips on the side that had to be snipped off to allow it to fit into one of the Optical Drive's combined Power / SATA II connector. A small pair of snips did the job. Snip the Power Splitter, not the SATA II connector of course.
Getting Started - Accessing the Optical Drive Bay
There are quite a few guides to removing the Optical Drive from the 2009/2010 Mac Pro but they all tell you to take off the side panel and leave the case latch in the OPEN position as there is a rod that engages in the Optical Drive bay too. Remove your drive sleds for ease of access.
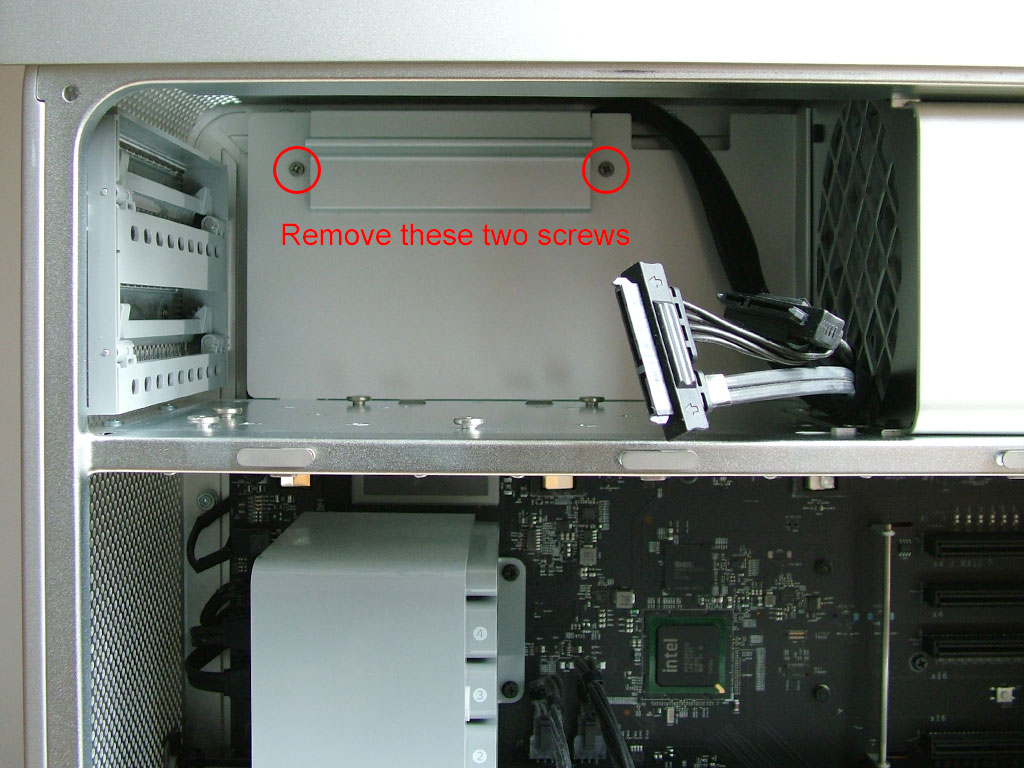
This is the view once you have taken the Optical Drive caddy out. You will need to remove the two highlighted screws to get the small backplate off. Be prepared to find dust behind it...
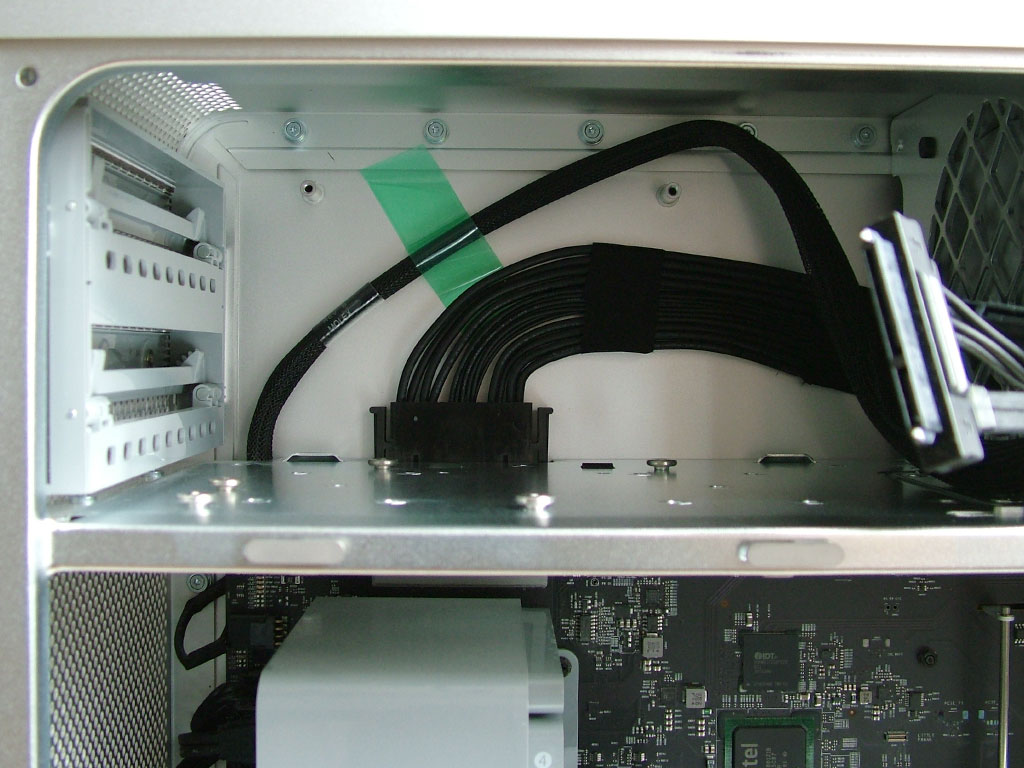
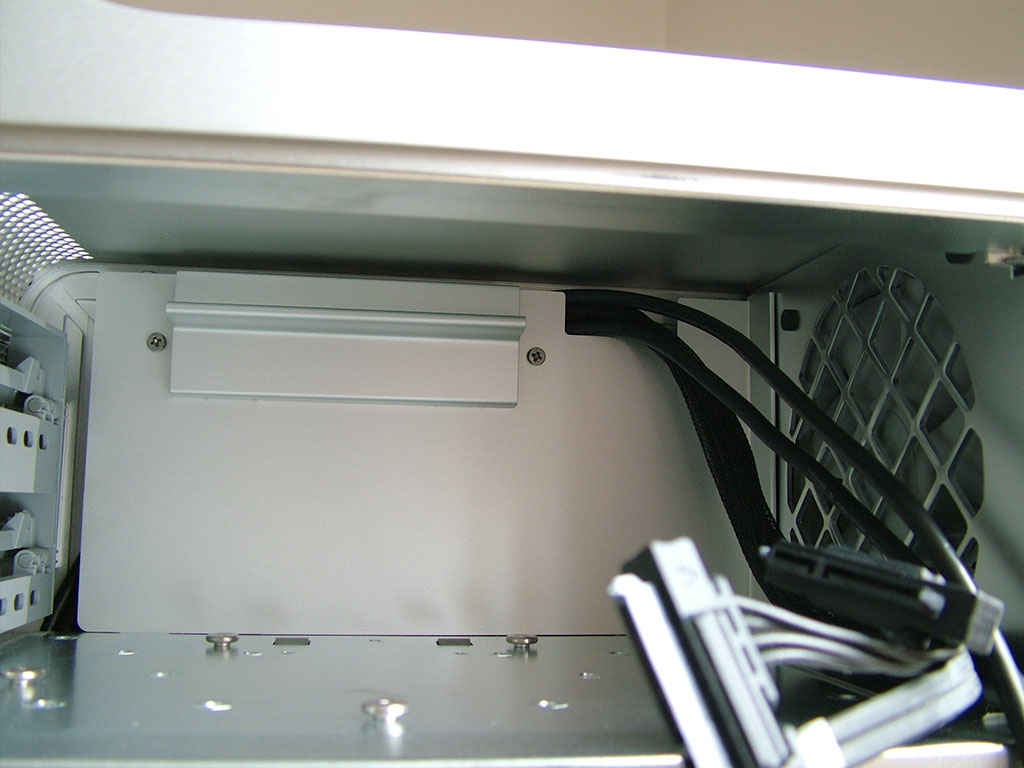
With the backplate removed you can see the original Optical Drive power and SATA II cables. We will be taking power from one of the SATA II connectors but not using the data cables...
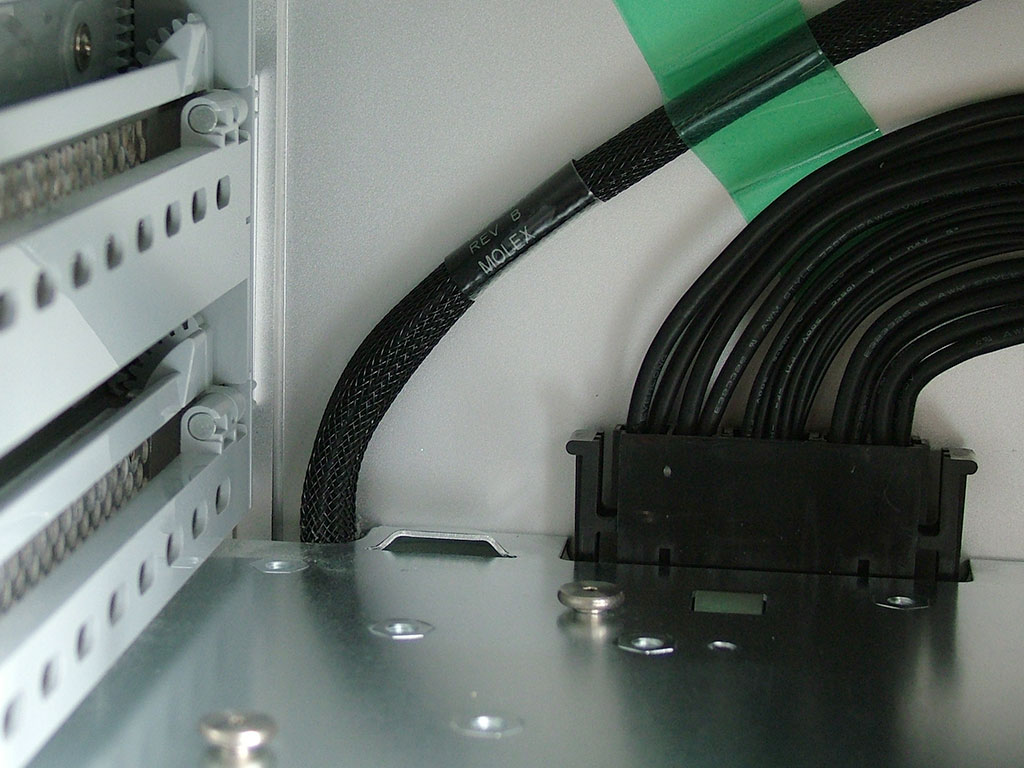
As Concorde Rules posted, there is a small opening in the corner which is just big enough to get your new SATA III cables through...
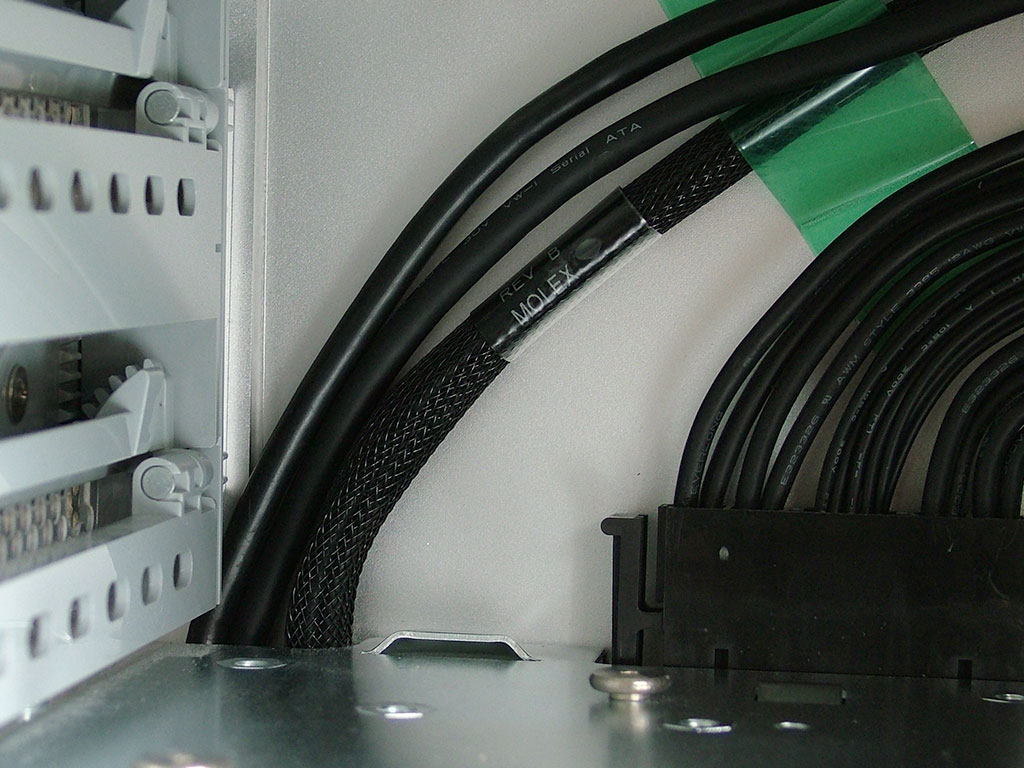
It is a squeeze but it does fit...
The back plate will then go back on and cover up your new cables...
Fitting the Rocket 640L card
As it ships, the Rocket 640L will come with some quite old firmware. The version numbers will be similar to these below...
Bios 1.0.0.1008
Firmware 2.3.0.1028
Bootloader 1.0.1.0002
While this firmware set will boot perfectly in OSX and Windows, it is affected by a Kernel Panic on Wake From Sleep. Fortunately Marvell who made the 88SE9230 Controller on the card have released a new Firmware set to address this issue.
DOWNLOAD LINK : UNAVAILABLE AT THIS TIME
I do not know if this new firmware is available for general release yet so I will not post a link until I have permission to do so.
You do need a PC to update this firmware with a bootable DOS image on CD or USB as a normal OS will lock access to the firmware for security reasons.
A successful flash of the firmware takes about a minute and will update the card to the following versions...
Bios 1.0.0.1013
Firmware 2.3.0.1046
Bootloader 2.1.0.1004
This firmware will boot in OSX and Windows. It will successfully Wake From Sleep. Drives will be shown as External however. Marvell may intend this for a specific reason to do with hot-removable drives.
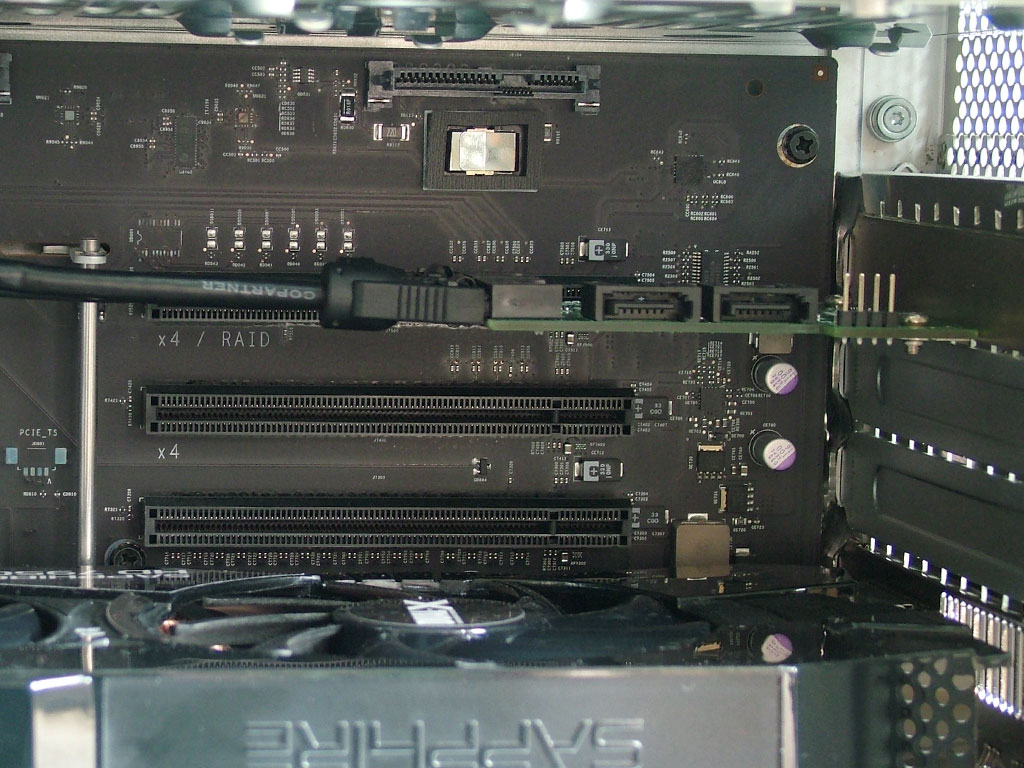
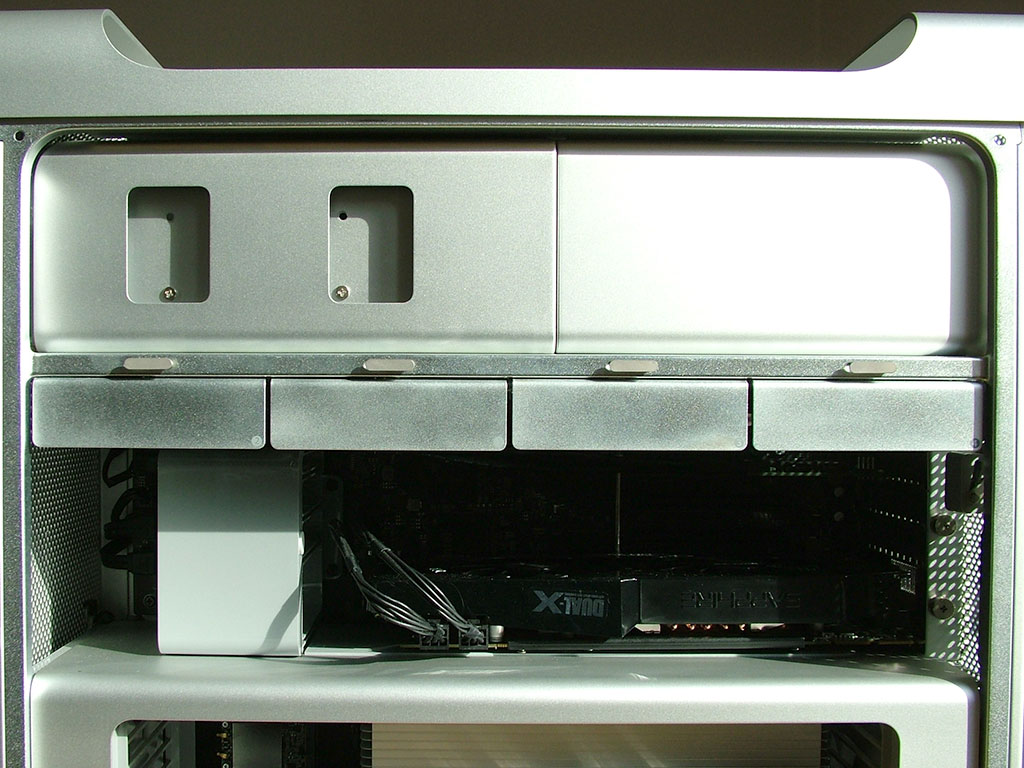
I put my Rocket 640L in the top PCI-E slot just under the drive sleds...
Assembling the OWC Multi-Mount
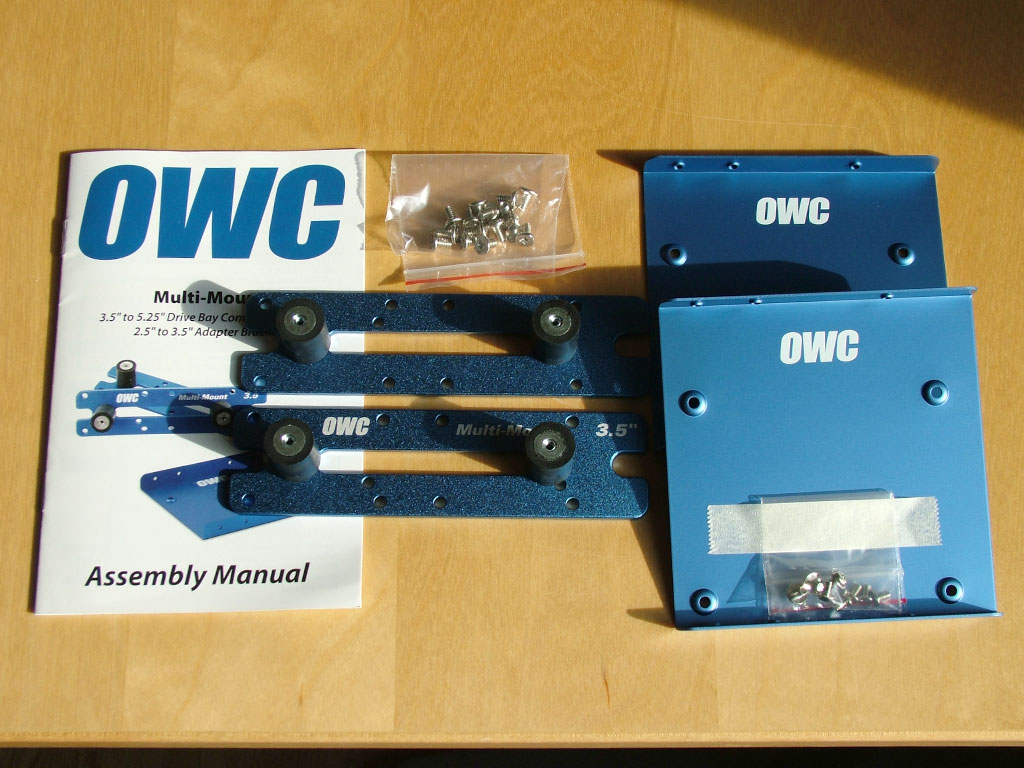
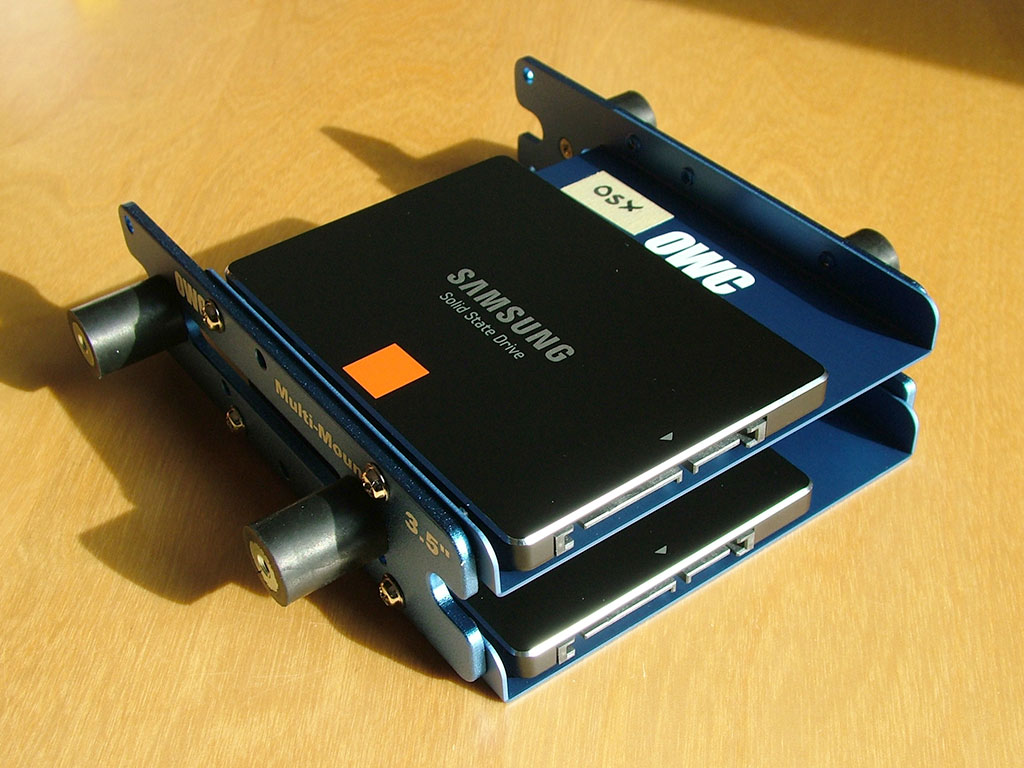
The OWC Multi-Mount is a beautiful piece of kit which will fit two 3.5" or 2.5" drives into a single 5.25" drive bay. The package contents are as follows...
The 2.5" SSD fits neatly onto the holding plate with four screws that go into the underside of the SSD...
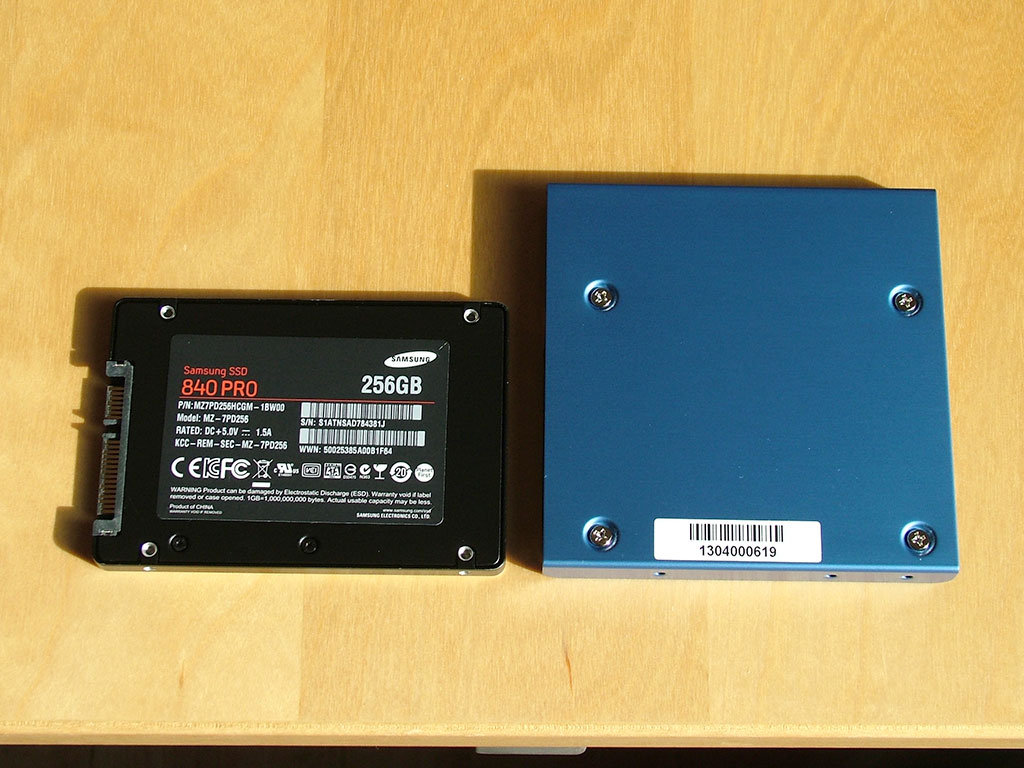
Two of them together will look like this...
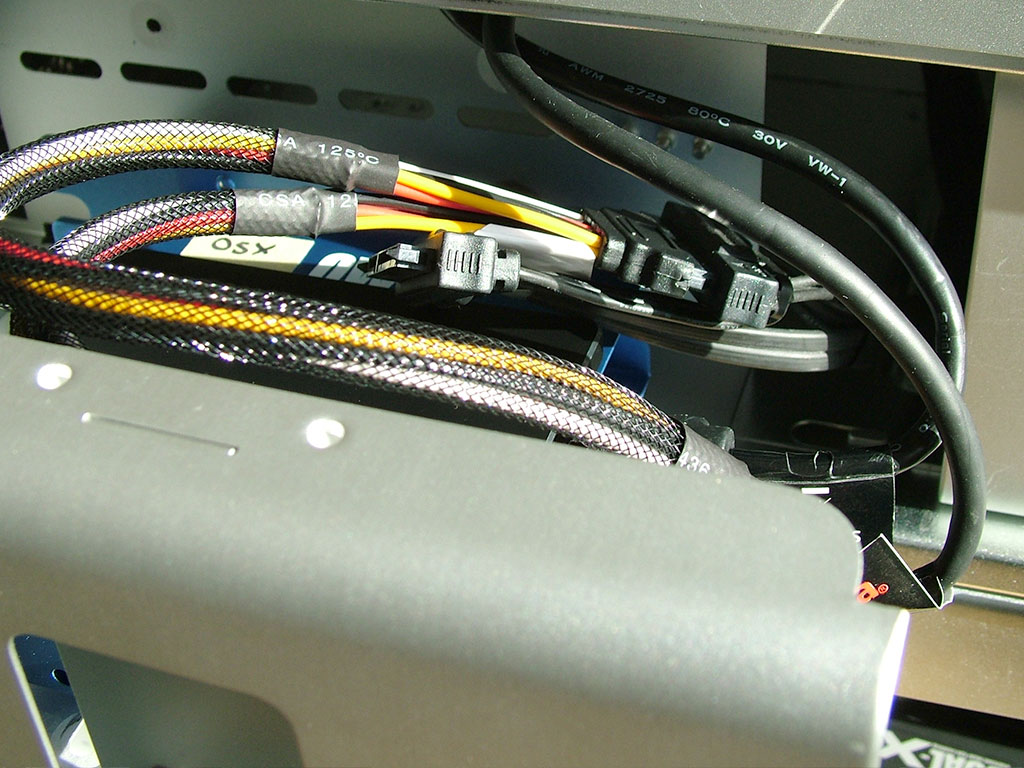
If you are keeping the Optical Drive in its bay, you will have a harder time getting the power splitter tidied away nicely but it will go.
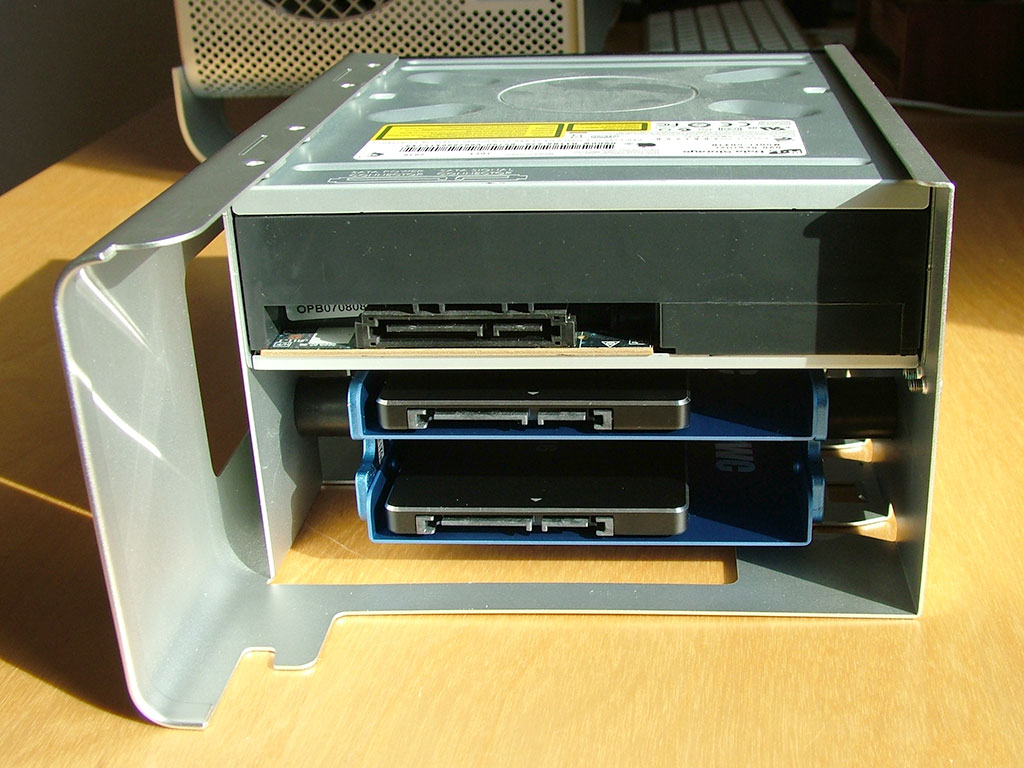
I have not used my Optical Drive for over a year so decided to take it out. This gives me more space for the SATA III data and power cables, improves airflow to the PSU and stops the annoying gronking noise when you power on the Mac Pro.
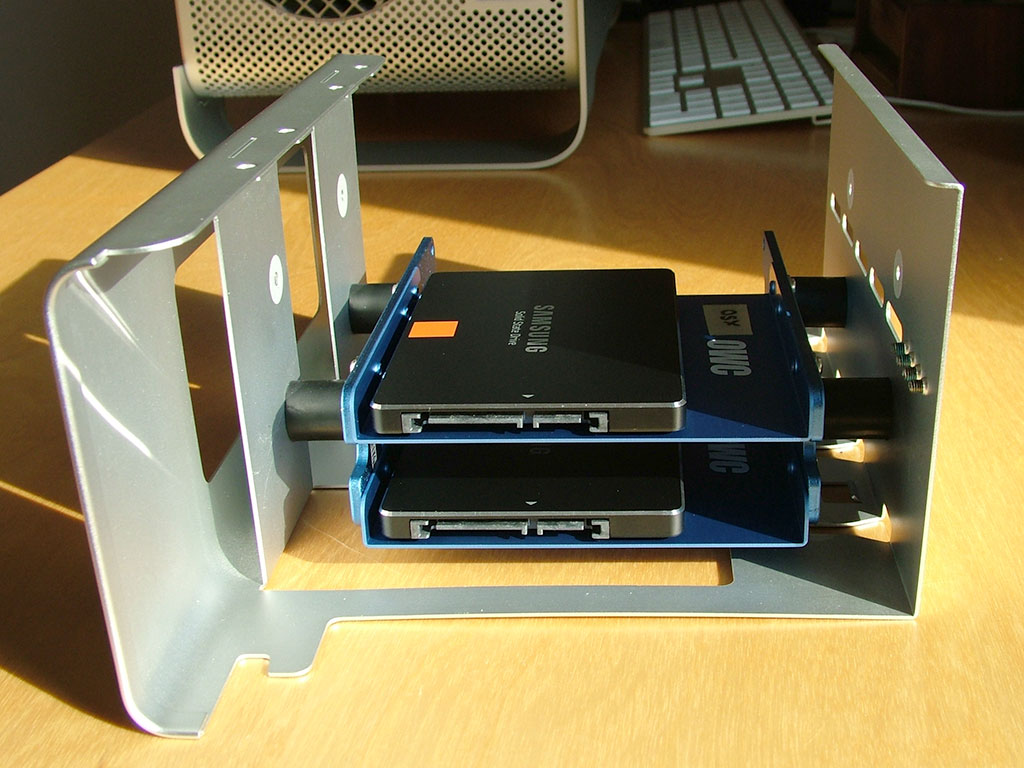
Cabling is easier without the Optical Drive. I stored the power splitter on the top of the SSDs like this...
When the Optical Drive sled is put back in, there is no clue that there are SSDs in the bay. Just like it should be...
Enabling TRIM
The Rocket 640L fully supports TRIM when used with an SSD that is TRIM-compatible too. The TRIM Enabler application is a great tool for turning on TRIM on non-Apple drives. Using the tool and then checking About This Mac - More Info - System Report - SATA / SATAExpress and choosing your SSD will report "TRIM Support: Yes"
The Final Result
Boot times for the Rocket 640L are as follows...
Time to Chime : 13s
Time to Apple : 21s
Time to Desktop : 32s
This is only one second faster than the Samsung 840Pro connected directly to the original SATA II cable (without the Rocket 640L in the Mac Pro) so it appears that early reports of prolonged boot times have been overcome.
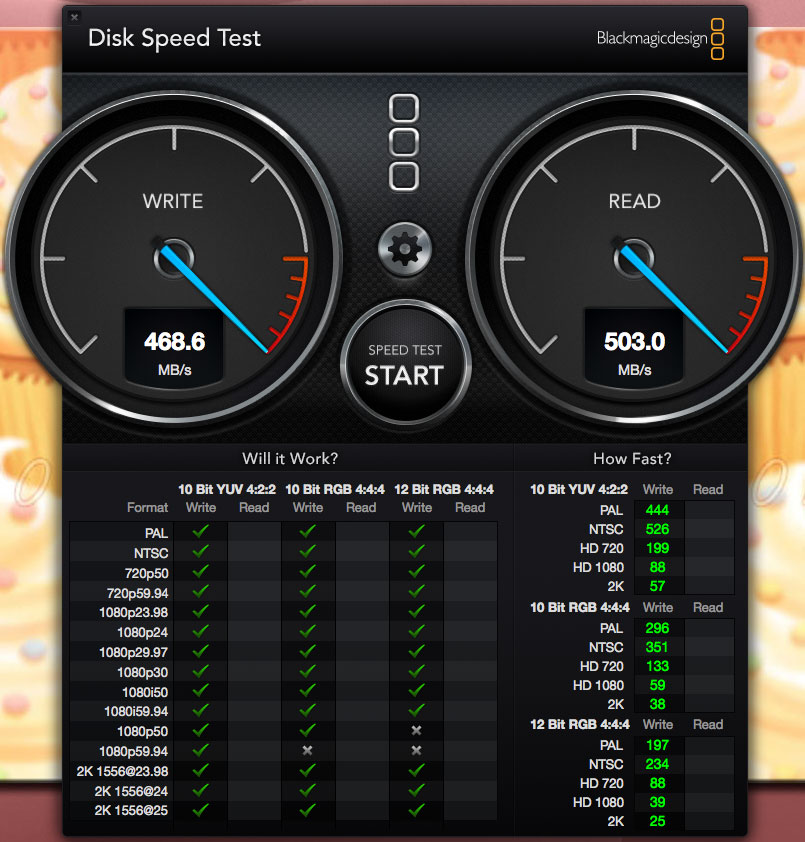
This is a Black Magic Speed Test for ONE Samsung 840PRO 256Gb SSD over the SATA III cable through the Rocket 640L card. I do not intend to run the pair of SSDs in a RAID config but that is perfectly possible with both the Rocket 640L and RocketRAID 640L. Speeds should top out at about 650-675MB/s in RAID 0
I followed his guide when I installed my Highpoint Rocket 640L card to enable two bootable SATA III SSDs but since my specific installation differed from his, I thought some new pictures might inspire other folks to try the same thing.
I would also like to thank the folks at Mac-Upgrade.co.uk for ordering an OWC Multi-Mount from the States for me.
For the purpose of this guide I will be installing two non-RAID SATA III SSDs in the Optical drive bay.
What you will need
Host Card : Highpoint Rocket 640L Lite (£56) (or the RocketRAID 640L Lite if you need more RAID options)
SATA Cable : 100cm SATA III cable (£5.70 ea) (one for each SSD)
Power splitter : 30cm SATA Power Splitter (£3)
Drive Bay Adapter : OWC Multi-Mount 2xSSD (£39)
There are several much cheaper mounting kits available such as the Silverstone PC Drive Bay Adapter that Concorde Rules listed but I had the spare cash so decided to treat myself. Note that OWC have recently updated the Multi-Mount to include better SSD trays and the stock at Mac-Upgrade is the new stock.
NOTE : The specific SATA Power Splitter that I listed there has two small plastic clips on the side that had to be snipped off to allow it to fit into one of the Optical Drive's combined Power / SATA II connector. A small pair of snips did the job. Snip the Power Splitter, not the SATA II connector of course.
Getting Started - Accessing the Optical Drive Bay
There are quite a few guides to removing the Optical Drive from the 2009/2010 Mac Pro but they all tell you to take off the side panel and leave the case latch in the OPEN position as there is a rod that engages in the Optical Drive bay too. Remove your drive sleds for ease of access.
This is the view once you have taken the Optical Drive caddy out. You will need to remove the two highlighted screws to get the small backplate off. Be prepared to find dust behind it...

With the backplate removed you can see the original Optical Drive power and SATA II cables. We will be taking power from one of the SATA II connectors but not using the data cables...

As Concorde Rules posted, there is a small opening in the corner which is just big enough to get your new SATA III cables through...

It is a squeeze but it does fit...

The back plate will then go back on and cover up your new cables...

Fitting the Rocket 640L card
As it ships, the Rocket 640L will come with some quite old firmware. The version numbers will be similar to these below...
Bios 1.0.0.1008
Firmware 2.3.0.1028
Bootloader 1.0.1.0002
While this firmware set will boot perfectly in OSX and Windows, it is affected by a Kernel Panic on Wake From Sleep. Fortunately Marvell who made the 88SE9230 Controller on the card have released a new Firmware set to address this issue.
DOWNLOAD LINK : UNAVAILABLE AT THIS TIME
I do not know if this new firmware is available for general release yet so I will not post a link until I have permission to do so.
You do need a PC to update this firmware with a bootable DOS image on CD or USB as a normal OS will lock access to the firmware for security reasons.
A successful flash of the firmware takes about a minute and will update the card to the following versions...
Bios 1.0.0.1013
Firmware 2.3.0.1046
Bootloader 2.1.0.1004
This firmware will boot in OSX and Windows. It will successfully Wake From Sleep. Drives will be shown as External however. Marvell may intend this for a specific reason to do with hot-removable drives.
I put my Rocket 640L in the top PCI-E slot just under the drive sleds...

Assembling the OWC Multi-Mount
The OWC Multi-Mount is a beautiful piece of kit which will fit two 3.5" or 2.5" drives into a single 5.25" drive bay. The package contents are as follows...

The 2.5" SSD fits neatly onto the holding plate with four screws that go into the underside of the SSD...

Two of them together will look like this...

If you are keeping the Optical Drive in its bay, you will have a harder time getting the power splitter tidied away nicely but it will go.

I have not used my Optical Drive for over a year so decided to take it out. This gives me more space for the SATA III data and power cables, improves airflow to the PSU and stops the annoying gronking noise when you power on the Mac Pro.

Cabling is easier without the Optical Drive. I stored the power splitter on the top of the SSDs like this...

When the Optical Drive sled is put back in, there is no clue that there are SSDs in the bay. Just like it should be...

Enabling TRIM
The Rocket 640L fully supports TRIM when used with an SSD that is TRIM-compatible too. The TRIM Enabler application is a great tool for turning on TRIM on non-Apple drives. Using the tool and then checking About This Mac - More Info - System Report - SATA / SATAExpress and choosing your SSD will report "TRIM Support: Yes"
The Final Result
Boot times for the Rocket 640L are as follows...
Time to Chime : 13s
Time to Apple : 21s
Time to Desktop : 32s
This is only one second faster than the Samsung 840Pro connected directly to the original SATA II cable (without the Rocket 640L in the Mac Pro) so it appears that early reports of prolonged boot times have been overcome.
This is a Black Magic Speed Test for ONE Samsung 840PRO 256Gb SSD over the SATA III cable through the Rocket 640L card. I do not intend to run the pair of SSDs in a RAID config but that is perfectly possible with both the Rocket 640L and RocketRAID 640L. Speeds should top out at about 650-675MB/s in RAID 0

Last edited:
As an Amazon Associate, MacRumors earns a commission from qualifying purchases made through links in this post.

