Become a MacRumors Supporter for $50/year with no ads, ability to filter front page stories, and private forums.

Tarek

macrumors 6502
Original poster
Jun 25, 2009
398
78
Cairo
I tried Command + R for internet recovery but this model doesn't seem to have it. The issue is, I don't have access to another Mac in order to create a bootable USB so would I be able to do it on my Windows PC? The Mac is currently on MacOS Sierra. Also if there's a way to erase all content and settings without having to format, that would be even better.

Thank you
 

MBAir2010

macrumors 604
May 30, 2018
6,975
6,354
there
try the option only process.

then you can erase the drive using "disk utility"

you can make a bootable usb with the macbook since all of them can,
unless the usb ports does not work
 
  • Like
Reactions: Tarek

Tarek

macrumors 6502
Original poster
Jun 25, 2009
398
78
Cairo
try the option only process.

then you can erase the drive using "disk utility"

you can make a bootable usb with the macbook since all of them can,
unless the usb ports does not work
I am currently downloading macOS Catalina DMG and will flash it to a USB drive using TransMac according to some guides I found, do you think that'll work? I saw that Catalina is the latest compatible macOS with that model.
A 2012 will have Internet Recovery. Use Command-Option-R to force it (plain Command-R will typically boot to the recovery partition instead).

Erase All Content and Settings is not available on that model.
I tried that combo but nothing happens, it keeps just booting into macOS no matter what I do.
 

MBAir2010

macrumors 604
May 30, 2018
6,975
6,354
there
osx daily has great rebooting instructions, i can provide a link.
i would try the tool Nermal provided that is fail-safe!

what OSX do you want on the MacBook Air?
 
  • Like
Reactions: Tarek

Tarek

macrumors 6502
Original poster
Jun 25, 2009
398
78
Cairo
I don't know what TransMac is, but you should use the createinstallmedia tool. It's supported by Apple and will almost certainly work.
I completely forgot that I could just use the Mac for that. I already have the DMG file, can I just transfer it over to the MBA and do this?
osx daily has great rebooting instructions, i can provide a link.
i would try the tool Nermal provided that is fail-safe!

what OSX do you want on the MacBook Air?
macOS Catalina. I read about compatibility and I believe that's the latest OS this model received.
 

Tarek

macrumors 6502
Original poster
Jun 25, 2009
398
78
Cairo
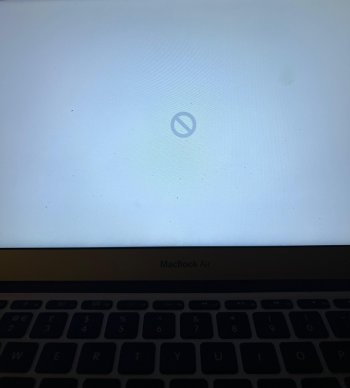
I used the createinstallmedia tool on the MBA but I keep getting stuck here when I hold Option and boot from USB. What am I doing wrong? I am sure this model is compatible with Catalina.

EDIT: Okay last shot, I am downloading macOS Mojave from the App Store on the Mac, hopefully when I use createinstallmedia then it should work well, maybe the Catlaina DMG I downloaded from a random gdrive wasn't the way to go lol
 

Attachments

  • WhatsApp Image 2024-08-16 at 3.59.20 AM.jpeg
    WhatsApp Image 2024-08-16 at 3.59.20 AM.jpeg
    379.4 KB · Views: 66
Last edited:

Nermal

Moderator
Staff member
Dec 7, 2002
21,005
4,584
New Zealand
maybe the Catlaina DMG I downloaded from a random gdrive wasn't the way to go lol
I know there are hacked versions around, made to run on non-Apple hardware. Who knows what you've ended up with.

If you continue to get the "no" icon once you've downloaded from the App Store and used createinstallmedia then follow these steps:
- Hold Option to display the boot menu.
- Choose the USB drive.
- Hold Command-V to boot in "verbose mode". This will make the screen fill with text, which you can then post here.
 
  • Like
Reactions: Tarek

Fishrrman

macrumors Penryn
Feb 20, 2009
29,233
13,304
OP:

I have the solution for you.
PRINT OUT this reply and keep it next to you as you work.

Try INTERNET RECOVERY.
This is NOT THE SAME as "the recovery partition" (command-R)

Do this:
Power down, all the way off.

Then...
Press AND HOLD
Command-OPTION-R
KEEP HOLDING THESE KEYS DOWN as you press the power on button.
DON'T LET GO OF THESE KEYS (shouting intentional).

When asked for your wifi password, NOW you can let go of the key combo and enter it.
You should then see the internet utilities loading (spinning globe).
It takes a while - be patient.

When the utilities have loaded, don't open the OS installer.
Instead, open disk utility.
IMPORTANT IMPORTANT IMPORTANT
You MUST go to the "view" menu and choose "show all devices".
You can't see the internal SSD unless you do this!

Now, look at "the list on the left".
The TOPMOST item should be the physical drive inside.
We need to ERASE it, so click on the top line to select the drive and then click "erase".

Erase to APFS, GUID partition format.
When the erase is done, quit disk utility and open the OS installer.

Start clicking through.
The Mac will restart several times, and the screen will go dark for a minute or more with no other indication of activity. Just be patient.

When done, you'll see the initial setup screen (choose your language).

WHAT YOU DO NOW DEPENDS ON WHAT YOU'RE GOING TO DO WITH THE Macbook.
If you're selling it or giving it away, PRESS THE POWER ON BUTTON AND KEEP HOLDING IT DOWN UNTIL THE SCREEN GOES DARK and the MBP shuts down.
It's now ready to hand over to the next person.

OR... if you're going to rebuild it and use it for yourself...
... click through setup.
IF you have a back drive, CONNECT IT NOW and use setup assistant to restore your data.

Good luck.
 

Tarek

macrumors 6502
Original poster
Jun 25, 2009
398
78
Cairo
I know there are hacked versions around, made to run on non-Apple hardware. Who knows what you've ended up with.

If you continue to get the "no" icon once you've downloaded from the App Store and used createinstallmedia then follow these steps:
- Hold Option to display the boot menu.
- Choose the USB drive.
- Hold Command-V to boot in "verbose mode". This will make the screen fill with text, which you can then post here.
Thankfully it worked. I ended up running into issues while downloading Mojave so I opted for High Sierra, used createinstallmedia method and then it worked. Thanks a lot!
Is it even worth the trouble?
Technically yes. It's still pretty good for at least browsing and basic tasks, it's still plenty quick because it has a SSD that doesn't have a lot of read/write on it because I barely used it. I actually have 2 other MBPs (2012 and 2015) that need battery replacements and then I'll probably sell them as well.
YES!

early intel mac are very usable in 2024, i'm using 3 from 2010-2012
while the new M1 are in a box.
Agreed.

OP:

I have the solution for you.
PRINT OUT this reply and keep it next to you as you work.

Try INTERNET RECOVERY.
This is NOT THE SAME as "the recovery partition" (command-R)

Do this:
Power down, all the way off.

Then...
Press AND HOLD
Command-OPTION-R
KEEP HOLDING THESE KEYS DOWN as you press the power on button.
DON'T LET GO OF THESE KEYS (shouting intentional).

When asked for your wifi password, NOW you can let go of the key combo and enter it.
You should then see the internet utilities loading (spinning globe).
It takes a while - be patient.

When the utilities have loaded, don't open the OS installer.
Instead, open disk utility.
IMPORTANT IMPORTANT IMPORTANT
You MUST go to the "view" menu and choose "show all devices".
You can't see the internal SSD unless you do this!

Now, look at "the list on the left".
The TOPMOST item should be the physical drive inside.
We need to ERASE it, so click on the top line to select the drive and then click "erase".

Erase to APFS, GUID partition format.
When the erase is done, quit disk utility and open the OS installer.

Start clicking through.
The Mac will restart several times, and the screen will go dark for a minute or more with no other indication of activity. Just be patient.

When done, you'll see the initial setup screen (choose your language).

WHAT YOU DO NOW DEPENDS ON WHAT YOU'RE GOING TO DO WITH THE Macbook.
If you're selling it or giving it away, PRESS THE POWER ON BUTTON AND KEEP HOLDING IT DOWN UNTIL THE SCREEN GOES DARK and the MBP shuts down.
It's now ready to hand over to the next person.

OR... if you're going to rebuild it and use it for yourself...
... click through setup.
IF you have a back drive, CONNECT IT NOW and use setup assistant to restore your data.

Good luck.

Thanks a lot for this. Fortunately, the createinstallmedia method worked but I'll keep this saved in case I need it in the future.
 
  • Like
Reactions: MBAir2010
Register on MacRumors! This sidebar will go away, and you'll see fewer ads.