Become a MacRumors Supporter for $50/year with no ads, ability to filter front page stories, and private forums.

troop231

macrumors 603
Original poster
Jan 20, 2010
5,826
561
I'm wanting to generate a UIImage that's a RGB gradient that also has a portion of black on the left side. I would like to do this programmatically, instead of having to make the image in Photoshop and using it as an asset in the app.

I've searched on here and have seen the generation of iOS color wheels before, but nothing like a rectangle below which I mocked in Photoshop:

bMs75.png


This will be for letting users change text color as they touch inside of the UIImage.

I'm not really sure where to begin however, and would appreciate some pointers.

This is the code I used to make a color wheel before, but I need a rectangle (as shown above) now.

Code:
     UIGraphicsBeginImageContextWithOptions(CGSizeMake(110, 110), YES, 0.0);
     [[UIColor blackColor] setFill];
     UIRectFill(CGRectMake(0, 0, 110, 110));
     
     int sectors = 360;
     float radius = MIN(100, 100)/2;
     float angle = 2 * M_PI/sectors;
     UIBezierPath *bezierPath;
     
     for (int i = 0; i < sectors; i++)
     {
         CGPoint center = CGPointMake(55, 55);
         bezierPath = [UIBezierPath bezierPathWithArcCenter:center radius:radius startAngle:i * angle endAngle:(i + 1) * angle clockwise:YES];
         [bezierPath addLineToPoint:center];
         [bezierPath closePath];
         UIColor *color = [UIColor colorWithHue:((float)i)/sectors saturation:1. brightness:1. alpha:1];
          [color setFill];
          [color setStroke];
         [bezierPath fill];
         [bezierPath stroke];
     }
     
     self.colorWheelImage = UIGraphicsGetImageFromCurrentImageContext();
     UIGraphicsEndImageContext();

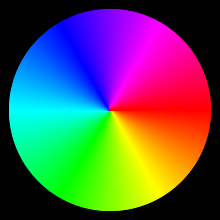
Result of that code:

D2lVTM0.png
 
Last edited:
Edit: still would like to improve this to make it visually appealing with the Hue Saturation Brightness model.

cox8Ohs.png


Code:
    self.textColorLayer = [CAGradientLayer layer];
    [self.textColorLayer setFrame:CGRectMake(171, 31, 140, 35)];
    self.textColorLayer.colors =@[(id)[UIColor blackColor].CGColor,(id)[UIColor redColor].CGColor,(id)[UIColor orangeColor].CGColor,(id)[UIColor yellowColor].CGColor,(id)[UIColor greenColor].CGColor,(id)[UIColor cyanColor].CGColor,(id)[UIColor blueColor].CGColor,(id)[UIColor purpleColor].CGColor,(id)[UIColor magentaColor].CGColor];
    
    self.textColorLayer.startPoint =CGPointMake(0, .5);
    self.textColorLayer.endPoint =CGPointMake(1, .5);
    
    self.textColorLayer.cornerRadius = 17.5f;
    
    [self.theCell.layer addSublayer:self.textColorLayer];
 
Last edited:
Your posted code is drawing a series of filled arcs, each one in a slightly different hue. That is, it's stepping around a circle, and at each step (the filled arc), it's also stepping the hue. In an HSB/HSV color space, hue varies in a circular way, starting from pure red at the East (zero degrees or radians from the horizontal X axis).

To draw a rectangle, change the code to draw a piece of a rectangle instead of a piece of a circle. Continue stepping the hue as you draw each piece. Since the overall shape is a rectangle, each piece will be a thin vertical rectangle.

To get black on the left, fill that first, then start stepping the thin rectangles at an offset of 15 or so points.


If there's something you don't understand about the color-circle code, you need to ask about that. Likewise, if there's something you don't understand about the Hue-Saturation-Brightness color model, you need to ask about that. Otherwise we'll probably assume you understand what's happening in the posted code and why.

If you copy-pasted that code from somewhere else, tell us where it's from.

EDIT
Wow, I'm really getting slow.

I understand the circle code, but don't understand how I'd apply it for a rectangle. The resolved code probably doesn't look as good compared to a bezier path however, and I'd still like to make it with the Hue Saturation Brightness model instead of the CAGradientLayer method above. So technically the question is un-resolved now.
 
I'm obviously lost and have been scratching my head at this all day. The below code gives me the resulting image:
3GIkEtK.png


Code:
    - (void)viewDidLoad
    {
        [super viewDidLoad];
    
	UIGraphicsBeginImageContextWithOptions(CGSizeMake(140, 35), YES, 0.0);
    
        int sectors = 255;
        int xAxis = 0;

        UIBezierPath *bezierPath;
    
        for (int i = 0; i < sectors; i++)
        {
            xAxis ++;
        
            bezierPath = [UIBezierPath bezierPathWithRect:CGRectMake(xAxis, 0, 5, 35)];
    
            [bezierPath closePath];
            UIColor *color = [UIColor colorWithHue:((float)i)/sectors saturation:1. brightness:1. alpha:1];
            [color setFill];
            [color setStroke];
            [bezierPath fill];
            [bezierPath stroke];
        }
    
        self.colorImage = UIGraphicsGetImageFromCurrentImageContext();
        UIGraphicsEndImageContext();
    
        self.theImageView.image = self.colorImage;
        self.theImageView.layer.masksToBounds = YES;
        self.theImageView.layer.cornerRadius = 17.5f;
    }
 
Last edited:
Resolved finally: I ended up using a UISlider to do what I wanted instead, which looks better too.
 
Register on MacRumors! This sidebar will go away, and you'll see fewer ads.