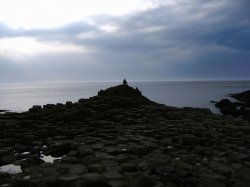
Hiya, yes another thread asking for help and any criticism (and don't worry, I can take it). I took this shot on holiday in Ireland last year and now I want it printed nice and large, maybe on canvas as a present to my friend who I stayed with while I was there. In my humble opinion, I think its a decent-to-good shot, actually a really lucky one-time shot that turned out miles better than I ever thought. I've done some photoshopping to add a neutral density filter effect to the sky which was overblown. Any more ideas on how to improve it before I send it to print?
Got a tip for us?
Let us know
Become a MacRumors Supporter for $50/year with no ads, ability to filter front page stories, and private forums.
How to perfect this photo for large print?
- Thread starter 01jamcon
- Start date
- Sort by reaction score
You are using an out of date browser. It may not display this or other websites correctly.
You should upgrade or use an alternative browser.
You should upgrade or use an alternative browser.
1st thing, level up the horizon.
Haha, in all the time I've had this picture on my desktop, I should've noticed that it aint straight, but fair cop, I shall striaghten it, thank you.
The sky in the upper left corner is blown out (over exposed)...see if you can bring some detail back with the Burn Tool (Photoshop).
This is more of a personal preference on how you want the photo too look but...I'd say either decide on making the bottom part really dark, or lighten it up so we can see some more detail. It's kinda half way between those two right now and I'm itching to see more and it's making squint really hard at the bottom too scavenge every bit of detail I can find.
edit: and maybe try the Curves tool for that^
This is a very nice shot. One thing I would try to do is to accentuate the raining light on the left side of the image. Try bumping the contrast a bit (or if you know what you're doing, you can use the curves).
Another thing, especially for printing, is to try to reduce the noise a bit. Noise ninja will do that, or if you don't have that you can just despeckle the blue channel.
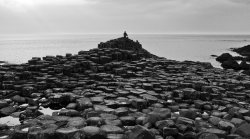
Also- I think this picture would look awesome as a black & white- have you tried that? This is, of course, a personal preference.
Another thing, especially for printing, is to try to reduce the noise a bit. Noise ninja will do that, or if you don't have that you can just despeckle the blue channel.
Also- I think this picture would look awesome as a black & white- have you tried that? This is, of course, a personal preference.
The sky in the upper left corner is blown out (over exposed)...see if you can bring some detail back with the Burn Tool (Photoshop).
This is more of a personal preference on how you want the photo too look but...I'd say either decide on making the bottom part really dark, or lighten it up so we can see some more detail. It's kinda half way between those two right now and I'm itching to see more and it's making squint really hard at the bottom too scavenge every bit of detail I can find.
edit: and maybe try the Curves tool for that^
You're right, it is in between because I couldn't decide myself, I didn't really want a complete silhouette, but I didn't like the grey with the blue-tinted sky, the colours didn't seem to mix well for me. But I shall keep playing with curves and watching more tutorials on photoshopping before I get a finalized print. Perhaps some detail is lost because this is a small exported version of the real photo, I think that the full version has a bit more detail than you can see.
Also- I think this picture would look awesome as a black & white- have you tried that? This is, of course, a personal preference.
From the version done by sonor, I can't say that I prefer the black and white version. (I do really like the crop though, the 2/3 rule really works I guess) I realise that I could still play with the RGB channels to get it looking more how I'd like, but seeing as the shot was virtually in b&w to begin with, I thought I'd leave the blue cast that was there originally just to make it feel a bit more cold/moody. Thanks for the suggestions though I shall keep on trying to get it right.
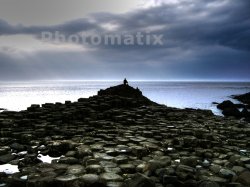
I am REALLY new to this idea, but you may want to check out a technique called HDR (High Dynamic Range) http://en.wikipedia.org/wiki/High_dynamic_range_imaging
The basic idea is that you have 3 versions of the same photo. Under exposed, over exposed, and normal. Then through some magic, you combine the 3 images and get an image that really pops, and would look great in print. I used a program called Photomatics Pro (a demo version), but I'm sure you can find articles on how to do this in PhotoShop, or Gimp, or whatever.
But since I wasn't there to take the pictures, I created an over-exposed and under-exposed version of your picture with iPhoto (-3/+3) and it seemed to work pretty well.
EDIT: I should mention that I've only been playing with HDR since yesterday, and am pretty new to the digital photography game, so others here can probably give you better instructions")
The basic idea is that you have 3 versions of the same photo. Under exposed, over exposed, and normal. Then through some magic, you combine the 3 images and get an image that really pops, and would look great in print. I used a program called Photomatics Pro (a demo version), but I'm sure you can find articles on how to do this in PhotoShop, or Gimp, or whatever.
But since I wasn't there to take the pictures, I created an over-exposed and under-exposed version of your picture with iPhoto (-3/+3) and it seemed to work pretty well.
EDIT: I should mention that I've only been playing with HDR since yesterday, and am pretty new to the digital photography game, so others here can probably give you better instructions
Attachments
I am not an "let's do an HDR because we can" person, but I'll admit this one has some potential for it.
Personally, what I do rather an an HDR is (for the context of this photo) create two layers and edit (curves) the bottom section to my hearts content, regardless of how the sky looks. Then do the opposite for the sky, ignoring the bottom. Then I'd just mask them onto each other so I get a perfect sky as well as the bottom. (I might give it a try later, but I need to go out soon)
Like I said, this is how I am used to doing it, but I think the HDR idea might work well too, but I'm no expert on that.
Do it in HDR & B&W.
After seeing the black and white example, I was thinking the same thing. Is that even possible? What would you do, convert the HDR to B&W?
Restraint
The most important thing when editing, whether HDR or not, is not keep the light consistent ad natural to what would have been realistic in the situation. Our eyes are very good at detecting what is a realistically lit scene. This is why many HDR, if done without subtlety, look unnatural. HDR is best when it stays within the realms of plausibility.
The mock-up that was posted earlier is pushing it a bit.
Register on MacRumors! This sidebar will go away, and you'll see fewer ads.