Folks,
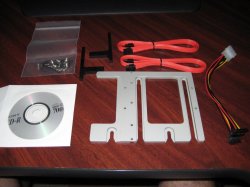
This is a pictorial installation guide for the MaxConnect 2-drive + DVD sled kit from http://maxupgrades.com - this kit is part number SZ-MCMPOPT04 and was $89. Look for the picture that says maxPro 6x towards the middle of the page, but the picture isn't really representative of what you get. That's why I put together this pictorial, so if you're interested in using those 2 extra ports, while offering good ventilation to the extra drives, you'll see what's involved.
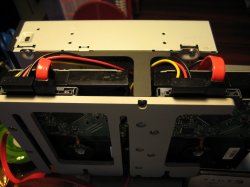
The whole install took about 15 minutes, but I already had 2 SATA cables installed under the fan assembly when I did my CPU upgrades, so if you don't have that, it'll take 5-10 minutes longer. TIP: If you are going ahead and removing the fan assembly to connect the extra 2 cables, go ahead and clean your CPU heatsinks with compressed air while you're in there.
I placed my comments in the pictures as captions in Picasa Web Album Slide Show mode, so be sure to hit "Play" when visiting the photo album and extend the delay time a few more seconds.
http://picasaweb.google.com/pamplin/MaxConnect#slideshow/5372468214321152386
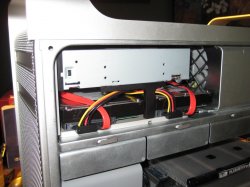
Overall the kit does what it is supposed to, but it is not even CLOSE to what I thought it was going to be (a replacement slide-out bay with 2 slide-out hard disk trays). Nope, you basically attach the drives to the sled with screws, then bolt the DVD onto that, then install the cabling and fit it all in.
I didn't like the little hex screws used throughout (you lose that wrench, well, you lose), and the manual was not accurate in terms of the parts included (their picture of the DVD holder was COMPLETELY different.)
Was it worth $89? Probably not. But it's installed and working without issues, so I guess it's better than fashioning my own out of driftwood or something.
Go check it out! Update: I added some highlight pics here (without the Picasa captions).
JP
This is a pictorial installation guide for the MaxConnect 2-drive + DVD sled kit from http://maxupgrades.com - this kit is part number SZ-MCMPOPT04 and was $89. Look for the picture that says maxPro 6x towards the middle of the page, but the picture isn't really representative of what you get. That's why I put together this pictorial, so if you're interested in using those 2 extra ports, while offering good ventilation to the extra drives, you'll see what's involved.
The whole install took about 15 minutes, but I already had 2 SATA cables installed under the fan assembly when I did my CPU upgrades, so if you don't have that, it'll take 5-10 minutes longer. TIP: If you are going ahead and removing the fan assembly to connect the extra 2 cables, go ahead and clean your CPU heatsinks with compressed air while you're in there.
I placed my comments in the pictures as captions in Picasa Web Album Slide Show mode, so be sure to hit "Play" when visiting the photo album and extend the delay time a few more seconds.
http://picasaweb.google.com/pamplin/MaxConnect#slideshow/5372468214321152386
Overall the kit does what it is supposed to, but it is not even CLOSE to what I thought it was going to be (a replacement slide-out bay with 2 slide-out hard disk trays). Nope, you basically attach the drives to the sled with screws, then bolt the DVD onto that, then install the cabling and fit it all in.
I didn't like the little hex screws used throughout (you lose that wrench, well, you lose), and the manual was not accurate in terms of the parts included (their picture of the DVD holder was COMPLETELY different.)
Was it worth $89? Probably not. But it's installed and working without issues, so I guess it's better than fashioning my own out of driftwood or something.
Go check it out! Update: I added some highlight pics here (without the Picasa captions).
JP