Become a MacRumors Supporter for $50/year with no ads, ability to filter front page stories, and private forums.

jabz10

macrumors member
Original poster
Nov 18, 2008
69
31
New Zealand
I currently have a 8 Core 2.26GHz, I am intending to try upgrade the CPU's to 12 Core via the Firmware flashing method and replace the CPUs.

My question is around obtaining the Xeon X5660 CPU's from Ebay. For example can I just get 2 of these

Or this there something else I should be looking for? Is there a specific variant(s) of the Xeon X5660 I need? Or can I get them from Ebay as long as the 2 I get (even from different sellers) are Xeon X5660 2.8GHz Socket 1366?

That looks exactly right to me. I just did the same with x5680s off eBay.
 
Would I be able to put in dual i7 970 or 980's and their extreme variants? Would it work, same socket?
 
Nope. One of main selling points of Xeon is that only they have the QPI link to let two CPUs chat.

Used to be part of reason they were worth more money in MP.
 
Ok I ended up getting 2 of these Xeon X5660 http://www.ebay.com/itm/141120592840

I tried to install them tonight and failed so far. Basically I met all the pre requisites.
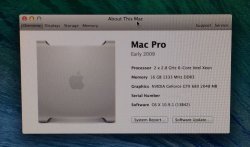
Installed the firmware correctly.

I read up on several threads, and largely the followed this guide

I first tried just CPU A, installed the board and tried booting the Mac Pro, initially I got no POST and a blinking power light. I tightened the heatsink some more according to the guide.
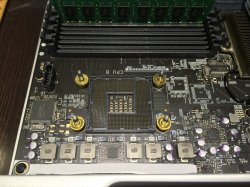
I now got a solid power light, but a few secs later I got a RED LED next to the thermal/fan connector on the processor tray CPU A. Then the OVTMP CPU A Led lit up on the logic board.

Tried a few things here, removed and reseated CPU, reapplied Arctic S5 etc, made sure the heatsink thermal/fan connector is plugged in all the way. Checked 2mm extra thermal pad on voltage regulators.

Same result, even after a SMC reset.
I then tried again but this time with the 2nd Xeon X5660 in CPU socket A, same result.

By now was getting worried I fried something, so I check the LGA socket couldn't find any bent pins. I then tried putting the original Nehalem Xeon E5520 2.26GHz back.
This works fine, the Mac pro posts, and I hear the chime followed by the gray Apple boot screen. Great relief comes over me.

This is where I am at now, unsure why I cannot get it to post with a single X5660.
I do have non ECC ram, but I wouldn't think it'd show the above symptoms if RAM is incompatible? The RAM works fine with the current Nehalem Xeon's E5520
 
This is where I am at now, unsure why I cannot get it to post with a single X5660.
When you didn't get past POST, it could be over or under-tightening the screws, or the fan/sensor connector is not properly seated assuming the processor is not defective. I noticed that Thomaspin's guide does not recommend using washers to compensate the 2mm gap, which is puzzling since most people used washers to lessen the possibility of over-tightening the screws. Given that there are no exact steps to follow, you may have to make minor adjustment of each screw by tightening or loosening a half (or quarter) turn until it works while not damaging the processor socket.
 
Update success!


I ended up using some washers (3 x brass flat washers to = 2mm) as mentioned by xcodeSyn which helped with tightening of the heatsink screws. This cannot be underestimated, Thomaspin's guide does not recommend them, but I do 110% it is the only real way to ensure you don't over tighten the heat sink screws!

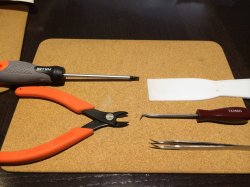
I also used the following tools:
-T15 Torx security bit screwdriver for heatsink screws
-Sharp pair of cutters for the heatsink fan connector
-Fine tip tweezers, for manipulating the heatsink fan connector, and to straighten any bent CPU socket pins (thankfully wasn't required)
-Plastic spatula, for spreading the Arctic silver 5
-Angled pick for pushing the heatsink fan connector properly into the socket once the heat sink is placed over the CPU's.

Now I just need to get some 32GB 1333MHZ ECC Ram.
 

Attachments

  • about.jpg
    about.jpg
    274.2 KB · Views: 2,539
  • tools.jpg
    tools.jpg
    338.1 KB · Views: 953
  • cpub.jpg
    cpub.jpg
    441.2 KB · Views: 2,930
Last edited:
Update success!


I ended up using some washers (3 x brass flat washers to = 2mm) as mentioned by xcodeSyn which helped with tightening of the heatsink screws. This cannot be underestimated, Thomaspin's guide does not recommend them, but I do 110% it is the only real way to ensure you don't over tighten the heat sink screws!

I also used the following tools:
-T15 Torx security bit screwdriver for heatsink screws
-Sharp pair of cutters for the heatsink fan connector
-Fine tip tweezers, for manipulating the heatsink fan connector, and to straighten any bent CPU socket pins (thankfully wasn't required)
-Plastic spatula, for spreading the Arctic silver 5
-Angled pick for pushing the heatsink fan connector properly into the socket once the heat sink is placed over the CPU's.

Now I just need to get some 32GB 1333MHZ ECC Ram.

Awesome.
 
Update success!


I ended up using some washers (3 x brass flat washers to = 2mm) as mentioned by xcodeSyn which helped with tightening of the heatsink screws. This cannot be underestimated, Thomaspin's guide does not recommend them, but I do 110% it is the only real way to ensure you don't over tighten the heat sink screws!

I also used the following tools:
-T15 Torx security bit screwdriver for heatsink screws
-Sharp pair of cutters for the heatsink fan connector
-Fine tip tweezers, for manipulating the heatsink fan connector, and to straighten any bent CPU socket pins (thankfully wasn't required)
-Plastic spatula, for spreading the Arctic silver 5
-Angled pick for pushing the heatsink fan connector properly into the socket once the heat sink is placed over the CPU's.

Now I just need to get some 32GB 1333MHZ ECC Ram.

Congrats!

Thomaspin mentioned that the heatsinks were not stable when he tried washers.

Do your heatsinks wobble at all?

Do you mean that you used 3 washers per post to make up for the 2mm difference? Not sure what you mean by "x 3".
 
Update success!

Congrats!

Unfortunately I wasn't so luckily with my dual x5660 upgrade. I used 2 M4 1mm nylon washers and my CPU A install went fine. Booted up fine and got a Geekbench score of ~14K with just the single processor! Of course the fans were going full blast. However could not get it to work with the CPU B. Tried at least half a dozen times thinking it wasn't seating right, swapping out washers, memory, drives, video cards etc. It never posts.

What is also strange is it never gives a blinking power light or lights on the board itself. It just turns on and sits there with the fans running slow. I can even see the fan running on the CPU B heat sink so I know that connection is fine. Right now I'm thinking I might have a bad second x5660, but wasn't up to swapping it out with CPU A as I was pretty frustrated and also was a bit worried that if it was a bad CPU that maybe it also damaged the socket. So for now I went back to my dual x5550's which worked for both A and B.

I have a used 2009 single CPU board arriving in a few days, so I'll try both processors there to see if one of the x5660 just isn't working.
 
Thomaspin mentioned that the heatsinks were not stable when he tried washers.

Do your heatsinks wobble at all?
The heatsinks would wobble with or without washers before the screws are tightened. That's why you should avoid any lateral movement once the heatsink is in place over the CPU socket before tightening the screws.

If you have the time and patience, here are two links with many posts of people's experiences upgrading their 2009 DP MP:

1 https://forums.macrumors.com/threads/781908/

2. http://forum.netkas.org/index.php/topic,852.225.html

Here's a quote from the 2nd link:
MindBender said:
The 2mm thick washers are crucial. Without them the heat sink is easily overtightened or tightened asymmetrically, leading to poor contacts.
There are more than one way of doing the upgrade, any guide is just a reference and not a bible to be followed literally.
 
Update success!


I ended up using some washers (3 x brass flat washers to = 2mm) as mentioned by xcodeSyn which helped with tightening of the heatsink screws. This cannot be underestimated, Thomaspin's guide does not recommend them, but I do 110% it is the only real way to ensure you don't over tighten the heat sink screws!

I also used the following tools:
-T15 Torx security bit screwdriver for heatsink screws
-Sharp pair of cutters for the heatsink fan connector
-Fine tip tweezers, for manipulating the heatsink fan connector, and to straighten any bent CPU socket pins (thankfully wasn't required)
-Plastic spatula, for spreading the Arctic silver 5
-Angled pick for pushing the heatsink fan connector properly into the socket once the heat sink is placed over the CPU's.

Now I just need to get some 32GB 1333MHZ ECC Ram.

Stunning - I just ordered a pair of X5660 as well and wasn't going to use the washer but maybe I will....

My biggest problem is finding the 2.0mm Thermal Pads in New Zealand... Maybe Amazon Ex USA is my only option...

----------

Was just looking around on Ebay and seen these one of the better prices I have seen for official Apple ram, they have 8gb sticks if you want to go higher. Most likely you will need to reset the pram to get the 1333mhz speed recoginzed/used.

http://www.ebay.ca/itm/32GB-8X4GB-D...?pt=US_Memory_RAM_&hash=item20db7c1254&_uhb=1


I picked up 2 x 4Gb sticks from OWC for $70 plus $2.99 shipping to NZ

http://eshop.macsales.com/item/Other%20World%20Computing/1333D3W4M08K/

Hope these work with my other 4 x 4Gb sticks
 
Stunning - I just ordered a pair of X5660 as well and wasn't going to use the washer but maybe I will....

My biggest problem is finding the 2.0mm Thermal Pads in New Zealand... Maybe Amazon Ex USA is my only option...

----------


I picked up 2 x 4Gb sticks from OWC for $70 plus $2.99 shipping to NZ

http://eshop.macsales.com/item/Other%20World%20Computing/1333D3W4M08K/

Hope these work with my other 4 x 4Gb sticks

You want the washers they are the best guide to let you know your close to being done tightening. That ram should just work as the ram already in your machine would be the same single sided variety for the chips on it as that is you bought. Here is the link where I got my pad from Hong Kong all the way across Canada in a week for the economy service I thinking NZ would be even faster. Make sure you remove the plastic from both sides of it once you cut to fit.

http://www.ebay.ca/itm/180824714310?ssPageName=STRK:MEWNX:IT&_trksid=p3984.m1439.l2649


Great thanks - ordered !!
 
Finally bought X5680s for my Mac Pro upgrade, after so much research and rereading and watching videos over and over, lets hope I get it right. But one thing that I can't find the answer for is what hole size for the nylon washer! I know its 2mm, but Amazon has different hole sizes!! Is nylon better than metal?
 
Finally bought X5680s for my Mac Pro upgrade, after so much research and rereading and watching videos over and over, lets hope I get it right. But one thing that I can't find the answer for is what hole size for the nylon washer! I know its 2mm, but Amazon has different hole sizes!! Is nylon better than metal?

I *think* I used a M5 metal washer on mine. I had bought some M4 ones but they were too small (home depot and lowes were my sources)

My 2c on this:

If nylon I'd got more than 2mm thickness since I'd expect them to compress somewhat. In fact, I think the proper thickness is more like 2.5-3mm -- I had about 1.8-2mm of thickness, and still had maybe another mm of gap left in the end.

If the unit is ever going to be moved or shipped, I'd worry that having a gap between the cpu and washers won't provide enough stability. And I don't mean crush down the CPU until you hit the 2mm point -- I mean 2.5mm+ of washers.

Of course best is just to use a single-socket or 5,1 dual-socket board - I'm just relieved I didn't kill my system when upgrading, and I did have a spare single-socket board in case I screwed up.
 
I just upgraded my dual 2.26GHz machine two nights ago...

I measured the difference in thickness between new and original CPUs. My measurements showed a difference of 0.088" to 0.089" (2.235mm to 2.261mm). Both of my CPUs with the heat spreader varied in thickness from one side to the other by .001" (.0254mm)

For spacers I stacked two metal #6 washers on each post. I bought a box of 100 zinc plated washers at the local hardware store for $2.69. Two #6 washers stacked together measured out to between 0.086" to 0.087", which I decided was close enough to the difference in the CPUs. The thickness of washers probably varies with manufacturer and/or production run, so best to measure with calipers or a micrometer. Ideally, one would use shim stock to exactly match the difference in thickness.

For what it is worth: I installed the CPUs one at a time and each came up fully functional on the first try.

Hi, did you have to use any thermal pad to make up for the difference? If so, where and how do you install them.
 
If you have an iPad or mac maybe search on iBooks for 'mac pro 4.1'.

I did this a while back and I defiantly would recommend spacers/washers. I used brass washers and used 2.0mm of spacing, if I ever did it again I would use 2.2mm as I whimped out after 3 and 3/4 turns...

Best of luck ;)
 
Thermal pads are surprisingly hard to come by. If you are in NZ, they mostly come from Asian sources anyway, no need to get from the US.... go to HK ebay.

All of you using washers, isn't a concern maintaining reliable heat transfer via the snug fit of thermal pad from the heat sinks to the heat sensors on the logic board, the way you'd have it if you followed the no-washer method?

FYI, I've got my X5680s, got my firmware flashed to 5,1 with no complications, and am preparing for surgery once my thermal pads get here.
 
Register on MacRumors! This sidebar will go away, and you'll see fewer ads.