Become a MacRumors Supporter for $50/year with no ads, ability to filter front page stories, and private forums.

Megatronous

macrumors member
Original poster
Mar 22, 2021
33
3
Hi guys, it's been a while since I posted on this forum. The last time I posted I had the exact same problem, but didn't have the time anymore to look into it. Besides that, I was too mindf*cked with all the different programs etc. I started a new topic because posting in the other one would be too chaotic.

I'm trying to create a bootable USB of Mac OS Lion X through my MBP M1 (macOS Monterey 12.4). I want to boot my Mac Pro 1.1 with it.

Unfortunately, I encounter some problems creating a USB. It is obvious that OS X Lion is not supported on the M1, resulting in the fact that I can't obtain the Mac OS X Lion Installer. (In order to obtain the Installer, there is a pre-installer(?) which scans my MBP to see if it is compatible with Lion. I can download the InstallMacOSX.dmg of Apple themselves or the InstallESD.dmg file found on the web, but I can't extract the InstallMacOSX.pkg file.

(Lion) DiskMaker X is not compatible on the M1. DiskDrill (as far as I know) requires the same Installer, that I just don't know how to obtain, to create a bootable USB. When extracting the InstallESD.dmg file to a folder and manually searching the installer through DiskDrill, the Lion Installer is unclickable. The name is greyed out.

I saw certain websites that suggest using Terminal and 'createinstallmeda', but I'm not able to succeed with that. I fear that it is a combination of the fact that I have almost zero to no knowledge about Terminal and that the M1 Macs use different types of paths than an Intel Mac so I simply can't copy-paste the ones on the web.

The USB is already erased and formatted as a Mac OS Extended Journaled.

Is there someone that can help me by creating a bootable USB though the M1 Mac or is it simply impossible?
 
Last edited:
The "createinstallmedia" steps cannot work as the Lion installer is too old for that command.
If you don't have a Mac that you can use to make a bootable USB for Lion, there are other sources to get a USB installer that is ready to use - such as https://www.etsy.com/listing/938380751/mac-os-x-lion-107-bootable-usb-flash
Well my question was if it was even possible. I mean, I'm not that technically inclined but there should be a way right?

I furthermore have an iMac G5 if that could do the trick, but I would understand it if it won't because again, PPC (just like M1) is just different than Intel.
 
If you can get to the installer app - which will be named "Install Mac OS X Lion.app" (You may or may not see the .app extension, but it is an app, and not a .dmg or a .pkg file.)
You CAN try the iMac G5, to use the Leopard Disk Utility to "restore" that app to a USB flash drive, if you wish. You do need to go inside the app to the /Contents/SharedSupport, where you WILL find the "installESD.dmg". That file will be about 4.73 GB in size -- another way to tell that you have the correct file. Use that .dmg as the source for the Restore tab, and your external USB drive (flash drive should work great) as the destination for the restore. Takes a few minutes for nearly 5GB to copy across. And, you should end up with a USB bootable drive that you can use to boot your MacPro, and install Lion then.
 
  • Like
Reactions: Nermal
Either on G5 (via MacPorts) or M1 (via homebrew) or e.g. any Linux machine - assuming you have a MacOS Lion disk image:

Install dmg2img via homebrew in the terminal:
[S]sudo apt-get[/S] brew install dmg2img

Then use dmg2img in the terminal to convert the .dmg image into a .iso image.

dmg2img -i YourLion.dmg -o YourLion.img

Connect the USB-stick you want to make an installer medium of. Continue in the terminal and execute:

diskutil list

You will see something like:

Code:
/dev/disk0
   #:                       TYPE NAME                    SIZE       IDENTIFIER
   0:      GUID_partition_scheme                        *500.1 GB   disk0
   1:                        EFI                         209.7 MB   disk0s1
   2:                  Apple_HFS Macintosh HD            2497.1 GB   disk0s2
/dev/disk3
   #:                       TYPE NAME                    SIZE       IDENTIFIER
   0:     FDisk_partition_scheme                        *8.0 GB     disk3
   1:                 DOS_FAT_32 THUMBDRIVE              8.0 GB     disk3s1

In this example the USB-stick (THUMBDRIVE) is mounted on /dev/disk3.

Execute in the terminal - CHANGE /DEV/WHATEVER DEPENDING ON YOUR SYSTEM - for this example:

sudo dd if=/path/to/your/YourLion.img of=/dev/disk3

Get a coffee or some tea. When dd has finished, eject the USB-Stick, connect it to the computer you want Lion install on, start it holding down the option/Alt key, select the USB-Stick and install… maybe more tea? 🤓


EDIT: correct brew command to install dmg2img
 
Last edited:
Either on G5 (via MacPorts) or M1 (via homebrew) or e.g. any Linux machine - assuming you have a MacOS Lion disk image:

Install dmg2bin via homebrew in the terminal:
sudo apt-get install dmg2img

Then use dmg2img in the terminal to convert the .dmg image into a .iso image.

dmg2img -i YourLion.dmg -o YourLion.img

Connect the USB-stick you want to make an installer medium of. Continue in the terminal and execute:

diskutil list

You will see something like:

Code:
/dev/disk0
   #:                       TYPE NAME                    SIZE       IDENTIFIER
   0:      GUID_partition_scheme                        *500.1 GB   disk0
   1:                        EFI                         209.7 MB   disk0s1
   2:                  Apple_HFS Macintosh HD            2497.1 GB   disk0s2
/dev/disk3
   #:                       TYPE NAME                    SIZE       IDENTIFIER
   0:     FDisk_partition_scheme                        *8.0 GB     disk3
   1:                 DOS_FAT_32 THUMBDRIVE              8.0 GB     disk3s1

In this example the USB-stick (THUMBDRIVE) is mounted on /dev/disk3.

Execute in the terminal - CHANGE /DEV/WHATEVER DEPENDING ON YOUR SYSTEM - for this example:

sudo dd if=/path/to/your/YourLion.img of=/dev/disk3

Get a coffee or some tea. When dd has finished, eject the USB-Stick, connect it to the computer you want Lion install on, start it holding down the option/Alt key, select the USB-Stick and install… maybe more tea? 🤓
Thanks for helping me! It is probably me doing something wrong but I got this error:
Schermafbeelding 2022-08-23 om 21.28.50.png


I first installed Homebrew through the method provided by this video:

I then launched Homebrew in Terminal with the command: brew help. (Don't know if that is the way to do it.)

Then I copy pasted your first provided piece of code: sudo apt-get install dmg2img

That resulted in the error above.

I'll use the G5 as a last resort. I mean, the M1 is a lot quicker and the iMac is still on the shelf. :p Thanks for the method I can use with my G5 @DeltaMac!
 
apt-get install XYZ is a command used on some Linux distros.
For Homebrew, you need brew install XYZ. You shouldn't need "sudo" with Homebrew
 
  • Like
Reactions: gilby101
@Dayo Yes, with brew install dmg2img it installed succesfully.

However I am stuck again at the second piece of coding. DeltaMac said that I should use the InstallESD.dmg file, I downloaded that one from the internet. This is the error that I get:

marwan@Marwans-MBP ~ % dmg2img -i installESD.dmg -o installESD.img dmg2img v1.6.7 (c) vu1tur (to@vu1tur.eu.org) ERROR: Can't open input file installESD.dmg
 
Sorry, I know next to nothing about AS machines but doing installation stuff on machines with newer versions of Mac OS than the wanted version can be a PITA not to mention 32/64 bit stuff that may be happening.
Any reason why you are not creating the installer on the target machine?
 
Last edited:
Sorry, I know next to nothing about AS machines but doing installation stuff on machines with newer versions of Mac OS can the wanted version can be a PITA not to mention 32/64 bit stuff that may be happening.
Any reason why you are not creating the installer on the target machine?
The previous owner wiped everything of the SSD, even the OS, so that's why. :p
 
I wrote a script for creating USB installers for older Mac OS from newer ones that may be helpful:

Caveats:
  1. Actually only tested for El Capitan and Yosemite.
    • Assumed same will apply to the others in the list
    • This may not be the case ... particularly with Lion.
  2. Not sure if it will work on AS which to me, is like an alien life form

03 Feb 23: Confirmed for Lion to Sierra.
 
Last edited:
A USB creator script likely uses createinstallmedia, which is in the installer from OS X 10.9 and later. However, this is 10.7 Lion, and scripts that use createinstallmedia can't make an installer. Takes other methods.

Yes, the G5, running Leopard, is more likely to get there.
 
You CAN try the iMac G5, to use the Leopard Disk Utility to "restore" that app to a USB flash drive, if you wish. You do need to go inside the app to the /Contents/SharedSupport, where you WILL find the "installESD.dmg". That file will be about 4.73 GB in size -- another way to tell that you have the correct file. Use that .dmg as the source for the Restore tab, and your external USB drive (flash drive should work great) as the destination for the restore. Takes a few minutes for nearly 5GB to copy across. And, you should end up with a USB bootable drive that you can use to boot your MacPro, and install Lion then.
This should be all that's needed. Once you have the InstallESD.dmg, go to Disk Utility and Restore it to the USB drive. I don't see any reason why this won't work on the Arm-based machine as it won't 'manipulate' the image in any way; it's just a straight copy.
 
I'm uncertain if this will work, but there might be another possibility: If you have a Firewire cable, put your iMac G5 into Target Disk Mode, connect it to your 1.1 and then start the Mac Pro using your iMac G5 as the boot drive. 10.5 is universal and should boot the Mac Pro just fine. Then, run the Lion installer and use the drive in your Mac Pro as the installation destination.

Lion supposedly requires 10.6.6 or later to install from, but this requirement exists because 10.6.6 was the version of Mac OS X that introduced the Mac App Store, which was required to obtain Lion. You already have the Lion installer, so it might run just fine booted from 10.5.
 
To create Lion bootable iso:

Code:
#!/bin/sh
# Create a bootable ISO from the OS X Lion app


if [ ! -f /Applications/Install\ OS\ X\ Lion.app/Contents/SharedSupport/InstallESD.dmg ]; then
    echo "Download the OS X Lion App and then rerun this script."
    open "https://support.apple.com/kb/DL2077?locale=en_US"
    exit 1
fi

# Mount the installer image
hdiutil attach /Applications/Install\ OS\ X\ Lion.app/Contents/SharedSupport/InstallESD.dmg -noverify -nobrowse -mountpoint /Volumes/install_app

# Convert the boot image to a sparse bundle
hdiutil convert /Volumes/install_app/BaseSystem.dmg -format UDSP -o /tmp/Lion

# Increase the sparse bundle capacity to accommodate the packages
hdiutil resize -size 8g /tmp/Lion.sparseimage

# Mount the sparse bundle for package addition
hdiutil attach /tmp/Lion.sparseimage -noverify -nobrowse -mountpoint /Volumes/install_build

# Remove Package link and replace with actual files
rm -v /Volumes/install_build/System/Installation/Packages
cp -rpv /Volumes/install_app/Packages /Volumes/install_build/System/Installation/

# Unmount the installer image
hdiutil detach /Volumes/install_app

# Unmount the sparse bundle
hdiutil detach /Volumes/install_build

# Resize the partition in the sparse bundle to remove any free space
hdiutil resize -size `hdiutil resize -limits /tmp/Lion.sparseimage | tail -n 1 | awk '{ print $1 }'`b /tmp/Lion.sparseimage

# Convert the sparse bundle to ISO/CD master
hdiutil convert /tmp/Lion.sparseimage -format UDTO -o /tmp/Lion

# Remove the sparse bundle
rm /tmp/Lion.sparseimage

# Rename the ISO and move it to the desktop
mv -v /tmp/Lion.cdr ~/Desktop/Lion.iso
 
  • Like
Reactions: 3448322
To create Lion bootable iso:

Code:
#!/bin/sh
# Create a bootable ISO from the OS X Lion app


if [ ! -f /Applications/Install\ OS\ X\ Lion.app/Contents/SharedSupport/InstallESD.dmg ]; then
    echo "Download the OS X Lion App and then rerun this script."
    open "https://support.apple.com/kb/DL2077?locale=en_US"
    exit 1
fi

# Mount the installer image
hdiutil attach /Applications/Install\ OS\ X\ Lion.app/Contents/SharedSupport/InstallESD.dmg -noverify -nobrowse -mountpoint /Volumes/install_app

# Convert the boot image to a sparse bundle
hdiutil convert /Volumes/install_app/BaseSystem.dmg -format UDSP -o /tmp/Lion

# Increase the sparse bundle capacity to accommodate the packages
hdiutil resize -size 8g /tmp/Lion.sparseimage

# Mount the sparse bundle for package addition
hdiutil attach /tmp/Lion.sparseimage -noverify -nobrowse -mountpoint /Volumes/install_build

# Remove Package link and replace with actual files
rm -v /Volumes/install_build/System/Installation/Packages
cp -rpv /Volumes/install_app/Packages /Volumes/install_build/System/Installation/

# Unmount the installer image
hdiutil detach /Volumes/install_app

# Unmount the sparse bundle
hdiutil detach /Volumes/install_build

# Resize the partition in the sparse bundle to remove any free space
hdiutil resize -size `hdiutil resize -limits /tmp/Lion.sparseimage | tail -n 1 | awk '{ print $1 }'`b /tmp/Lion.sparseimage

# Convert the sparse bundle to ISO/CD master
hdiutil convert /tmp/Lion.sparseimage -format UDTO -o /tmp/Lion

# Remove the sparse bundle
rm /tmp/Lion.sparseimage

# Rename the ISO and move it to the desktop
mv -v /tmp/Lion.cdr ~/Desktop/Lion.iso
While you can copy and execute line wise in the terminal - this is a shell script to extract the actuall installation medium from the official MacOSX Lion installer and create an iso-image. To use it, it requires some additional action:

  • Save the text to an ASCII-file - e.g. as “makelioninstalleriso.sh”
  • open a terminal and type: chmod a+x and drag the file makelioninstalleriso.sh onto the terminal window where you just typed the command. It will show something like:chmod a+x /what/ever/the/path/is/to/makelioninstalleriso.sh. Press return.
  • Make sure that you have Apple‘s official Install OS X Lion-installer inside the Apllication folder on the Mac.
  • In the still open terminal window execute:./makelioninstaller.sh to create the iso-image.
 
Last edited:
Either on G5 (via MacPorts) or M1 (via homebrew) or e.g. any Linux machine - assuming you have a MacOS Lion disk image:

Install dmg2img via homebrew in the terminal:
[S]sudo apt-get[/S] brew install dmg2img

Then use dmg2img in the terminal to convert the .dmg image into a .iso image.

dmg2img -i YourLion.dmg -o YourLion.img

Connect the USB-stick you want to make an installer medium of. Continue in the terminal and execute:

diskutil list

You will see something like:

Code:
/dev/disk0
   #:                       TYPE NAME                    SIZE       IDENTIFIER
   0:      GUID_partition_scheme                        *500.1 GB   disk0
   1:                        EFI                         209.7 MB   disk0s1
   2:                  Apple_HFS Macintosh HD            2497.1 GB   disk0s2
/dev/disk3
   #:                       TYPE NAME                    SIZE       IDENTIFIER
   0:     FDisk_partition_scheme                        *8.0 GB     disk3
   1:                 DOS_FAT_32 THUMBDRIVE              8.0 GB     disk3s1

In this example the USB-stick (THUMBDRIVE) is mounted on /dev/disk3.

Execute in the terminal - CHANGE /DEV/WHATEVER DEPENDING ON YOUR SYSTEM - for this example:

sudo dd if=/path/to/your/YourLion.img of=/dev/disk3

Get a coffee or some tea. When dd has finished, eject the USB-Stick, connect it to the computer you want Lion install on, start it holding down the option/Alt key, select the USB-Stick and install… maybe more tea? 🤓


EDIT: correct brew command to install dmg2img
I can't seem to get this going im new to coding and if you can msg me id appreciate the help my kids iMac with lion need3ed a new install I can't get it going and if really need help please
 
after receiving a DM - let’s go back to comment 9, dmg2img is successfully installed and the official diskimage with the OS-installer is downloaded and you have installESD.dmg.

  1. Open the folder in which you downloaded installESD.dmg in the Finder.
  2. Open a terminal window. type cd ~ and press return.
  3. type dmg2img -i in the terminal (there is a space after -i)
  4. select installESD.dmg in the Finder and drag it onto the terminal window after dmg2img -i . the line i n the terminal should now read dmg2img -i /where/ever/you/dragged/it/from/installESD.dmg
  5. add -o installESD.img after it. The line in 5he terminal should now read as dmg2img -i /where/ever/you/dragged/it/from/installESD.dmg -o installESD.img
  6. Press return. Wait till the conversion finishes.
  7. Open your user home folder in the Finder. Inside you should find installESD.img.
Now connect your USB-stick and follow the steps given previously above.
thank you so much
 
Either on G5 (via MacPorts) or M1 (via homebrew) or e.g. any Linux machine - assuming you have a MacOS Lion disk image:

Install dmg2img via homebrew in the terminal:
[S]sudo apt-get[/S] brew install dmg2img

Then use dmg2img in the terminal to convert the .dmg image into a .iso image.

dmg2img -i YourLion.dmg -o YourLion.img

Connect the USB-stick you want to make an installer medium of. Continue in the terminal and execute:

diskutil list

You will see something like:

Code:
/dev/disk0
   #:                       TYPE NAME                    SIZE       IDENTIFIER
   0:      GUID_partition_scheme                        *500.1 GB   disk0
   1:                        EFI                         209.7 MB   disk0s1
   2:                  Apple_HFS Macintosh HD            2497.1 GB   disk0s2
/dev/disk3
   #:                       TYPE NAME                    SIZE       IDENTIFIER
   0:     FDisk_partition_scheme                        *8.0 GB     disk3
   1:                 DOS_FAT_32 THUMBDRIVE              8.0 GB     disk3s1

In this example the USB-stick (THUMBDRIVE) is mounted on /dev/disk3.

Execute in the terminal - CHANGE /DEV/WHATEVER DEPENDING ON YOUR SYSTEM - for this example:

sudo dd if=/path/to/your/YourLion.img of=/dev/disk3

Get a coffee or some tea. When dd has finished, eject the USB-Stick, connect it to the computer you want Lion install on, start it holding down the option/Alt key, select the USB-Stick and install… maybe more tea? 🤓


EDIT: correct brew command to install dmg2img
what would my path be
 

Attachments

  • Screen Shot 2023-01-27 at 5.47.58 PM.png
    Screen Shot 2023-01-27 at 5.47.58 PM.png
    71.2 KB · Views: 107
Either on G5 (via MacPorts) or M1 (via homebrew) or e.g. any Linux machine - assuming you have a MacOS Lion disk image:

Install dmg2img via homebrew in the terminal:
[S]sudo apt-get[/S] brew install dmg2img

Then use dmg2img in the terminal to convert the .dmg image into a .iso image.

dmg2img -i YourLion.dmg -o YourLion.img

Connect the USB-stick you want to make an installer medium of. Continue in the terminal and execute:

diskutil list

You will see something like:

Code:
/dev/disk0
   #:                       TYPE NAME                    SIZE       IDENTIFIER
   0:      GUID_partition_scheme                        *500.1 GB   disk0
   1:                        EFI                         209.7 MB   disk0s1
   2:                  Apple_HFS Macintosh HD            2497.1 GB   disk0s2
/dev/disk3
   #:                       TYPE NAME                    SIZE       IDENTIFIER
   0:     FDisk_partition_scheme                        *8.0 GB     disk3
   1:                 DOS_FAT_32 THUMBDRIVE              8.0 GB     disk3s1

In this example the USB-stick (THUMBDRIVE) is mounted on /dev/disk3.

Execute in the terminal - CHANGE /DEV/WHATEVER DEPENDING ON YOUR SYSTEM - for this example:

sudo dd if=/path/to/your/YourLion.img of=/dev/disk3

Get a coffee or some tea. When dd has finished, eject the USB-Stick, connect it to the computer you want Lion install on, start it holding down the option/Alt key, select the USB-Stick and install… maybe more tea? 🤓


EDIT: correct brew command to install dmg2img
which one is the brew
 
I have successfully created an USB installer from the file Apple currently makes available following on terminal the steps @startergo posted, so just wanted to give a thumbs up.

I used an intel machine however, if that matters.
 
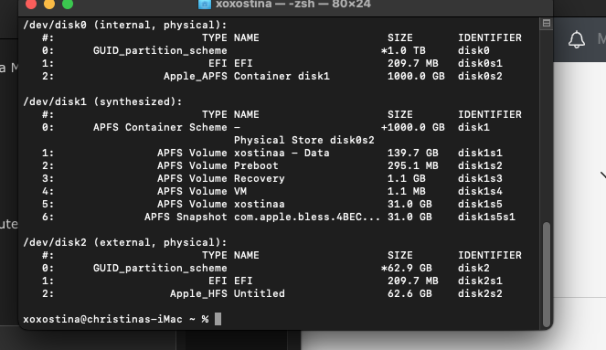
what would my path be
you connected a 64GB USB-stick? ( you can see the sizes in the second column from the right, usually there are more than 1 partition on a physical medium, so the sum of them under one device-entry in that list should help to identify).
/dev/disk2 (external, physical) is probably your output destination for dd.
 
after receiving a DM - let’s go back to comment 9, dmg2img is successfully installed and the official diskimage with the OS-installer is downloaded and you have installESD.dmg.

  1. Open the folder in which you downloaded installESD.dmg in the Finder.
  2. Open a terminal window. type cd ~ and press return.
  3. type dmg2img -i in the terminal (there is a space after -i)
  4. select installESD.dmg in the Finder and drag it onto the terminal window after dmg2img -i . the line i n the terminal should now read dmg2img -i /where/ever/you/dragged/it/from/installESD.dmg
  5. add -o installESD.img after it. The line in 5he terminal should now read as dmg2img -i /where/ever/you/dragged/it/from/installESD.dmg -o installESD.img
  6. Press return. Wait till the conversion finishes.
  7. Open your user home folder in the Finder. Inside you should find installESD.img.
Now connect your USB-stick and follow the steps given previously above.
I must note that the Lion and Mountain Lion installers now come as InstallMacOS.dmg inside which is InstallMacOS.pkg. Here is an updated guide on how to unpack the properly in the /Applications folder with InstallESD.dmg as Disk Image. After that one can proceed with the script here. If Iso image is not needed skip the last step for conversion and restore the Lion.cdr to USB.
 
Last edited:
Register on MacRumors! This sidebar will go away, and you'll see fewer ads.