Here at MacRumors, I've published a lot of tips on mass converting videos to make one's life much easier when mass-converting several videos at a time. In the article below, I present you them all in an edited, more verbose format.
1, Using batch files (or looping commands) with command-line applications
Some of the video converters (for example, Project-X or FFmpeg) (also) have a command-line interface (CLI). Should you want to mass-convert / mass-process a bunch of files in, say, a directory or of the same type, batch files can be of tremendous help.
With the excellent DVB TS recording processor Project-X, I've already shown how you how you can quickly and easily extract the subtitle tracks from several TS files at once. Just enter the following at the (OS X or any kind of Unix / Linux) command line to mass-process TS files:
for f in *.ts; do java -jar ProjectX.jar "$f"; done
This iterates over files with .ts extension (this is what the for f in *.ts; do ; done part is for) and for each of them, it executes the middle part of the command, java -jar ProjectX.jar. The (varying) parameter passed to the java interpreter is in "$f": it simply passes the just-iterated filename to the java executable.
Based on this explanation, it's very easy to generalize this to even supply output filenames to apps that, say, require an explicitly given output filename (the above command only required an input one) to write their output to. An example of invoking FFmpeg for a quick remux (container change) with forcing (see the switch -bsf h264_mp4toannexb) FFmpeg to add a keyframe before each converted H.264 stream to make it 100% compatible with the m2ts container:
for f in *.mkv; do Video\ Container\ Switcher.app/Contents/Resources/ffmpeg -i "$f" -acodec copy -vcodec copy -bsf h264_mp4toannexb "$f.m2ts"; done
(Originally published HERE; note that you can easily check out the context of the posts I link to by clicking the first discussion thread link in the You are viewing a single post from a discussion thread on MacRumors Forums. title above each post.)
Here, the FFmpeg executable is in the Contents/Resources/ directory of the Video Container Switcher.app discussed in the above discussion thread. It's passed two dynamic parameters: first, the input filename itself (as was the case with Project-X), "$f", right after the input flag (-i). The second dynamic parameter set by the loop is "$f.m2ts". It essentially instructs FFmpeg to add the m2ts extension to the original filename of the input file to save the converted file to.
2, Batch converting any files to MP4 / M4V / MKV's with preserving all (subtitle / audio) tracks
Also here at MacRumors, I've explained (post HERE and HERE) how one can easily fix a well-known problem of HandBrake: for input files with more than one audio/subtitle track, the need to manually add every single (with DVD's, the original bitmap VobSub) subtitle and every single audio track to the target, converted MKV and MP4 / M4V files while, say, converting the video track from MPEG-2 to H.264. Below, I elaborate on this.
2.1 Preserving tracks in MKV files
Note that, unfortunately, HandBrakeBatch (as opposed to HandBrake), the most recommended tool for mass (batch-mode) MP4 / M4V audio/subtrack preserving (see section 2.2 below) can't output to MKV files, only mp4/m4v ones. Therefore, we'll need to stick with the commercial (but still very cheap) MKVTools for mass conversions.
MP4Tools is one of the video handler apps I recommend the most for, among other things, remuxing MKV's to MP4's, joining more than one MP4's into just one target MP4 and the like.
Its brother, MKVTools (homepage), has the same user interface and very similar capabilities. (Actually, the main difference between the two is that MP4Tools creates / changes MP4 files while MKVTools MKV files; when converting, from any kind of other file type.)
To mass-convert files to MKV, you'll need to purchase a license for the app and, assuming you do want to reencode the video track, download the regular (non-beta) version of the app. (With its bother, MP4Tools, you don't need to do the same there, it's the beta that you should use for most purposes.)
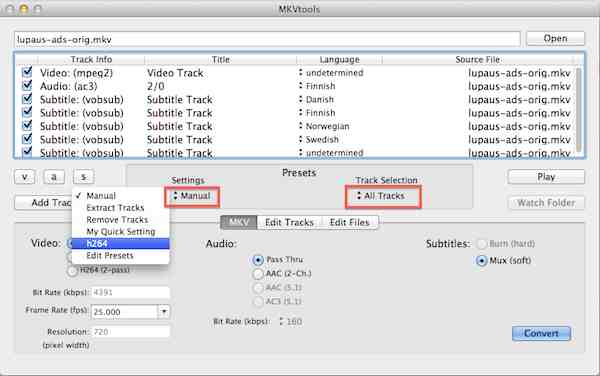
Start the app and drag-and-drop the set of files you'd like to convert. Say we need to preserve all the additional tracks of THIS direct DVD rip file. The file has, being an unaltered, original DVD rip, an MPEG-2 video track you'll need to convert to the iOS- / Apple TV- (and storage-)friendly H.264. It also has a lot of subtitle tracks. Should you have no other test file to test the batch conversion on, I recommend duplicating the above file with slightly different names and, having finished this, dragging the whole bunch of files to the app it'll also prove unattended batch (mass-conversion) mode works as intended.
To do batch conversions in MKVTools (or, for that matter, MP4Tools), you'll need to create a preset (or modify an existing one) that will be applied to all the files in the batch. To do this, click Manual under Settings (annotated in the next screenshot, along with a sample context menu displayed as the result of the click):
(click the image for a much larger and better-quality one!)
In the screenshot, I've highlighted a menu item h264, which I've created myself previously by clicking Edit Presets (on the above screenshot) directly under it. You'll, of course, need to create one yourself. (Note that, should you want to use one preset only, can freely edit the pre-defined My Quick Setting as well.)
An example of what you should set in the preset:
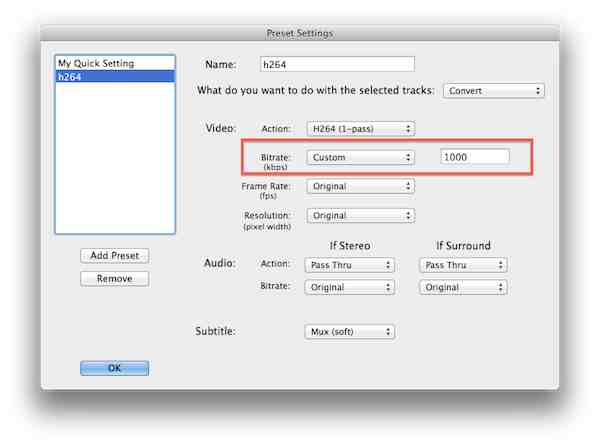
Pay special attention to Bitrate (kbps) (annotated above). It defaults to Original. If your input video is in a format far less storage-effective than H.264, you'll definitely want to overwrite it and supply a meaningful target bitrate. If you don't touch it, the target video files will be approximately as large as the source ones with unnecessarily large video bitrate. For example, the original test file has a video bitrate of 4300 kbps, which is a definite overkill for properly encoded H.264 at standard definition. Therefore, I've supplied 1000 here, which is well enough for an SD H.264 video stream.
You can also change the audio. When targeting iOS, you will want to include AAC in both the If Stereo and If Surround cases. (With the latter, you can choose both 5.1 and stereo AAC.) As with the video bitrate, you may also want to decrease the bitrate, particularly if you downmix 5.1 surround audio to stereo. (There's absolutely no point in wasting 400+ kbps on a stereo AAC track.) A screenshot of this:
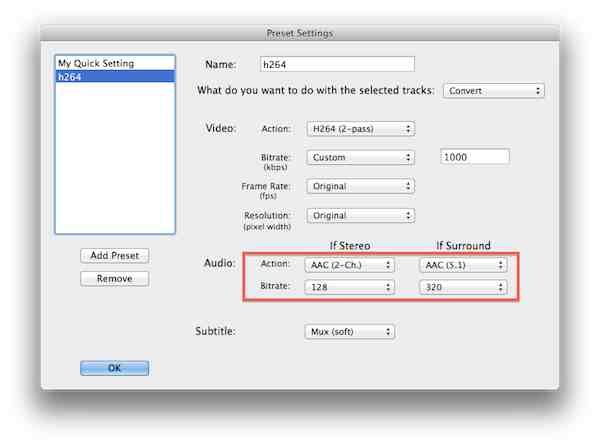
Note that if you convert for an AppleTV and you do have an external AC-3 decoder, you'll want to prefer selecting AC-3 in the If Surround drop-down menu.
After dragging the file(s) to MKVTools and making sure you select the right preset (and also All tracks in the right-side Track Selection menu), just click Convert in the lower right corner and the mass-remuxing will start. An example also showing subtitle tracks are also passed thru (annotated at the bottom), while the video and the audio tracks are indeed converted:
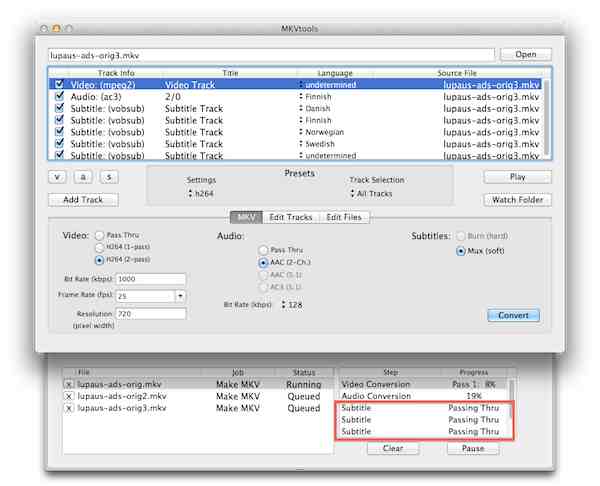
Note that, as has been explained, currently, as of beta 3.2b4(1), you'll need to use the non-beta version of MKVTools for the H.264 conversion to take effect. Surely some time the H.264 bug will be fixed in the beta. Using it should be done in pretty much the same way as the regular version: it's only the layout of the preset setter dialog that is somewhat different.
2.2 Preserving tracks in MP4/M4V files
You can use MP4Tools for mass conversion in exactly the same way as MKVTools for MKV files; therefore, I don't present you a separate tutorial on the former. (Just create and select a preset after registering the app; drag-and-drop the files to convert and select the preset, making sure you select all tracks to be passed on.)
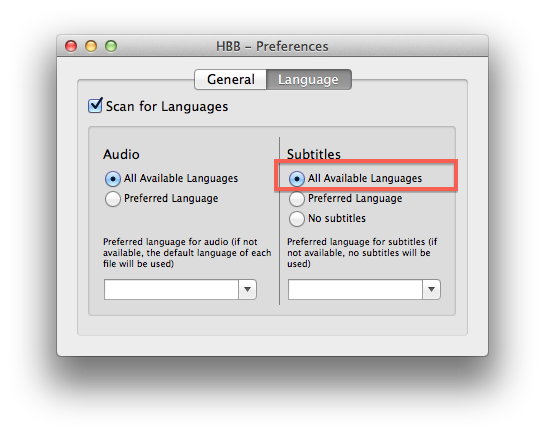
With HandBrakeBatch (but, as has been explained in the introduction, not the plain HandBrake!), you can do exactly the same. If you only want to preserve all the audio tracks in the target MP4/M4V file, you don't need to do anything. If you want to do the same to the subtitle tracks, go to Preferences and select the "All available languages" radio button in the "Language" tab:
After this, just drag-and-drop your source files to the list and start converting.
3. Preserving / copying the original filedate
In some cases (archiving, say, family videos where you want to know when they were shot), you will want to make your converted files to have the same creation / modification timestamp as the original files (my dedicated post is HERE).
Fortunately, this is also very easy with HandBrakeBatch. Go to Preferences and enable the "Keep original file Creation and Modification dates" checkbox in the default "General" tab:

After this, as usual, drag-and-drop your source files to the filelist of the app and start converting.
1, Using batch files (or looping commands) with command-line applications
Some of the video converters (for example, Project-X or FFmpeg) (also) have a command-line interface (CLI). Should you want to mass-convert / mass-process a bunch of files in, say, a directory or of the same type, batch files can be of tremendous help.
With the excellent DVB TS recording processor Project-X, I've already shown how you how you can quickly and easily extract the subtitle tracks from several TS files at once. Just enter the following at the (OS X or any kind of Unix / Linux) command line to mass-process TS files:
for f in *.ts; do java -jar ProjectX.jar "$f"; done
This iterates over files with .ts extension (this is what the for f in *.ts; do ; done part is for) and for each of them, it executes the middle part of the command, java -jar ProjectX.jar. The (varying) parameter passed to the java interpreter is in "$f": it simply passes the just-iterated filename to the java executable.
Based on this explanation, it's very easy to generalize this to even supply output filenames to apps that, say, require an explicitly given output filename (the above command only required an input one) to write their output to. An example of invoking FFmpeg for a quick remux (container change) with forcing (see the switch -bsf h264_mp4toannexb) FFmpeg to add a keyframe before each converted H.264 stream to make it 100% compatible with the m2ts container:
for f in *.mkv; do Video\ Container\ Switcher.app/Contents/Resources/ffmpeg -i "$f" -acodec copy -vcodec copy -bsf h264_mp4toannexb "$f.m2ts"; done
(Originally published HERE; note that you can easily check out the context of the posts I link to by clicking the first discussion thread link in the You are viewing a single post from a discussion thread on MacRumors Forums. title above each post.)
Here, the FFmpeg executable is in the Contents/Resources/ directory of the Video Container Switcher.app discussed in the above discussion thread. It's passed two dynamic parameters: first, the input filename itself (as was the case with Project-X), "$f", right after the input flag (-i). The second dynamic parameter set by the loop is "$f.m2ts". It essentially instructs FFmpeg to add the m2ts extension to the original filename of the input file to save the converted file to.
2, Batch converting any files to MP4 / M4V / MKV's with preserving all (subtitle / audio) tracks
Also here at MacRumors, I've explained (post HERE and HERE) how one can easily fix a well-known problem of HandBrake: for input files with more than one audio/subtitle track, the need to manually add every single (with DVD's, the original bitmap VobSub) subtitle and every single audio track to the target, converted MKV and MP4 / M4V files while, say, converting the video track from MPEG-2 to H.264. Below, I elaborate on this.
2.1 Preserving tracks in MKV files
Note that, unfortunately, HandBrakeBatch (as opposed to HandBrake), the most recommended tool for mass (batch-mode) MP4 / M4V audio/subtrack preserving (see section 2.2 below) can't output to MKV files, only mp4/m4v ones. Therefore, we'll need to stick with the commercial (but still very cheap) MKVTools for mass conversions.
MP4Tools is one of the video handler apps I recommend the most for, among other things, remuxing MKV's to MP4's, joining more than one MP4's into just one target MP4 and the like.
Its brother, MKVTools (homepage), has the same user interface and very similar capabilities. (Actually, the main difference between the two is that MP4Tools creates / changes MP4 files while MKVTools MKV files; when converting, from any kind of other file type.)
To mass-convert files to MKV, you'll need to purchase a license for the app and, assuming you do want to reencode the video track, download the regular (non-beta) version of the app. (With its bother, MP4Tools, you don't need to do the same there, it's the beta that you should use for most purposes.)
Start the app and drag-and-drop the set of files you'd like to convert. Say we need to preserve all the additional tracks of THIS direct DVD rip file. The file has, being an unaltered, original DVD rip, an MPEG-2 video track you'll need to convert to the iOS- / Apple TV- (and storage-)friendly H.264. It also has a lot of subtitle tracks. Should you have no other test file to test the batch conversion on, I recommend duplicating the above file with slightly different names and, having finished this, dragging the whole bunch of files to the app it'll also prove unattended batch (mass-conversion) mode works as intended.
To do batch conversions in MKVTools (or, for that matter, MP4Tools), you'll need to create a preset (or modify an existing one) that will be applied to all the files in the batch. To do this, click Manual under Settings (annotated in the next screenshot, along with a sample context menu displayed as the result of the click):

(click the image for a much larger and better-quality one!)
In the screenshot, I've highlighted a menu item h264, which I've created myself previously by clicking Edit Presets (on the above screenshot) directly under it. You'll, of course, need to create one yourself. (Note that, should you want to use one preset only, can freely edit the pre-defined My Quick Setting as well.)
An example of what you should set in the preset:

Pay special attention to Bitrate (kbps) (annotated above). It defaults to Original. If your input video is in a format far less storage-effective than H.264, you'll definitely want to overwrite it and supply a meaningful target bitrate. If you don't touch it, the target video files will be approximately as large as the source ones with unnecessarily large video bitrate. For example, the original test file has a video bitrate of 4300 kbps, which is a definite overkill for properly encoded H.264 at standard definition. Therefore, I've supplied 1000 here, which is well enough for an SD H.264 video stream.
You can also change the audio. When targeting iOS, you will want to include AAC in both the If Stereo and If Surround cases. (With the latter, you can choose both 5.1 and stereo AAC.) As with the video bitrate, you may also want to decrease the bitrate, particularly if you downmix 5.1 surround audio to stereo. (There's absolutely no point in wasting 400+ kbps on a stereo AAC track.) A screenshot of this:

Note that if you convert for an AppleTV and you do have an external AC-3 decoder, you'll want to prefer selecting AC-3 in the If Surround drop-down menu.
After dragging the file(s) to MKVTools and making sure you select the right preset (and also All tracks in the right-side Track Selection menu), just click Convert in the lower right corner and the mass-remuxing will start. An example also showing subtitle tracks are also passed thru (annotated at the bottom), while the video and the audio tracks are indeed converted:

Note that, as has been explained, currently, as of beta 3.2b4(1), you'll need to use the non-beta version of MKVTools for the H.264 conversion to take effect. Surely some time the H.264 bug will be fixed in the beta. Using it should be done in pretty much the same way as the regular version: it's only the layout of the preset setter dialog that is somewhat different.
2.2 Preserving tracks in MP4/M4V files
You can use MP4Tools for mass conversion in exactly the same way as MKVTools for MKV files; therefore, I don't present you a separate tutorial on the former. (Just create and select a preset after registering the app; drag-and-drop the files to convert and select the preset, making sure you select all tracks to be passed on.)
With HandBrakeBatch (but, as has been explained in the introduction, not the plain HandBrake!), you can do exactly the same. If you only want to preserve all the audio tracks in the target MP4/M4V file, you don't need to do anything. If you want to do the same to the subtitle tracks, go to Preferences and select the "All available languages" radio button in the "Language" tab:
After this, just drag-and-drop your source files to the list and start converting.
3. Preserving / copying the original filedate
In some cases (archiving, say, family videos where you want to know when they were shot), you will want to make your converted files to have the same creation / modification timestamp as the original files (my dedicated post is HERE).
Fortunately, this is also very easy with HandBrakeBatch. Go to Preferences and enable the "Keep original file Creation and Modification dates" checkbox in the default "General" tab:
After this, as usual, drag-and-drop your source files to the filelist of the app and start converting.