Become a MacRumors Supporter for $50/year with no ads, ability to filter front page stories, and private forums.

New10

macrumors newbie
Original poster
May 2, 2010
5
0
hey guys..

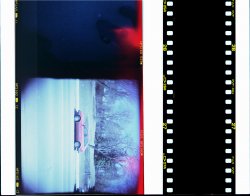
so i saw this picture (not created by me):

4425810115ef37b4d73fo.png


and was inspired to give a "film " border to my photos

this is what i have so far (created by me):

picture9c.png


i am not entirely satisfied w/ how the border looks...i dont feel like it looks realistic...

i plan on making a collage like the photo above so i was thinking the number on the film strip needs to change as well as some other aesthetic improvements that could probably either be made in photoshop or with a better film strip stock image...

i extracted the border from this image

kodakfilm.jpg


so my question is

1.) does anyone on here have a better image of a "film strip" that i could use in my pictures? maybe one that is more detailed higher resolution etc.

2.) any other ideas on how i could make the whole film strip theme more realistic?


thanks
 

pdxflint

macrumors 68020
Aug 25, 2006
2,407
14
Oregon coast
The bottom image looks like it came from a black and white contact sheet...so that's about as real as film strips get.

On the border you created so far-- two things to think about: you forgot the sprocket holes, which are pretty darn important if you want it to look like "real" film border, at least for 35mm, and you're putting a b/w film border on a color image... definitely not realistic.

You need to know what the film edges look like both in negative and positive, and get the positive "look" going for your border. You would need a 'positive' contact sheet printed, then scan it. Then overlay the film image in photoshop with your digital image, leaving the border as is. That seems the easiest way to do it...

Anyone else?
 

GuyNextDoor

macrumors member
Jan 30, 2008
39
0
Brooklyn, NY
It's a bit hard to tell from the scanned film frame you show, but in addition to the sprocket holes, two things jump out at me:
1 - The "black area" surrounding the image completely frames the image, on all four sides, not just top and bottom, and is wider than what you produced.
2 - The edges between the image and border are not as crisp as what you've produced, they are a bit soft.
 

Stratification

macrumors regular
Jan 17, 2005
240
0
Spokane, WA
To echo what was just said, I think a big part of selling it will be the softer edges. You don't get crisp absolutely straight edges like that, at least not in the look you're going for.
 

New10

macrumors newbie
Original poster
May 2, 2010
5
0
Yup... sprocket holes 'say' 35mm film. But, IMO, the best way to end up with something that looks like film... is to shoot some film. ;)


i actually purposely left out the sprocket holes because the holes in the image that i have are not too obvious and since im making a collage it would create too much black "dead space" if that makes sense.

this collage doesnt have any sprocket holes and i think it still looks realistic

4425810115ef37b4d73fo.png


to those saying i need to fray/roughen up the edges in the center image how would i do that in photoshop??

also if anyone has a better "film strip" image pls help out cuz ive looked up and down on google and cant find anything better than the image i posted

i also dont have one of my own to scan so thats kind of a problem.
 

Designer Dale

macrumors 68040
Mar 25, 2009
3,950
101
Folding space
i actually purposely left out the sprocket holes because the holes in the image that i have are not too obvious and since im making a collage it would create too much black "dead space" if that makes sense.

this collage doesnt have any sprocket holes and i think it still looks realistic

4425810115ef37b4d73fo.png


to those saying i need to fray/roughen up the edges in the center image how would i do that in photoshop??

also if anyone has a better "film strip" image pls help out cuz ive looked up and down on google and cant find anything better than the image i posted

i also dont have one of my own to scan so thats kind of a problem.

The collage isn't made to replicate 35mm film. The aspect ratio is too close to square, so it is something like 120 or 220 medium format film. I have never shot with medium format, only large and 35mm in film. I can't remember if 120/220 had sprocket holes. 120 is on the left and 35mm on the right below.

Dale
 

Attachments

  • Film_size_comparison.jpg
    Film_size_comparison.jpg
    703.1 KB · Views: 177

jampat

macrumors 6502a
Mar 17, 2008
682
0
to those saying i need to fray/roughen up the edges in the center image how would i do that in photoshop??

I would create a mask on the photo layer filled with white, use black paint, smallish soft brush, setup some size jitter and angle and reduce the opacity (or maybe flow?). Click one corner, ctrl-click another corner and it will draw a line connecting the two points, but the edge won't be straight due to the size jitter. You may need to play with the brush engine settings to get the effect you want.
 

pdxflint

macrumors 68020
Aug 25, 2006
2,407
14
Oregon coast
If you want it to look more realistic, and you want the thinner edge without the sprocket holes but still with the film id/frame number, etc. you need to crop your images to a 6x7 format or square, so it looks like medium format film. Otherwise, it will look fake no matter what you do.

Make your black background, including lettering on the edges, and then in separate layers add your cropped (to look like correct format) images on top. Size the top layer images so they fit very similarly close to the edges, and space them close together, like they would look on the negative, with a very slight black area between each image. This distance should be consistent, like it would be as shot in a med. format camera. Also, keep the spacing for the frame numbers the same distance from each other. This might do the trick.
 

wonderspark

macrumors 68040
Feb 4, 2010
3,048
102
Oregon
Yes, the negative you want to emulate is 120 film, which has no sprocket holes. The film is wound from one reel to another across the film plane. This is also why the images are not spaced exactly from frame to frame across the negative, because the advance lever doesn't move exactly the same distance between shots. The square images are 6x6. Other common frame sizes are 6x4.5 and 6x7, for example.

Study the image. Notice that the imperfections in the frame image will be consistent, because they are made by the same camera body, so don't just go making random imperfections around each image frame.

You could trace one of the images very carefully around the frame, and use that as a mask for all your images. Black over the existing images, insert your own images, and use that mask to make the same frame imperfections, consistently across each image.

I just took a look at the sample with... Lady GaGa or whatever... and noticed that they're all image 17 / 17A. This is bogus. Each frame has a sequential number. They copied frame 17 for all frames. Don't do that if you want it to be realistic.
 
Register on MacRumors! This sidebar will go away, and you'll see fewer ads.