So I got my Nikon D40 the other day. I went into shutter priority mode to try and take some blurred water shots, and they came fairly good. What I want to know is what the default shutter speed is in shutter priority mode. I want it back to what it was when I first turned the camera on. Since I am very new to photography, I want to know the default because I'd like to know the middle ground point and then from there I can adjust higher or lower. Thanks
Got a tip for us?
Let us know
Become a MacRumors Supporter for $50/year with no ads, ability to filter front page stories, and private forums.
Nikon D40 default shutter speed in shutter priority mode?
- Thread starter xvrockerlouvx
- Start date
- Sort by reaction score
You are using an out of date browser. It may not display this or other websites correctly.
You should upgrade or use an alternative browser.
You should upgrade or use an alternative browser.
I don't know what the default setting was, but you can do a master reset and it will reset all your settings.
I'm not sure why knowing the default is all that important though. It's just a shutter speed, you should experiment with various speeds depending on your subject to see what works best.
I'm not sure why knowing the default is all that important though. It's just a shutter speed, you should experiment with various speeds depending on your subject to see what works best.
I don't know what the default setting was, but you can do a master reset and it will reset all your settings.
I'm not sure why knowing the default is all that important though. It's just a shutter speed, you should experiment with various speeds depending on your subject to see what works best.
Well I'm not sure what a good setting would be for certain things, as well as not knowing how much or how little each setting changes the picture. I wouldn't know the correct starting point basically.
There is no one starting point for shutter speed, there are general rules of thumb for different focal lengths but it really depends upon the shot you are trying to capture. There are just too many variables that come into play.
For a better understanding you should do some research on how to get a good exposure and how the different settings effect each other, the camera manual gives you some info in that respect but is a little limited and not the most friendly of sources. You can also try searching for some information online but what I would really recommend is picking up a copy of Understanding Exposure by Bryan Peterson.
That book is light on the theory but gives a lot of practical advice, which is really helpful when you are trying to learn the ins and outs of basic photography, from there you can go to some of the books that are heavier in the theory aspect of photography for further enlightenment.
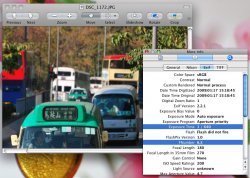
As you already have a good picture, maybe you can find the shutter information from the picture file. The information is attached by the camera when the photo is shot. Attached is an example in Preview with Inspector dialog (Hotkey: Command + I)
But, as others have already mentioned, it depends on the environment very much. You cannot expect the same set of configuration works next time...
But, as others have already mentioned, it depends on the environment very much. You cannot expect the same set of configuration works next time...
Attachments
basically, the faster the shutter speed, the less likely your subject will be blurred. for example, if you're shooting a sporting event and want a totally focused image of someone in motion - you'd want to set your shutter speed relatively high to get the desired result. And, the lower the shutter speed, the more blur the subject in motion will be.
so, in shutter-priority mode - the camera will automatically select the correct aperture setting according to whatever shutter speed the user selects. if, i am not mistaken.
so, in shutter-priority mode - the camera will automatically select the correct aperture setting according to whatever shutter speed the user selects. if, i am not mistaken.
i would also like to add that another way of looking at shutter speed and how it affects your images is to listen to your shutter clicking. the slower the click, the slower the shutter speed and the more light it is letting in. you can also twist off the lens and look inside where you will find the actual "shutter." so, it's a mechanical device that opens and closes much like human eyelids.
and oh... that button to take the picture is also known as the "shutter release button." hope this makes this clear.
and oh... that button to take the picture is also known as the "shutter release button." hope this makes this clear.
So I got my Nikon D40 the other day. I went into shutter priority mode to try and take some blurred water shots, and they came fairly good. What I want to know is what the default shutter speed is in shutter priority mode. I want it back to what it was when I first turned the camera on. Since I am very new to photography, I want to know the default because I'd like to know the middle ground point and then from there I can adjust higher or lower. Thanks
The general rule is 1/effective focal length (35mm terms) so, if you were shooting at 50mm you could hand hold at 1/50*1.5 (for the 'crop factor' of your camera) so anything above, say 1/75th would be ok, handheld, without VR for stationary objects. With VR you probably could shoot at 1/30 or 1/15th perhaps. With care perhaps even lower still. What you end up shooting at really ends up being a choice based on your conditions, and the effect that you want. I often shoot at about 1/30th when the light is dim, handheld, with a standard zoom.
You're not going to be able to pick a normal 'middle ground' as it depends too much on conditions. Indoors at night you're going to need high ISOs and long shutter speeds (1/15th perhaps, 1600ISO), and you may blur things. Outside shutter speeds from about 1/125 into the thousands may be used.
Figuring out how ISO, aperture and shutter speed relate is important. Play around, perhaps on manual. I've never really understood the point of shutter priority, but I am a bit crazy. Familiarise yourself with the idea of a stop.
If you want to be really methodical, try an experiment along these lines:
On a sunny day, take a bunch of photos of the same stationary object. Keep everything the same except your shutter speed (go into manual mode). Start with your camera on the fastest setting (which leaves the shutter open for the shortest amount of time [1/4000 of a second on the D40?]) and move down to the slowest (30 seconds on the D40), taking a picture at every point on the way.
You`ll find that a lot of the fastest speeds produce an image that`s too dark because the shutter will have been open for too short a time to let enough light onto the image sensor. A lot of the slowest speeds will be blurred (from your shaking hands) and/or too bright (from too much light hitting the sensor).
Do the same experiment standing in the shade (i.e. out of direct sunlight), at sunset/dusk and at night. Do all of the above with subjects that are moving slowly (instead of being stationary) and ones that are moving more quickly.
You can save a lot of time by looking at your pictures on the D40`s LCD. So, for example, when you find that 1 second is way too bright in certain light, you won`t have to bother going further.
In general, if everything else stays the same, you need longer exposure times in lower light. You need shorter exposure times when your subject is moving, and also when you`re not using a tripod, if you want to avoid blurred images.
If you do it methodically and take a look at all these series of pics on your computer (split them into different events or albums on iPhoto), in a single day you`ll be able to see that there`s a different range of good shutter speeds for different subjects in different levels of light. Hit `command` and `i` in iPhoto to bring up information on the shutter speed so you can compare more easily.
I talk about the need to keep all other things equal because there are a number of other factors/settings that will influence your photos and ruin your experiment if you change them. For example:
-aperture. This refers to the size of the opening in the lens that light comes in through. Obviously, a smaller hole means less light hits the sensor, just like only opening the curtains in your bedroom halfway means your it will be more dimly lit. Don`t try this experiment in shutter priority mode because your camera will automatically adjust the size of the aperture and you won`t get useful results; use manual mode.
-ISO
-focal length (how far out are you zoomed?)
You need to read about these concepts because they`re really important. If you do the above, though, it`ll take you a single day to get a much better idea of how changing nothing but the shutter speed affects your photos.
Register on MacRumors! This sidebar will go away, and you'll see fewer ads.