Become a MacRumors Supporter for $50/year with no ads, ability to filter front page stories, and private forums.

MacMike81

macrumors regular
Original poster
Jan 15, 2011
117
8
Ohio
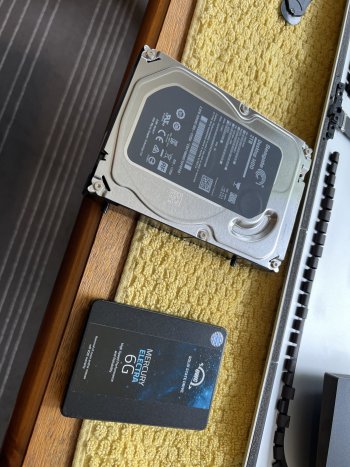
I am replacing a failing Fusion Drive on my 2017 iMac this weekend. I went with the OWC kit. Hopefully it goes smooth. I am most worried about removing the screen...yikes.

I am preemptively backing up using SuperDuper and I'll do a TM backup too. I was thinking about just starting over fresh and manually moving User files over from TM.

The way I understand it is the Fusion Drive is a NVMe drive attached to a disk drive? Ive read online that there are ways to split them via software and only use the disk portion and abandon in place the NVMe part. I am not interested in doing that. BUT when I make a backup and IF I restore to the new drive will the Fusion backup create any problems restoring to a single drive? Hope that makes sense?

Side info, I am speculating that the drive is failing because I am getting ALOT of "Restart because of an error" messages. I ran an app that shows detailed health info of drives and a portion of my Fusion Drive was in the yellow. Some quick googling makes it seem like a lot of Fusion Drives are hitting End of Life simutaniously. I plan to get a new iMac when they move to the M2 so this is strictly an experiment to buy me some time.
 
I am most worried about removing the screen...yikes.
I was in the same boat as you a few years ago. It was actually not that bad. Just make yourself a nice clean working area, lay out all the tools and parts, and go slowly step by step. If your experience is at all like mine, you will spend most of your time removing the old glue from the display before you install the new adhesive strips. From what I understand, it's important to get a clean surface so the new adhesive works right. The rest of it was very straighforward. I used a kit and instructions from iFixit, but I imagine it's pretty similar.

The way I understand it is the Fusion Drive is a NVMe drive attached to a disk drive?
Exactly. They're physically separate. The disk drive is a basic SATA connection, and the blade SSD is a special NVMe drive that's apparently a bit tricky to source and install correctly. In my case it was the SSD that was dying (according to DriveDX it was down to <5% of its lifetime), but I left it in place and installed a 2.5" SATA SSD with an adpater bracket in place of the HDD. No "splitting" necessary.

Ive read online that there are ways to split them via software and only use the disk portion and abandon in place the NVMe part.
What I did was, prior to the surgery, put my new SATA SSD into an external enclosure, cloned my internal drive onto it with Carbon Copy Cloner. Then I booted off of that and ran it for a couple days to make sure it was working properly. Finally I installed it into the iMac after opening it up, and when I was all done it booted perfectly. Totally seamless.

I reformatted the little 128GB blade SSD at the end but since it was almost dead I didn't trust it with much, and it was too small to be useful anyway.
 
Last edited:
I was in the same boat as you a few years ago. It was actually not that bad. Just make yourself a nice clean working area, lay out all the tools and parts, and go slowly step by step. If your experience is at all like mine, you will spend most of your time removing the old glue from the display before you install the new adhesive strips. From what I understand, it's important to get a clean surface so the new adhesive works right. The rest of it was very straighforward. I used a kit and instructions from iFixit, but I imagine it's pretty similar.


Exactly. They're physically separate. The disk drive is a basic SATA connection, and the blade SSD is a special NVMe drive that's apparently a bit tricky to source and install correctly. In my case it was the SSD that was dying (according to DriveDX it was down to <5% of its lifetime), but I left it in place and installed a 2.5" SATA SSD with an adpater bracket in place of the HDD. No "splitting" necessary.


What I did was, prior to the surgery, put my new SATA SSD into an external enclosure, cloned my internal drive onto it with Carbon Copy Cloner. Then I booted off of that and ran it for a couple days to make sure it was working properly. Finally I installed it into the iMac after opening it up, and when I was all done it booted perfectly. Totally seamless.

I reformatted the little 128GB blade SSD at the end but since it was almost dead I didn't trust it with much, and it was too small to be useful anyway.
There is a step after I install the new formatted drive to power on the iMac before adhering the screen. I am planning on leaving the adhesive covering the sticky and kind of holding it all together and powering it on to test. does that sound feasible?

Also while I have this bad boy apart is there anything I should do/upgrade? Ive seen mention of heatsinks, but unclear which ones. Anything that needs new thermal paste? I am planing on having a clean brush and the vacuum nearby before final assembly.
 
IMG_1790.jpeg
A little update, It didn’t go as planned….

Thanks everyone that helped me leading up to this job. Whille I was waiting on shipping I did a SuperDuper backup to a spare external drive.

When my OWC kit arrived I connected the SSD via USB and did a second backup using SuperDuper. Then I tried to boot from it just to be sure it was going to work. It booted and everything worked.

The screen removal went great it was really easy. If that is the only thing keeping you from doing this upgrade, don’t be scared!

The insides were crazy dusty. I used a iFixIt guide for removing the fan and swept out the dust.

I got the new SSD installed and then made sure the adhesive was completely removed. I noticed there was a film like a thin tape around the boarder of the screen under the foam pieces. I used a smugger tool to pick up a end. I pulled it up and it left more adhesive. I was really confused. But continued to peel and scrub with denatured alcohol. It was a real PITA. I started to wonder if it was ment to be removed? It seemed to be very permanent. I removed the right and bottom and decided to leave the left and top.

Hopefully it will be ok, it isn’t completely back together yet, more on that in a sec. After I stuck the adhesive strips on the chassis I left the protective plastic on the opposite sides still attached. I layed the screen on the chassis to power it on to test.

I got a circle with line!!! Crap! I did some troubleshooting and used a boot usb to get into recovery. The drive was there, and the existing fusion SSD portion too. I ended up going into Disk Utility and reformatting the OWC SSD and reinstalling Ventura. I am currently doing a restore from the first SuperDuper backup I had made. But everything seems to be working fine.

Some notable observations. The Fusion SSD still shows in Disk Util. What do I do with it?

When booting at the Apple Logo screen, the status bar goes about 1” then pauses for about 15sec the takes off and boots to login screen. I wonder if it’s checking the old Fusion SSD still?

Thanks gang.
 

Attachments

  • IMG_1791.jpeg
    IMG_1791.jpeg
    575.6 KB · Views: 60
View attachment 2242503A little update, It didn’t go as planned….

Thanks everyone that helped me leading up to this job. Whille I was waiting on shipping I did a SuperDuper backup to a spare external drive.

When my OWC kit arrived I connected the SSD via USB and did a second backup using SuperDuper. Then I tried to boot from it just to be sure it was going to work. It booted and everything worked.

The screen removal went great it was really easy. If that is the only thing keeping you from doing this upgrade, don’t be scared!

The insides were crazy dusty. I used a iFixIt guide for removing the fan and swept out the dust.

I got the new SSD installed and then made sure the adhesive was completely removed. I noticed there was a film like a thin tape around the boarder of the screen under the foam pieces. I used a smugger tool to pick up a end. I pulled it up and it left more adhesive. I was really confused. But continued to peel and scrub with denatured alcohol. It was a real PITA. I started to wonder if it was ment to be removed? It seemed to be very permanent. I removed the right and bottom and decided to leave the left and top.

Hopefully it will be ok, it isn’t completely back together yet, more on that in a sec. After I stuck the adhesive strips on the chassis I left the protective plastic on the opposite sides still attached. I layed the screen on the chassis to power it on to test.

I got a circle with line!!! Crap! I did some troubleshooting and used a boot usb to get into recovery. The drive was there, and the existing fusion SSD portion too. I ended up going into Disk Utility and reformatting the OWC SSD and reinstalling Ventura. I am currently doing a restore from the first SuperDuper backup I had made. But everything seems to be working fine.

Some notable observations. The Fusion SSD still shows in Disk Util. What do I do with it?

When booting at the Apple Logo screen, the status bar goes about 1” then pauses for about 15sec the takes off and boots to login screen. I wonder if it’s checking the old Fusion SSD still?

Thanks gang.

Option 1
1. Do a PRAM reset.
2. Power up and hold Opltion. If the iMac show 2,3 items on the boot menu, choose one that works for you (not the Recovery)

Option 2
Boot to Recovery, go to Disk Utility and try unmounting the Apple nVME blade (The disk with volume of 32GB or 128GB) from the system. Then reboot to see if it fixes.

Hope this helps.

The reason you got the circle mark, is you haven't removed the nVME blade yet. It's still assumed as the main booting volume and as it was corrupted, the iMac informed you that it could not boot from the default booting device.
 
Last edited:
  • Like
Reactions: MacMike81
Option 1
1. Do a PRAM reset.
2. Power up and hold Opltion. If the iMac show 2,3 items on the boot menu, choose one that works for you (not the Recovery)

Option 2
Boot to Recovery, go to Disk Utility and try unmounting the Apple nVME blade (The disk with volume of 32GB or 128GB) from the system. Then reboot to see if it fixes.

Hope this helps.

The reason you got the circle mark, is you haven't removed the nVME blade yet. It's still assumed as the main booting volume and as it was corrupted, the iMac informed you that it could not boot from the default booting device.
Awesome thanks! I figured it had something todo with the system looking at the NVMe.

Can I assign a drive letter to the old NVMe and use it as storage? Obviously I won’t put anything important. But I might as well try because it’s there.
 
Awesome thanks! I figured it had something todo with the system looking at the NVMe.

Can I assign a drive letter to the old NVMe and use it as storage? Obviously I won’t put anything important. But I might as well try because it’s there.

Of course you can use the stock nVME drive as storage, but its size is not very big.
Another option to think of is installing the original Mac OS that came with the iMac out-of-factory, to do some trouble shooting in case there is something wrong with Ventura in the future.
 
  • Like
Reactions: MacMike81
Of course you can use the stock nVME drive as storage, but its size is not very big.
Another option to think of is installing the original Mac OS that came with the iMac out-of-factory, to do some trouble shooting in case there is something wrong with Ventura in the future.
Mine is 128GB. That’s a decent size, I am sure I could find something to put on it. lol.

In the confusion of troubleshooting drives I ended up booting from USB and doing a fresh Ventura install. Then used migration assistant. The first few boot ups I got the “restarted because of an error” screen again! I let the system sit idle for about an hour then restarted again and it work perfect.

I will try reseting the PRam and NVRam tonight and unmounting the NVMe from Recovery.

If I get more errors or strange behaviors, Ill wipe and start over from a fresh install and manually move files over from my external SuperDuper backup.
 
I used a smugger tool to pick up a end. I pulled it up and it left more adhesive. I was really confused. But continued to peel and scrub with denatured alcohol. It was a real PITA. I started to wonder if it was ment to be removed? It seemed to be very permanent. I removed the right and bottom and decided to leave the left and top.
I spent the most time just removing that adhesive. Definitely meant to be removed! I ended up getting a clean surface to apply the new strips to, but it took a while.
 
  • Like
Reactions: MacMike81
I spent the most time just removing that adhesive. Definitely meant to be removed! I ended up getting a clean surface to apply the new strips to, but it took a while.
That is some serious tape Apple used. It was confusing to me because it seems like a sandwich of adhesive/foam/adhesive/tape/adhesive.

I removed the gummy/sticky from the chassis 100%. On the glass i for sure removed gummy/sticky but then noticed the “tape” its really thin almost like an audio cassette tape. Like I said i picked it and was able to pull it off in one piece but it left a really sticky residue, really really hard to remove. It took me close to an hour of soaking and rubbing with denatured alcohol for one side.

I ended up cleaning and removing the bottom and right side. The top and left were in good condition and still completely stuck. Not pulled up or nicked on the edges or corners. I wiped it with denatured and it didn’t budge. I decided to leave it.

I’ll keep an eye on the top edge; assuming because of the weight if it was going to release it might start on the top? Time will tell. If it starts To peel I am very comfortable cutting and removing the screen again. It wasn’t as nearly bad as i thought it would be. This entire project has to only get me to the M2/M3 iMac release. :)
 
  • Like
Reactions: ignatius345
That is some serious tape Apple used. It was confusing to me because it seems like a sandwich of adhesive/foam/adhesive/tape/adhesive.

I removed the gummy/sticky from the chassis 100%. On the glass i for sure removed gummy/sticky but then noticed the “tape” its really thin almost like an audio cassette tape. Like I said i picked it and was able to pull it off in one piece but it left a really sticky residue, really really hard to remove. It took me close to an hour of soaking and rubbing with denatured alcohol for one side.

I ended up cleaning and removing the bottom and right side. The top and left were in good condition and still completely stuck. Not pulled up or nicked on the edges or corners. I wiped it with denatured and it didn’t budge. I decided to leave it.

I’ll keep an eye on the top edge; assuming because of the weight if it was going to release it might start on the top? Time will tell. If it starts To peel I am very comfortable cutting and removing the screen again. It wasn’t as nearly bad as i thought it would be. This entire project has to only get me to the M2/M3 iMac release. :)
Yeah, that hour you spent tracks with my experience. It was easily the hardest part of the whole thing. If you DID end up with a bad seal, I suppose nothing is stopping you from just duct taping around the bezels 🙃.
 
Option 1
1. Do a PRAM reset.
2. Power up and hold Opltion. If the iMac show 2,3 items on the boot menu, choose one that works for you (not the Recovery)

Option 2
Boot to Recovery, go to Disk Utility and try unmounting the Apple nVME blade (The disk with volume of 32GB or 128GB) from the system. Then reboot to see if it fixes.

Hope this helps.

The reason you got the circle mark, is you haven't removed the nVME blade yet. It's still assumed as the main booting volume and as it was corrupted, the iMac informed you that it could not boot from the default booting device.
Well I did a NVRam reset and now it won't boot. It gets to the apple logo and the bar goes about 1" than stops indefinitely.

Working on restoring from Recovery now. :(
 
More updates for people that might be googling this topic.

It seems like the connected Ethernet was keeping it from booting. I unplugged it and it booted fine.

ALSO

I am still getting “restart due to error” message. I think there must be something wrong with my backup i used in migration assistant.

Next steps I guess would be a wipe and fresh clean install. I am Loosing my energy as far as doing this. It’s very time consuming. The thought of loosing everything in Keychain, and setting up 2 other users is stressful.
 
Register on MacRumors! This sidebar will go away, and you'll see fewer ads.