There has been some confusion about how ISO affects images shot in RAW. A recent thread about shooting in aperture priority mode got somewhat derailed by claims that ISO is "fake" and applied during RAW conversion, the claim being that one should just shoot at base ISO and then increase exposure in post. It got me thinking so I shot a series looking to objectively assess the impact of increasing ISO on image quality.
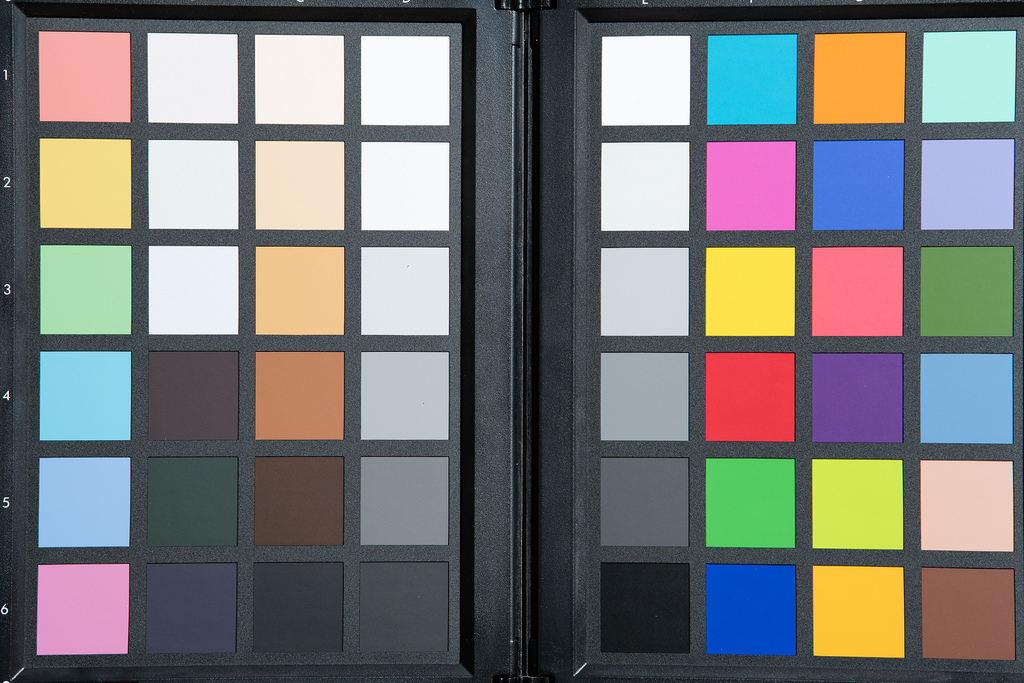
I used a color calibration chart as the subject. Not perfect for the test since the squares are discreet, but I don't have a gradient target to use as a test.
The series was shot with a Nikon D850 and 70-200 f/2.8E FL lens @ 190mm. This filled the frame with the color target and didn't require any cropping. The camera was on a tripod and I used a remote release. Not totally vital for this test as it isn't a sharpness test.
I tested from ISO 64 (the base ISO of the D850) to ISO 12,800.
I used an Einstein studio strobe for the light that was positioned roughly 45 degrees off axis and 45 degrees above the target to provide uniform light. The room was otherwise dark, so all of the light was coming from the strobe. All images shot at 1/250th second. In general, I tried to decrease the strobe output by a stop as I increased the ISO by a stop. Early images shot at f/8, but as I increased the ISO I reached the lower limits of the strobe's output, so had to stop down the lens to keep exposure constant. ISO 3200 was the breakpoint where I couldn't decrease the strobe output further and stopped down to f/11. ISO 6400 was at f/16. ISO 12800 was at f/22.
For ISO 3200, ISO 6400, and ISO 12800 I also took a shot at ISO 100 with the same flash output to test the hypothesis of whether it is better to use a higher ISO value, better to use ISO 100, or whether it is a wash between the two. Where the ISO 3200 pic was properly exposed, the ISO 100 pic with the same light reaching the sensor was 5 stops underexposed at the time of capture. 6 stops for the ISO 6400 pic and 7 stops for the ISO 12800 pic.
I used RawDigger on the RAW files to graphically quantitate the results. For those not familiar with the program, it can display a histogram with EV on the X-axis and number of pixels registering that EV value on the Y-axis. Ideally, one wants this graph to be continuous without any gaps. Gaps indicate areas where there is no pixel information for that specific EV value. Assuming that the subject has somewhat continuous color tonal values, any gaps (specifically ones where there is zero pixel information present) imply that the sensor failed to capture useful information that was actually present in the subject. Gaps are bad. More gaps are bad. Larger gaps are bad (like, really bad). They can result in banding or other artifacts. They represent gaps in the tonal continuity of the image as captured by the sensor. Bad, bad, bad.
The RawDigger histograms let you see how all the pixels on the sensor responded to the light they received in each color channel. The overall area under the curve is a graphical representation of how all the pixels recorded light at the time of image capture. Huge spikes with gaps on either side mean that a large number of pixels all recorded one value where presumably there was actually tonal/color variation in the subject. In other words, the sensor failed to capture the differences that were really there.
Including a pic of the target at ISO 100 to give a baseline. As ISO was increased by a stop, flash output was lowered by a stop to achieve the same overall exposure. As mentioned above, starting at ISO 3200 I had to stop down the lens as strobe output couldn't go lower.
Below are the RawDigger histograms. They are all labeled with the ISO and aperture used. Overall exposure was kept constant throughout the series to the best of my ability. The 3 exceptions being the ISO 100 shots corresponding to ISO 3200, ISO 6400, and ISO 12800 as outlined above.
Nota bene: pay special attention to the scales on both the X-axis and Y-axis. The X-axis corresponds to EV values. For the early pics at low ISO, the leftmost edge of the scale is -8 EV. For later pics at higher ISO it moves to -12 EV since a significant number of pixels registered in this range. The Y-axis corresponds to the number of pixels registering that EV. At low ISO values the pixel spread is smoother (a good thing). At higher ISO values a large number of pixels all registered the same value with gaps around them (a very bad thing).
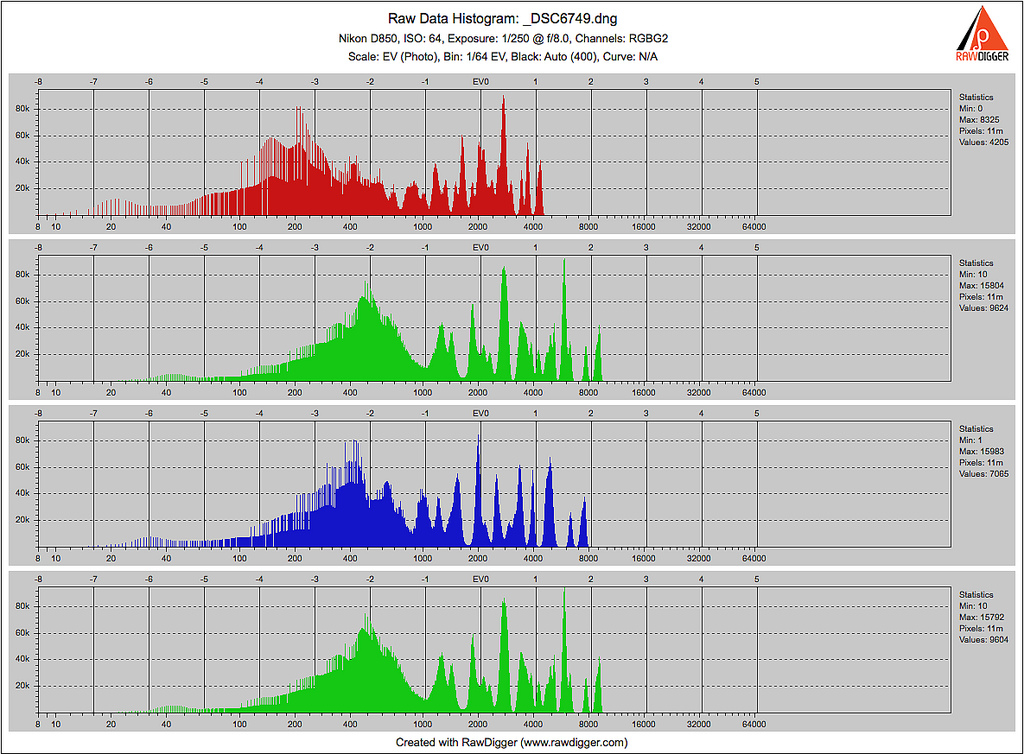
This pic is slightly underexposed compared to others in the series. I used the ISO 100 pic as the baseline since it was then easy to adjust strobe output in full stops to ISO changes in full stops.
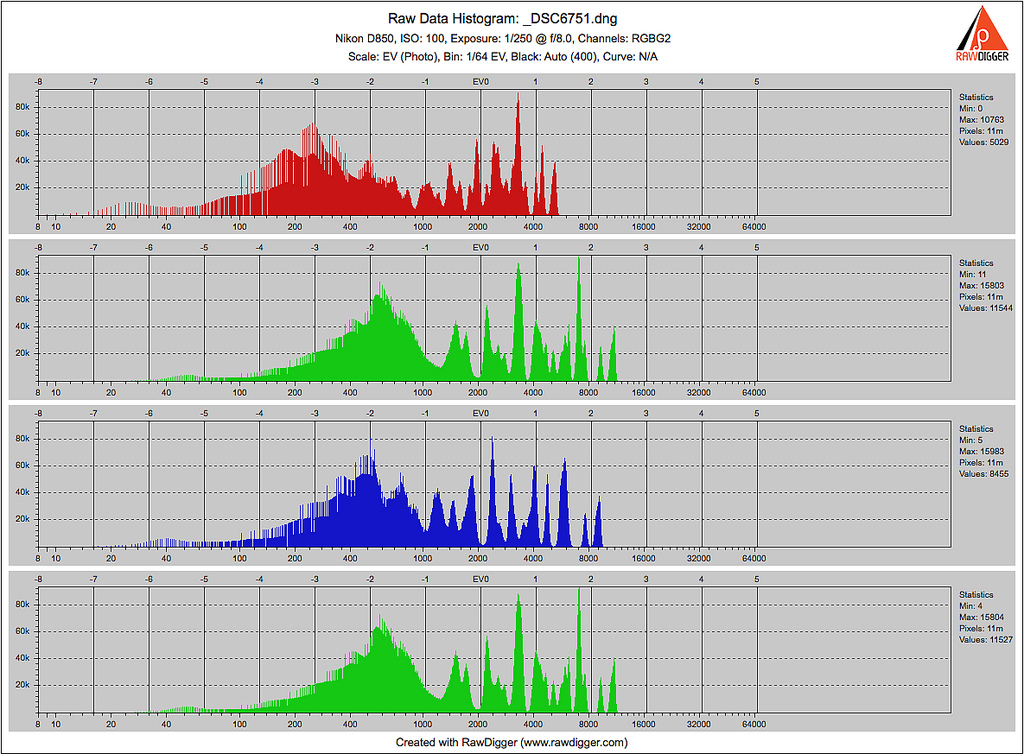
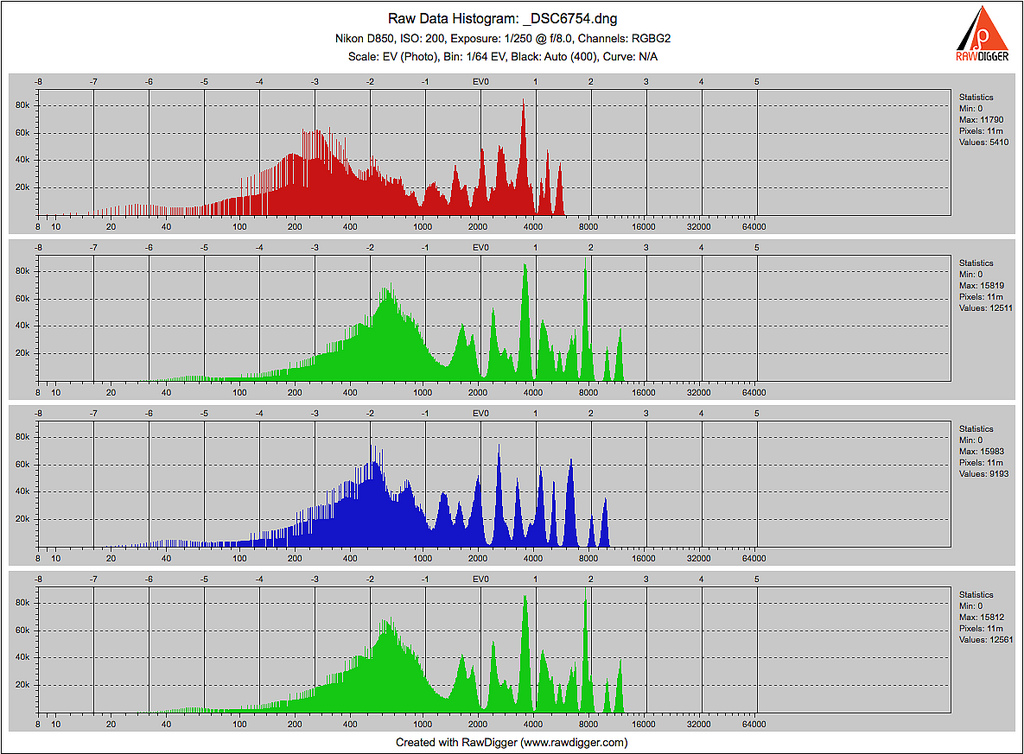
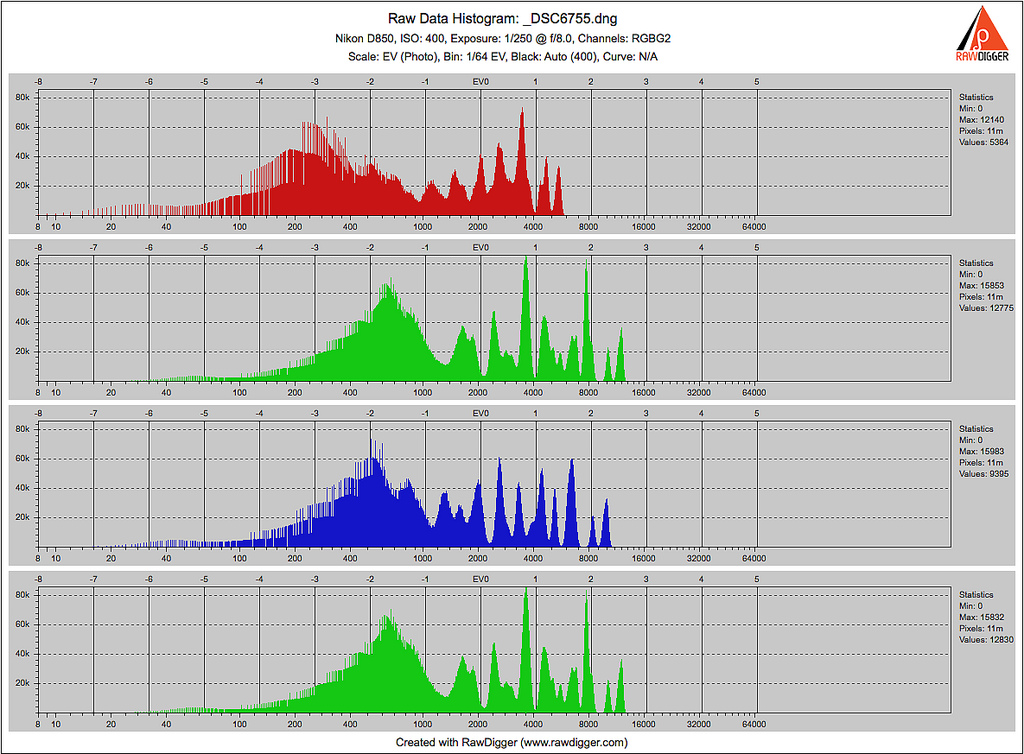
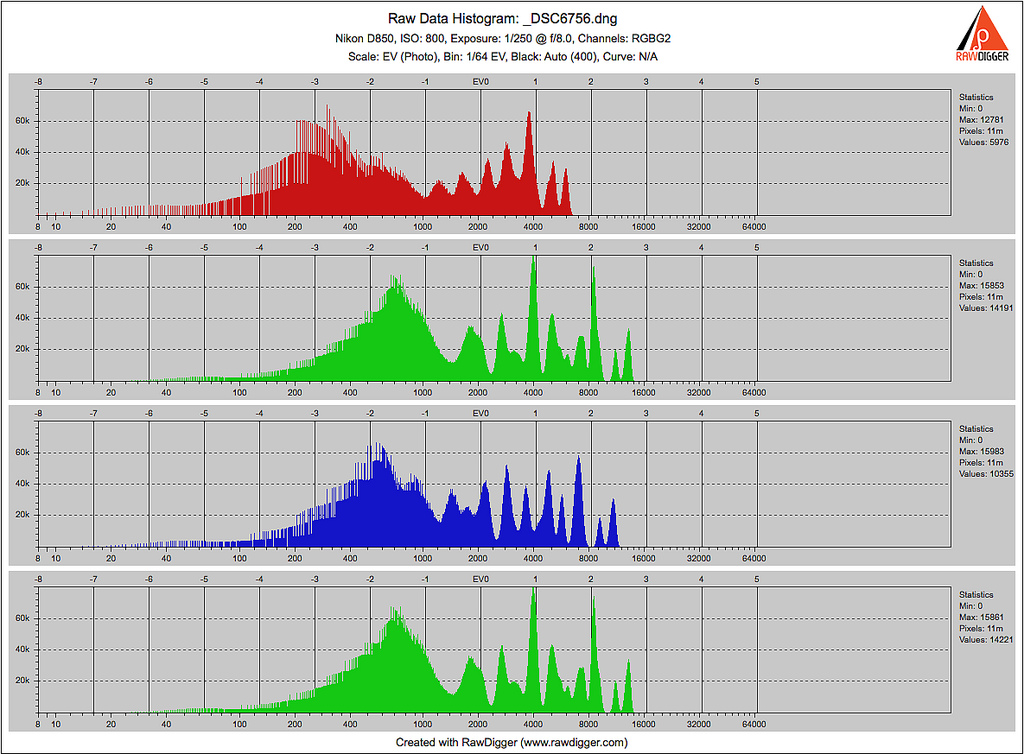
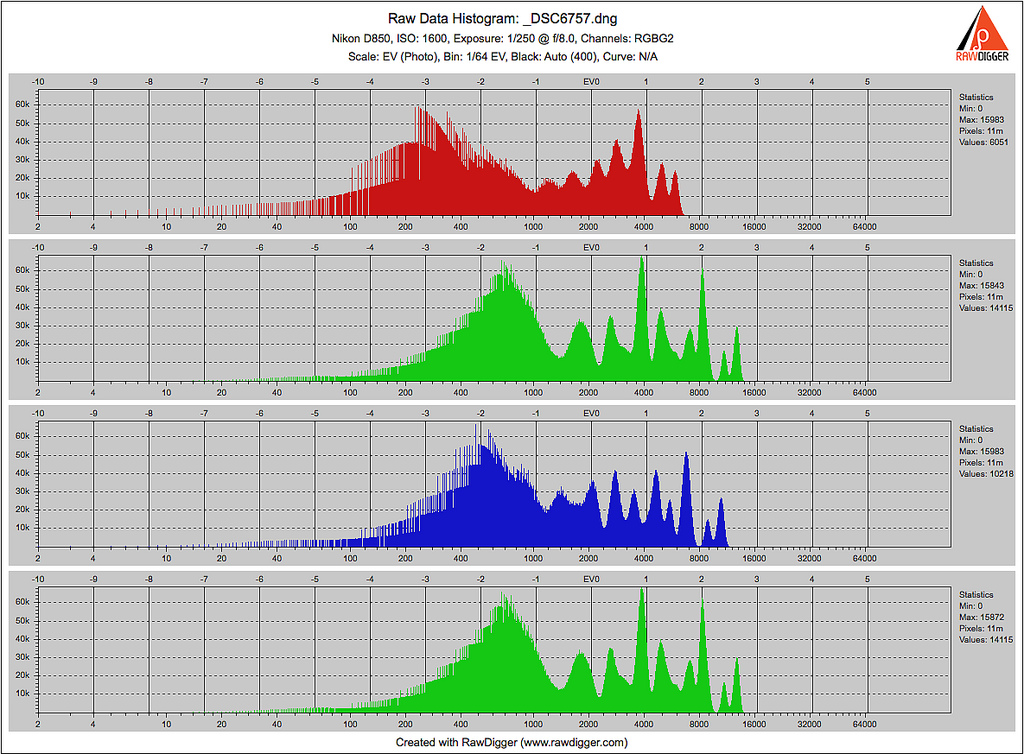
Note here that I had to change the EV scale as some pixels were registering lower than -8 EV. This is potentially a bad thing, though not horrible. There is also more gapping at the low end of the EV scale. Also not a good thing.
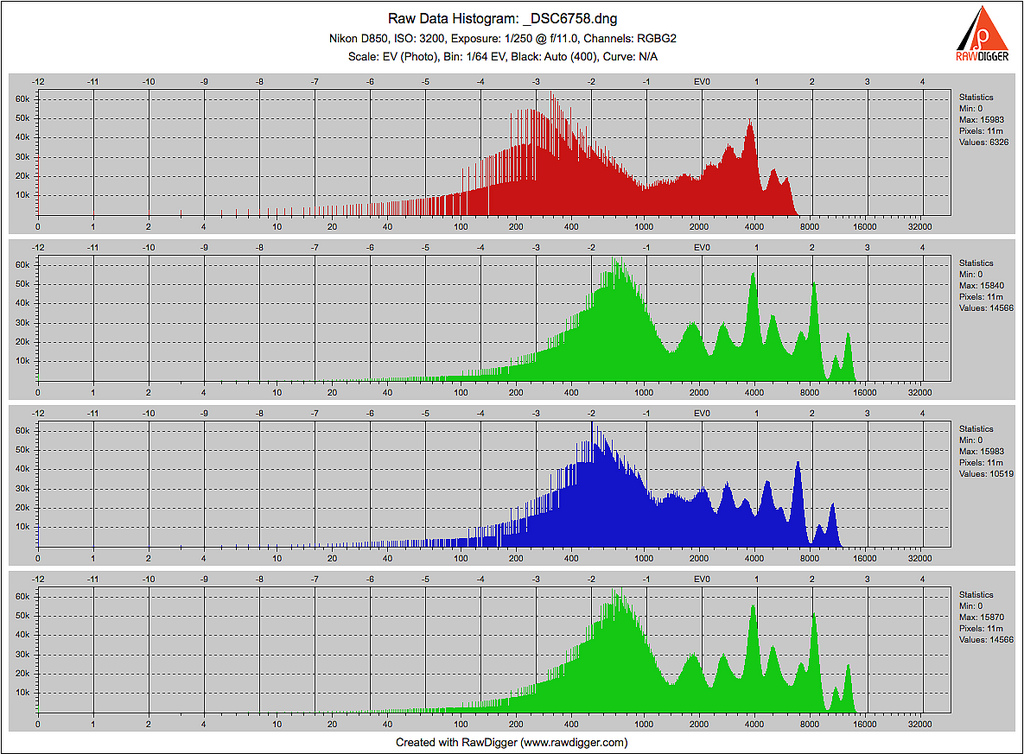
Note here that I had to change the EV scale as a significant number of pixels in the red channel (and a few in the green channel) were registering at -12 EV. This is a bad thing. Also the gapping at the low end is becoming more pronounced.
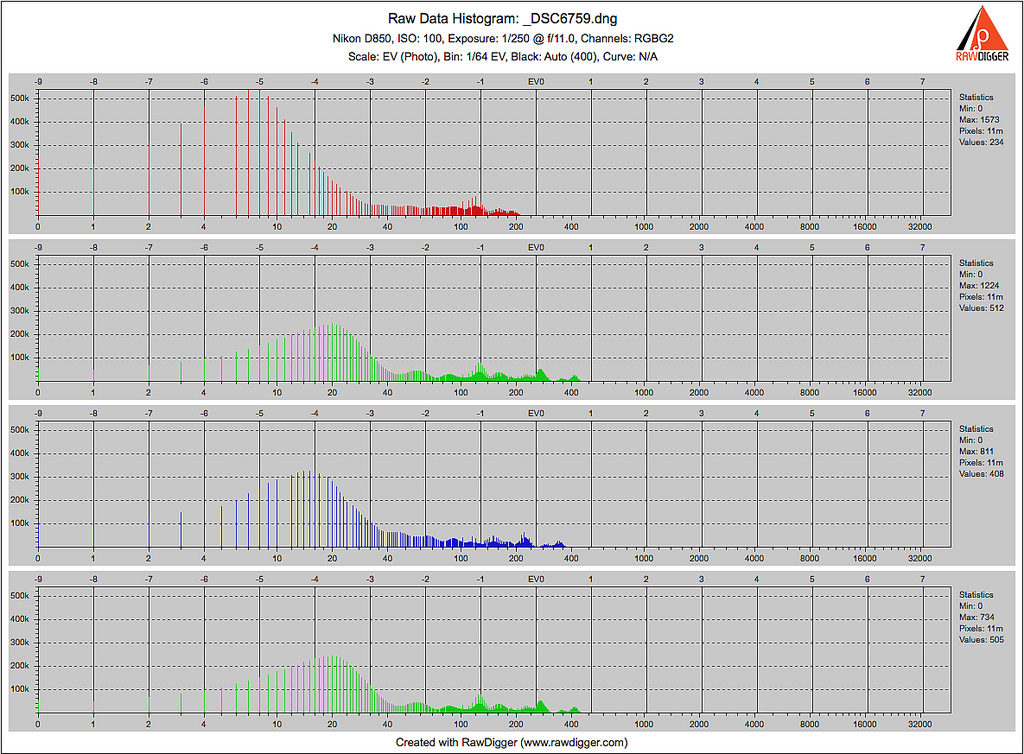
The ISO 100 shot for the same light level as the above ISO 3200 shot. This is horrid. Major gapping. Also note that the Y-axis changed fairly dramatically. Related to the gapping, massive numbers of pixels were registering the same EV value despite the fact (as seen in the ISO 3200 shot) that there is tonal/color information present in the subject, the sensor just wasn't able to capture it at ISO 100.
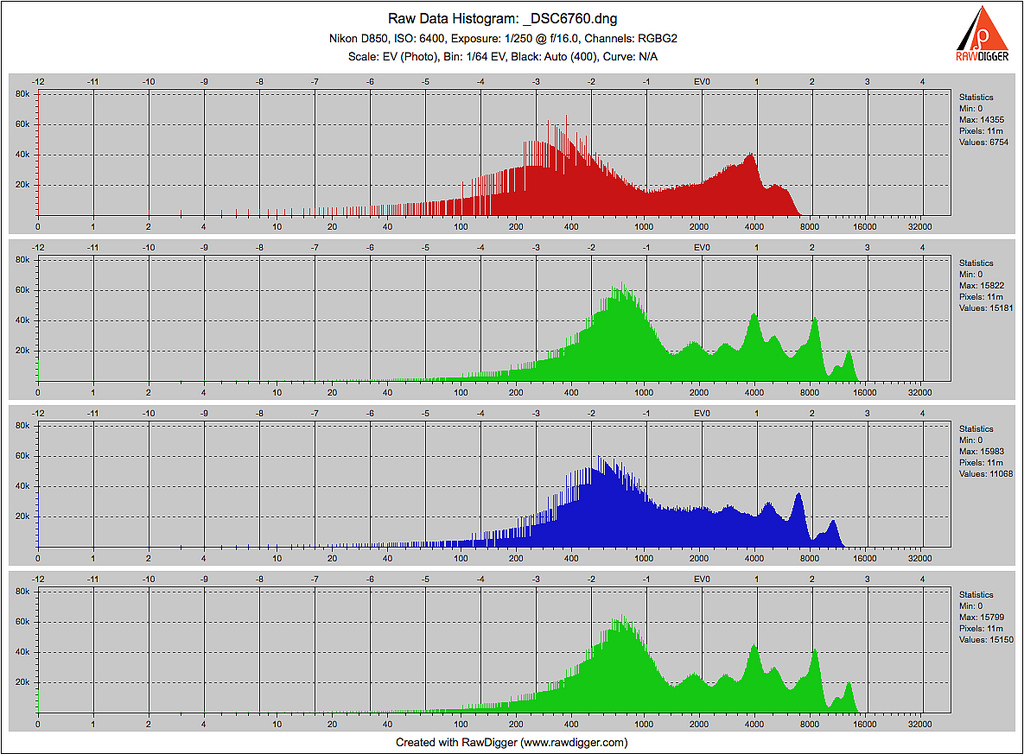
Again, the X-axis scale is -12 EV because an even larger number of pixels registered here compared to ISO 3200. This is a bad thing.
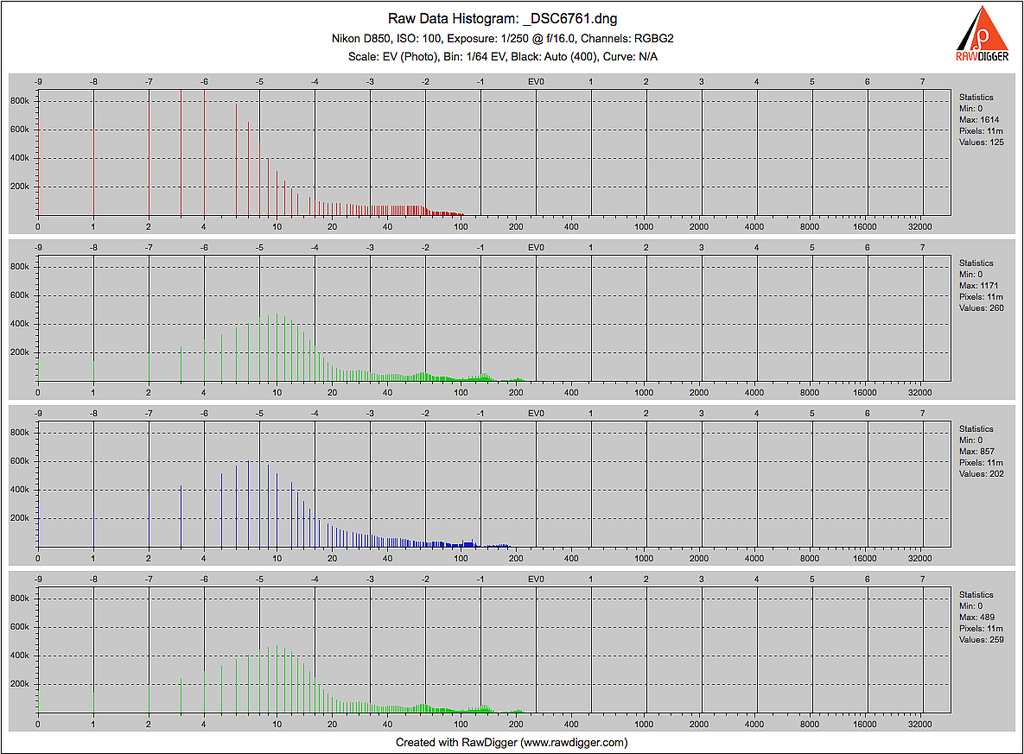
The ISO 100 shot for the same light level as the above ISO 6400 shot. This is even more horrid.
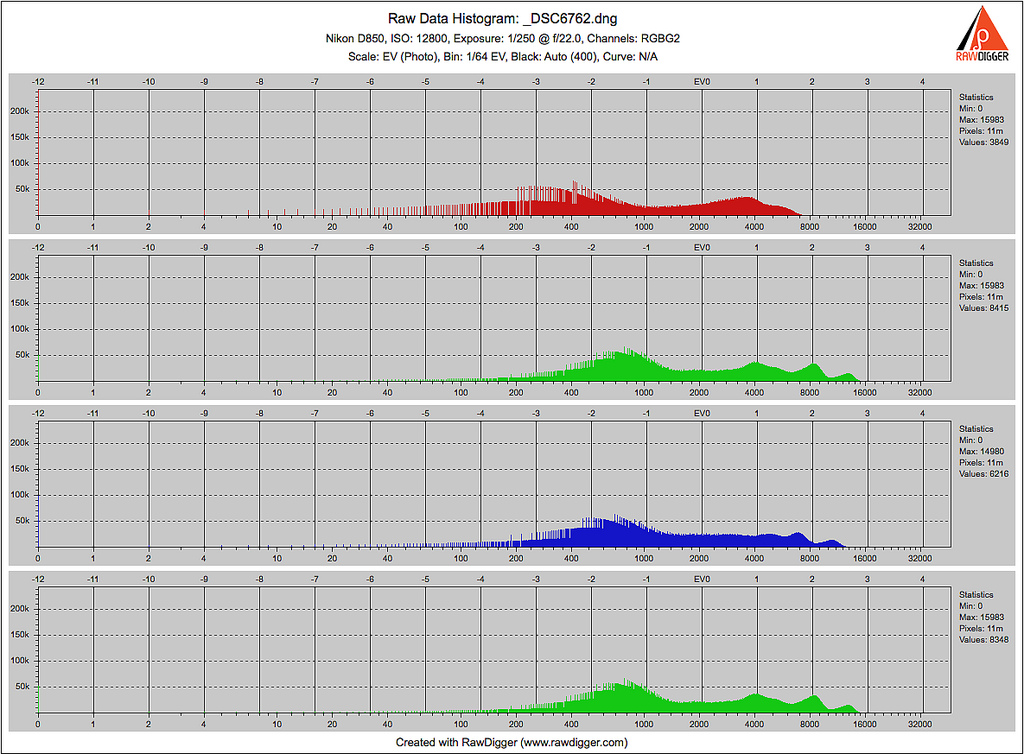
Same story as above with this shot at ISO 12800 but worse. All 3 channels are showing a significant number of pixels at -12 EV and the gapping is even worse.
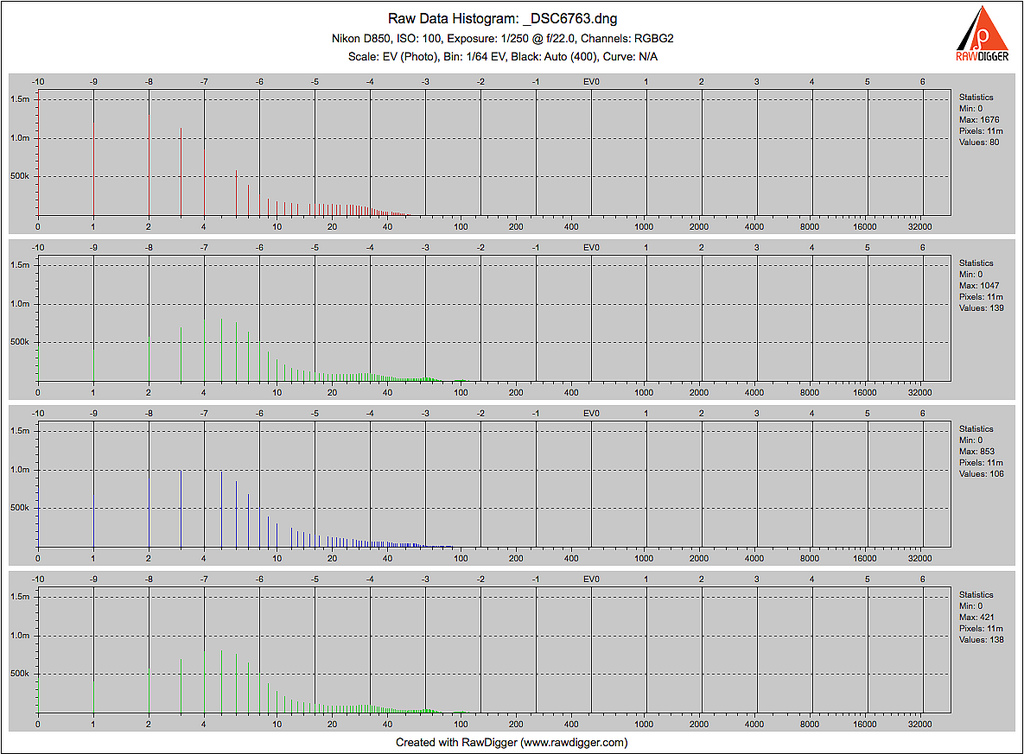
The ISO 100 shot for the same light level as the above ISO 12800 shot. Yikes. Notice the scale on the Y-axis. This shot is effectively 7 stops underexposed. LR only lets you increase exposure by 5 stops. This image couldn't be salvaged under any circumstances.
Two takeaways for me from this series. First: it is a really, really bad idea to significantly underexpose with a low ISO hoping the image will be the same with some fiddling in post compared to one properly exposed using a higher ISO. That is just completely inaccurate, internet videos notwithstanding. The proof is in the pudding as shown above. Expose properly and accept a higher ISO value if you need to.
Second: for my Nikon D850, there are two break points regarding ISO. ISO 1600 isn't as good as ISO 800 (or lower), but it isn't horrible. ISO 3200 is a bigger breakpoint as image degradation is much more obvious at that point compared to lower ISO values and I would be hesitant to use it. Anything higher than ISO 3200 is unacceptable to me unless I really had no other option. The other option being to just not take the pic .
.
Sorry for the length of this post, but hopefully people will find it helpful
I used a color calibration chart as the subject. Not perfect for the test since the squares are discreet, but I don't have a gradient target to use as a test.
The series was shot with a Nikon D850 and 70-200 f/2.8E FL lens @ 190mm. This filled the frame with the color target and didn't require any cropping. The camera was on a tripod and I used a remote release. Not totally vital for this test as it isn't a sharpness test.
I tested from ISO 64 (the base ISO of the D850) to ISO 12,800.
I used an Einstein studio strobe for the light that was positioned roughly 45 degrees off axis and 45 degrees above the target to provide uniform light. The room was otherwise dark, so all of the light was coming from the strobe. All images shot at 1/250th second. In general, I tried to decrease the strobe output by a stop as I increased the ISO by a stop. Early images shot at f/8, but as I increased the ISO I reached the lower limits of the strobe's output, so had to stop down the lens to keep exposure constant. ISO 3200 was the breakpoint where I couldn't decrease the strobe output further and stopped down to f/11. ISO 6400 was at f/16. ISO 12800 was at f/22.
For ISO 3200, ISO 6400, and ISO 12800 I also took a shot at ISO 100 with the same flash output to test the hypothesis of whether it is better to use a higher ISO value, better to use ISO 100, or whether it is a wash between the two. Where the ISO 3200 pic was properly exposed, the ISO 100 pic with the same light reaching the sensor was 5 stops underexposed at the time of capture. 6 stops for the ISO 6400 pic and 7 stops for the ISO 12800 pic.
I used RawDigger on the RAW files to graphically quantitate the results. For those not familiar with the program, it can display a histogram with EV on the X-axis and number of pixels registering that EV value on the Y-axis. Ideally, one wants this graph to be continuous without any gaps. Gaps indicate areas where there is no pixel information for that specific EV value. Assuming that the subject has somewhat continuous color tonal values, any gaps (specifically ones where there is zero pixel information present) imply that the sensor failed to capture useful information that was actually present in the subject. Gaps are bad. More gaps are bad. Larger gaps are bad (like, really bad). They can result in banding or other artifacts. They represent gaps in the tonal continuity of the image as captured by the sensor. Bad, bad, bad.
The RawDigger histograms let you see how all the pixels on the sensor responded to the light they received in each color channel. The overall area under the curve is a graphical representation of how all the pixels recorded light at the time of image capture. Huge spikes with gaps on either side mean that a large number of pixels all recorded one value where presumably there was actually tonal/color variation in the subject. In other words, the sensor failed to capture the differences that were really there.
Including a pic of the target at ISO 100 to give a baseline. As ISO was increased by a stop, flash output was lowered by a stop to achieve the same overall exposure. As mentioned above, starting at ISO 3200 I had to stop down the lens as strobe output couldn't go lower.

Below are the RawDigger histograms. They are all labeled with the ISO and aperture used. Overall exposure was kept constant throughout the series to the best of my ability. The 3 exceptions being the ISO 100 shots corresponding to ISO 3200, ISO 6400, and ISO 12800 as outlined above.
Nota bene: pay special attention to the scales on both the X-axis and Y-axis. The X-axis corresponds to EV values. For the early pics at low ISO, the leftmost edge of the scale is -8 EV. For later pics at higher ISO it moves to -12 EV since a significant number of pixels registered in this range. The Y-axis corresponds to the number of pixels registering that EV. At low ISO values the pixel spread is smoother (a good thing). At higher ISO values a large number of pixels all registered the same value with gaps around them (a very bad thing).

This pic is slightly underexposed compared to others in the series. I used the ISO 100 pic as the baseline since it was then easy to adjust strobe output in full stops to ISO changes in full stops.


Note here that I had to change the EV scale as some pixels were registering lower than -8 EV. This is potentially a bad thing, though not horrible. There is also more gapping at the low end of the EV scale. Also not a good thing.

Note here that I had to change the EV scale as a significant number of pixels in the red channel (and a few in the green channel) were registering at -12 EV. This is a bad thing. Also the gapping at the low end is becoming more pronounced.

The ISO 100 shot for the same light level as the above ISO 3200 shot. This is horrid. Major gapping. Also note that the Y-axis changed fairly dramatically. Related to the gapping, massive numbers of pixels were registering the same EV value despite the fact (as seen in the ISO 3200 shot) that there is tonal/color information present in the subject, the sensor just wasn't able to capture it at ISO 100.

Again, the X-axis scale is -12 EV because an even larger number of pixels registered here compared to ISO 3200. This is a bad thing.

The ISO 100 shot for the same light level as the above ISO 6400 shot. This is even more horrid.

Same story as above with this shot at ISO 12800 but worse. All 3 channels are showing a significant number of pixels at -12 EV and the gapping is even worse.

The ISO 100 shot for the same light level as the above ISO 12800 shot. Yikes. Notice the scale on the Y-axis. This shot is effectively 7 stops underexposed. LR only lets you increase exposure by 5 stops. This image couldn't be salvaged under any circumstances.
Two takeaways for me from this series. First: it is a really, really bad idea to significantly underexpose with a low ISO hoping the image will be the same with some fiddling in post compared to one properly exposed using a higher ISO. That is just completely inaccurate, internet videos notwithstanding. The proof is in the pudding as shown above. Expose properly and accept a higher ISO value if you need to.
Second: for my Nikon D850, there are two break points regarding ISO. ISO 1600 isn't as good as ISO 800 (or lower), but it isn't horrible. ISO 3200 is a bigger breakpoint as image degradation is much more obvious at that point compared to lower ISO values and I would be hesitant to use it. Anything higher than ISO 3200 is unacceptable to me unless I really had no other option. The other option being to just not take the pic
Sorry for the length of this post, but hopefully people will find it helpful
Last edited:


