[ Hardware: 2008 Mac Pro 2.8 GHz Octo, 2 80gb Intel X25-M SSD's, Transintl Pro Caddy 2 ]
[ Note: Sorry for the poor colors in the pictures, I had a fluorescent light filter on my camera and the room was lit by incandescent lights, I was too lazy to remove it ]
]
I've always been interested in SSD's, and have been waiting for the performance and price to get to the right points. I finally decided to take the plunge once the firmware update for the X25-M's was released.
The only problem was I didn't have the space to put them in my computer. All 4 bays are filled with necessary HD's, with the only option being to install them in the 5.25" bay.
I didn't want to go with MaxUpgrades because their product is quite expensive and even more expensive with the 2.5" adapter. I decided I would give Transintl a go with the Pro Caddy 2 even though there is barely any info about it on the web.
It was pretty expensive for some machined sheet metal + screws + cables, coming in at $97 after shipping, but I would rather have paid this than simply sit the SSD's in the bay or secure them with duct tape.
It shipped a day after I placed the order and was well packed. It came with the Pro Caddy 2 unit, 2 right-angle to flat sata cables, a molex to dual sata power connectors adaptor, a cd with installation instructions in pdf format, and a small bag with various screws for installation.
The Pro Caddy 2 is actually an entire optical bay replacement, which I didn't realize until it arrived. It consists of a frame that slides in the Mac Pro and a flat mount for the hard drives that screws onto the frame.
Top of Mount:

Bottom of Mount:

5.25" Bay Frame:

The first thing I did was disassemble my mac pro. The instructions were fairly detailed through each step, indicating which screws to remove and including small pictures.
In order to wire the cables, it is necessary to remove hard drives, pci/video cards, the cpu cover, 5.25" bay frame, and the front fan assembly. This wasn't too difficult, there were just a couple not so easy to reach screws and the power connectors on the optical drives were hard to grip to remove.
Next came wiring sata cables. The instructions were not very detailed here, and there was very little room to fit the sata connectors through the small opening in the back of the optical bay to motherboard. I found the best way to do this was to try and wiggle my finger through the hole to clear a small path, then try to fit the connector through this path. After this you simply connect the straight sata connectors to the motherboard, and leave the right-angle connectors in the bay for later use. Connecting the power adaptor was easy to, just plug it in to the existing molex connector in the bay.
Wiring Sata + Power Cables:
After this it's time to install the hard drives on the mount. For 2.5" hard drives, there are only three mounting holes on the plate. It was slightly troublesome to figure out which screws worked with the 2.5" hard drives since all the assorted screws were in one bag.
Two 80gb X25-M's mounted on plate:
Top: Bottom:
Next came installing the mounting plate into the new bay frame. The plate screws in on the bottom, so it was necessary to hold the plate against the frame and keep the holes aligned while trying to screw it in.
Bottom of frame with mounting plate mounted:

SSD's mounted on plate in frame:

Here is a comparison shot of the new 5.25" bay frame on top of the old 5.25" bay frame. The new frame is certaintly less appealing, with no smooth curves or nice finish. It is also a bit flimsier, but once the optical drive was installed it felt solid.
Comparison Shot:

After installing the mounting plate it was time to install the optical drive. This was very simple, removing it from the old frame and using the same screws to secure it to the new frame.
Frame with SSD's and optical drive:


Now it was time to install this into the mac pro. The instructions weren't very detailed on how to wire it but I figured it out. The sata and power ports on the drives were right up against the mount so the connectors had to be slightly forced in. This could have been remedied by slightly alleviating the drives off the mount but the connectors seemed not to be flexing too much so I left them as they were.
It was necessary to slide the frame as far as possible into the slot in the mac pro in order to get the latch on the back to close. The frame does not have the nice curved extension that the apple frame does which explains why it's necessary for it to be further in the slot.
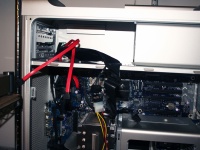
Installed and Wired:


Reassembling the computer wasn't detailed in the instructions, with them saying follow the disassembly instructions backwards. Getting the fan assembly screw back in was difficult but I managed to do it after a few minutes.
After everything was back together I proceeded to update the firmware. The firmware update cd would not recognize the presence of the drives no matter what I tried, so I had to remove drives from the computer and place them in an hp computer. This updated the firmware drives flawlessly and I reinstalled them back in the mac pro. If anyone is planning on installing these drives in there mac pros, I suggest you try to upgrade the firmware first before installing them in the Pro Caddy 2. It was a pain to remove and reinstall them and I wasted about an hour meddling around.
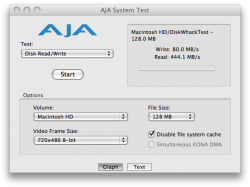
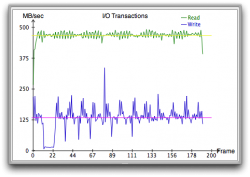
I booted from my old OSX partition and created a RAID0 array of the two drives using disk utility. Then I installed a fresh copy of OSX on them, and booted into that. I won't go into detail about their performance as its already well documented on this forum, but man they fly. Applications open nearly instantly, boot up time is much shorter from the logon screen to loaded desktop. I am very happy with this investment.
Conclusion:
The Pro Caddy 2 by Transintl is a solid option for installing two drives in the optical bay. It is a bit expensive but comparably priced to other solutions available. Installing two SSD's in RAID0 and using them for a boot drive will most likely take your breath away if you've never booted off a raid array or SSD before.
Any questions?
[ Note: Sorry for the poor colors in the pictures, I had a fluorescent light filter on my camera and the room was lit by incandescent lights, I was too lazy to remove it
]I've always been interested in SSD's, and have been waiting for the performance and price to get to the right points. I finally decided to take the plunge once the firmware update for the X25-M's was released.
The only problem was I didn't have the space to put them in my computer. All 4 bays are filled with necessary HD's, with the only option being to install them in the 5.25" bay.
I didn't want to go with MaxUpgrades because their product is quite expensive and even more expensive with the 2.5" adapter. I decided I would give Transintl a go with the Pro Caddy 2 even though there is barely any info about it on the web.
It was pretty expensive for some machined sheet metal + screws + cables, coming in at $97 after shipping, but I would rather have paid this than simply sit the SSD's in the bay or secure them with duct tape.
It shipped a day after I placed the order and was well packed. It came with the Pro Caddy 2 unit, 2 right-angle to flat sata cables, a molex to dual sata power connectors adaptor, a cd with installation instructions in pdf format, and a small bag with various screws for installation.
The Pro Caddy 2 is actually an entire optical bay replacement, which I didn't realize until it arrived. It consists of a frame that slides in the Mac Pro and a flat mount for the hard drives that screws onto the frame.
Top of Mount:

Bottom of Mount:

5.25" Bay Frame:

The first thing I did was disassemble my mac pro. The instructions were fairly detailed through each step, indicating which screws to remove and including small pictures.
In order to wire the cables, it is necessary to remove hard drives, pci/video cards, the cpu cover, 5.25" bay frame, and the front fan assembly. This wasn't too difficult, there were just a couple not so easy to reach screws and the power connectors on the optical drives were hard to grip to remove.
Next came wiring sata cables. The instructions were not very detailed here, and there was very little room to fit the sata connectors through the small opening in the back of the optical bay to motherboard. I found the best way to do this was to try and wiggle my finger through the hole to clear a small path, then try to fit the connector through this path. After this you simply connect the straight sata connectors to the motherboard, and leave the right-angle connectors in the bay for later use. Connecting the power adaptor was easy to, just plug it in to the existing molex connector in the bay.
Wiring Sata + Power Cables:

After this it's time to install the hard drives on the mount. For 2.5" hard drives, there are only three mounting holes on the plate. It was slightly troublesome to figure out which screws worked with the 2.5" hard drives since all the assorted screws were in one bag.
Two 80gb X25-M's mounted on plate:
Top:
 Bottom:
Next came installing the mounting plate into the new bay frame. The plate screws in on the bottom, so it was necessary to hold the plate against the frame and keep the holes aligned while trying to screw it in.
Bottom of frame with mounting plate mounted:

SSD's mounted on plate in frame:

Here is a comparison shot of the new 5.25" bay frame on top of the old 5.25" bay frame. The new frame is certaintly less appealing, with no smooth curves or nice finish. It is also a bit flimsier, but once the optical drive was installed it felt solid.
Comparison Shot:

After installing the mounting plate it was time to install the optical drive. This was very simple, removing it from the old frame and using the same screws to secure it to the new frame.
Frame with SSD's and optical drive:


Now it was time to install this into the mac pro. The instructions weren't very detailed on how to wire it but I figured it out. The sata and power ports on the drives were right up against the mount so the connectors had to be slightly forced in. This could have been remedied by slightly alleviating the drives off the mount but the connectors seemed not to be flexing too much so I left them as they were.
It was necessary to slide the frame as far as possible into the slot in the mac pro in order to get the latch on the back to close. The frame does not have the nice curved extension that the apple frame does which explains why it's necessary for it to be further in the slot.
Installed and Wired:


Reassembling the computer wasn't detailed in the instructions, with them saying follow the disassembly instructions backwards. Getting the fan assembly screw back in was difficult but I managed to do it after a few minutes.
After everything was back together I proceeded to update the firmware. The firmware update cd would not recognize the presence of the drives no matter what I tried, so I had to remove drives from the computer and place them in an hp computer. This updated the firmware drives flawlessly and I reinstalled them back in the mac pro. If anyone is planning on installing these drives in there mac pros, I suggest you try to upgrade the firmware first before installing them in the Pro Caddy 2. It was a pain to remove and reinstall them and I wasted about an hour meddling around.
I booted from my old OSX partition and created a RAID0 array of the two drives using disk utility. Then I installed a fresh copy of OSX on them, and booted into that. I won't go into detail about their performance as its already well documented on this forum, but man they fly. Applications open nearly instantly, boot up time is much shorter from the logon screen to loaded desktop. I am very happy with this investment.
Conclusion:
The Pro Caddy 2 by Transintl is a solid option for installing two drives in the optical bay. It is a bit expensive but comparably priced to other solutions available. Installing two SSD's in RAID0 and using them for a boot drive will most likely take your breath away if you've never booted off a raid array or SSD before
.Any questions?