Do I need this: http://www.pny.eu/product/p-14-205-643/Accessories-amp-upgrade-kits/SSD-Upgrade-Kit/
it says A 2.5 to 3.5 mounting bay
it says A 2.5 to 3.5 mounting bay

you won't need this. the mini is already a 2.5" bay machine. If you want to add the ssd as a second drive you will need a kit like the "owc data doubler" unless you have the server variant which already has the cable and the screws. but regardless you will still need to buy the logic board removal tool - again OWC
good luck mate.
Oh, and check the icix it instructions and the OWC installation videos. they are both very helpful.
To add a SSD you only need:
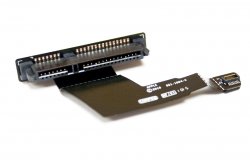
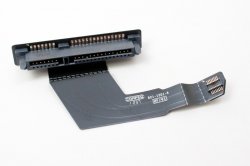
SATA cable for lower bay
torx 8 + hex 2mm to remove the airport grill.
That's it.
Leave the board in place and don't care about the screws. Connect the cable to the SSD, slide it in, add the spacer that comes with it if it is too loose. The SSD won't move a bit.
5 min. work.
DON'T FOLLOW OWC/IFIXIT VIDEOS!
You can seriously damage your machine if you really care about inserting 2 screws on the side and take the complete machine apart to do so!
To add a SSD you only need:
SATA cable for lower bay
torx 8 + hex 2mm to remove the airport grill.
That's it.
Leave the board in place and don't care about the screws. Connect the cable to the SSD, slide it in, add the spacer that comes with it if it is too loose. The SSD won't move a bit.
5 min. work.
DON'T FOLLOW OWC/IFIXIT VIDEOS!
You can seriously damage your machine if you really care about inserting 2 screws on the side and take the complete machine apart to do so!
I suggest you visit ifixit.com and view the video there about taking the Mini apart.
Also -- visit youtube and search for "late 2012" Mini videos.
There will probably be several, but by taking the time to view them you will have several perspectives of how others do it, and what parts they needed.
If you don't want to take the Mini apart to install an SSD, you can also buy a USB3/SATA docking station, put the SSD into it, and boot and run the Mini that way, with no perceptible loss of speed. You can find these gadgets at amazon.com (enter "usb3 sata dock" in the search bar).
It really isn't hard to take the damn thing apart. and you can seriously damage anything by doing anything when you open a machine up!
The key is to be careful, slow and steady, and not rush the mod
----------
OP:
the first two are effectively the same. the OWC kit i know works (the sata cable does) i have never seen the second one ( http://www.amazon.de/Festplatten-Fle...c+data+doubler ) but given that its much much cheaper i would go with that. google the brand and see if there are any known issues with this kit too.
The third option that you showed is for MBP and will not work on a mini so disregard that.
Also please do consider what blanka above has posted. if you have no experience with taking things apart and are concerned that you may damage your mini i'd go with his alternative. That being said keep in mind that you SSD won't be secured in the box (though its not like it can go anywhere (quite a tight fit).
With respect to the drive that the os is on, it doesn't matter how you install the drive. you would still have to format the new drive, and then proceed to install the os on it. (google clean install osx)
Good luck mate,
There is a definite difference between the sata cables for the lower and upper drives, they are not interchangeable.Is the cheap kit the right cable? I saw somewhere there's a difference when there are 2 cables?
[[ yes, and yes on the ifixit and you tube. but a resounding no on this usb 3 business….
1) you'll run into problems when you disconnect the drive. (minor)
2) chicken way out… one should learn more about the **** they buy and not just be zombie-like consumers of whatever (major)
3) defeats the purpose of having a slick mini sitting on a desk… (minor) ]]
Nonsense -- absolute nonsense.
I've been running a late 2012 2.6ghz Mini (typing on it now) with an "external booter" since mid-January. My external boot drive is an IBM 520 series SSD mounted in a plugable.com "lay-flat" docking station, which I keep in an out-of-the-way location on my desk.
NO problems at all running that way - NONE. Turns on when I want, boots to login screen in about 15 seconds, sleeps without problems, wakes without problems. No problems, period.
It boots and runs beautifully, just as fast as if the SSD were internal.
Your "chicken way out" argument makes no rational sense at all.
It was very quick and convenient to leave the SSD external, and actually CHEAPER to do it that way. The dock cost me all of $23. And if I replace the Mini, I can keep on using it for other purposes.
Cheaper, faster, less involved -- makes sense to me. You might as well say that a surgeon (who has the option of choosing a more-invasive or less-invasive procedure) should opt for the _more invasive_ one, because to do anything less is "the chicken way out", even though the end results will be the same!
There is a definite difference between the sata cables for the lower and upper drives, they are not interchangeable.
as far as I know, both top and bottom hard drive cables for the mac mini are the same, left is the 'lower', right is the 'upper'
Only what I read on these forums, about adding a second drive, lots of chatter about upper and lower sata connectors.There is? none of the sites selling the cable say that…? can you show a link where there is support for this?
Only what I read on these forums, about adding a second drive, lots of chatter about upper and lower sata connectors.
If I'm wrong then I apologize for the misinformation.
Only what I read on these forums, about adding a second drive, lots of chatter about upper and lower sata connectors.
If I'm wrong then I apologize for the misinformation.
Basically if you went to the OWC site to look at their Data Doubler kit and then to their 2012 Mac Mini installation video you will see they have an addendum to the original install video because Apple change something in the 2012 half was through.
I put in the SSD with 2 pins in the side. Put the gromets in the frame (had to cut off a bit of the gromet edges in order to have them fit). Removed the antenna, slided in the SSD and the spacer that came with it, to give it a little distance from the HD and make sure it fits really tight.
No Fan removal, no Logic board removal. Nothing, just the antenna. And it is very solid in place. No movement of any kind possible.
so... i have to gut the whole thing to install the drive.. awesome DDDI followed the iFixit guide and it was pretty straight forward. Then again, I am pretty comfortable with taking electronics apart and putting them back together.
I do highly recommend their 2nd HD upgrade package and following their guide. I like knowing that things are done right, even if the whole thing has to come apart.
though some here may/will disagree totally agree with the things done right part
but i am not sure about the iFixit kit. I read (here and on the ifixit site) that some are experiencing problems with the sata cable that they provide... I'm guessing you had no such issues? (which drive bay did you use for the new drive?)