Become a MacRumors Supporter for $50/year with no ads, ability to filter front page stories, and private forums.

Cloud9

macrumors 6502
Original poster
Aug 10, 2005
336
17
between flesh and thought
I do LOTS of artistic editing to photos I take for my photography business.

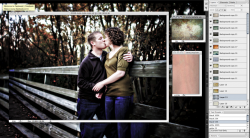
One of the effects I like to incorporate is adding layers of texture to the images I am working with. To do this I currently use two tiff files of 900+ mbs in size. Each Tiff File is basically used as my texture palette. One file is for landscape orientated photos and the other is for portrait orientation. Each tiff is composed of about 60 layers, each layer representing a different texture. I decided to work in this way because it seemed faster to just select the the tiff file, cycle through the layers, and duplicate the textures I want to use into the image I am working on. I find this is easier then to move back and forth between bridge and and cs3. and requires very few steps to get the texture I want on the image.

BUT

I find having 1.8 gigs of tiffs open can drag on system performance. Is there a more efficient way to do what I am doing? Performance is not too bad. I have an ssd and 6 gigs of ram on my macbook pro. But I find it can stutter a bit with prolonged use.

I have a attached a pic for reference.

Thanks.
 

Attachments

  • Picture 2.png
    Picture 2.png
    631.6 KB · Views: 169
Maybe im missing something or I read your post wrong, but it seems like you have alot of unused layers that are eating up performance. Also what are the files sizes of the pictures before you add all of these layers?

I'm also curious what type of computer you are using and the specs.
 
MBP santa rosa, 2.4, 6 gigs of ram. SSD G.Skill 128. All images stored on local drive. I have CS3 set to use maximum ram.

The original photos are between 3-8 MBs in size.

Yes most of the textures are not used for each photo. But through the course of my work flow it is convenient to have access to all the files as I will eventually use most of them depending on the project.
 
It sounds like you're asking how to use 20+ layers of high-resolution images w/o maximizing RAM? Frankly it sounds like an inefficient workflow. However, my buddy Bert is known to use thousands of layers by working on a large (excuse me, gigantic) image in sections. These are later flattened and assembled into one composite file.

http://revision3.com/pixelperfect/2008-09-22SneakPreview

As a suggestion for a more efficient workflow, you might consider converting the target photo to a Smart Object. To this you can add overlay textures and filters (with masks if appropriate). Combine as many layers as possible to reduce file size. Save this document as the "master." Then control-click on the Smart Object layer name to select "Replace Contents" for the next image. Adjust the masks and you're done.

Oh, and save the TIFF with LZW compression. This won't make it any smaller while you are working but will reduce the size on your hard drive. Printing an LZW TIFF placed in InDesign, Illustrator or QuarkXPress may require a PS level-3 device for decompression though.

(BTW, nice photo.)
 
The files you are working on are too large for the MacBook Pro to work efficiently. A 128 gig solid state drive is not large enough to accommodate the scratch disk area you need to process the files. Only 6 gigs of ram is also pushing the limits.

The Photoshop scratch disk should be on a drive that is physically separate from the image data.

Ideally, for this type of work, you should be using a quad or octacore MacPro with 8 gigs or more of ram and a raid 0 scratch disk.

If you do not have access to such a machine, you must reduce the file sizes to something workable.

Jerry
 
I cant get a tower.

I have read that the fastest scratch disk is an internal one. And the SSD I am using is pretty darn fast. What If I had 2 of them for a 256gb ssd RAID 0? I plan on doing that in about week or two anywayby taking out the optical.
 
As a suggestion for a more efficient workflow, you might consider converting the target photo to a Smart Object. To this you can add overlay textures and filters (with masks if appropriate). Combine as many layers as possible to reduce file size. Save this document as the "master." Then control-click on the Smart Object layer name to select "Replace Contents" for the next image. Adjust the masks and you're done.

Oh, and save the TIFF with LZW compression. This won't make it any smaller while you are working but will reduce the size on your hard drive. Printing an LZW TIFF placed in InDesign, Illustrator or QuarkXPress may require a PS level-3 device for decompression though.

Can you explain this to me a little more slowly. I have not worked with smart objects before.

what I do now involves these steps.

1. From lightroom, select a photo to edit in photoshop.

2. Photo opens in photoshop. I select 1 or more textures from the humongous texture file I have open and duplicate the layers into the photo I just opened from lightroom.

3. I work on image, adjust textures and any actions or tweaking.

4. Save and close.

5. repeat for next image.
 
Register on MacRumors! This sidebar will go away, and you'll see fewer ads.