Become a MacRumors Supporter for $50/year with no ads, ability to filter front page stories, and private forums.

p11hlf

macrumors member
Original poster
Jul 27, 2018
69
44
Southampton UK
Hi Guys,

I have owned a few Mac Pros over the years in different parts of the world and I wanted to share with you my latest creation.

The specs are as follows
  • 3.46Ghz X5690 CPU
  • GTX 1080ti With working boot screen and factory core overlock
  • 24GB Samsung 1333mhz Ram
  • 256GB Samsung PCIE SM951 OSX Boot Drive
  • 256GB Samsung SSD Windows 10 Boot Drive
  • 1TB WD Games drive
  • PIXLAS MOD done
  • USB 3.0 Card
The CPU and GPU are water-cooled with an Alphacool Eisbaer 240mm rad fitted with a custom 3D printed mount that suspends the rad from the 1st drive sled. The lower tunnel has been trimmed and all fans are running from the standard fan plugs using the 3pin fan hack found on this forum by @amedias

The CPU tray can be easily removed as per the normal design.

This design is a work in progress, the CPU tunnel cover will be refitted using magnets like the 3,1 and I plan to print a mount to hold the fan over the IOH cooler.

Why?
Because I wanted to, I fancied putting my grey matter to good use and build something that didn't cost me the earth. I don't have the money for a second gaming PC so use this dual OS machine for a myriad of things. Including Gaming, freelance web design and simple video edits.

Its now super quiet while gaming, low fan noise during heavy loads and much more enjoyable experience.

Please let me know your thoughts and feel free to ask any questions.

Here is the full build

IMG_2012.JPG


Here are some progress shots
IMG_1994.JPG
IMG_2001.JPG

IMG_2009.JPG
 
Awsome!

I've been working out a Water-cooling project too, so it's very interesting to see the way you solved complications.
I see you (probably temporarily) placed the fan for the Northbridge almost above the IOH heatsink.
Maybe to put it more in front would be more effective....?(like almost touching the PCB).
I've seen generic waterblocks that could fit the Northbridge , wasn't that n option for you?

Great work mate!
Seems your "grey matter" is working fine :)
 
Looks great! Although what KeesMacPro already said, I think you are better off cooling the Northbridge as well, they tend to get nice and toasty (especially in my dual-CPU). I've got my Northbridge thermal paste replaced with some Thermal Grizzly Kryonaut and it makes a big difference, although I had to adjust my fan curves a lot to keep it under 65C. I think it would be awesome to make an extra block for your Northbridge as it's equally as important as your CPU :)
 
Wow! Job well done, I really like it. I once had plans to water cool my Vega VII with Alpha cool GPU block.
Finally someone like you had the gut's to do it. Congrats, and keep posting pics once the final version is ready.
Great job man!
 
Thanks guys, I currently have a ghetto setup for the north bridge.

its just the single CPU fan from the stock cooler zip tied to it.

i have ordered a cooler from a dual system and plan to 3D print a holder for the smaller fan to blow directly onto the stock cooler. I have noticed a significant north bridge drop since water cooling and I hope for more once the new fan and temp probe arrive.

i won’t go downtown the water cooling method for the north bridge because of cost, and have already seen drops in temps already.

ill keep you updated as the build continues
 
If you plan single socket cooling, go with W3690. You can overclock this puppy.

I wish my 2 x 5680 was dead quiet. Maybe 2 aio block & pump + radiator works flawless?

edit: Is pull better than push in radiator config? If I'm not wrong pressure push fan config always better and quiet.
 
Last edited:
If you plan single socket cooling, go with W3690. You can overclock this puppy.

I wish my 2 x 5680 was dead quiet. Maybe 2 aio block & pump + radiator works flawless?

edit: Is pull better than push in radiator config? If I'm not wrong pressure push fan config always better and quiet.

have you got a link to actual over clocking on the Mac Pro, didn’t think it was possible.

aio pump and second block will work fine on a dual, no worries.

i went with pull obviously, because it’s a pain in the ass to clean a push radiator. I have a filter magnetised to the front of the rad which I can clean much easier.
 
  • Like
Reactions: HaypurTiryading
have you got a link to actual over clocking on the Mac Pro, didn’t think it was possible.

aio pump and second block will work fine on a dual, no worries.

i went with pull obviously, because it’s a pain in the ass to clean a push radiator. I have a filter magnetised to the front of the rad which I can clean much easier.

Check here. Overclocking could be done in Windows/software method. Warm reboot into Macos keep clock speeds. W3690's multiplier is open. X5690's multiplier is not. X5690's can only overclock via bclk/bus speed increase method. I'm researching. Overclocking is risky and I'm not responsible any further complications.

 
  • Like
Reactions: p11hlf
I had a chance this morning to take a quick peak at the Northbridge, I also took some photos.

I will go down the 3d printed mount route and have a quick Render of something I mocked up this morning.

I have a dual cpu heat sink coming which has 60mm fans and thermal probe I can use.

in the mean time I have the 80 stock fan from the single cpu cooler zip tied to the Northbridge heatsink

the IOH diode sits at 65c on idle.

IMG_2024.JPG

IMG_2023.JPG


mac pro v8.png
 
  • Like
Reactions: KeesMacPro
Check here. Overclocking could be done in Windows/software method. Warm reboot into Macos keep clock speeds. W3690's multiplier is open. X5690's multiplier is not. X5690's can only overclock via bclk/bus speed increase method. I'm researching. Overclocking is risky and I'm not responsible any further complications.


W3690 ordered!
[automerge]1591534121[/automerge]
The 3D picture looks very promising and "cool" ! :)

Thanks, hoping to have the Fan here in a day or two. The final result will look similar to the water pump in design styling.
 
  • Like
Reactions: KeesMacPro
@p11hlf
Thanks for the post the watercool and your neat metal work looks good.

Will you post your NB Heats sink shroud on thingiverse or another site ?

I'd like to get some basic measurements on the Heatsink, I'm a bit stuck as I've only got one cMP 5,1 and I use it !

I'm keen to get a shroud and a heat pipe or phase change solution for the North Bridge on the Dual Processor to connect to the main hatch, there's plenty of surface area to radiate from if we could get.

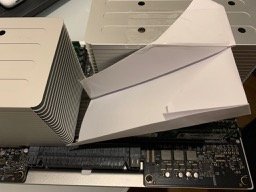
in the mean time my ghetto solution is an origami shroud.
 

Attachments

  • MacPro5,1 NB CPU A Baffle.jpg
    MacPro5,1 NB CPU A Baffle.jpg
    20.7 KB · Views: 2,300
  • Like
Reactions: p11hlf
Do you control the rpm through the CPU header= iStats/MFC ?

The pump runs from a SATA to 4 pin cable, running fro one of the HDD sata ports. The fan runs off the standard CPU header. So had full control, i disassembled a dual cpu heat sink and will have to design a mount for the thermal probe for the water pump as at the moment its just reading ambient temps by dangling in the air.
 
Wow , very well thought and assembled project!
With the thermal sensor attached its about complete I guess.
 
  • Like
Reactions: p11hlf
Wow , very well thought and assembled project!
With the thermal sensor attached its about complete I guess.

thanks for the kind words, it’s been a labour of love.

im gonna test this w3690 cpu with intel extreme utility and look into some different fans for the radiator. Finally I’ll mount the shroud for the cpu tunnel and call it a day for now.
 
  • Like
Reactions: KeesMacPro
The pump runs from a SATA to 4 pin cable, running fro one of the HDD sata ports. The fan runs off the standard CPU header. So had full control, i disassembled a dual cpu heat sink and will have to design a mount for the thermal probe for the water pump as at the moment its just reading ambient temps by dangling in the air.

Nice print. You are one step ahead of me. A couple of weeks ago I ordered a brand new Prusa MK3S, they are back-ordered for 7 weeks, of course, I get the kit. What do you use at the moment, which Slicer did you go for, are you on Fusion360 for mac?
Great idea to use the Apple CPU cooling fan for the North Bridge, however to be honest I never experienced any problems on high temps on that North Bridge. In my case always the GPU was the bottleneck, not the CPU. Mac Fan Control never reported any temps out of the un-usual. Anyways, great set up, congrats!
 
thanks for the kind words, it’s been a labour of love.

im gonna test this w3690 cpu with intel extreme utility and look into some different fans for the radiator. Finally I’ll mount the shroud for the cpu tunnel and call it a day for now.

Try techpowerup Throttle Stop. ;)
 
Nice print. You are one step ahead of me. A couple of weeks ago I ordered a brand new Prusa MK3S, they are back-ordered for 7 weeks, of course, I get the kit. What do you use at the moment, which Slicer did you go for, are you on Fusion360 for mac?
Great idea to use the Apple CPU cooling fan for the North Bridge, however to be honest I never experienced any problems on high temps on that North Bridge. In my case always the GPU was the bottleneck, not the CPU. Mac Fan Control never reported any temps out of the un-usual. Anyways, great set up, congrats!

Thanks, the prusa seems nice. i purchased a cheap as chips second hand 3dsystems cube. it does 2 materials at the same time and a largish bed.

i use fusion 360 to build all my models, its been a great learning experience with many online tutorials. I then use the 3dsystems software to slice it up for printing.

I did not have northbridge issues either other than a snapped rivet, however i wanted something more than have the fan zip tied to the heatsink so the lower temps were a bonus.
[automerge]1592038302[/automerge]
Try techpowerup Throttle Stop. ;)

ill give it a go, thanks!
 
  • Like
Reactions: AlexMaximus
Thanks, the prusa seems nice. i purchased a cheap as chips second hand 3dsystems cube. it does 2 materials at the same time and a largish bed.

i use fusion 360 to build all my models, its been a great learning experience with many online tutorials. I then use the 3dsystems software to slice it up for printing.

I did not have northbridge issues either other than a snapped rivet, however i wanted something more than have the fan zip tied to the heatsink so the lower temps were a bonus.
[automerge]1592038302[/automerge]


ill give it a go, thanks!


Ahh how nice, I love the white design language of it. It has an old school Apple flavor to it. I am sure the cube looks awesome right beside a Mac Pro 5.1 tower. Thanks for your contribution! I am looking forward to diving into this amazing 3D print world, - on a Mac Pro 5.1 :)
 
doneski

let me know what you think.

View attachment 922607
Awesome!
doneski

let me know what you think.

View attachment 922607
Looks great, do you mind sharing the 3d File either here or I suggest on https://www.thingiverse.com/
[automerge]1592056433[/automerge]
ok printed and fitted!

temps dropped from high 70's to 60c on the IOH diode, I have screws and springs holding down the heatsink with a graphite pad as the thermal material.

Great Print !
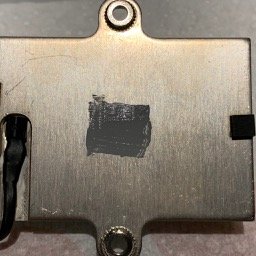
@p11hlf I'm intrigued by the thermal pad idea. I'm getting a deltaT of 12ºC between DIODE and Heatsink. It is quite consistent and It makes me wonder why as the Heatsink Sensor is embedded in the bottom of the fin plate.

The Apple standard NorthBridge Heatsink is a shiny silver metal perhaps steel? and the Northbridge has very little surface area for heat transfer at least compared to a X56x0 CPU with Integrated Heat Spreader so I would not expect the same deltaT of 3-5ºC.

Yet 12ºC seems quite high.


Did you record your before and after when changing to the Graphite thermal pad ?
 

Attachments

  • Mac PRo5,1 Northbridge Heatsink face with test thermal paste.jpg
    Mac PRo5,1 Northbridge Heatsink face with test thermal paste.jpg
    27.5 KB · Views: 241
Last edited:
7A0BAA3F-E8BD-483E-AC79-5DB2AC22058C.jpeg


Mac pro looks cool from the outside, but inside it’s not a total beauty so it needs a lift. Especially the dull light grey pci fan is the ugliest piece of plastic ever conceived. I wonder how apple’s design team could have allowed that in.

The motherboard is dark grey/black, so it screams for a darker case paint finish.

Here is my maxed out water cooled case mod and paint job, mac pro 4.1, work in progress. Dark grey and copper finish, Gold plated screws. Completely silent.

I water cool only the gpu, the cpu is fine with silent fans and liquid metal treated heatsink. By skipping the cpu I get away with just a 120mm radiator. I can overclock the gpu still by +15% and temps remain around 45 degree celcius.

I put the radiator on the cpu compartment, the single cpu model has plenty of free space for a 120mm fan and radiator on the left side of the board. The temperature effect on cpu is neglible.

All the internal fans have been changed to silent noctua ones with 4-pin connector mods so that automatic smc fan control works. I added an extra fan for the radiator that is manually controlled with the pump.

I run extra electricity to the gpu from 2x sata ports, no pixlas mod required. I made custom braided cables for them.

One of the sata ports fuels also the pump and the other provides power to the manual fan controller (noctua) responsible the pump and radiator fan speed and also splits electricity to led lights. Led Controller (Hue+) runs from usb port from the outside, through a hole in the pci backplate possible with the gpu waterblock making the radeon vii thin enough to provide extra backplate, also also to make space for cooling the nvme heatsink. I wish this computer had an internal usb port just for aesthetics. Right now working on a mod for that on that empty pci backplate.

The water reservoir + pump has been put in the dvd compartment with a 5.25 mount.

I had to dremel holes for the pipes (4x). This means I had to destroy one sata tray holder, which I removed all anyway to make more space.

The machine also has 2x nvme m.2 hard drives, 4x ssd raid, 10gb ethernet and usb 3.2 gen 2 port. 48 gb ram and 3.46ghz 6-core cpu (looking to overclock that silicon also).

This machine easily runs most latest games 120 fps in 2K. Pretty good for a 11 year old spec.

Mother board has been modified to include faster wifi and bluetooth 4.0 upgrades. Opencore provides speed hacks & custom boot menu without flashing the gpu.

Eventually I will also paint the memory sticks and hard drives dark grey, install pass through pipes for the holes and make a transparent side cover.

Love to hear your feedback!
 
Last edited:
Register on MacRumors! This sidebar will go away, and you'll see fewer ads.