Become a MacRumors Supporter for $50/year with no ads, ability to filter front page stories, and private forums.

mattspace

macrumors 68040
Original poster
Jun 5, 2013
3,344
2,975
Australia
from the Apple technician's manual:

"Never operate the computer on its side with the access panel facing down."

Would seem to settle one question at least :)
 
  • Like
Reactions: thornslack

Don_Con

macrumors member
Oct 3, 2019
30
10
Alexandria, VA
hi folks,

Just thought id share a few pics of a simple diy solution to mount the cMP on the underside of a desk, for people who are short on knee & foot space, and want to keep access to the inside of their machine, plus free airflow etc.

Diy1.jpg


Diy2.jpg


Diy3.jpg


All threaded galvanised pipe. Its suppsed to be a plumbing product, but as a guy at the hardware store remarked once, its mostly used by people making furniture now.

Bits on the end unscrew to make it easier to lift the machine on to them, and go back on to provide a bit of a safety lip. Electrical tape to pad the galvanised pipe and stop and metal on metal contact.

Cheers.

Curious how this setup has lasted in the long run? I went to Lowes yesterday based on this thread and I am about to do the same.
 

mattspace

macrumors 68040
Original poster
Jun 5, 2013
3,344
2,975
Australia
Curious how this setup has lasted in the long run? I went to Lowes yesterday based on this thread and I am about to do the same.

Still going strong, but looking a little more like a Cthulhuesque tentacled horror than before. given the multiple external drives, wacom tablet, dual screens, speakers, usb hubs etc.

IMG_4014.jpg


Gotta be a little careful if you're playing a game (on the xbox mounted on an articulated arm under there as well) and don't accidentally kick the tower. But it's pretty convenient if you want to scratch your foot.

The wall-facing legs of the table now have 10 socket powerboards cabletied to them, facing back to the wall, so all power for everything plugs into them.

The front legs (out of frame) have a dry-powder fire extinguisher at the ready, just in case ;)
 

Don_Con

macrumors member
Oct 3, 2019
30
10
Alexandria, VA
Still going strong, but looking a little more like a Cthulhuesque tentacled horror than before. given the multiple external drives, wacom tablet, dual screens, speakers, usb hubs etc.

View attachment 877061

Gotta be a little careful if you're playing a game (on the xbox mounted on an articulated arm under there as well) and don't accidentally kick the tower. But it's pretty convenient if you want to scratch your foot.

The wall-facing legs of the table now have 10 socket powerboards cabletied to them, facing back to the wall, so all power for everything plugs into them.

The front legs (out of frame) have a dry-powder fire extinguisher at the ready, just in case ;)

Thanks for the fast reply. Super intense setup there! Love the Cthulhuesque reference.

Quick follow up question, I noticed one thing after buying the galvanized pipe, floor fittings, and 90 degree connectors I got from lowes. Obviously 1/2in steel pipe is super strong, but one thing that concerns me is the amount of actual threads that engage between the 90 degree connectors in the pipes parallel to the desk.

I am probably worrying to much, and the real support comes from the screws you put through the desk, but did your piping function similarly?
 

mattspace

macrumors 68040
Original poster
Jun 5, 2013
3,344
2,975
Australia
Quick follow up question, I noticed one thing after buying the galvanized pipe, floor fittings, and 90 degree connectors I got from lowes. Obviously 1/2in steel pipe is super strong, but one thing that concerns me is the amount of actual threads that engage between the 90 degree connectors in the pipes parallel to the desk.

IIRC the threaded section on mine is around 1/2-2/3” in length, and it locks solid a bit before that is fully ingested. I think I put a couple of wraps of plumbers tape in it to provide a bit more lock and fine tuning, and used vice grips to provide leverage to twist them to fullest lock. From memory, I locked the elbows to the base plates so they were fixed solid, before I marked / drilled the base plates to the underside of the desk, so everything was locked up solid.
 
  • Like
Reactions: Don_Con

Don_Con

macrumors member
Oct 3, 2019
30
10
Alexandria, VA
IIRC the threaded section on mine is around 1/2-2/3” in length, and it locks solid a bit before that is fully ingested. I think I put a couple of wraps of plumbers tape in it to provide a bit more lock and fine tuning, and used vice grips to provide leverage to twist them to fullest lock. From memory, I locked the elbows to the base plates so they were fixed solid, before I marked / drilled the base plates to the underside of the desk, so everything was locked up solid.

Thanks, same feelings here, when I insert and twist them down, they lock in tight and dont move. I am thinking spreading the weight across 4 of them, for a 55lb tower, the threads should be able to handle the distributed load.

I am going to red loc-tite the threads as well, probably just for overkill/feel good measures.

Thx for the replies.
 

Don_Con

macrumors member
Oct 3, 2019
30
10
Alexandria, VA
Completed my project tonight. Not great pictures, but here are the details

1.) Total parts Cost - $65 bucks from Lowes (adjust for Washington DC cost of living).
a.) I used 4in by .5in steel pipe, with 90 degree connectors
b.) I used 1.25in by 9 thread multi-use screws
c.) electrical tape
d.) red loctite
2.) If you install laying on the ground, wear eye glasses. Wood shavings in the eyes suck.
3.) Have an extra long drill bit as the lateral piping actually holding the MP will block one of the screw holes (more than likely), so extra long drill bit will allow you to put the screw in still at a slight angle.
4.) Measure first, and do it again.
5.) Total Time Spent: 20 minutes at lowes, 10 mins measuring, 40 min installing (includes drilling pilot holes for each screw).


20191117_210728.jpg
20191117_210745.jpg
 

mattspace

macrumors 68040
Original poster
Jun 5, 2013
3,344
2,975
Australia
Great to see someone duplicating my project :)


3.) Have an extra long drill bit as the lateral piping actually holding the MP will block one of the screw holes (more than likely), so extra long drill bit will allow you to put the screw in still at a slight angle.
4.) Measure first, and do it again.

FYI the way I built mine is I:
  • assembled each hanger completely
  • put my desk upside down on the floor
  • sorted placement within the feet of the CMP (since it's top / bottom symmetrical)
  • marked with pencil
  • drilled the baseplates into the desk still assembled, just loosen to reach screws if they're occluded by the laterals
  • flip the desk onto its feet
  • lift the CMP onto the hangers
  • reinstall the endcaps.
 
Last edited:
  • Like
Reactions: Don_Con

Don_Con

macrumors member
Oct 3, 2019
30
10
Alexandria, VA
Great to see someone duplicating my project :)


FYI the way I built mine is I:
  • assembled each hanger completely
  • put my desk upside down on the floor
  • sorted placement within the feet of the CMP (since it's top / bottom symmetrical)
  • marked with pencil
  • drilled the baseplates into the desk still assembled, just loosen to reach screws if they're occluded by the laterals
  • flip the desk onto its feet
  • lift the CMP onto the hangers
  • reinstall the endcaps.

This was definitely the smart way to do it. Due to overall lack of space in my room, and definitely a much bigger gap in my patience, I decided to install the hangers upside down with the desk as is. No regrets, other than the size of my office (at times) :)
 

mattspace

macrumors 68040
Original poster
Jun 5, 2013
3,344
2,975
Australia
screen_stand.jpg


...6 years later (from the first post), I tackled another problem with pipe, to cheat a few extra inches out of the front of my desk, so the Wacom can go back past the monitor.

Because, get ready to laugh... the wacom is a super effective RF shield, and the keyboard only has its radio-clear window on the lower back surface, so if you have the keyboard sitting on the tablet, it blocks the bluetooth signal.
 
  • Like
Reactions: ZombiePhysicist

mode11

macrumors 65816
Jul 14, 2015
1,452
1,172
London
Putting those bulbous ends on the end of every pipe seems like overkill. There's no reason for the Mac to move sideways and fall off in the first place (especially with the grip from the tape), so a single screw-on end would be enough for safety.

Would be less hassle than removing all four when removing the Mac for maintenance, or having to carefully lift it up over all of them (these computers are really heavy, especially when trying to lift whilst under a desk).
 

mattspace

macrumors 68040
Original poster
Jun 5, 2013
3,344
2,975
Australia
Putting those bulbous ends on the end of every pipe seems like overkill. There's no reason for the Mac to move sideways and fall off in the first place (especially with the grip from the tape), so a single screw-on end would be enough for safety.

Would be less hassle than removing all four when removing the Mac for maintenance, or having to carefully lift it up over all of them (these computers are really heavy, especially when trying to lift whilst under a desk).

It's cheap peace of mind. When youre removing the machine, you just unscrew the caps - they're only finger-tight.
 

porican

macrumors member
Aug 11, 2016
30
9
hi folks,

Just thought id share a few pics of a simple diy solution to mount the cMP on the underside of a desk, for people who are short on knee & foot space, and want to keep access to the inside of their machine, plus free airflow etc.

Diy1.jpg


Diy2.jpg


Diy3.jpg


All threaded galvanised pipe. Its suppsed to be a plumbing product, but as a guy at the hardware store remarked once, its mostly used by people making furniture now.

Bits on the end unscrew to make it easier to lift the machine on to them, and go back on to provide a bit of a safety lip. Electrical tape to pad the galvanised pipe and stop and metal on metal contact.

Cheers.
Did you source parts at a chain or a local hardware store? Do you have specs for the parts you used? Is every part steel, including the flanges? (I have only been able to find iron flanges).

I have a feeling I need to just go to a store and ask I have just not had much luck with the staff at the big chains (home depot, lowes)

Thanks!
 

mattspace

macrumors 68040
Original poster
Jun 5, 2013
3,344
2,975
Australia
Did you source parts at a chain or a local hardware store? Do you have specs for the parts you used? Is every part steel, including the flanges? (I have only been able to find iron flanges).

I have a feeling I need to just go to a store and ask I have just not had much luck with the staff at the big chains (home depot, lowes)

Thanks!

The parts are all galvanised steel, but cast iron would work equally well, I suspect. There's even decorative non-galvanised blackened waxed / oiled steel some specialists do.

Look at @Don_Con post a few earlier, they picked up all their stuff at Lowes. I'm in Australia, so saying I bought all the bits at Bunnings (the biggest hardware chain here) probably isn't a lot of help :)
 
  • Like
Reactions: porican

mikas

macrumors 6502a
Sep 14, 2017
898
648
Finland
I really like your solutions all.

Just to bring my take in, not realized though, just a thought.
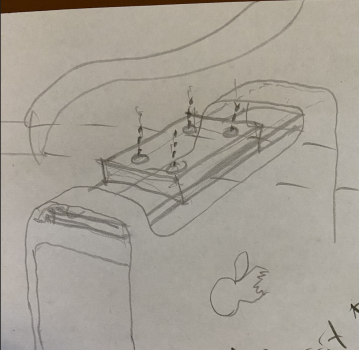
Two wooden planks approriately sized, glued together maybe. Four holes drilled through both. Attached to the table with screw lengts according to your desks dimensions (vertical height of the table top).

After installing with apropriate toleraces to the desktop., you can then just slide the rear (or the front) first in to it, end the slide a little bit back and tilt slightly, shove it in, and you are installed with it.

Of course there would be more to it to make it perfect, but I just thought this would be pretty quick, and dirty cheap too. You can make it yourself, or order through some carpentry shop. Well maybe not from a carpentry shop, probably from a Bauhaus or similar who do offer cut services for their stock wood products, straight from their shelves in a minute or two.
1676305420852.png
 

Attachments

  • 1676305365271.png
    1676305365271.png
    1.6 MB · Views: 50

porican

macrumors member
Aug 11, 2016
30
9
I really like your solutions all.

Just to bring my take in, not realized though, just a thought.
Two wooden planks approriately sized, glued together maybe. Four holes drilled through both. Attached to the table with screw lengts according to your desks dimensions (vertical height of the table top).

After installing with apropriate toleraces to the desktop., you can then just slide the rear (or the front) first in to it, end the slide a little bit back and tilt slightly, shove it in, and you are installed with it.

Of course there would be more to it to make it perfect, but I just thought this would be pretty quick, and dirty cheap too. You can make it yourself, or order through some carpentry shop. Well maybe not from a carpentry shop, probably from a Bauhaus or similar who do offer cut services for their stock wood products, straight from their shelves in a minute or two.
View attachment 2157883
a wood block could theoretically work but it would probably have to be pretty thick to be strong enough.

having two separate "hooks" would make getting it on and off a little easier, too

could work tho
 
Register on MacRumors! This sidebar will go away, and you'll see fewer ads.