Got a tip for us?
Let us know
Become a MacRumors Supporter for $50/year with no ads, ability to filter front page stories, and private forums.
Resolved Extremely Slow Mid 2012 Macbook Pro
- Thread starter TiredTechnique
- Start date
- Sort by reaction score
You are using an out of date browser. It may not display this or other websites correctly.
You should upgrade or use an alternative browser.
You should upgrade or use an alternative browser.
@ TiredTechnique
"So you mean basically just one big wide piece of tape underneath the cable, and then on top of it as well?"
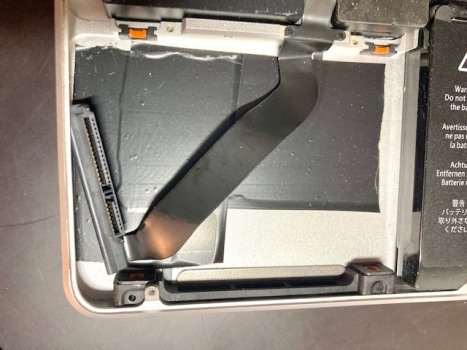
YES, exactly like that - but with broad taper, like seen in my pic - and do not use the slim taper of the author of the (besides that etail) very informing YT video. His solution has still resting surface WITHOUT protection.
DO NOT fix the bigger cable onto the slim one. It is better to let them be separately. just cover the bigger cable between 2 layers of taper for protection - but without fixing it on the surface as well.
This guarantees also that the 2 cables will NOT cross each other.
If you fix it, there is not enough free part of the bigger cable to prevent tension on the bigger cable when inserting or changing the SSD. Because you have to connect the cable with the SSD and then putting the SSD in and vice versa for disconnecting.
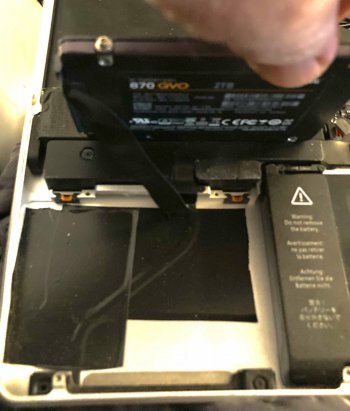
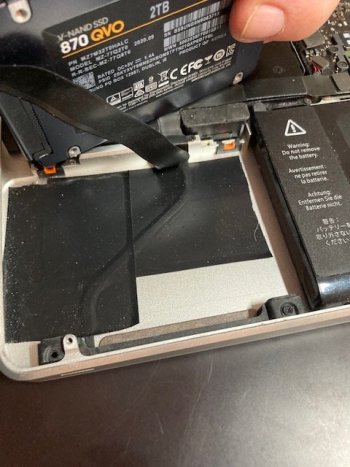
Just opened my MBP in a hurry to let you have a look at my solution to prevent that I get the SATA Problem a second time. No further Problem since 6 or 7 years now…
sorry for bad quality of pic, but I think now you understand better.
Attachments
Last edited:
What do you guys think about covering the metal vs the cable itself? I got my new cable in the mail.
I will do the repair some time next week.
I will do the repair some time next week.
Wait so you stick the smaller cable between the metal and the tape, but for the larger cable you wrap it in tape instead of fixing it to the other tape?@ TiredTechnique
"So you mean basically just one big wide piece of tape underneath the cable, and then on top of it as well?"
YES, exactly like that - but with broad taper, like seen in my pic - and do not use the slim taper of the author of the (besides that etail) very informing YT video. His solution has still resting surface WITHOUT protection.
DO NOT fix the bigger cable onto the slim one. It is better to let them be separately. just cover the bigger cable between 2 layers of taper for protection - but without fixing it on the surface as well.
This guarantees also that the 2 cables will NOT cross each other.
If you fix it, there is not enough free part of the bigger cable to prevent tension on the bigger cable when inserting or changing the SSD. Because you have to connect the cable with the SSD and then putting the SSD in and vice versa for disconnecting.
Just opened my MBP in a hurry to let you have a look at my solution to prevent that I get the SATA Problem a second time. No further Problem since 6 or 7 years now…
sorry for bad quality of pic, but I think now you understand better.
Wait so you stick the smaller cable between the metal and the tape, but for the larger cable you wrap it in tape instead of fixing it to the other tape?
I thought that it is easy to understand if you read what I posted and regard my photos…
Waht is absolutely important is simply the fact, that you prevent definitely ANY contact of any of the cables with the abrasive inner surface of the body. THAT is the principle thing to do.
since this happens exclusively to older MBP still delivered with HDD and working for many years with microvibrating HDD and not SSD, most of the older cables are already been „rubbed“ and impaired not only by its aging plastic isolation but more so by vibrations before the HDD was more or less exchanged against a SSD.
If you tape the smaller cable directly on the surface this might go well, because to 99,9% it will be fixed definitely - but it is IMHO better to first put taper ALL OVER the inner surface that might get contact with the cables, ok?
The small cable seems to have nothing directly to do with file transfer, it has even zero connection with the SSD - but it might nevertheless lead to problems if damaged.
So this is my personal modification :
Again: layer by layer…
- one layer of tape onto the BARE WHOLE (!) INNER SURFACE of the HDD-bay of the body. Have a look at the photos.
- Then put the small cable (Not the bigger cable!) onto this first layer and connect it correctly.
- after assuring (!) that the small cable is perfectly placed without posing problems for inserting the SSD you put a second layer of the thin (!) but sturdy tape again all over the bay, like easily to see regarding the photos above.
- the bigger cable for the SSD should rest free from being tapered onto the surface because if you do, this might lead to tension of the cable when connecting and moving the SSD into the bay or taking it out.
Now there are two possibilities:
1) you can now let the SSD-cable be as it is - because you did. definitely prevent any contact between cable and the abrasive surface. 7years ago I did so and did not have any problems with that.
2) you can just put taper around the SSD cable without fixing it anywhere to assure flexibility of the cable when moving the SSD into or out of the bay.and have a second isolation.
I did not do this, because SSD do not induct permanently microvibrations that force abrasive processes. IMHO the principle act is to successfully prevent just the direct contact between the abrasive surface and any of the both cables. This has already be successfully done by posing taper all over the surface, ok?
Another reason is that too much layers of tape will narrow the space to install the SSD/HDD And -more than that - lead to more Pression on the cables Because when fixing the SSD at the end the SSD will be pushed a little bit down. The more you narrow the space available this *might* lead to pressire onto the cables which could be contraproduvtive. This is not aprobleem at all as long as you use thin tape light that I used and avoid thick tape. This is the reason why I chose a very thin, but sufficient taper and NOT thicker tape with texture like „McGyver“ type of tape…
So, my recommendation is to just put the two layers like described above and enjoy the machine for many more years… ok?
let us hear of it once you succeeded to have a well running machine..
and please - since this can’t be done by nobody else than the opener of a thread - add some tags to this thread like „defective SATA cable“ , „Slow or not working older MBP“ „exchanging SATA cable in older MBP“ to prevent that these problems are discussed on and on again although at least now the procedure might be well discussed.
thank you for that.
cheers.
Last edited:
This is what I did. When I replaced the SATA cable I covered the metal where the cable lays with tape. Have not had a problem since.What do you guys think about covering the metal vs the cable itself? I got my new cable in the mail.
I will do the repair some time next week.
Thanks. Instructions make sense just translation issues sometimes make it difficult to understand what you mean. I don't have wide electrical tape so I'll just try to overlap some regular thin electrical tape to cover most of the metal. I tried to add tags and couldn't figure out how.and please - since this can’t be done by nobody else than the opener of a thread - add some tags to this thread like „defective SATA cable“ , „Slow or not working older MBP“ „exchanging SATA cable in older MBP“ to prevent that these problems are discussed on and on again although at least now the procedure might be well discussed.
thank you for that.
cheers.
Would the raised edge of overlapping electrical tape probably damage the cable? I feel like if the cable is so fragile it gets ruined by unpolished flat metal this might be a problem.
After installing the new SSD and new RAM, I found that I could not even get a hard drive to show up in disk utility. The new cable must be faulty.
After installing the new SSD and new RAM, I found that I could not even get a hard drive to show up in disk utility. The new cable must be faulty.
You should first just install the „old“ SSD… since you wrote that this SSD has still a lot of space.
Try to connect the new SSD externally and start the MBP To stop speculation if the cable is impaired or not and get some facts Instead..
The exchange of the cable is that simple that it should not be possible to mess it up…
good luck and bye bye.
I did this, the new SSD works fine and the computer boots great off of it, the cable for sure is just defective.You should first just install the „old“ SSD… since you wrote that this SSD has still a lot of space.
Try to connect the new SSD externally and start the MBP To stop speculation if the cable is impaired or not and get some facts Instead..
The exchange of the cable is that simple that it should not be possible to mess it up…
good luck and bye bye.
I did this, the new SSD works fine and the computer boots great off of it, the cable for sure is just defective.
No kidding, it didn't occur to me to test it ahead of time because I've never had a new cable not work in my entire life.
Just FYI:
If someone has similar problems with a slow oder even not starting older MBP,
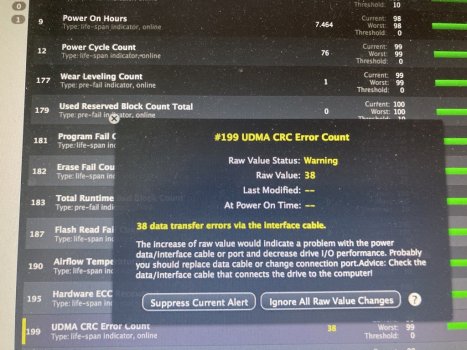
it could help to run the DriveDx App.
a very good diagnostic tool for all type of hard drives and SSD.
if there is a problem with the cable this app will even give you the right diagnosis, have a look at the photo.
cheers
If someone has similar problems with a slow oder even not starting older MBP,
it could help to run the DriveDx App.
a very good diagnostic tool for all type of hard drives and SSD.
if there is a problem with the cable this app will even give you the right diagnosis, have a look at the photo.
cheers
Attachments
There is no way on earth that usb 2 is the limiting factor here. A 200mb update that is supposed to take a minute or two took about 4 hours.
Don't rule it out.
It isn't just the raw throughput but also the command rate that you can achieve over the slower bus to the drive.
A large number of small writes over a bus that's 10% of the speed will tank performance even if the over-all size of the data is not that large.
I experimented with another drive before replacing the cable, even on usb 2 it works fine.Don't rule it out.
It isn't just the raw throughput but also the command rate that you can achieve over the slower bus to the drive.
A large number of small writes over a bus that's 10% of the speed will tank performance even if the over-all size of the data is not that large.
Register on MacRumors! This sidebar will go away, and you'll see fewer ads.


