Become a MacRumors Supporter for $50/year with no ads, ability to filter front page stories, and private forums.
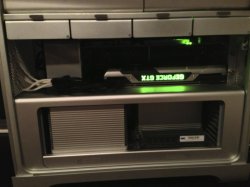
Only in 2006-2008 cases. Otherwise, for a permanent placement - you have to put a tool, like my Dremel, to the far front side of the PSU/DVD support tray, after removing it, to do to it as was done to the earlier cases by Apple. Temporarily you could just drape it over the side.

Before I toss both optical drives instead of getting the booster, what exactly is it that needs modification on the case, and why? My Pro hasn't really moved in over two years so I'm not worried about "jiggling" of components due to their not being screwed in place. Can you not just remove the second drive and jam the booster in the bay, snake the cables wherever, and close the case lid?
 
Before I toss both optical drives instead of getting the booster, what exactly is it that needs modification on the case, and why? My Pro hasn't really moved in over two years so I'm not worried about "jiggling" of components due to their not being screwed in place. Can you not just remove the second drive and jam the booster in the bay, snake the cables wherever, and close the case lid?

I have a thread. Search for it. Only cutting I did was in the back for the power cord to go through. I had enough room to feed 24 wires (4x6pin) through the front back corner. Had to feed the wires individually and reconnect the pins to the connector. There was another member that robbed the power off the internal PSU to power the booster PSU and also the 12v to turn it on.
 
Before I toss both optical drives instead of getting the booster, what exactly is it that needs modification on the case, and why? My Pro hasn't really moved in over two years so I'm not worried about "jiggling" of components due to their not being screwed in place. Can you not just remove the second drive and jam the booster in the bay, snake the cables wherever, and close the case lid?

I Think Tutor is referring to snaking the cables down the back of the Mac Pro (part where the Board is, and the gap there is quite small so you may have to enlarge to to be able to snake something through there.

I am thinking of just getting a stop gap upgrade for now till Titan is supported on OSX so I may just buy an external Modular Power supply and run the wires in through an open slot. I know not pretty but I'd rather avoid messing with the insides of my Mac Pro too much, especially when what I am doing is permanent

+ I am not sure how I feel about the heat issues of the inside of a Mac Pro with an additional PSU there.

Does anyone know roughly how long a card can fit in a Mac Pro? Might just buy a 3GB 7950 of some type to make some stuff run smoother.

The hole that I'm referring to in my 2007 Mac Pros and the hole that I made in my 2009 Mac Pro is just before the front grill on the side opposite the removeable side panel. The cables remain in the case. OrangeSVTguy apparently just disassembled the cables to run them down what appears to be the same route. Wish I had thought of doing that. BTW - the Booster blows what little hot air it produces out of the front of the Booster, so I just raised the front DVD drive flap for its exiting.
 
I have a thread. Search for it. Only cutting I did was in the back for the power cord to go through. I had enough room to feed 24 wires (4x6pin) through the front back corner. Had to feed the wires individually and reconnect the pins to the connector. There was another member that robbed the power off the internal PSU to power the booster PSU and also the 12v to turn it on.

How did you take apart the connectors and cables, and put them back together?
 
I have the pin removal tools, not cheap btw. You can also take some paper clips and hammer them flat or a very tiny jewelers flat head screwdriver might work too.

So basically you force the pins out by pushing them out and then reattach them to the connector after threading them?

you were able to get all the power cables through the side by doing this?
 
Right here ;)
So basically you force the pins out by pushing them out and then reattach them to the connector after threading them?

you were able to get all the power cables through the side by doing this?
Here it is completed. I was able to run 24 wires through the slot near the front, which is 4x 6pins. There was not enough room to route sleeved cables which I initially tried to route. Everything works great. Running 2 670s of the aux PSU.

Click thumbnails to enlarge.
6ed54d4a3cee32ac5d73febb67a837b3_zps67add1cb.jpg

8ef5ecfcad0cec4980ae4ed98338419a_zps87d9b8c0.jpg

c276042bb23e94f690dbbc57ad0d6813_zps11e6b89a.jpg

f0f330f67690ef2a690341189537481e_zpsfd494850.jpg


Here is the hole I drilled to run the power for the power supply. I plan to install a mini plug here so I can unplug the Mac if I ever need to move it.
ddbe8ab99c8719a14d18b93bb0ad5fb0_zps990275e1.jpg

3f6b457075198952df89710b56e67655_zps539d455f.jpg


I can convert 2 of the 6pins to 8 as soon as I figure out how these propritery cables work.
3546c42385f5f3cfbab7db39eea390b1_zpscc93f4a2.jpg

As soon as I get time figure out these proprietary cables, I'll run 2 more wires to convert 2 of the 6pins to 8pins.
 
I have a thread. Search for it. Only cutting I did was in the back for the power cord to go through. I had enough room to feed 24 wires (4x6pin) through the front back corner. Had to feed the wires individually and reconnect the pins to the connector. There was another member that robbed the power off the internal PSU to power the booster PSU and also the 12v to turn it on.

Don't need to search, read it already. The question was directed to what MUST be cut (if anything) to place the booster in the second bay in order to power only the Titan in a 2009/10/12 Mac Pro. Just one six and one eight pin, and maybe, another SSD or two at some point down the road. I have a PCI-E slot I can free up, or I could even mod an existing PCI-E card with enough room to a drill a slot for an AC power cord, even put a rubber grommet on it for a nice fit/finish. It's a little bit difficult to visualize what is and isn't possible without having the booster sitting here.

UPDATE: Well between writing this reply and posting it, you posted pics. That helps. Thanks.


Ref triggering the booster, I've read there is a lack of documentation on this, especially for the Mac Pro. What is the easiest way to turn the booster on when the main power button is pressed, i.e., connect what to what using what type of connectors/adapters?
 
Is there a way to install the FPS Booster without modding anything inside the Mac Pro Case? Like cutting out a piece of the case? Thanks!

Also see Dr. Stealth's approach here:
https://forums.macrumors.com/posts/16662391/

It is the neatest attempt at installing a 450W booster I have seen (though did require a very small modification to the case); especially connecting to the existing power to avoid an additional cable running to an AC socket.

----------

Ref triggering the booster, I've read there is a lack of documentation on this, especially for the Mac Pro. What is the easiest way to turn the booster on when the main power button is pressed, i.e., connect what to what using what type of connectors/adapters?

See also Dr. Stealth's thread (link below); he connects to a 12V tap from the main PSU (which turns on the auxillary 450W PSU when the Mac Pro is turned on). You need a soldering iron, and additional tools to do this. A multimeter will help identify the correct (12V) pins to connect to.

https://forums.macrumors.com/posts/16663101/
 
Also see Dr. Stealth's approach here:
https://forums.macrumors.com/posts/16662391/

It is the neatest attempt at installing a 450W booster I have seen (though did require a very small modification to the case); especially connecting to the existing power to avoid an additional cable running to an AC socket.

----------


See also Dr. Stealth's thread (link below); he connects to a 12V tap from the main PSU (which turns on the auxillary 450W PSU when the Mac Pro is turned on). You need a soldering iron, and additional tools to do this. A multimeter will help identify the correct (12V) pins to connect to.

https://forums.macrumors.com/posts/16663101/

Thanks, for the info...BUT...no way I'm messing with the soldering part to trigger the booster, much less avoid the AC power cord. Now that I see where they're talking about cutting a hole in the case and how thick it is, no problem.

I'll run the AC through the back. That's easy. To trigger the booster, will the now unused SATA connector for the second DVD drive not do the trick via an adapter of some sort?
 
Right here ;)


As soon as I get time figure out these proprietary cables, I'll run 2 more wires to convert 2 of the 6pins to 8pins.


Thanks for the images, trying to muster up the courage to try to do something like that, but only for 1 video card.

you are running both cards entirely off the aux PSU? nothing pulling from the 2 6 pin tracers on the Motherboard?
 
I'll run the AC through the back. That's easy. To trigger the booster, will the now unused SATA connector for the second DVD drive not do the trick via an adapter of some sort?

Sure, you can get the 12V trigger signal from the unused SATA connector. As you guessed, you just need an adapter to connect the SATA power to the (probably) 4-pin molex connector on your auxiliary PSU. Search amazon for "SATA to molex power" --- just make sure you get the male/female plug/sockets all worked out right --- easiest if you have everything in front of you and then figure out the exact connector you need.
 
Sure, you can get the 12V trigger signal from the unused SATA connector. As you guessed, you just need an adapter to connect the SATA power to the (probably) 4-pin molex connector on your auxiliary PSU. Search amazon for "SATA to molex power" --- just make sure you get the male/female plug/sockets all worked out right --- easiest if you have everything in front of you and then figure out the exact connector you need.

Thanks. Seems like this mod/upgrade to accommodate a single Titan or other 6+8 GPU is actually easier than it's been made out to be in some cases, without posing a risk to the mobo or making potentially serious (if not done with precision) hardware alterations.

Regarding exhaust, is the fan flip an alternative to either ignoring booster cooling or leaving the drive door ajar?
 
You will need to snap one end of the plug as Mac has power & data in one plug while adapter will have it as a single plug.

They are like $6 on Newegg.

This is the part that many people forget. They think the PSU will "sense" that power is needed and turn on. it does not . For a 3,1 Mac it is actually easier as it has Molex power for ODD.

OK. Like this one:

http://www.newegg.com/Product/Product.aspx?Item=N82E16812816029

Or this one and snip off or just ignore the data portion of the cable:

http://www.newegg.com/Product/Product.aspx?Item=N82E16812186065

Thanks again.
 
Actually, I don't see the one I got before and am not going to dig through 1000 newegg emails to find it, but think:

http://www.newegg.com/Product/Product.aspx?Item=N82E16812123305

but you don't need the 2 extra molex ends.

It was just the little black part. You could get that one and just snip them off I suppose.

You then snap off the one end of the snaps that won't fit into Apple all-in-one connector and you are good to go.

The point being, you are in no need of extra cables, you just need the black part and I know I have bought them like that before when we used to bundle XP Booster PSUs in a package with 580s.
 
For true electricity vampires when sucking 250w from SATA and off Mobo isn't enough

After you have bitten into Titan's muscles and want to feel more juices pulsing through them with Nvidia's Control Panel and Precision X 4.0, where will your thirst for more juice take you? Could it take you here: See 20-Pin Main Power Connector pic here: [ http://www.tomshardware.com/reviews/power-supply-specifications-atx-reference,3061-8.html ], or directly to the PSU from which those juices flow. Or, here: See the straddlemount here: [ http://www.ttiinc.com/object/fp_fci_straddlemount.html ]. Is that referencing electro porn? Getting excited? Stop that drooling! You may want to tap every point of 12v electrical contact there too. As for tapping into the PSU, I must warn you that 1st place has already been taken - see above posts. And some of you may well tap into all of these sources - all in the name of GPGPU advancement in the Mac Pro. Ingenuity knows no bounds when thirst is great. Just think different[ly] or outside of the cardboard and leave no point of access to more juice ignored.
 
Actually, I don't see the one I got before and am not going to dig through 1000 newegg emails to find it, but think:

http://www.newegg.com/Product/Product.aspx?Item=N82E16812123305

but you don't need the 2 extra molex ends.

It was just the little black part. You could get that one and just snip them off I suppose.

You then snap off the one end of the snaps that won't fit into Apple all-in-one connector and you are good to go.

The point being, you are in no need of extra cables, you just need the black part and I know I have bought them like that before when we used to bundle XP Booster PSUs in a package with 580s.

Found one...I think. Thanks.

http://www.newegg.com/Product/Product.aspx?Item=N82E16812816038
 

That should do it!

So as you've found, logically there's not much involved to fit a booster PSU to the MacPro. Provided the space is available, I think it should be the default "no brainer" approach to powering any GPU with more than two 6-pin connectors. It's not worth sweating over complications of failed hardware or erratic behavior resulting from drawing too much power from where ever else was hacked into. I say, do it once properly, and be done with it!
 
Different Strokes For Different Folks

That should do it!

So as you've found, logically there's not much involved to fit a booster PSU to the MacPro. Provided the space is available, I think it should be the default "no brainer" approach to powering any GPU with more than two 6-pin connectors. It's not worth sweating over complications of failed hardware or erratic behavior resulting from drawing too much power from where ever else was hacked into. I say, do it once properly, and be done with it!

As I've indicated above more than once, I agree with your suggestion to just go the FSP route from the get go. But after really listening to others' real concerns, I recognize that others have different talents and reasons for doing or wanting to do things differently than I do or would do them. So I try to accommodate those differences by helping them to do things the way that they prefer doing them. My many years of existence, tho' short in the big scheme of things, reinforces in me the knowledge that my brain isn't the only one that matters. Along the way, there are those, who at first I may sense disagreement with, who keep showing me that my brain is just one among many. I learn valuable things from them and about the things that they feel are important. Fundamentally, they teach me each day, in some way, that there's more than one way to skin a bobcat.
 
Thanks to all the Mac Rumors members that made this possible. Using Tutor, Macvidcards and Stealth's information I was able to get the GTX Titan running flawlessly on my 2010 Mac Pro. Did a very minor modification to the case to allow routing for extra power from the DVD bay. Rock solid for 24 hours Constant benchmarking. Extremely happy. I am just hoping that eventually we can get EFI boot screens.
 

Attachments

  • Titan MacPro.jpg
    Titan MacPro.jpg
    161.4 KB · Views: 836
Last edited:
Thanks to all the Mac Rumors members that made this possible. Using Tutor, Macvidcards and Stealth's information I was able to get the GTX Titan running flawlessly on my 2010 Mac Pro. Did a very minor modification to the case to allow routing for extra power from the DVD bay. Rock solid for 24 hours Constant benchmarking. Extremely happy. I am just hoping that eventually we can get EFI boot screens.

By working you mean only on the windows side right?

On the OSX Side OpenCL is still broken and the link speed is 2.5 instead of 5 right? or has that changed
 
Register on MacRumors! This sidebar will go away, and you'll see fewer ads.