Become a MacRumors Supporter for $50/year with no ads, ability to filter front page stories, and private forums.
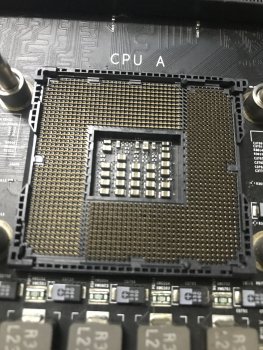
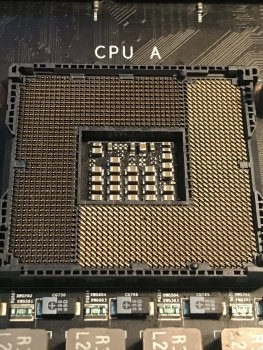
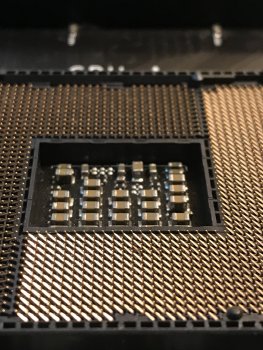
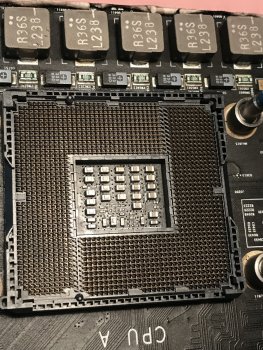
Hate to say it, but it looks like you bent about half the pins in Socket A, In the picture the right half all seem bent to the left. This is why I de-lidded my CPUs, IMO the amount of old thread lock left in the heat sinks makes tightening the things down sort of dangerous, since in my case it made it seem like they were tight to the CPU all the way until the end..
Sorry that happened to you. 😭
Oh I hurt those pins! the problem is i will have to adjust it ??? or it is dead thank you for this!
[automerge]1572662421[/automerge]
I will have to adjust the pins! Hope they work! thank you very much
I will have to adjust the pins! Hope they work! thank you very much!
[automerge]1572662858[/automerge]
I will have to adjust the pins! Hope they work! thank you very much
I will have to adjust the pins! Hope they work! thank you very much!
Yeah, look at socket A the one with issues VS Socket B. All pins should be facing the same direction, in the picture of socket A they are not. He replaced de-lidded CPUs with CPUs with lids, the most common issue with lidded CPUs is bending pins, because the washers weren't thick enough or someone attempted to do it without washers.

Of course i could be wrong, but until Trungha confirms that it's just an illusion from the photo, it looks like one side of the heat sink was tightened too far and it bent the pins.
Thank you for the help! I'll fix it carefully and hope it works!
 
Last edited:
I don't think you bent any pins, the half that look bent is just lighting. The pins do face in 2 different directions, I really don't think they are bent. You need to make 100% sure they are actually bent and know which way they should be before messing with them.
 
I don't think you bent any pins, the half that look bent is just lighting. The pins do face in 2 different directions, I really don't think they are bent. You need to make 100% sure they are actually bent and know which way they should be before messing with them.
Thank you I will look at it carefully!
 
Thank you for the help! I'll fix it carefully and hope it works!
Like people have mentioned, you're the only one who can determine if Socket A looks exactly like Socket B. If Socket B looks like some of the pins are bent, you're probably out of luck, I don't think you will be able to bend them back into place.

If they look the same, IMO most likely it's the opposite problem, you're not tightening the heatsink down far enough, probably because it's got old thread lock stuck in the threads. That's what happened to me, I had one Heatsink not touch the CPU and it doesn't show up.

Are you aware you need to use washers on lidded CPUs when you use them in a 2009 Mac Pro?
 
  • Like
Reactions: Trungha
Like people have mentioned, you're the only one who can determine if Socket A looks exactly like Socket B. If Socket B looks like some of the pins are bent, you're probably out of luck, I don't think you will be able to bend them back into place.

If they look the same, IMO most likely it's the opposite problem, you're not tightening the heatsink down far enough, probably because it's got old thread lock stuck in the threads. That's what happened to me, I had one Heatsink not touch the CPU and it doesn't show up.

Are you aware you need to use washers on lidded CPUs when you use them in a 2009 Mac Pro?
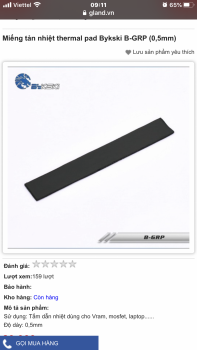
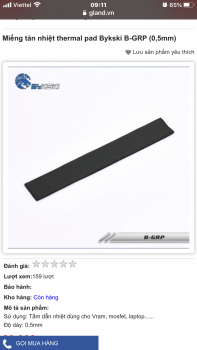
Yes, I used these thermal pads to lift the laundry! Maybe it's not up to standard!
[automerge]1572677416[/automerge]
Yes, I used these thermal pads to lift the laundry! Maybe it's not up to standard!
0,5mm
 

Attachments

  • 2EE3B79D-6712-4F23-8A4F-3481FAF67BD9.png
    2EE3B79D-6712-4F23-8A4F-3481FAF67BD9.png
    1.2 MB · Views: 91
  • 98E51619-50FD-4BB3-A519-1C841907FFC3.png
    98E51619-50FD-4BB3-A519-1C841907FFC3.png
    1.2 MB · Views: 95
I would go the proper way and delid the CPUs.

I dont think ALL the pins are bent. This would be too perfect. All pix I have seen of damaged sockets have bent some pins, not all. Guess thats a light reflexion.
 
Yes, I used these thermal pads to lift the laundry! Maybe it's not up to standard!
[automerge]1572677416[/automerge]

0,5mm

Those aren't the washers we're talking about. That's the extra thermal pads. You need to use washers on the studs that the heat sink goes over.
 
  • Like
Reactions: Trungha
Those aren't the washers we're talking about. That's the extra thermal pads. You need to use washers on the studs that the heat sink goes over.
Do you have images for adding washers! Please send me help! thank you!
[automerge]1572750328[/automerge]
Update! New picture
 

Attachments

  • 7E0322DB-8DDC-4255-844B-F56FBA371D39.jpeg
    7E0322DB-8DDC-4255-844B-F56FBA371D39.jpeg
    580.8 KB · Views: 116
  • EBE656B3-F1E6-42F9-8A00-BFB14E326760.jpeg
    EBE656B3-F1E6-42F9-8A00-BFB14E326760.jpeg
    687.8 KB · Views: 134
  • 2F972725-74BB-4994-8FF3-164D642C7650.jpeg
    2F972725-74BB-4994-8FF3-164D642C7650.jpeg
    524 KB · Views: 130
  • 7D14AC71-389C-4E2C-A52E-432D655B45EF.jpeg
    7D14AC71-389C-4E2C-A52E-432D655B45EF.jpeg
    810 KB · Views: 137
Last edited:
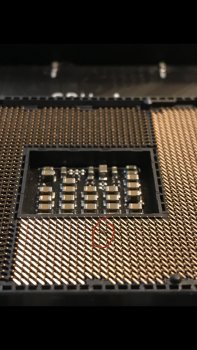
Ok, now there is a burnt pin visible.

One example more for: do it delidded...
Is this place? I tried to straighten it! I also added a 2mm washer! The problem is not solved!
 

Attachments

  • 3D530FF3-D1E4-4048-A4F2-50FFB5A5DC45.jpeg
    3D530FF3-D1E4-4048-A4F2-50FFB5A5DC45.jpeg
    328.3 KB · Views: 114
Is there any solution for me! Thank you!

Option 1:
Some people have fixed their CPU tray by very carefully bending the bent pins back up. This is probably not going to work, but it is worth a try. What concerns me is that the pin looks scorched, as if it was heated up like @Macschrauber said. Or maybe the pin pressed into an adjacent pin/pad and electrically shorted. There may be irreversible damage.

Option 2:
If that doesn't work, you need a replacement CPU tray. It has to be the correct type with the correct SMC version.

Warning:
The dual CPU 2009 upgrade is dangerous. If you get another CPU tray to try this again, you should do so with care. In my opinion the safest method is to use a vise to remove the CPU lid, after which everything is installed like stock/factory.

I do not care for the approach that keeps the lids on the CPU. If you insist on this method, then you need to use washers (spacers) to prevent overtightening the heatsinks, which results in the exact type of damage you have already experienced.

I think you are Vietnamese and that English is your second language. I am worried that you are mistranslating critical safeguards like "washers" into "laundry", and that a mistranslation has led to an unsafe upgrade which damaged your CPU sockets. The type of "washer" we mean is a "spacer" like so:
1050-ar-hockey-accessory-helmet-part-washer.jpg
Thank you! English is difficult for me! I appreciate your help! I used 2 washers, the total height is 2mm! Perhaps a pin was burnt! I will find a 4.1 tray instead!
 
Thank you! English is difficult for me! I appreciate your help! I used 2 washers, the total height is 2mm! Perhaps a pin was burnt! I will find a 4.1 tray instead!

You should use 4 washers per socket, and the total height should be 2.3mm (AFAIK, 2.4mm, e.g. 3x 0.8mm also work)
 
  • Like
Reactions: Trungha
I strongly prefer delidding method by way of vise. Everything is factory physical dimensions. No additional thermal padding needed. No washers/spacers needed. No issues with heatsink fan connector.

If you screw up a delidding today, you've ruined a $50-$80 CPU. If you screw up the CPU tray, you've ruined a $450 tray. I do understand in years past that the costs were different and so the decision may have gone the other way. CPUs cost a lot more back then. Depending on how far back you go, several hundred dollars each; and you had to risk that cost twice. But today it seems like a no-brainer.

Good luck @Trungha, I wish you well with your repair and hope to see a report of success here in the future.
Really thank you for your advice! Good luck and peace! If the results are good, I will report it again!
 
Really thank you for your advice! Good luck and peace! If the results are good, I will report it again!

I also share the same thoughts by ActionableMango and highly recommend using the Delidded CPU process. I’ve upgraded two 2009 cMac Pros’ CPUs using the Delidded method for two clients. Process went smoothly and straightforward. You remove the old CPUs, clean the heatsinks and place the new 12 core CPUs and apply thermal paste. Reinstall the heatsinks and your good to go. Good Luck and hope you’re able to upgrade your 2009 cMac Pro.
 
  • Like
Reactions: Trungha
I also share the same thoughts by ActionableMango and highly recommend using the Delidded CPU process. I’ve upgraded two 2009 cMac Pros’ CPUs using the Delidded method for two clients. Process went smoothly and straightforward. You remove the old CPUs, clean the heatsinks and place the new 12 core CPUs and apply thermal paste. Reinstall the heatsinks and your good to go. Good Luck and hope you’re able to upgrade your 2009 cMac Pro.
Thank you! I hope Socket is still working well! I will open the cpu assembly and the results will update to you!
 
Register on MacRumors! This sidebar will go away, and you'll see fewer ads.