Become a MacRumors Supporter for $50/year with no ads, ability to filter front page stories, and private forums.
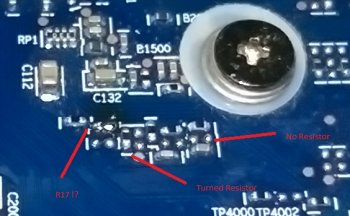
Mabe someone can help me out. After i have succsesfully overclocked my Pro 3.1 i'd like to change the PCIE Speed of my Gigabyte Windforce Card.

I also desoldered R17 but GPUz shows no difference in Linkspeed.
Looks like my card is using the standard pcb but has a different configuration:

View attachment 632882

As you can see i resoldered R17 already.
Can someone measure the other resistor values for me, so i can configure this card exactly like the standard configuration?

Greetings, Stefan

In my experience, GPU Z may shows PCIe 1.1 when the GPU is idling. Did you verify that in Oceanwave as well?

Anyway, which card is it? 3,1 and 79xx may be a bad combination (due to a known power management issue in OSX).
 
In my experience, GPU Z may shows PCIe 1.1 when the GPU is idling. Did you verify that in Oceanwave as well?

Anyway, which card is it? 3,1 and 79xx may be a bad combination (due to a known power management issue in OSX).

It is an Gigabyte Windforce 7950 Rev 1 (rev 2 had a different pcb). I used Furmark to gain gpu load but it remains on 1.1 .
All other resistors are different to, i wonder what can be change by these fields.

There seems to be no Power Management on a Mac Pro 3.1, it drains at least 200W all the time :eek:
What kind of Card do you suggest?

About Power management issue, refer to this one.

http://netkas.org/?p=1325

I don't have the 3,1 so don't know all the details, but it's about performance, but power draw. The worst you can get is the card still draw 200W, but not performing.
 
I reuploaded the relevant zone on the PCB. Those Pads look exactly like in post #72 (first design).
I noticed that HAL's board looks exactly the same, so i gave it another try. After i downloaded Oceanwave i can see the difference, so my card is running at 5GT but GPUz is always showing wrong values in Windows because the rendering-test did not show up. Using Furmark in background was not a solution.

Is there any drawback on an Windows PC with this mod?
 

Attachments

  • 2016-05-25 10.23.38.jpg
    2016-05-25 10.23.38.jpg
    83.5 KB · Views: 577
Last edited:
Thanks a lot for this topic.
To summ up:
there are 3 different versions

1. Post #72
2. also Post #72 resistors are in a white square and orientated like a chessboard
3. Post #164 and my #180 -> 3. Design (very similar to 1. )
 
2 styles

original reference with all in lines

revision, with them moved about

note that your style means no HDMI once flashed with Hamachi FB

Confirmed ;)
Is there anything i can do to fix this?
I saw you have a Store and read your blog, nice work!
 
Last edited:
Confirmed ;)
Is there anything i can do to fix this?
I saw you have a Store and read your blog, nice work!

I don't think there is any fix. The easiest work around is to boot from the PC ROM, and only switch the EFI when you need it. For 7950, there should be zero performance difference in OSX regardless if EFI exist or not.
 
Ok i am not using HDMI in the moment. I will try the display Port output on a 4k display (and with an HDMI adaptor), if these combinations do work, everything is fine.

I wonder what a pc will do, if R17 is missing? Is PCIE 3.0 still working?
 
Ok i am not using HDMI in the moment. I will try the display Port output on a 4k display (and with an HDMI adaptor), if these combinations do work, everything is fine.

I wonder what a pc will do, if R17 is missing? Is PCIE 3.0 still working?

7950 Mac EFI not working well in 4K 60Hz, it may not even boot. 4K 30Hz is OK. If you want 4K 60Hz, better boot from the PC VBIOS. Or you can only connect the 4K 60Hz monitor after boot.

No idea, I don't have a PC to test it. If I have a PC, I think the 7950 is far too old to stay in the PCIe 3.0 slot :p
 
I can't seem to find any references or discussion on the topic of Boot Camp or how the R17 resistor mod on the R9 280x effects the card if it is installed in a PC later in life. If you are using bootcamp, does the R9 280X perform at full speed? Is it something to do with the Mac Pro Logic Board design (even when running boot camp) that needs R17 removed to achieve full speed? If R17 is removed and it is used in a PC later on - does it behave as exactly the same card as it would with R17?

Thanks for any thoughts if anyone knows..
 
  • Like
Reactions: Born Again
I can't seem to find any references or discussion on the topic of Boot Camp or how the R17 resistor mod on the R9 280x effects the card if it is installed in a PC later in life. If you are using bootcamp, does the R9 280X perform at full speed? Is it something to do with the Mac Pro Logic Board design (even when running boot camp) that needs R17 removed to achieve full speed? If R17 is removed and it is used in a PC later on - does it behave as exactly the same card as it would with R17?

Thanks for any thoughts if anyone knows..

No PC, can't test it, but never heard anyone has issue to put in a flashed / R17 modded card in a PC. I am sure those Hackintosh guys can tell you the answer.

And no idea what "full speed" is, the card is PCIe 3.0, but cMP only has PCIe 2.0. So, no matter mod it or not, it can never run at max spec. However, I doubt if there will make any difference. I have 2x 7950, one installed in the x16 slot, the 2nd one installed in the x4 slot. The performance difference? 2.4%

https://forums.macrumors.com/thread...mac-with-2-d700s.1732849/page-5#post-21722712

So, if going from PCIe 2.0 x4 to PCIe 2.0 x16 can only gain 2.4%. I don't think going from PCIe 2.0 x16 to PCIe 3.0 x16 will make any difference. Therefore, I assume the card can actually perform at full speed under bootcamp in cMP. Anyway, the benchmark also shows that the card's performance (in bootcamp) is more or less the same as the reviews.

By the way, unless you decided to put the card in slot 3 or 4. IMO, there is no need to do this mod (especially if you have concern), there will be almost no performance gain from PCIe 1.1 x16 to PCIe 2.0 x16
 
Well, Just purchased a 4,1 and upgrading. YAY... New toy. Purchased a MSI R7950 Twin Froze 3GD5 open box for $99.99. So flashed it and worked great of course went to do the R17 removal but it's marked on the card as being the one next to the usual one I remove. So rather then doing it and having to fix it after figured I would ask on here.

I'm pretty sure it is this one on this card but correct me if I am wrong. Thanks for any feedback.

IMG_0166.jpg

If I were you, I won't go for this particular R17 mod.

1) it looks non-standard, high risk to kill the card or doing some damage.

2) the real world performance gain is roughly zero

So, high risk, low (or No) return, better don't do it.
 
  • Like
Reactions: YZFNYC
If I were you, I won't go for this particular R17 mod.

1) it looks non-standard, high risk to kill the card or doing some damage.

2) the real world performance gain is roughly zero

So, high risk, low (or No) return, better don't do it.

I'm looking at my MSI Twin Frozr "gaming G series" board, which I believe is a stock reference design (except for the cooler, of course). I removed R17, which worked.

That does look like the correct resistor, in the same position as mine, etc. I'd expect (NO GUARANTEES, do it at your own risk, of course) that removing it would work in your case as well. However, I do note a difference or two between your board and mine, so there is some additional risk, as pointed out. I just think it's minimal.

That said, I agreee with h98': Don't bother. Any gain will be impossible to notice except for a very slight change in some benchmark result that does not reflect real-life usage. Depending on your level of experience with such incredibly tiny components, you could damage your board. And, should you want to put it back, you will find that to be very difficult.
 
Last edited:
  • Like
Reactions: YZFNYC
I'm looking at my MSI Twin Frozr "gaming G series" board, which I believe is a stock reference design (except for the cooler, of course). I removed R17, which worked.

That does look like the correct resistor, in the same position as mine, etc. I'd expect (NO GUARANTEES, do it at your own risk, of course) that removing it would work in your case as well. However, I do note a difference or two between your board and mine, so there is some additional risk, as pointed out. I just think it's minimal.

That said, I agreee with h98': Don't bother. Any gain will be impossible to notice except for a very slight change in some benchmark result that does not reflect real-life usage. Depending on your level of experience with such incredibly tiny components, you could damage your board. And, should you want to put it back, you will find that to be very difficult.

Thanks for the advice guys. I appreciate it. I did however take the R17 resistor out that is pictured and have 5.0GT/S speed now. I know it doesn't make much of a difference but I love to tinker with things.

This is for the R7950 Twin Frozr 3GD5/OC P/N 912-V277-020

R7950.png


I attached the modded rom file so that anyone trying to do it can get it done simply.

First Flash with the rom and once you verify that is working remove the R17 resistor highlighted in my above post.

Helping one another is what we do here. So I appreciate your help with it, thanks again h9826790 & Ph.D.
.
 

Attachments

  • MSI_R7950MAC.zip
    88.8 KB · Views: 497
Last edited:
I can't seem to find any references or discussion on the topic of Boot Camp or how the R17 resistor mod on the R9 280x effects the card if it is installed in a PC later in life. If you are using bootcamp, does the R9 280X perform at full speed? Is it something to do with the Mac Pro Logic Board design (even when running boot camp) that needs R17 removed to achieve full speed? If R17 is removed and it is used in a PC later on - does it behave as exactly the same card as it would with R17?

Thanks for any thoughts if anyone knows..
fair question lou
 
I've successfully removed R17 from my Gigabyte R9 280X (Rev. 2.0), but I've also by accident scratched R18 off.
The card is working fine and Link-Speed is 5.0 GT/s. Does anybody know what R18's function is?
 
Running with 5.0GT/s on ATI(AMD) cards, it needs to move resistor.
On nvidia card, it needs to modify softstraps.(Where to modify softsraps)
softstraps located in 0h0058~0h0077
example for 9500GT:
The first picture is the softstraps of PC card.

If put the card in Mac OS X 10.7 or later, it will show up 2.5GT/s.

kXsqq9F.jpg


The second picture is the softstraps modified for Mac.
It shows up 5.0GT/s if you modify "1E" to "FA".

Wm6RHou.jpg


Same concept for every nvidia card but not same hex value.
If interested in the mod, please find the answer by yourself.
I just offer the hint to let you guys on the correct direction.
Don't always wait for answer from others.
By some reason, they could hide the answer for some purpose.

Hi, I've tried ti decompile this hex code to x86 and armv7. But it returns nonsense. How did you find where the softstrap is without decompiling the rom?
 
On Sunday I bought an HIS HD 7950 3 Gb for ¥8,800 plus sales 8% tax in Osaka's "Den Den Town" = a clone of Tokyo's Akihabara district.
Sunday night I flashed it using Netkas's script ( bless his heart .. )
Today I did the PCI 2.0 R17 mod.
You can see my progress here http://forum.netkas.org/index.php/topic,5619.msg37169.html#msg37169
I'll be posting a detailed guide on how to do this R17 mod for this HIS card later this week inn this thread.

The R17 mod is not hard but it can be terrifying for the uninitiated. Be warned that there are two distinctly different layouts for the AMDHD 7950 R17 resistor but luckily they are roughly in the same position on the front of the card's PCB.
The numerical order concerning their placement is the key .. plus the hands and eyes of a brain surgeon.
 
  • Like
Reactions: zoltm
THIS IS THE 5.0 GT/s mod for a HIS HD 7950 ONLY. ( MSI ref, card maybe possible too. )

There are TWO PCB layouts for HD 7950 cards ( look at the pictures below ).

WARNING : Before attempting this mod look at all the pictures, familiarise yourself with them. Identify which relate to your particular HD 7950.

TOOLS :

1. ( best ) A high magnification jeweller's headset or a high mag magnifying glass mounted in some
kind of clamp close enough to see the resistors clearly.

2. The absolute tiniest flathead screw driver you can find. Mine is about 1 mm in width.

3. Get a wooden toothpick. Now using a hobby knife, whittle it so that you end up with two very flat and very thin sides ; This will be put under your very tiny driver to avoid shorting anything on the PCB and / or scratching / cutting through any PCB traces


Generally the relevant resistor grouping is just a little South West of the BOTTOM RIGHT
fan screw position.


a. IMPORTANT : There are two different 7950 PCB version boards with different layouts positions for the
R17 resistor.

b. On what I suspect is a MSI HD 7950 the R17 is the first one in the group running from LEFT to RIGHT.

c. On my HIS HD 7950 the R17 is the 2nd. one from the left in the group.

HOW TO DO THE MOD

d. Dust off the PCB card with a soft brush.

e. Set up your magnifying glass and POSITIVELY IDENTIFY which of the pics is your card.

f. Do " e." again .. . just to be certain.

g. Wash your hands and thoroughly dry them.

h. WHITTLE down wooden or plastic toothpick and using tape secure it to where your screw driver
will be levering the R17 off the board.

i. Can't stress this too much. . WORK SLOWLY .. like a brain surgeon. No excess pressure, sudden pushes etc.

j. Place the tiny drivers edge on the whittled toothpick under the R17 . .. . . .

k. For God's sake do not use too much force or pressure .. . start to gently & slowly lever the R17 UP and OFF the board with the whittled toothpick under the driver.

===============================================
Probably a version 1 AMD reference 7950 PCB layout
AMD LAYOUT 01 MSI R17 general position.jpg

NOTE : I personally would not use any " cutting" instruments such as the scalpel pictured here - too scared of slipping and cutting a board trace.


Close up
AMD LAYOUT 01 MSI R17 position.jpg


My HIS HD 7950. It appears to be reference but with a different PCB layout
AMD LAYOUT 01 HIS 7950 pcb 01.jpg


My HIS HD 7950 CLOSE UP. The actual R17 resistor is literally the size of a grain of sand.
AMD LAYOUT 02 HIS 7950 close up 02.jpg


DONE !

HIS HD 5970 5GT-S.jpg


If you want to verify the new speed in GPUz hit the question mark " ? "

HIS HD 7950 PCI 2.0 speed check.jpg


My heartfelt thanks and gratitude to all the guys over at Netkas and Macrumors too of course.
 
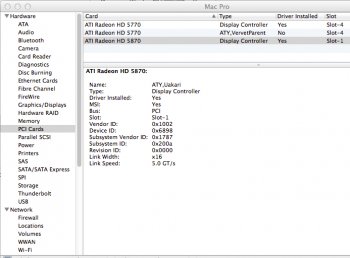
The HIS iCooler V HD 5870 1gb & the Sapphire Vapor-X HD 5870 O/C 1Gb cards can now be upped to 5.0 GT/s
Nekton1 & I both did the mod successfuly last night .. nekton1 with a soldered resistor .. me with a very sharp, finely pointed 2HB lead pencil.
LINK http://forum.netkas.org/index.php?PHPSESSID=129t4km0d8luq5nhl252fohv75mkbk93&topic=13649.0
These are still viable cards for cMP's . Apple shipped them with 5.0 GT/s . .why ? Must be a good reason.

EDIT : The XFX 5770 is only there because it is so slim and easy to use when flashing bigger cards.
 

Attachments

  • HIS HD 5870 5.0 GTs.jpg
    HIS HD 5870 5.0 GTs.jpg
    243.5 KB · Views: 368
Register on MacRumors! This sidebar will go away, and you'll see fewer ads.