I did the upgrade yesterday on my new 27" iMac and I wanted to add some information to the original post that some might find helpful.
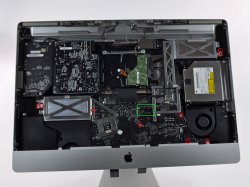
1. The photo does not show the right/all screws that you have to remove!
1. Two screws on the left heatsink. The third one is not necessary since it only connects the heatsink to the bracket
2. Two screws on the right heatsink, that's correct (Actually, I think you could even do with removing just one screw on each heatsink, since the two always seem to have sort of a suspension function, connected by a tiny metal piece.)
3. Four screws on the logic board itself. There is one hidden near the bottom of the iMac on the right (of the photo) underneath a wide black cable, don't forget that
4. One screw on the metallic bracket that connects the left heatsink to the logic board. It is marked with an arrow. It also connects the logic board to the enclosure!
I have indicated the screws positions an ifixit's last year's iMac since I don't have a hi-res photo. The position seemed to be the same.
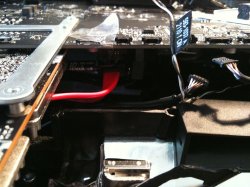
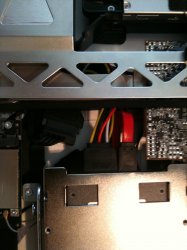
2. You don't necessarily need an angled SATA cable
I had one, but it turned out the angled part was to big. The non-angled side of the cable however was small enough to fit by folding the cable.
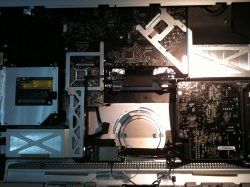
I have also indicated the position of SATA connectors on the logic board (underneath, of course) since I could find no information anywhere on that and thought it could've been very helpful.
My iMac now works wonderfully with a 160GB Postville and a 2TB Samsung F4.
I hope this helps.
1. The photo does not show the right/all screws that you have to remove!
1. Two screws on the left heatsink. The third one is not necessary since it only connects the heatsink to the bracket
2. Two screws on the right heatsink, that's correct (Actually, I think you could even do with removing just one screw on each heatsink, since the two always seem to have sort of a suspension function, connected by a tiny metal piece.)
3. Four screws on the logic board itself. There is one hidden near the bottom of the iMac on the right (of the photo) underneath a wide black cable, don't forget that
4. One screw on the metallic bracket that connects the left heatsink to the logic board. It is marked with an arrow. It also connects the logic board to the enclosure!
I have indicated the screws positions an ifixit's last year's iMac since I don't have a hi-res photo. The position seemed to be the same.
2. You don't necessarily need an angled SATA cable
I had one, but it turned out the angled part was to big. The non-angled side of the cable however was small enough to fit by folding the cable.
I have also indicated the position of SATA connectors on the logic board (underneath, of course) since I could find no information anywhere on that and thought it could've been very helpful.
My iMac now works wonderfully with a 160GB Postville and a 2TB Samsung F4.
I hope this helps.
")