Become a MacRumors Supporter for $50/year with no ads, ability to filter front page stories, and private forums.

startergo

macrumors 603
Original poster
Sep 20, 2018
5,019
2,282
1. Install Qemu:
Code:
brew install qemu virglrenderer sphinx-doc
brew link sphinx-doc --force
pip install sphinx_rtd_theme
If you want to install qemu with options:
Code:
brew uninstall qemu
sudo port clean qemu
sudo port install qemu +spice_protocol +spice +ssh +usb +vde +vnc
sudo port install alacritty glfw3 glew libepoxy spice-server
Or install it from source:
Code:
git clone https://gitlab.com/qemu/qemu qemu-master
cd qemu-master
git submodule init
git submodule update --recursive
./configure --target-list="ppc-softmmu x86_64-softmmu" --enable-slirp --enable-cocoa --enable-spice --enable-hvf --enable-virglrenderer
make
sudo make install
2. In terminal clone the repo:
Code:
git clone https://github.com/royalgraphx/LegacyOSXKVM
3. Modify all Snow Leopard .sh scripts by replacing accel=kvm with accel=hvf.
4. Replace /usr/share/edk2-ovmf/x64/OVMF_CODE.fd with ~/LegacyOSXKVM/ovmf/OVMF_CODE.fd (providing you cloned the repo in the ~ directory).
5. Download sl_utm.qcow2 to the ~/LegacyOSXKVM/osxinstaller/sl_utm.qcow2 directory.
1715304412863.png

6. Download the 1920x1080-OpenCoreSLeopard.img file to the ~/LegacyOSXKVM/opencore/1920x1080-OpenCoreSLeopard.img directory:
1715304648228.png


7. Open Terminal and navigate to the cloned repository and start Qemu:
Code:
cd LegacyOSXKVM && qemu-img create -f raw harddrives/macintosh.img 40G && ./SLeopard-Install-HiRes.sh
8. Disable debug logging in the Opencore by changing Target to 0 in the Config file
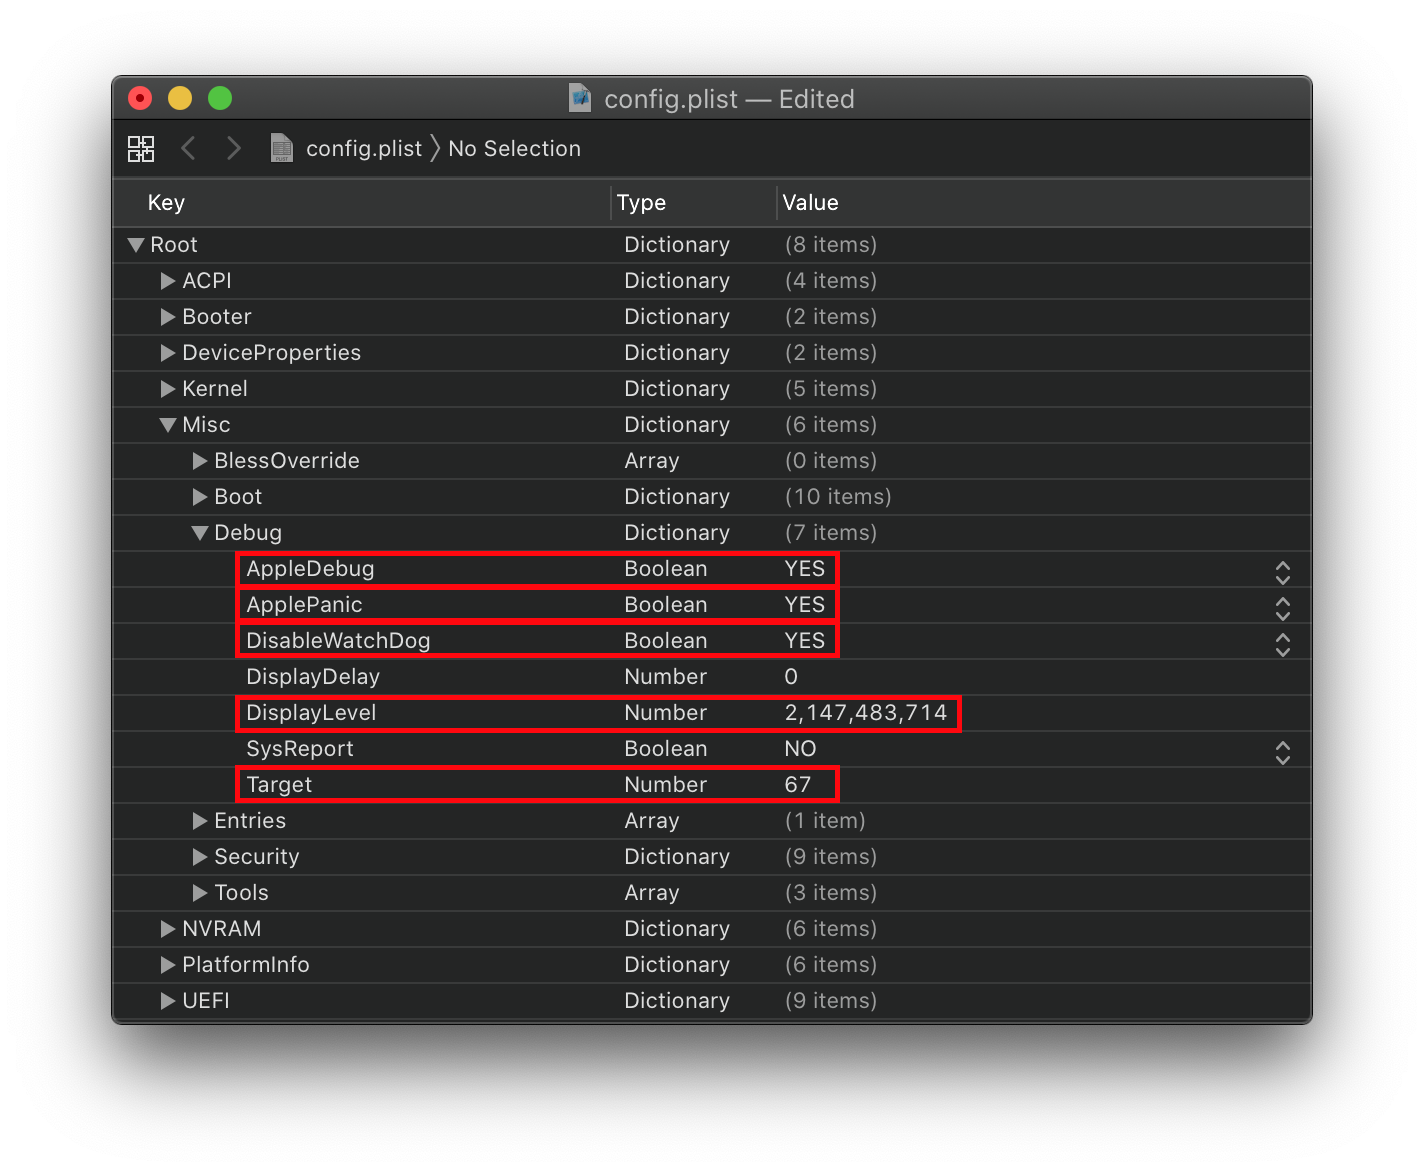
debug.4f3d7c16.png

Once installed you can use the other scripts like SLeopard-Boot-HiRes.sh for booting.
Caveat: audio: Could not create a backend for voice `adc'
Enjoy!
For VMware Fusion follow this guide.
 
Last edited:
  • Like
Reactions: x3sphere

startergo

macrumors 603
Original poster
Sep 20, 2018
5,019
2,282
Now that you have the QEMU Snow Leopard you can create easily a UTM Snow Leopard. It provides 7MB Vram rather than 3MB from QEMU:
1. Install UTM from the App Store.
2. Create a new machine:
2.1.
1715375985455.png
2.2.
1715376045340.png
2.3.
1715376094977.png
2.4.
1715376164196.png
2.5.
1715376207658.png
2.6.
1715376256694.png
2.7.
1715376301698.png
2.8.
1715376345226.png
2.9. Import the drives from:
Code:
~/LegacyOSXKVM/osxinstaller/sl_utm.qcow2
~/LegacyOSXKVM/opencore/1920x1080-OpenCoreSLeopard.img
~/LegacyOSXKVM/harddrives/macintosh.img

Once you install the Virtual Machine you can add and install VMQemuVGA.kext to /Library/Extensions or the kexts in the OpenCore directory on the EFI drive which mounts automatically on boot. You can instal then Vmware tools attached.
Download and install the mDNSresponder_fix.sh to fix internet:
Code:
sudo cp ~/Downloads/mDNSresponder_fix.sh /usr/bin/
sudo chmod +x /usr/bin/mDNSresponder_fix.sh
sudo chown root:wheel /usr/bin/mDNSresponder_fix.sh
sudo defaults write com.apple.loginwindow LoginHook /usr/bin/mDNSresponder_fix.sh

For Snow Leopard you have to fix the expired certificates as well:

If you need copy/paste to/from guest use Apple Remote Desktop or similar.


Surprisingly Snow Leopard in UTM runs much smoother than in Parallels. I can access local networks and even copy/paste if I run Remote Desktop to the VM.

You can use bridged network and have internet without the mDNS_responder_fix by installing this Virtio driver:
 

Attachments

  • VMQemuVGA.kext.zip
    29.2 KB · Views: 63
  • darwinPre15.iso.zip
    2.4 MB · Views: 94
  • mDNSresponder_fix.sh.zip
    680 bytes · Views: 78
Last edited:

Edgecrusherr

macrumors 6502
Jan 21, 2006
397
529
Interesting, thanks for this! I haven't been able to get Snow Leopard working on Apple Silicon, something to do with the differences in Apple's hypervisor. Are you on Intel or Apple Silicon?
 

startergo

macrumors 603
Original poster
Sep 20, 2018
5,019
2,282
Interesting, thanks for this! I haven't been able to get Snow Leopard working on Apple Silicon, something to do with the differences in Apple's hypervisor. Are you on Intel or Apple Silicon?
On Intel but in the original git project there is an instruction to run it on Apple silicon:
AS_SL.md
 

Edgecrusherr

macrumors 6502
Jan 21, 2006
397
529
On Intel but in the original git project there is an instruction to run it on Apple silicon:
AS_SL.md
The steps for Snow Leopard on Apple Silicon didn't work out for me. I copied the repro, moved the files into the appropriate folders, then ran the boot script. It looks like I need to specify the image format for macintosh.img. Any idea how to do that? I have my terminal history and a screenshot below for reference.

rick@HacStudio ~ % cd /Users/rick/LegacyOSXKVM
rick@HacStudio LegacyOSXKVM % /Users/rick/LegacyOSXKVM/SLeopardPPC-Boot.sh
WARNING: Image format was not specified for 'harddrives/macintosh.img' and probing guessed raw.
Automatically detecting the format is dangerous for raw images, write operations on block 0 will be restricted.
Specify the 'raw' format explicitly to remove the restrictions.
QEMU 9.0.0 monitor - type 'help' for more information
(qemu) [/CODE]

Screenshot 2024-05-22 at 2.24.49 PM.jpg
 

startergo

macrumors 603
Original poster
Sep 20, 2018
5,019
2,282
You are using the wrong script.
So basically, I installed Mac OS X Snow Leopard to a macintosh.img on an x86_64 host, my main PC... and then once the screen to reboot appeared, I simply shut the VM down gracefully using the reboot option, and preserved the preinstalled macintosh.img that is ready for first time boot. It does not have any sort of username or anything, its literally right after install and reboot, so... basically I have to share this macintosh_preinstalled.img to you guys on Apple Silicon Macs, just in case you do not have an x86_64 machine available to you.

All you need to do, is unzip the AS_SL.zip file in opencore/ so that you can get AS_SL.img. Now, you need to download the 40GB disk image of Mac OS X Snow Leopard, and drop it into harddrives/ and rename it from macintosh_preinstalled.img to macintosh.img. You are now ready to simply use AS-SL-Boot.sh.
After following the instruction here run AS-SL-Boot.sh. Make sure the files described in the script reside in the proper locations under the same names.
 

Edgecrusherr

macrumors 6502
Jan 21, 2006
397
529
You are using the wrong script.

After following the instruction here run AS-SL-Boot.sh. Make sure the files described in the script reside in the proper locations under the same names.
Thank you, that was it! So, I have it running in UTM via terminal, which is really great, I appreciate your post and royalgraphx's GitHub. I've been trying to get SL running on Apple Silicon for the last 3 years.

It's not very stable (maybe an Apple Silicon issue, as it's running emulated, not virtualized), but it runs. My only major issues is I can't get the screen res to change, and the browsers still aren't loading sites. I was able to install the VMQemuVGA kext, and the VMware Tools (had to update to 10.6.8 to get tat working), and ran the commands and scrip for mDNSresponder_fix. Also, I tried importing everything into UTM using your guide, but it hangs at some step in the boot process (see screenshot below), and changing around some of the hardware options causes kernel panics, particularly (or entirely) when loading Lilu.

I'd love to get a full UTM file built, then I could post it online for everyone who wants to run PPC apps and SL on their Apple Silicon.

Screenshot 2024-05-23 at 9.23.29 AM.jpg
 

startergo

macrumors 603
Original poster
Sep 20, 2018
5,019
2,282
My only major issues is I can't get the screen res to change, and the browsers still aren't loading sites.
For internet fix you will have to do this:
Fixing HTTPS issues on old versions of OS X
For the hang see here:
    • CFG Lock (MSR 0xE2 write protection)(This must be off, if you can't find the option then enable AppleXcpmCfgLock under Kernel -> Quirks. Your hack will not boot with CFG-Lock enabled)
      • For 10.10 and older, you'll need to enable AppleCpuPmCfgLock as well
  • #


and the browsers still aren't loading sites
Is your internet working? Can you check for Apple system update?
My only major issues is I can't get the screen res to change
My resolution is 1920x1080. You can't change that. Not without a driver.
 
Last edited:
  • Like
Reactions: Edgecrusherr

Edgecrusherr

macrumors 6502
Jan 21, 2006
397
529
For internet fix you will have to do this:
Fixing HTTPS issues on old versions of OS X
For the hang see here:


Is your internet working? Can you check for Apple system update?

My resolution is 1920x1080. You can't change that. Not without a driver.
Thanks, I booted it up in QEMU and changed the boot argument for AppleXcpmCfgLock, under Kernel > Quirks from false to true, then reimported that into UTM. I now get past that screen, but it ultimately ends up on another kernel panic. I'll get you screenshots in a little bit.

Internet is working under QEMU, I was able to get all system updates installed.

For the screen, I'm stuck at 1280x720. That's under QEMU, I may be able to get that fixed if I can get it running under UTM.
 

startergo

macrumors 603
Original poster
Sep 20, 2018
5,019
2,282
I finally got Mavericks working too in UTM. I guess all Legacy machines should be working too. There was a problem with the keyboard driver, but I found a workaround by adding USB1.1 controller to UTM.

Code:
-device pci-ohci -device usb-kbd -device usb-tablet
1716492723303.png
Of course one needs to pay attention that the USB1.1 support was dropped in Ventura but all previous versions should be fine.


USB 1.1 (OHCI/UHCI) Support​

For Penryn systems and pre-2013 Mac Pros, USB 1.1 support was outright removed in macOS Ventura. While USB 1.1 may seem unimportant, it handles many important devices on your system. These include:

  • Keyboard and Trackpad for laptops
  • IR Receivers
  • Bluetooth
With OpenCore Legacy Patcher v0.6.0, basic support has been implemented via Root Volume patching. However due to this, users will need to use a USB hub for installation and post-OS updates when patches are cleaned:

usb11-chart.5b4b5b26.png


The following systems rely on USB 1.1
  • iMac10,x and older
  • Macmini3,1 and older
  • MacBook7,1 and older
  • MacBookAir3,1 and older
  • MacBookPro7,1 and older
    • MacBookPro6,x is exempt
  • MacPro5,1 and older
 
Last edited:
  • Like
Reactions: Edgecrusherr

Edgecrusherr

macrumors 6502
Jan 21, 2006
397
529
Awesome job on Mavericks!

Ok, so I have 2 sets of screenshot attached at Zip files. One is matching your settings in UTM, and the other is me trying to setup UTM based on AS-SL-Boot.sh that royalgraphx used in his post about Snow Leopard in QEMU on Apple Silicon. I've done a lot of variations on these, and they all end in a kernel panic. I have the kernel panics attached as well. Not sure if any of this helps.

Thanks again!
 

Attachments

  • startergo settings.zip
    1.6 MB · Views: 49
  • royalgraphx settings.zip
    968 KB · Views: 66

Edgecrusherr

macrumors 6502
Jan 21, 2006
397
529
Which opencore configuration file are you using?
I have the one what works in QEMU attached. It's the one that shows up in Snow Leopard after following the steps to get it running in QEMU. It's the stored in AS_SL.img. However, I've also used 1920x1080-OpenCoreSLeopard.img and a few others.
 

Attachments

  • config.plist.zip
    4.7 KB · Views: 36

startergo

macrumors 603
Original poster
Sep 20, 2018
5,019
2,282
Try this EFI folder. It has the latest OpenCore. If you want you need to set proper serial numbers in the generic section.
 

Attachments

  • SL_Qemu_EFI.zip
    2.2 MB · Views: 67

startergo

macrumors 603
Original poster
Sep 20, 2018
5,019
2,282
One can easily create an EFI .qcow drive with the EFI OpenCore directory inside it:
Code:
hdiutil create -size 200M -fs "MS-DOS FAT32" -volname EFI-LEGACY ~/Desktop/EFI-LEGACY.dmg
- Mount the image.
- Drop the OpenCore EFI folder inside.
- Unmount the image.
- Convert the image to qcow2:
Code:
hdiutil convert ~/Desktop/EFI-LEGACY.dmg -format UDTO -o ~/Desktop/EFI-LEGACY.cdr
qemu-img convert -p ~/Desktop/EFI-LEGACY.cdr ~/Desktop/EFI-LEGACY.img
qemu-img convert -f raw -O qcow2 ~/Desktop/EFI-LEGACY.img ~/Desktop/EFI-LEGACY.qcow2
 
Last edited:

Edgecrusherr

macrumors 6502
Jan 21, 2006
397
529
Thanks again! So, I made a DMG with the OpenCore folder you uploaded. In the file I set SNs and UIDs pulled from the one of the other OpenCore configs I've already downloaded, and set the AppleXcpmCfgLock to true. I did this for the config.plist.legacy.plist file as well (wasn't sure which one it would reference). I got the below kernel panic. I've also attached the config files, in case you want to look at those. The panics seem to be Lilu every time.

Screenshot 2024-05-24 at 2.05.36 PM.jpg
 

Attachments

  • config.plist.zip
    10.7 KB · Views: 35

startergo

macrumors 603
Original poster
Sep 20, 2018
5,019
2,282
Change these:
Code:
<key>FixupAppleEfiImages</key>
            <true/>
Try this as TRUE or FALSE:
Code:
<key>ForceExitBootServices</key>
            <true/>
Set this to true:
Code:
<key>DeviceProperties</key>
            <true/>
Set this to 3-5 seconds
Code:
<key>ExitBootServicesDelay</key>
            <integer>5</integer>
 
  • Like
Reactions: Edgecrusherr

Edgecrusherr

macrumors 6502
Jan 21, 2006
397
529
Change these:
Code:
<key>FixupAppleEfiImages</key>
            <true/>
Try this as TRUE or FALSE:
Code:
<key>ForceExitBootServices</key>
            <true/>
Set this to true:
Code:
<key>DeviceProperties</key>
            <true/>
Set this to 3-5 seconds
Code:
<key>ExitBootServicesDelay</key>
            <integer>5</integer>
Getting close! I got USB errors when booting after making the changes to the config. I disable USB just to see what happens, then it goes to a slightly different panic (I think it's Lilu again).

First boot:
Screenshot 2024-05-27 at 11.42.24 AM.jpg


After disabling USB:
Screenshot 2024-05-27 at 11.43.27 AM.jpg
 

startergo

macrumors 603
Original poster
Sep 20, 2018
5,019
2,282
Enable usb and try this
All you need to do, is unzip the AS_SL.zip file in opencore/ so that you can get AS_SL.img. Now, you need to download the 40GB disk image of Mac OS X Snow Leopard, and drop it into harddrives/ and rename it from macintosh_preinstalled.img to macintosh.img. You are now ready to simply use AS-SL-Boot.sh.
 

Attachments

  • config.plist.zip
    4.1 KB · Views: 43
Last edited:
  • Like
Reactions: Edgecrusherr

startergo

macrumors 603
Original poster
Sep 20, 2018
5,019
2,282
Is this with the 40GB disk downloaded from https://github.com/royalgraphx/LegacyOSXKVM?

For now though, all I really need to explain is that for some reason the various KP's that users experience when attempting to first boot or install Mac OS X Snow Leopard on M-Series Macs such as the Commpage or Installer KP are results of some weird TCG/32-Bit emulation errors. As well as OS X itself having trouble with the emulated TCG from ARM64 hosts. I've observed that x86_64 hosts using TCG (or commonly known as simply using emulation and not virtualizing) do not experience such errors. Leads me to believe that the installer uses various older parts for 32-Bit cryptography while installing, and the commpage error mainly being the CPU being weird, as in, how it appears to the guest machine. Reading the actual commpage.c file you'll see the section it kernel panics on. Either way, it turns out it's simply the installer phase. Commpage error was mitigated with OC, and as for the installer randomly having a protection fault 13 during the install, it works perfectly fkn fine once its actually installed lmfao. Also, I personally have not had enough time to properly debug what is happening with TCG on ARM64, so I could be completely wrong on my theory and OC could mitigate every issue if used properly. Take my words with a grain of salt, simply read below on how to actually use this guide...

So basically, I installed Mac OS X Snow Leopard to a macintosh.img on an x86_64 host, my main PC... and then once the screen to reboot appeared, I simply shut the VM down gracefully using the reboot option, and preserved the preinstalled macintosh.img that is ready for first time boot. It does not have any sort of username or anything, its literally right after install and reboot, so... basically I have to share this macintosh_preinstalled.img to you guys on Apple Silicon Macs, just in case you do not have an x86_64 machine available to you.

All you need to do, is unzip the AS_SL.zip file in opencore/ so that you can get AS_SL.img. Now, you need to download the 40GB disk image of Mac OS X Snow Leopard, and drop it into harddrives/ and rename it from macintosh_preinstalled.img to macintosh.img. You are now ready to simply use AS-SL-Boot.sh.
 
Register on MacRumors! This sidebar will go away, and you'll see fewer ads.