Become a MacRumors Supporter for $50/year with no ads, ability to filter front page stories, and private forums.

amedias

macrumors 6502
Original poster
Feb 9, 2008
263
289
Devon, UK
I've been reading around this subject for a while as a pet peeve of mine is noisy computers.
My normal workstations are entirely passively cooled and silence is bliss, but I do still use my cMPs when I need machines with a bit more power or more cores for testing virtual environments and the noise of my 5,1s has always annoyed me.

I don't mind them making a little noise when they're really working, but in low utilisation and idle states I still get annoyed by them even with all fans on minimum.

So I started reading all the various threads on replacing stock fans with quieter ones (Noctua or Gelid being my preference) and there's seemingly a few people that have done this, although the Apple-specific PWM implementation* always seems to be the gotcha. I'm posting this as a bit of a compendium of info from other threads and my own testing for those that might be interested.

* Apple Mac Pros don't use PC style PWM to control their fans, instead of a square wave switched input on pin 4 at different duty cycles (PC style) they use an analogue variable voltage.

First a history lesson on fan pinouts

Old school fans, also known as 2-pin fans
1 - GND
2 - VCC** (normally 12V)

These fans run at constant RPM based on the input voltage (12V) and provide no tacho reading so the system cannot tell what the RPM is. A lot of old PCs and old PowerMacs used these fans, cooling is basically configured for 'worst case scenario' with all fans running all the time, when the system is idle then it's cool and noisy, when it's loaded its hot and noisy (and hopefully doesn't ever reach 'overheat'.

** note on VCC...
Input voltages other than 12V can be used and the fan will run slower or faster accordingly. If the voltage is too lo the fan may stop, if too high it may burn out.

PC fans with tacho, also known as 3-pin fans
1 - GND
2 - VCC (normally 12V)
3 - Sense/Tacho

These fans run at constant RPM based on the input voltage (12V), they also provide a sense/tacho reading on an additional pin which the system can read to report on fan speed, fan failure and with some systems they will be able to vary voltage on the VCC pin on the motherboard to vary fan speed. This is not PWM, but does allow motherboards to vary fan speed in response to thermal conditions, and the tacho allows them to receive feedback on the fan status.

PC PWM fans, also known as 4-pin fans
1 - GND
2 - VCC (normally 12V)
3 - Sense/Tacho
4 - PWM control signal

These fans run at variable RPM based a PWM signal on pin 4, like 3-pin fans they provide a sense/tacho reading on pin3 which the system can read to report on fan speed and fan failure it also acts as feedback to adjust the PWN signal. With these fans VCC is constant and the RPM of the fan is controlled by an internal motor driver circuit which responds to the PWM signal, a switched 25kHz square wave where the duty cycle of the wave dictates fan speed.
A point here which will be relevant later, is that just like 2 and 3 pin fans, the fan draws the bulk of it's current to run the motor from VCC on pin 2.

Apple Mac Pro fans, also known as "Damn you Apple and your proprietary nonsense!" fans
1 - GND
2 - VCC (12V)
3 - Sense/Tacho
4 - Apple RPM control,

These fans run at variable RPM based on the control signal on pin 4, like 3-pin fans they provide a sense/tacho reading on pin3 which the system can read to report on fan speed and fan failure it also acts as feedback to adjust the control signal. Unlike PWM fans the control signal which is used to drive the motor is an analogue voltage variable from 0V to ?V (I need to get a new multimeter to confirm the max but I suspect it might be 12V based on reports from others). the 12V on VCC is constant and used to drive the fan control circuitry and the motor at min speed.
Back to that point above, I need to test this myself (when the new multimeter turns up) but it appears from reading other sources that the fan draws the bulk of it's current to run the motor from Control on pin 4, more on this later!

So you can see the issue plainly, if you plug in a PC PWM fan to a Mac Pro header the PWM signal will not work, and the fan will run at full speed due to 12V on VCC pin. It will however report RPM back to the SMC so at least you can see the fan speed in your software of choice.

Most people I've read about seem to adopt one of four approaches:

1. Use PC fans plugged into the Mac Pro headers and let them run at full speed
2. Use PC fans plugged into the Mac Pro headers and use inline fixed resistors to run < full speed
3. Use PC fans plugged into the Mac Pro headers and use inline variable resistors to run at manual controlled speed
4. Use PC fans and conversion/adaptor boards to convert Apple control signal to PC PWM signal

Options 1 & 2 are simple and if you choose your fans or resistors carefully can result in lower noise, but there's no variable RPM so no way to adapt to changing thermals so you have to plan for either never running the machine at full load for extended periods, or making sure your cooling is sufficient for 'worst case scenario' and just put up with whatever the noise level is.

Option 3 is a little better as you have manual control over the fans, level of annoyance will be dictated by where the controls are physically located and how often you need to tune RPM to workload. Which fine if you're sat next to the box all day ;-)

Option 4 is a great option as you can use unmodified fans and have full automatic control of the fans. It is however very hard to achieve, many have looked into this but I've not (yet) seen a single case of someone confirming they've got it working 100%, and certainly no easy off-the-shelf solution I've seen. It also leaves you with the problem of where to stash the converter board(s).

Now, I'll refer you back to the pinouts above, there is a 5th option, and it's a workable solution if you choose your fan models with care.

Option 5!

Use 3-pin PC fans, plugged into the Mac Pro headers but with a few pins swapped.

If you take a normal 3-pin PC fan, pop the pins out of the connector and replace them into the 4 pin connector from a Mac Pro fan but arrange the wires from the fan like this:

Mac Pro outputPinFan input
GND1GND
VCC (12V)2* empty *
Sense/Tacho3Sense/Tacho
Control voltage4VCC


What you end up with is a 3-pin PC fan, being driven off the analogue variable voltage from the Mac Pro Control pin 4.
This is the exact same type of control you get on motherboards that can vary the speed of 3-pin fans, and is the same as using step down resistors (fixed or adjustable) but it has the added benefit of still letting the SMC do automatic control.

So this DOES give automatic fan control that the SMC can manage, and as long as a few conditions are met works 100%. If those conditions are not met then you can still get ~80-90% of the way there and fan control software can get you the other 10%, see below for details.

So there must be a gotcha with this too right? Well yes... but easy to deal with.

Issue 1
The Mac Pro control voltage can be very low, even 0V, below a certain voltage (about 3V IMEbut some are lower) most fans can't operate so this will cause the fan to stop, the SMC obviously doesn't like this so will pulse the control voltage to get the fan to restart so you'll just hear your fans momentarily stop and restart all the time at idle.

You can deal with this with a hardware mod or in software. In software just set the minimum speed of the fans to a high enough level that the voltage on pin 4 is sufficient to drive the fan. You can either do this by trial and error watching the RPM pulsing, or get your multimeter out and work it out, but that's it. Set minimum speed in Macs Fan control, or iStat or whatever you use and it will still vary UP from there as necessary. If you choose your model of fan wisely (medium/high RPM at 12V) you can get a minimum speed close or equal to the minimum of the original Apple fans and with your adjusted fan curves it'll be cool and quieter.

To fix this in hardware you need to make sure that there is a minimum voltage applied to the VCC pin on the fan regardless of output on Control pin 4 of the board. You can do this by taking VCC pin2 from the board and connecting it to the fan *in addition to the Control pin 4*. You will need to use an inline resistor to drop the 12V VCC input to whatever the minimum Voltage your fan needs to run. You should probably also use a diode in line *before the connection from VCC pin on the board* to prevent any input back to the board. If you do this then the fan will always have an applied voltage so cannot stop, the SMC will be happy and Control voltage will be at a minimum until thermal conditions dictate it need to be increased, this will then increase the Voltage to the fan and it will run faster just as it should.

EDIT - No longer worth worrying about as long as you use decent fans. I tested about a dozen today off the Mac Pro board header running with pin swap described above. It seems the SMC has target RPMs set for minimum value, rather than target voltages. Which means if you plug any fan in when it will try to run it at the default RPM (examples: 500RPM on the exhaust, 600RPM on the intake) and will just increase the voltage until it sees the RPM it wants.

What this means is that as long as you choose fans that can run at the minimum RPMs without stalling then you won't get the pulsing. What this also means is that once it starts ramping up once the voltage gets to 12V and stops increasin the SMC can have no further effect. So it pays to use fans that will run at high RPM @12V, yet will still run at the minimum RPM the SMC targets.
See further update post down the page for more info and examples.

ADDITIONAL EDIT - Resistors and diodes now confirmed as a workable solution by @KeesMacPro and myself today, see page 4!!

Issue 2, possibly?
Until I get my new multimeter I can't confirm what the max voltage seen on Control pin 4 is, there is a very small chance it's high enough to damage some fans, however all the fans I've tested have run fine at max RPM with no issue so I suspect it is indeed 12V as I've read elsewhere.


EDIT - Not an issue! I tested every PC fan I could lay my hands on in the house (about 20) and fed them various voltages, confirmed max RPM at 12V (as expected) and RPM did NOT increase beyond that even when fed with 20V so can be 99.99% sure that the fans have over-voltage protection built in and limit 12V to the motor. Sure you might be able to fry it by feeding >20V but that's not gonna happen.

ADDITIONAL EDIT - Max output on VControl pin is 12.3V, so NO risk of damaging fans.

Issue 3, maybe?
Until I get my new multimeter I can't confirm whether the standard Mac Pro fans draw most of their current off VCC pin 2 or Control pin 4. If it's from pin 4 then this is not an issue at all. If it's pin 2 then there is a very small chance that at high RPM pin 4 may not be able to provide sufficient current. I do not think this is the case is in my own testing (with several different fans) I was able to successfully run them up to max RPM without issue so I suspect what I've read is true.


EDIT - Not concerned about this any more but will still check when multimeter arrives, see post furhter down, but after running several fans off the Mac Pro headers via the V Control pin no issues seen.

So in summary, with a simple pin swap you can use PC 3-pin fans and get automatic fan control, you may need to set a minimum speed in software to keep them ticking over at idle, but with care fan choice this isn’t necessary. This requires NO soldering, NO converter boards and is totally reversible.

I'll be back to update and amend the outstanding questions once I've got my hand on a multimeter again!
 
Last edited:
Excellent writeup!
And excellent research 👍
Looking forward to the followup. And perhaps you have some specific fans you can recommend as replacements?
 
  • Like
Reactions: atonaldenim
Good timing, I love reading things like this. I just got a delivery of two Noctua 60mm fans as the noise was getting unbearable in my studio and I've been wanting a Covid-19 task to do. Your method sounds a bit beyond my comfort levels but I'll report back once I've installed the Noctua fans and let you know how it goes with them running at full 12v!
 
  • Like
Reactions: Flamenco Dude
Actually thinking aio mod for 2 x 5680. Low temp = low noise.

I think you're on a path towards more issues there...

For starters you'd need two (custom) water blocks, one for each CPU, which then means either two small rads or one big one, which then leaves the issue of where to put it/them.

With a single big rad anywhere you locate it it'll be limited in room and in airflow as it'll be the wrong orientation with regards to case airflow, and don't forget the whole tray slides out so you either need the rad to come out with the tray (tricky) or some loooong pipes (messay nd reduces airflow even more).

Similar issues with two small ones although you could mount one rad at each end where the current intake/exhaust fans are, but you still have the in-out with tray or pipes issue.

You also need decent cooling on the northbridge, which would be tricky to integrate into the waterblock for one of the CPUs, which then means either another small block or active fan cooling, then you've got the fact that the bottom compartment still needs ambient airflow front-to-back to cool the ram so only doable with the two small rads setup or keeping the original intake/exhaust fans

There is at least one (if not two) watercooled Mac Pros out there, but very very very custom job so not using off the shelf AIO's.

The cMP thermal design is actually pretty good, compartmentalisation, auto control etc. And when you look at it, especially in a dual CPU tray model, doesn't leave much room for alternatives. The only thing lacking is it's ability to use newer quieter fans.
[automerge]1587628142[/automerge]
Good timing, I love reading things like this. I just got a delivery of two Noctua 60mm fans as the noise was getting unbearable in my studio and I've been wanting a Covid-19 task to do. Your method sounds a bit beyond my comfort levels but I'll report back once I've installed the Noctua fans and let you know how it goes with them running at full 12v!

If you're going for the "constant speed run 'em at 12V" approach then you need to pick fans that have an RPM (at 12V) that's sufficient to cope with your worst case thermal scenario, as if they can't ramp up in response to load then cooling needs to b sufficient that it won't overheat.

If you're just replacing the 2 60mm fans *inside* the CPU heatsinks then it's not too bad as the intake and exhaust fans can still ramp when needed and at high RPM they can provide a LOT of air if needed.

If I were doing that (just the CPU heatsink fans) I'd pick a Fan with a RPM ~1200-1400 @12V, at that speed a Noctua will be very quiet and still enough airflow for idle and moderate load, but you may need to keep an eye on temps at high load. If your ambient conditions are bad you may need faster than that.

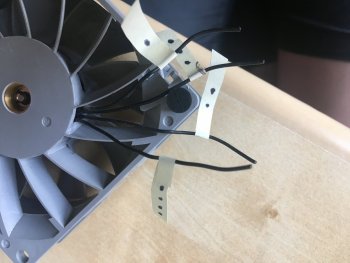
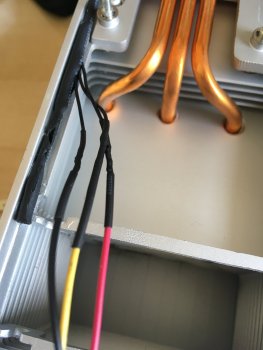
Good luck with your project, the hardest part of doing the heatsink fans is working out which wire is which from the connector as they're all black, and enclosed in heatshrink tubing from the connector to the fan so hard to trace without removing the heatshrink. And at the fan end they're not labelled either, I put coloured sticky labels on each wire, then cut my OEM fans out, tested them manually to work out which wire was which so that i could then fit the new fans back to the original cabling on the right wires.
 
Last edited:
  • Like
Reactions: foliovision
I'm lucky enough to have a bunch of 2009 and 2010 machines at my disposal so I've done some pretty brutal thermal testing on them so I know what I can and can't get away with*.

I've also been building entirely passive (non Apple) machines for over a decade so my expectations for noise levels are more stringent than a lot of people!

*Suffice it to say that (in a 20degC ambient room) with a single L5640 (6 core 2.26Ghz core/2.8GHz boost @40W TDP) fitted and 4x Dimms with big heatsinks you can run at 100% load and cool the entire bottom compartment of a Mac pro with a single 120mm intake Fan @600rpm if you build some ducting and baffles to better direct the airflow. Alternatively you can keep the CPU and NB in check with a single 80mm inside the heatsink @1000RPM but the ram will run hot, but still safe.

Moving up a TDP notch you can still cool a 130W CPU and the NB at 100% load using the same setups if you bump the RPMs a little, it'll run within 2-5deg of ProcHot but it'll run and won't overheat.

It gets a bit trickier with dual CPU machines for obvious reasons, couple the heat sources, but also less room for airflow, and also less room to add additional ducting.

I'd not suggest running setups like that long term but it it's good to know where the limits are so you can work up from there and build in more safety with higher RPMs or additional fans. It also means under idle/low load you can really drop the noise if you're willing to run warm, not everyone is, but these machines are a decade old already, and pretty cheap to replace really so if you do shorten the lifespan a bit it's not a big deal really. Saying that, I've not killed one through heat yet :-D
 
Been busy testing and fitting fans today so this is in addition to the updates in the original post.
When talking about the SMC target RPMs Vs specs of fans you choose.

Example: I tested a 120mm fan that runs @800RPM at 12V. It's also very tolerant of low voltages and will run happily down to ~280RPM without stalling. Plugged into the intake header on the Mac Pro it runs happily from boot at the default SMC target minimum of 600RPM. Ramp it up and it tops out at 800RPM.

This model fan is VERY quiet and I'm happy leaving a pair of them in one of my single 95W TDP CPU machines but ultimately it's not very flexible for big workloads as it won't ramp up above 800RPM, so you need to make sure the Booster fan inside the CPU heatsink has the capability to make up for any shortfall in compartment flow from the intake and exhaust.

I then tested a 120mm fan that runs @2000rpm at 12V, It's also fairly tolerant of low voltages and runs down to ~500RPM before stalling. So when this is plugged into the intake header it runs from boot at 600RPM, just like the fan above, but this one can ramp all the way up to 2000RPM if needed so is a much better choice for use in the Mac Pro. It also means you can get away with a quieter booster fan in the heatsink as they can all ramp up a bit if needed but under idle and low load conditions will be much quieter than the OEM Apple fans.

I then tested a beast of fan that runs @3000RPM at 12V, but this fan stalls below about 900RPM. So when this is plugged in the SMC gets a bit grumpy and sits constantly pulsing the fan trying to get it to run at 600RPM, which it wont, it just keeps bouncing between 900 and stopped, not ideal! If you set a minimum of 900RPM in your fan control software it runs fine and can still ram to the full 3000RPM if needed. Running at 900RPM is noisier than it could be but is on a par with the OEM Apple fans running at their minimum of 500/600RPM, but with better cooling so a good trade off if you do need the extra airflow but want to keep noise down to OEM minimum levels.

So what this means if you need to take care with your fan choice, the OEM delta fans apple uses are very good quality fans, with a very wide operating range of as low as 500RPM and has high as 4000RPM depending on the fan. You likely won't find many others that have such a wide operating rang using the normal driver methods, this is I suspect why the Apple fans don't use normal control methods as to do that range of RPM on normal 12V is hard.

When choosing your fans you want ones that will run at the minimums the SMC expects without stalling (check fan control software of your choice to confirm values for each fan) but also that run at *high enough* RPM at 12V to meet your cooling needs under your worst case load scenario. For some people the Apple original fans may be the only option, if your machine operates at high ambient and runs for days at full load for example.

For most mortals though the max RPMs of the Apple fans are overkill, I know for a fact that my machines have run for days with the CPUs at 100% and the SMC has only increased the fans a little bit and still maintained adequate cooling (certainly never had any of my machines EVER rev any of the fans over 2000rpm in normal use).

So I've now got one of my single 95W CPU machines running with a pair of extremely quiet 120mm fans, coupled with a very quiet replacement 80mm booster in the CPU heatsink. At idle and low load the fans run at minimum and it is very much quieter than a normal Mac Pro, now just need to do the PSU fan and PCI fans another day but these are pretty quiet anyway, most of the noise source was the CPU compartment intake/exhaust and booster fan before. At moderate load the 120mm fans spin up to 800RPM, still quieter than the OEM fans but more airflow, and the Booster fan spins up to ~900rpm and is still super quiet. At full load the Booster fan ramps all the way up to 1800RPM, temps remain in check and noise levels are still quieter than OEM fans were at the same load.

Will be ordering some more fans to sort PSU and PCI area, and also going to do the intake/exhausts on a couple of my dual CPU machines next week too.

So for me, armed with knowledge of my use case I can choose aftermarket fans that will provde adequate coooling for me yet allow me to enjoy much reduced noise levels.

Bold is my emphasis because the one thing I will not do is make recommendations on specific fans or cooling levels for other peoples environments, I'm not there to measure and observe, and I don't know your workloads so it would be reckless of me to advise.

If you want to replace your own fans then make sure you understand what you're doing ;-)

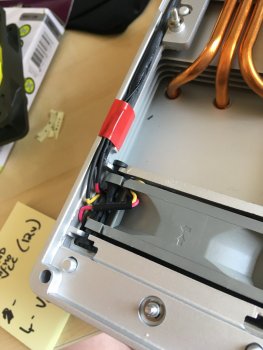
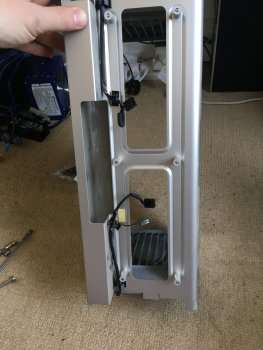
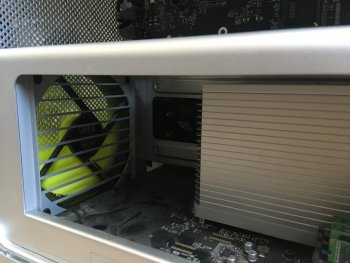
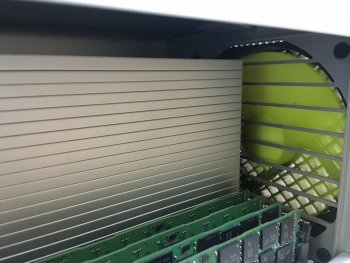
Some images of todays adventures attached.
 

Attachments

  • IMG_6134.jpg
    IMG_6134.jpg
    304.2 KB · Views: 1,853
  • IMG_6148.jpg
    IMG_6148.jpg
    289.2 KB · Views: 1,290
  • IMG_6149.jpg
    IMG_6149.jpg
    289.9 KB · Views: 1,226
  • IMG_6150.jpg
    IMG_6150.jpg
    418.7 KB · Views: 1,277
  • IMG_6151.jpg
    IMG_6151.jpg
    381.7 KB · Views: 1,880
  • IMG_6152.jpg
    IMG_6152.jpg
    373.8 KB · Views: 1,267
Last edited:
I wonder what the analog control voltage output rated power/current is?

I’m interested to know the current draw on the control circuit from the Apple fans. Would not surprise me if the stock fan motor is driven directly by the control voltage and the +12v is used to power the PWM sensor only.
 
I wonder what the analog control voltage output rated power/current is?

I’m interested to know the current draw on the control circuit from the Apple fans. Would not surprise me if the stock fan motor is driven directly by the control voltage and the +12v is used to power the PWM sensor only.

Once my multimeter arrives I’ll confirm.

I can tell you though that the Apple fans will NOT run if you feed power to only the VCC pin. They also won’t run if you feed only the control pin, they need a voltage on both pins to spin, so they clearly need the control circuitry powered in addition to the motor.

This is different to PC PWM fans that will run on just VCC (at Max speed) if the PWM pin is left disconnected.
 
Last edited:
I look forward to suggested products and a full documentation!

As I said above, I'm going to be very wary about recommending products, but what I'm happy to do, and will do, as I work my way through them is report on what RPM range can be achieved with the various fans I have (and more on order) so we can build up a list of known fans and their min-max when used in a Mac Pro. I'll also make some comments about airflow and cooling ability of various setups but I will stop short of recommending an specific configurations.

What this will do is allow people to make an informed decision for their own use case about what fans would work for them and what level of cooling they require.

If anyone else wants to assist me in building such a list then please feel free to PM me if you have questions on how to test as I would love for us to get a decent list together and consistent testing would be great :)
 
  • Like
Reactions: atonaldenim
As I said above, I'm going to be very wary about recommending products, but what I'm happy to do, and will do, as I work my way through them is report on what RPM range can be achieved with the various fans I have (and more on order) so we can build up a list of known fans and their min-max when used in a Mac Pro. I'll also make some comments about airflow and cooling ability of various setups but I will stop short of recommending an specific configurations.

What this will do is allow people to make an informed decision for their own use case about what fans would work for them and what level of cooling they require.

If anyone else wants to assist me in building such a list then please feel free to PM me if you have questions on how to test as I would love for us to get a decent list together and consistent testing would be great :)

Hence why I say "suggested" rather than "recommended". You've outright stated that you have been, and will continue to try different fans for this project. I don't think anyone here expects a comprehensive list or an outright "this is best" statement from you, but a shortlist of working models and their characteristics should allow users to choose from a few known-good options for their specific use case.

Anything on top of that is just gravy. I confess to being surprised that the solution is so simple, even taking into account the minimum requirements for fan operation. You're doing Cthulhu's work, mate - keep it up.
 
  • Like
Reactions: amedias
Hence why I say "suggested" rather than "recommended". You've outright stated that you have been, and will continue to try different fans for this project. I don't think anyone here expects a comprehensive list or an outright "this is best" statement from you, but a shortlist of working models and their characteristics should allow users to choose from a few known-good options for their specific use case.

gotcha 👍

I just know how quickly people can argue given an opinion so trying to make sure I stay on th right side of the fence. I will refrain from recommendations, but yes, 'suggestions' and information on RPM and cooling levels with different models will be a useful resource I think.

I've got a couple more 120mm Noctuas on the way in the post for next week, so will test and report back some more info then, can only afford to buy a few fans a t a time for this or it gets expensive!

One thing I will say is that the two 120mm fans in a 2009-2012 are both the easiest to replace and the ones that can have the most impact on idle and low-load noise levels.

The 2009-2012 Booster fans are next for noise impact, but trickier and more involved to replace, fiddly more than anything, and the ones I would be more inclined to leave unless you really want to get in there and have good candidate fans for replacement. The Apple OEM Deltas do a good job of being 'quiet enough' at idle but having their full RPM/airflow available is handy because they *can* keep the entire CPU/Ram bay in check on their own if necessary.

The PCI fan is the next biggest source of noise and an utter utter bastard to disassemble.

The PSU fan fortunately seems to have very little impact noise wise and in most machines will happily stay at default minimum RPM unless you're really taxing the PSU with a big load and a big GPU. If you do want to replace it it's not difficult but it is time consuming to get to!
 
  • Like
Reactions: RetroDan
Great explanations @amedias thanks!

I have replaced PSU fan and CPU fans the way you explain with 3-pin (swapping method). Fans never stop (Noctua) and the SMC can drive them within a certain RPM range that doesn't extend between Apple original fans' min and max. But it doesn't matter since Noctua fans are very efficient. It's just a cosmetic glitch on software such as Macs Fan Control.
Same to be done with in and exhaust fans.

Unfortunately, as far as the PCI fan is concerned, the plug has 6 pins and I was unable to understand the pinout and the signals of the pins. If you find out, it'll be great!
Nevertheless I managed to unmount it with caution. I had to cut the rubber mounts and replace them when remounting the fan in its enclosure. Ensure you mark the place of the cables and the direction of the fan.
 
Thanks for posting romaric17, glad to hear someone else has had success with the pin-swap method. I'm trying to find a fan with a decent usable RPM range when driven off the Mac Pro control pin, I don't think we'll find one with the full range the OEM fans have but I think for 90%+ of people the full RPM range is unnecessary as I can keep a 2x X5690 machine cool enough under full load with barely 30% of the available output.

I think a fan with 500-2000RPM range would be sufficient to cover all but the most extreme situations, and for some of the fans even up to 1200RPM would be more than sufficient.

For info, I've left one of my 2x 95W TDP machines (dual X5670 2.93GHz) running overnight with CPUs at full load AND Rember running Ram tests and temps have remained within tolerance with intake/exhaust at 500/600RPM, and Booster fans at 900RPM, no issues so far and whisper quiet.

Unfortunately, as far as the PCI fan is concerned, the plug has 6 pins and I was unable to understand the pinout and the signals of the pins. If you find out, it'll be great!

On my to-do list, got the fan out yesterday, will be probing pins and will post pin-out once sorted ;-)
 
Last edited:
I agree, for instance the Noctua fans I use can't spin at as many RPM as original fans but I'm sure they're more efficient as they move more air (and make less noise).
 
I think a fan with 500-2000RPM range would be sufficient to cover all but the most extreme situations, and for some of the ans even up to 1200RPM would be sufficient.

I completely agree; besides, stock volume at 2000RPM is quite noticeable, and at full speed the noise is absolutely interminable! A more modern fan that tops out 6000RPM, like this Maserfaliw, should be able to run much more efficiently and quietly.
 
As an Amazon Associate, MacRumors earns a commission from qualifying purchases made through links in this post.
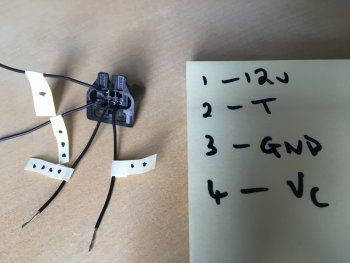
Here you go romaric17 pinout for the 6 pin connector for the PCI fan

There's only 4 pins connected as it's jut the fan in there, the other two pins are empty.

Pic shows connector removed from housing oriented *as you would plug it in to the board* ie: looking from the 'fan' side, not looking into the connector. Just make sure you get orientation matched to pic and it'll be fine. Sorry for weird ordering, it's jut how I labelled them from the fan, but match number of dots for pin number on the post it note.

(top left) = VCC (12V)
(bottom left) = GND
(middle bottom) = V Control
(bottom right) = Sense/Tacho

Of course another option for the PCI fan is to run a splitter off the PSU fan header on the board, and run the PCI fan as a mirror of the PSU fan and just leave it's tacho disconnected.
That will allow you to have a PCI fan idling 500RPM (which is lower than the SMC default of 800RPM), but it will ramp up in response to system load via the PSU monitor (which it does with the SMC anyway...)
 

Attachments

  • IMG_6160.JPG
    IMG_6160.JPG
    304 KB · Views: 1,367
Last edited:
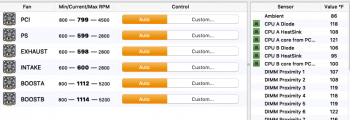
I am so glad I happened upon this thread! You know, I'm not entirely sure if this is the case, but it seems to me that the Boost A and Boost B fans are the most obnoxious of them all. (Actually, that would be my RX 580's cooling fan, but that's obviously not part of the Mac Pro.)

If I do a fan replacement, I would want to make sure that I at least replace the Boost fans and the Intake and Exhaust fans. With the method you described, wherein you simply need a software parameter set to keep the fans from 'pulsating,' is it possible to have the replacement Boost fan(s) run just as efficiently as the stock ones? Seems the stock ones idle at about 1000 and don't go past about 2000. As long as the method ensures they run at at least 1000 (and increase RPM as needed), I am perfectly fine with going ahead and tackling those. Obviously, the Exhaust and Intake are the easiest with which to begin, but they aren't the only fans in the case; and, as mentioned earlier, the CPU fans are—as far as I can tell—the most noticeable ones, even at idle.

On a side note, I wonder which fans will run as close to the stock RPMs as possible, at 12v. I have a 3-pin 80mm BeQuiet! fan in some PC of mine, and I noticed the fan completely stop after I set its mode to 'Silent', in the UEFI. It might have been a one-off thing, as I haven't noticed it happen since; however, it is worth noting that it might not be the correct type of fan to use in a Mac Pro. It seems to idle at about 1300RPM, which already evidently involves the bare minimum of its capacity. That said, even if it might need ~2000RPM to run comfortably, it may very well still be quieter at that RPM than the stock Boost fans are at 1000RPM.
 

Attachments

  • Screen Shot 2020-04-24 at 1.06.24 PM.png
    Screen Shot 2020-04-24 at 1.06.24 PM.png
    77.9 KB · Views: 592
Last edited:
Hello amedias,
Thank you so much for your great write up. One thing I wanted to discuss is the option of replacing/re-using the Apple motor controller. This way, everything would stay the same. Every fan comes with a motor controller chip and a motor in one unit. It should be possible to separate the controller board from the motor and replace just the motor. This way the electrical values would not matter for the original mac pro system, just the motor would be replaced. After all the motor has only two leads, - a simple 12V motor. All you need is to carfully separate it and resolder it, assuming the the motor has roughly the same size/power/miliWatt values.
 
No new fans arrived over the weekend so decided to pent some time over the doing some more thermal testing with a few different CPU trays fitted and at different load levels.

Also spent a productive couple of hours familiarising myself with the SMC interface under Mac OS and Linux so I could better control the fans for testing.

It's quite time consuming disconnecting and reconnecting fans when you want to do tests with some fans disabled etc. Especially as you have to remove the tray to reach two of the connectors so having full software of the fans saves a lot of time as I can fully stop them for testing, and also test and run RPMs lower than the SMC will allow under automatic conditions. Also means easy testing of the fans to find their stall RPM which is handy.

I'm not suggesting you make changes based on my experiments, but reporting here for information so other people can get a feel for what the impact of various changes are.

* DISCLAIMER *

I'm doing things with this testing that I really shouldn't, namely disabling fans and running them at lower RPM while stressing the CPU and system as a whole.

I'm OK with the risks as I understand what I'm doing and am prepared to do naughty things to my machines in the name of finding their limits.


If you want to do similar testing by all means crack on, but understand that if you mess up you could damage components or kill them! YOU HAVE BEEN WARNED.

So on to the testing....

I tend to do most of my thermal testing under Linux rather than Mac OS as the SMC is easier to control under Linux, temperature sensor reporting is also easier and I can do it all on CLI and use my own scripts for testing AND monitoring my tests.

You could do all this under Mac OS as well, but the SMC interface is just that little bit more annoying and abstracted.

A note on GPUs... All my initial tests are done with a single Nvidia GT710 fitted with a passive heatsink. This is a lower performance, very low power card, <20W TDP and under normal idle desktop conditions uses a few Watts only.

Since my initial tests are focused on the CPU compartment I wanted as little additional thermal load as possible so a low power GPU and single SSD were used.

In real world use many people will obviously be using a much more powerful GPU so thermal testing will also be needed on the PSU and PCI compartment but I'll get round to that later! The compartmentalisation of the cMP chassis actually works extremely well with very little thermal transfer between them, the exception is if you have a bunch of spinning disks fitted they *do* pass a fair bit of heat up into the Optical/PSU compartment.


---------------------------------------------------------------------------------------------
The Hardware
(tested this weekend, more configurations will follow)
---------------------------------------------------------------------------------------------

Mac Pro 2009 Chassis 1 (ref: MP1)


Standard Apple setup with the OEM delta fans fitted.

This chassis is used to test the OEM setup, all fans are nice and clean, operating normally and as quiet as they should be, no dodgy bearings etc. so this is my baseline test chassis for cooling and noise

Mac Pro 2009 Chassis 2 (ref: MP2)

Modified setup with replaced fans as follows:

Intake/Exhaust fans - 2x Coolink SWiF2-120 120mm 800*
PSU fan - 1x Coolink SWiF2-120 120mm 800*
PCI area fan - 1x Noctua NF-B9 REDUX 12V 1600

This is a recently modified chassis with some of the quietest and slowest spinning fans around. All the fans will run at a minimum of 350RPM before stalling, and the Coolinks will run stable at 200RPM!

* This is a nice fan, but not a great choice for the Mac Pro, more on that later...

Mac Pro 2009 Chassis 3 (ref: MP3)

Modified setup with replaced fans as follows:

Intake/Exhaust fans - 2x Noctua NF-S12B REDUX 12V 1200
PSU fan - 1x Noctua NF-S12B REDUX 12V 1200
PCI area fan - 1x Noctua NF-B9 REDUX 12V 1600

This is a recently modified chassis with some of the quietest and slowest spinning fans around. All the fans will run at a minimum of 350RPM before stalling.


Mac Pro 2009 Single CPU Tray 1 (ref: TS1)

1x L5640 2.26Ghz 6 Core @60W TDP
1x16 GB Dimm

This is an unusual config, but one I've used before and is a great test tray for low power/thermal load testing.
I've used this setup for 24x7 machines that perform various server duties but don't need a lot of power. Running the L series 60W TDP CPU keeps the power utilisation and temperature down. I normally run these trays with a full 4 Dimm 32GB or 64GB setup but for testing reduced it to 1 Dimm for minimal heat. You could even go down to a quad core L5630 to reduce the TDP to 40W but in my testing the power draw and heat generated is almost identical for these two CPUs under normal use, so you might as well have the extra 2 cores.

Mac Pro 2009 Single CPU Tray 2 (ref: TS2)

1x X5677 4 Core @130W TDP
4x16GB Dimms

This is my 'hot' single CPU test tray using a 130W TDP CPU and 4 Dims. I chose the X5677 over the X5690 as in my own testing it appears to be able to hold it's max boost clock for longer, and under higher temps that the X5690, so for single thread and lightly threaded workload its performance can be better when running hot. Basically the X5690 starts to throttle or drop back to default clock sooner than the X5677 when running hot so if your goal is good single core/lightly threaded speed at low noise then this setup works a treat.

For the two single trays I had two heatsink options to play with as well

Single CPU Heatsink 1 (ref: HS1)

1x 80mm Apple OEM Delta fan

This is the original setup from Apple, one big heatsink, overlapping the North Bridge and using an OEM Delta fan that can run at very high RPM if needed.

Single CPU Heatsink 1 (ref: HS2)

1x 80mm Noctua NF-R8 REDUX 12V 1800

On this heatinsk I replaced the original fan with an aftermarket Noctua. This fan can spin up to 1800RPM so is not as powerful as the OEM Delta fan, but under my own testing I've never really seen a single CPU Mac Pro spin the Boost fan over 2000RPM even under the worst loads with a 130W TDP CPU so I was curious to see how this fan would perform.


Mac Pro 2009 Dual CPU Tray 1 (ref: TD1)

2x L5630 2.16Ghz 4 Core @40W TDP (each) fitted with 2x 60mm Apple OEM Delta fans
4x16GB Dimms

This tray is another unusual config, but one I've used before with success. It uses a pair of L series CPUS, the fastest ones available @40W TDP so this tray provides low power but allows use of the full 128GB Ram capability. It still hase 8 cores and 16 threads available so is useful for concurrent, high memory workloads that don't need high single core speed.

It's an interesting setup to test as the entire CPU TDP for the tray is only 80W, and each CPU is only 40W and there's two heatsinks and fans to keep the whole lot cool so this can potentially be a VERY low noise setup, and in some cases quieter than a single CPU tray.

Mac Pro 2009 Dual CPU Tray 2 (ref: TD2)

2x X5670 2.93Ghz 6 Core @95W TDP (each) fitted with 2x 60mm Apple OEM Delta fans
8x16GB Dimms

This tray is representative of a fairly powerful 12 core setup that might have been supplied by Apple. a pair of 95W TDP CPUs and 8 Dimms is going to generate a fair bit of heat, it could be worse, you might have a pair of 130W TDP CPUs but this tray is my 'hot' test tray for real world use.

I'm still waiting for some more fans to arrive so dual trays were still fitted withe OEM Apple fans,


---------------------------------------------------------------------------------------------
The Fan Profiles

---------------------------------------------------------------------------------------------

Profile 1
- Automatic SMC control
All fans managed by SMC, no user intervention

Profile 2 - SMC Minimum
All fans *manually locked* to whatever the SMC reports the minimum for the fan is (details below), this is NOT advised as it means when things get hot the SMC cannot respond and increase RPMs, depending on your CPUs and amount of Dimms this may or may not get you into an overheat situation.

PSU - sMIN (500RPM)
PCI - sMIN (800RPM)
INTAKE - sMIN (600RPM)
EXHAUST - sMIN (500RPM)
BOOST (single) - sMIN (600RPM)
BOOSTA (dual tray) - sMIN (600RPM)
BOOSTB (dual tray) - sMIN (600RPM)

Profile 3 - Actual Minimum
All fans *manually locked* to the minimum RPM the fan will spin at. This is fan dependant, the Apple OEM fans are little less tolerant of very low RPMs than the aftermarket ones. This is definitely NOT advised as it's even less airflow than Profile 2, but you might be surprised by the results!

PSU - aMIN
PCI - aMIN
INTAKE - aMIN
EXHAUST - aMIN
BOOST(s) - aMIN

Profile 4 - Stupid
In this profile some fans are locked at the SMC minimums, and others are left on auto. This allows some response from the SMC while allowing reduced noise. Depending on your hardware you might actually get away with this in real world use.

PSU - AUTO
PCI - sMIN (800RPM)
INTAKE - sMIN (600RPM)
EXHAUST - sMIN (500RPM)
BOOST(s)- AUTO

Profile 5 - Stupider
I this profile some fans are locked at the actual minimums, and others on auto, it's a slightly more risky version of profile 5 but depending on your hardware it can work...

PSU - AUTO
PCI - aMIN
INTAKE - aMIN
EXHAUST - aMIN
BOOST(s)- AUTO

Profile 6 - Crazy
In this profile some fans are disabled and others on auto, it's an even riskier setup and only useful for very specific hardware and use cases, but can be 100% safe for certain setups.

PSU - AUTO
PCI - OFF
INTAKE - OFF
EXHAUST - AUTO
BOOST(s)- AUTO

Profile 7 - Daredevil
This profile basically removes all case airflow (except for the PSU) and leaves your CPU at the mercy of the BOOST fans only. Depending on your hardware at idle this can amazingly actually be a viable profile! With some CPU setups it can handle the loaded scenario too but a blended setup like one of the above will normally give better overall acoustics as it'll be quieter under load and acceptably quiet at idle with some of the other fans also in use.

PSU - sMIN
PCI - OFF
INTAKE - OFF
EXHAUST - OFF
BOOST(s) - AUTO

* Profile 2 and 3 pretty quickly showed me that the PSU was in danger of overheating if run at anything below the SMC minimum so all further profiles were left with PSU fan on auto. This fan is actually pretty quiet and under normal conditions doesn't spin up much unless you have a big GPU drawing a lot of power.

---------------------------------------------------------------------------------------------
The Tests
---------------------------------------------------------------------------------------------


So as you can see I have a number of permutations available to test as I wanted to see various outcomes.
I did a number of tests including:

Test 1 - stable idle test where the machine is just left on but not doing anything to see how what temps it stabilises at with various fans and fan RPMs.

Test 2 - half CPU load test where the machine is run at 50% CPU load using threads/2 instances of 'yes*'

Test 3 - full CPU load test where the machines is run at 100% CPU load using as many instances of 'yes' as there are CPU threads

Test 4 - full CPU and ram test where the machine is run at 100% CPU and memtester is run on a loop to get the ram toasty too.

While the tests are running I also run real-time monitoring of the clock frequency to see what boost clock it's running at on each core, this allows me to see how the CPU is holding up to the thermal stress as if it starts getting too hot then the clock will drop closer to base, and if it starts to overheat it will start thermal throttling to below base clock to prevent CPU damage.

*'yes' is not a CPU performance test, but it does occupy a CPU and is good for thermal loading as it will run the CPU at full utilisation and get it hot! And of course running instances = threads is a little unfair as the 'half load' test is not half at all as it will still load all the 'real' cores, but it's a useful standardised test for this purpose.

My test procedure was as follows:

1. Fit tray to chassis and boot to OS
2. Choose fan profile
3. Leave machine idle for ~30mins to stabilise and note temps, RPMs and a subjective nose level
4. Run half CPU load test, leave it running until stabilised + 30mins and note temps, RPMs and a subjective nose level
5. Stop test and wait for return to idle stable state
6. Run full CPU load test, leave it running until stabilised + 30minsand note temps, RPMs and a subjective nose level
7. Stop test and wait for return to idle stable state
8. Run full CPU & Ram test, leave it running until stabilised + 30mins and note temps, RPMs and a subjective nose level
9. Stop test and wait for return to idle stable state

*If at any point it looks like temps are getting out of control and dangerous I manually stop the test. If I had to stop the test it is noted in the results. Worth noting that I'm pretty relaxed here and will happily run the components up to temps that most people would panic at, but for the purposes of testing it's useful to go right to the limit ;-)


Summary

It is worth remembering that not everyone uses their computer in the same way. Heck, I even have several cMP's configured for different tasks and they're notably different in configuration.

Some people need a lot of raw CPU power and the GPU is just there to display a 2D desktop
Some people need a huge GPU and the CPUs is basically just there to keep the OS ticking over
Some people need CPU and GPU power
Some people need a single small SSD, others need 6 big HDDs all spinning at the same time

Your requirements will dictate where the heat is generated, and what level of cooling you need, just like your ears will dictate what level of noise you're happy to put up with!

You need to fully understand your use case and environment before you start messing around with the cooling in a cMP. The default OEM cooling setup is very capable, much more capable than a lot of people need, and for those use cases you can modify the OEM setup to get a quieter and still safe setup but you'll need to tune both the hardware and the software to your requirements.

If you're in any doubt then don't mess with it and let the SMC and Apple's fans handle everything.
If you're happy to meddle then crack on :-D


I'll update the thread later with the actual results of my testing this weekend as I need to go do something else now and it'll take a while to type out!
 
Last edited:
Update - Some more fans arrived yesterday a pair of Noctua NF-S12B REDUX 12V 1200 so I've fitted them to a 3rd Mac Pro Chassis (added to list above) for testing later. Also got a pair of Coolink SWiF2-12P 120mm on the way.

I've also ordered some more spare CPUs for some additional permutation testing.

X5672 - This is an interesting little quad core, *almost* as fast as a X5677/X5690 for single/lightly threaded workloads as it will boost to 3.6Ghz and has a max TDP of 95W so you can get ~95% performance with a 35W reduction in TDP, I think this could provide a very quiet Single CPU setup with decent performance for a very low price.

I'll be comparing this against an X5675, also a 95W TDP but 6 core and slightly lower clock. Curious how the difference in core count and clock will manifest at the same TDP in terms of cooling. I already know a single X5670 is easy to keep cool and fairly quiet.

I'll also pull on of the dual X5690 trays out of my other machines to test that at some point for 'worst case scenario' test.

Also playing around with more fan profiles tuned for each setup with some additional watch scripts to check temps and automatically flip between fan profiles (under MacOS and Linux). Some fan control can be achieved with Macs Fan Control, smcFanControl or iStat Menus, but not quite all of it, they all have minor caveats:

- Macs Fan Control only lets you set fan speed temp thresholds on a single sensor, ie: you cant make a particular fan spin up based on both CPU temp OR NB temp readings. And the non pro version doesn;t support ultiple profiles or swapping between them based on temp
- smc Fan Control allows you to set manual speeds and multiple profiles, but then has no way to change between them automatically based on temp
- iStat Menus has good profile and auto temp swapping options, but can't manually lock an RPM, the SMC will always take over. That also means you can't override the linking between BOOSTA and BOOSTB and the EXHAUST fans.

And None of them (quite rightly for consumer software) will let you set speeds below Apple SMC defaults or to turn fans off, hence I'm using my own scripts with more direct control.
 
  • Like
Reactions: Dishe and ctrlzone
Subscribed to this thread. Recently my 5,1 exhausted fan always noisy on lower fan speed because of rattling bearing, still running fine but rattle noise was unpleasant. Currently, I set intake fan running higher speed between 1200~1500 rpm to make rattle noise caused by exhausted fan swallowed by running air sound from intake fan. That sound are more pleasant, but that just temporary solution.
Have you tried TGPro? It allows for full fan control, bypassing the SMC. I use it on all my desktops.

This is interesting. Thank you for pointing out. I have hackintosh mimicking Mac Pro inside 5,1 enclosure. That software are able to control generic sensor which is game changer for hackintosh, because hackintosh haven’t valid sensor name.
 
Register on MacRumors! This sidebar will go away, and you'll see fewer ads.