After participating on a few threads about these modifications, I finally decided to post my own...
As a big fan of the iMac G4, I’ve always wanted to have my own modified one…
I bought my first iMac G4 in 2011, a 15", still in use to display photographs in my living room.
I begun my first mod in 2019, and I chose to include a 2009 Mini. The most interesting Mini with the first form factor : a core2duo and a 9400M from Nvidia.
I did the mod on a 17" iMac. I also bought a 20", but it is too heavy, and I did not want to do all the work again.
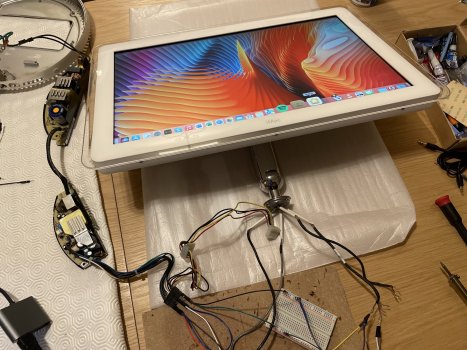
First choice : to keep the original screen. Not perfect, but really easier...
This is how I positioned the Mini, without the aluminum case, and with the Power Adapter on the original place of the HDD (I cut and solder the cable to reduce the needed space).

To plug the power adapter, I just cut a cable and connect the extremities on the black sector cables.
I also kept the bracket of the DVD Drive to segment the inside, but I cut the extremities.
I kept the original power supply of the iMac to provide 12V for the screen, and 5v with a 12v to 5v converter.
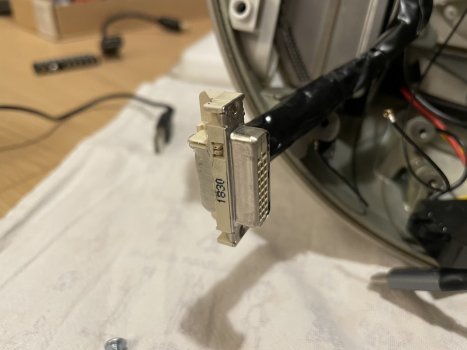
For the display connector, I followed Dremel Junkie instructions, but used a DVI female and I plugged each pin on the original cable in it. It is very simple, does not need soldering, and it can be disassemble.

This is how it looked like from behind, I closed the unused I/O, and I built a custom connector for the Pro Speakers from a USB port. I added a tiny Class D amplifier inside for the speakers.

It was already a huge improvement from the original G4, but it was not perfect : quite loudy at full CPU load or bad wifi reception (the antennas were inside the dome).

In 2020, I had an opportunity to buy a very cheap 2014 Mini.
It was the lower end, with a small i5 @1.4 Ghz, 4GB of ram and a HDD.
First thing, I replaced the HDD by a SSD…
This is my first inside arrangement, not perfect, I was worried to break the disk connector, and the antennas were still not well placed.

The Power Adapter is still placed at the upper space, where the HDD of the G4 was. The wires are just long enough to reach the motherboard.
I decided to replace the antennas, and to place them between the metallic dome and the white plastic dome. —> Really better reception !

Then, I decided to use an original motherboard.
I had to cut it, and i suppressed the inside of the USB ports.I only kept the metallic surrounding. The idea was to use USB 3 extender, and to keep only the inside of the ports (the blue plastic piece), and to place them on the original surrounding.

Really risky, because I broke one of the 3 ports on the motherboard. I had to use epoxy putty to glue the cables.


For the other connectors, I found on the internet on which welding point I had to solder my cables for the Ethernet, jack out and Pro Speakers connector.
I soldered a piece of a cut ethernet cable. This was also quite tricky ! Had to be very precise with the soldering iron.

Finally, this is what it looks like

And this is my 15" not modded SunFlower...

Of course, FireWire, modem and display connectors are not working.
I also added a USB2 hub for :
. Power the original fan at the top of the dome modified with a USB male port ;
. A USB sound card for two purposes :
-Plug the amplifier, to be able to switch between the built in speaker and the Apple Pro Speakers
-Plug a jack wired with the cables of the mic on the screen.
. Power the HDMI Splitter (see below)
I bought a SATA extender to avoid to break the disk connector. and the SSD was placed on the bottom case.

I added a HDMI splitter, allowing to display Netflix or Prime Video. The splitter breaks the HDCP protection.

And finally, I bought an AC to 5v DC to supply power for the Class D amplifier. And because I used a Y cable to plug the 3.5 jack out and the amplifier to the USB sound card, I’m able to use the Apple Pro Speakers with an external jack source even when the iMac is off…

It really is a long lasting project. I opened and closed the iMac so many times, did mistakes and did and undid lots of things… But I’m quite proud of the result !
As a big fan of the iMac G4, I’ve always wanted to have my own modified one…
I bought my first iMac G4 in 2011, a 15", still in use to display photographs in my living room.
I begun my first mod in 2019, and I chose to include a 2009 Mini. The most interesting Mini with the first form factor : a core2duo and a 9400M from Nvidia.
I did the mod on a 17" iMac. I also bought a 20", but it is too heavy, and I did not want to do all the work again.
First choice : to keep the original screen. Not perfect, but really easier...
This is how I positioned the Mini, without the aluminum case, and with the Power Adapter on the original place of the HDD (I cut and solder the cable to reduce the needed space).
To plug the power adapter, I just cut a cable and connect the extremities on the black sector cables.
I also kept the bracket of the DVD Drive to segment the inside, but I cut the extremities.
I kept the original power supply of the iMac to provide 12V for the screen, and 5v with a 12v to 5v converter.
For the display connector, I followed Dremel Junkie instructions, but used a DVI female and I plugged each pin on the original cable in it. It is very simple, does not need soldering, and it can be disassemble.
This is how it looked like from behind, I closed the unused I/O, and I built a custom connector for the Pro Speakers from a USB port. I added a tiny Class D amplifier inside for the speakers.
It was already a huge improvement from the original G4, but it was not perfect : quite loudy at full CPU load or bad wifi reception (the antennas were inside the dome).
In 2020, I had an opportunity to buy a very cheap 2014 Mini.
It was the lower end, with a small i5 @1.4 Ghz, 4GB of ram and a HDD.
First thing, I replaced the HDD by a SSD…
This is my first inside arrangement, not perfect, I was worried to break the disk connector, and the antennas were still not well placed.
The Power Adapter is still placed at the upper space, where the HDD of the G4 was. The wires are just long enough to reach the motherboard.
I decided to replace the antennas, and to place them between the metallic dome and the white plastic dome. —> Really better reception !
Then, I decided to use an original motherboard.
I had to cut it, and i suppressed the inside of the USB ports.I only kept the metallic surrounding. The idea was to use USB 3 extender, and to keep only the inside of the ports (the blue plastic piece), and to place them on the original surrounding.
Really risky, because I broke one of the 3 ports on the motherboard. I had to use epoxy putty to glue the cables.
For the other connectors, I found on the internet on which welding point I had to solder my cables for the Ethernet, jack out and Pro Speakers connector.
I soldered a piece of a cut ethernet cable. This was also quite tricky ! Had to be very precise with the soldering iron.
Finally, this is what it looks like
And this is my 15" not modded SunFlower...
Of course, FireWire, modem and display connectors are not working.
I also added a USB2 hub for :
. Power the original fan at the top of the dome modified with a USB male port ;
. A USB sound card for two purposes :
-Plug the amplifier, to be able to switch between the built in speaker and the Apple Pro Speakers
-Plug a jack wired with the cables of the mic on the screen.
. Power the HDMI Splitter (see below)
I bought a SATA extender to avoid to break the disk connector. and the SSD was placed on the bottom case.
I added a HDMI splitter, allowing to display Netflix or Prime Video. The splitter breaks the HDCP protection.
And finally, I bought an AC to 5v DC to supply power for the Class D amplifier. And because I used a Y cable to plug the 3.5 jack out and the amplifier to the USB sound card, I’m able to use the Apple Pro Speakers with an external jack source even when the iMac is off…
It really is a long lasting project. I opened and closed the iMac so many times, did mistakes and did and undid lots of things… But I’m quite proud of the result !


