I've been tempted for a while and after reading through most of the available info I finally found the courage to upgrade the CPUs of my slowly aging 2009 MP. Apple isn't exactly inspiring when it comes to announcing new MP models so I thought I might as well give it a go and build my own faster MP. Thankfully, a good friend with some PC build experience volunteered to help out. The model to be upgraded was a 2009 MP 4,1 2x2.26 Ghz. I went for the W5590 (4x3.33GHz) because they currently offer the most bang for buck in my view. Going higher for eg a 5690 (six core) would have been possible as well but in my opinion it's too costly for such an old rig.
There already is quite some information out there on this and similar upgrades, most importantly the pioneering work by by gugucom and anandtech. But I thought another experience report could still be useful. Anyway, let's go:
Material
2xW5590
Arctic Silver 5
Arctic cleaning liquid set (1+2)
optical tissues
3mm hex wench
10x10cm thermal pad, 2mm thickness
First, we started by taking out the heatsink and CPU B along with all the RAM modules in slots 5-8. One needs to be a little careful here as the CPU could stick to the HS as it did in our case and you don't want it to fall off on your mainboard (Fig 2 with old CPU still attached to the HS).
It's also a good idea at this stage to get a feeling for the pressure/strength needed to loosen the screws with the 3mm hex wench. This is important later on when putting everything back in. It took about 5-6 turns, one turn per screw at a time in a cross-like way to make sure the whole thing comes off evenly.
We then put the CPU tray back in to the MP to check if the MP would still startup with just CPU A (still the old one) and its HS. It started up as expected and after about 30-60sec the MP fan would go into overdrive making quite some noise. Again, this has been mentioned before, so no worries. After shuting down the MP we removed CPU A, HS and all remaining RAM modules.
Preparation of Heatsinks
We cleaned the copper contact area of the HS with the Arctiv Cleaner products and applied a thin layer of Arctic Silver 5 with an old credit card. Please see the Arctic Silver website for all details about using their products. On one side of the HS there is a narrow strip (pink, sorry no picture) of thermal pad which we removed and replaced with a thicker one of 2 mm.
The W5590 CPUs are lidded with an IHS whereas the original ones used by Apple are lidless making the W5590 about 1.7mm thicker (see again gugucom thread). A 2 mm thermal pad which can be compressed to 1 mm felt like the right choice to replace the original thinner one.
Preparation of CPUs
We cleaned CPU A and carefully placed it in the socket. Thankfully, there's only one way to put it in the socket.
Putting back the heatsinks
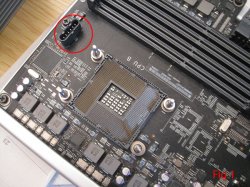
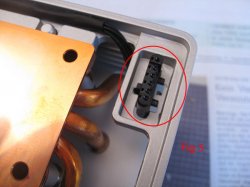
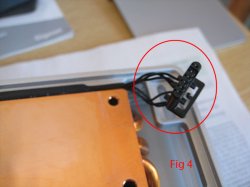
On the outer sides of both heatsinks there is a male plug which connects the temp regulation and fans to the mainboard (Fig 2&3 for HS male part of connector, Fig 1 for female counterpart on mainboard). According to some threads, the two parts of the connector may not properly reconnect once the heatsink is reinstalled due to the thicker CPU with IHS. As a result the fans would go crazy or not fire up at all. We therefore decided to take the connectors out of the small aluminium frame in the corner of the heatsink to facilitate the later reconnection (Fig 4). This was not a good idea...
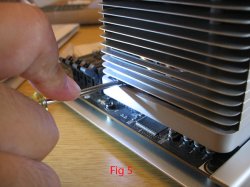
When we tried to put the HS back, the loosened male connector (or the cables) would get into the way even when properly connected making it impossible to properly place the HS over the CPU socket. So it was all back with the HS connector into the original configuration (Fig 3). We then put back the HS on CPU A which still required some fiddling with the connector to help it find its place. A second pair of hands was really helpful at this stage. We also applied some downwards pressure on the connector from the outside of the HS with the help of a small screwdriver (Fig 5) to make sure it connects properly. This is best done when the HS is already tightened to the mainboard to avoid any movements of the HS, not like we did it.
We then tightened the 4 screws of the HS very carefully, one turn per screw at a time, about 4 turns per screw in total, again in a cross-like fashion. After putting back the CPU in the MP (with only the new CPU A and socket B empty) and starting up the MP...nothing, no chime, no joy...
The white LED of the power up button was blinking and nothing much else was happening. After overcoming a slight panic attack on my side we pulled the tray back out and after giving each screw another turn the MP started up!! Never been so happy to hear the startup chime before!
The number of turns required for reattaching the HS will probably vary from case to case so I think the best advice is to apply about as much pressure when tightening the screws as when loosening the screws at the beginning.
The second CPU went much easier and everything worked the 1st time round. The temperatures after some intitial stress testing seem ok, around 50-60°, similar to what it was before. The CPU fans, however, are working a bit harder, at around 1700-1800 RPM.
Cost of upgrade
2xW5590 (ebay) USD 565
Arctic Silver 5 cleaning liquid set (1+2) CHF 24
3mm hex wench CHF 3
10x10cm thermal pad, 2mm thickness: Euro 20
import duties Switzerland CHF 30
Total ca CHF 600 CHF
Benchmarks
Most important for me since I do a lot of rendering is Cinebench CPU which went from 8 to 11.7 which almost equals to a 50% performance increase. I got a similar increase with Geeekbench from 12390 to 17740. And even Cinebench OpenGL went from 24.3 to 32.1 (on a GTX 570) showing once again that it's not a very sensitive tool for measuring OpenGL performance.
It took as about 2 hours in total for the whole surgery. I guess that's a bit on the long side compared to other reports but we took it really really carefully and step by step. Anyway I'm now a proud and happy owner of an 3.33 Ghz MP 4,1 Octo!
There already is quite some information out there on this and similar upgrades, most importantly the pioneering work by by gugucom and anandtech. But I thought another experience report could still be useful. Anyway, let's go:
Material
2xW5590
Arctic Silver 5
Arctic cleaning liquid set (1+2)
optical tissues
3mm hex wench
10x10cm thermal pad, 2mm thickness
First, we started by taking out the heatsink and CPU B along with all the RAM modules in slots 5-8. One needs to be a little careful here as the CPU could stick to the HS as it did in our case and you don't want it to fall off on your mainboard (Fig 2 with old CPU still attached to the HS).
It's also a good idea at this stage to get a feeling for the pressure/strength needed to loosen the screws with the 3mm hex wench. This is important later on when putting everything back in. It took about 5-6 turns, one turn per screw at a time in a cross-like way to make sure the whole thing comes off evenly.
We then put the CPU tray back in to the MP to check if the MP would still startup with just CPU A (still the old one) and its HS. It started up as expected and after about 30-60sec the MP fan would go into overdrive making quite some noise. Again, this has been mentioned before, so no worries. After shuting down the MP we removed CPU A, HS and all remaining RAM modules.
Preparation of Heatsinks
We cleaned the copper contact area of the HS with the Arctiv Cleaner products and applied a thin layer of Arctic Silver 5 with an old credit card. Please see the Arctic Silver website for all details about using their products. On one side of the HS there is a narrow strip (pink, sorry no picture) of thermal pad which we removed and replaced with a thicker one of 2 mm.
The W5590 CPUs are lidded with an IHS whereas the original ones used by Apple are lidless making the W5590 about 1.7mm thicker (see again gugucom thread). A 2 mm thermal pad which can be compressed to 1 mm felt like the right choice to replace the original thinner one.
Preparation of CPUs
We cleaned CPU A and carefully placed it in the socket. Thankfully, there's only one way to put it in the socket.
Putting back the heatsinks
On the outer sides of both heatsinks there is a male plug which connects the temp regulation and fans to the mainboard (Fig 2&3 for HS male part of connector, Fig 1 for female counterpart on mainboard). According to some threads, the two parts of the connector may not properly reconnect once the heatsink is reinstalled due to the thicker CPU with IHS. As a result the fans would go crazy or not fire up at all. We therefore decided to take the connectors out of the small aluminium frame in the corner of the heatsink to facilitate the later reconnection (Fig 4). This was not a good idea...
When we tried to put the HS back, the loosened male connector (or the cables) would get into the way even when properly connected making it impossible to properly place the HS over the CPU socket. So it was all back with the HS connector into the original configuration (Fig 3). We then put back the HS on CPU A which still required some fiddling with the connector to help it find its place. A second pair of hands was really helpful at this stage. We also applied some downwards pressure on the connector from the outside of the HS with the help of a small screwdriver (Fig 5) to make sure it connects properly. This is best done when the HS is already tightened to the mainboard to avoid any movements of the HS, not like we did it.
We then tightened the 4 screws of the HS very carefully, one turn per screw at a time, about 4 turns per screw in total, again in a cross-like fashion. After putting back the CPU in the MP (with only the new CPU A and socket B empty) and starting up the MP...nothing, no chime, no joy...
The white LED of the power up button was blinking and nothing much else was happening. After overcoming a slight panic attack on my side we pulled the tray back out and after giving each screw another turn the MP started up!! Never been so happy to hear the startup chime before!
The number of turns required for reattaching the HS will probably vary from case to case so I think the best advice is to apply about as much pressure when tightening the screws as when loosening the screws at the beginning.
The second CPU went much easier and everything worked the 1st time round. The temperatures after some intitial stress testing seem ok, around 50-60°, similar to what it was before. The CPU fans, however, are working a bit harder, at around 1700-1800 RPM.
Cost of upgrade
2xW5590 (ebay) USD 565
Arctic Silver 5 cleaning liquid set (1+2) CHF 24
3mm hex wench CHF 3
10x10cm thermal pad, 2mm thickness: Euro 20
import duties Switzerland CHF 30
Total ca CHF 600 CHF
Benchmarks
Most important for me since I do a lot of rendering is Cinebench CPU which went from 8 to 11.7 which almost equals to a 50% performance increase. I got a similar increase with Geeekbench from 12390 to 17740. And even Cinebench OpenGL went from 24.3 to 32.1 (on a GTX 570) showing once again that it's not a very sensitive tool for measuring OpenGL performance.
It took as about 2 hours in total for the whole surgery. I guess that's a bit on the long side compared to other reports but we took it really really carefully and step by step. Anyway I'm now a proud and happy owner of an 3.33 Ghz MP 4,1 Octo!