I made this post because despite the presumed simplicity of the task, it wasn't easy getting everything together, making sure I had the right parts, making things fit without knocking out big bits of case and/or slicing off digits in the process. Following these instructions, it's a 2/5 on the difficulty scale. Maybe even a little less. Without these instructions, it's a frustrating bitch of a chore. Hope this helps everyone else.
Pre-requisites for these instructions; must be a 2009-2010 Mac Pro with only 1 optical drive. If you have more than one optical drive, you'll need to remove the second one (bottom bay). You're also going to need tin snips for modifying the internal frame of the Mac Pro case lid.
PARTS LIST
1. You're going to need to buy the ATI Radeon 5870 graphics cards from Apple or a reseller. I purchased x2 from Apple using my Apple OS developer's discount to save a few bucks. Total cost for x2 cards was $808.
http://store.apple.com/us/product/MC743ZM/A?mco=MTY3ODQ5OTY
2. You'll also need a 5.25" power supply to power the second card as each of the 5870's require x2 of the 6-pin 12V plugs. This is the one I purchased:
http://www.newegg.com/Product/Produ...1044&cm_re=modular_psu-_-17-101-044-_-Product
3. Next, you need a SATA power adapter to go from SATA to 4-pin molex. This is necessary to switch the 5.25" PSU on and off, as you turn on and off your Mac Pro using the main power switch. Without it, the PSU will not self-start.
http://www.newegg.com/Product/Produ...+and+gender+changers-_-Nippon+Labs-_-12816038
4. For CrossFire under Windows (I'd recommend Windows 7 and Boot Camp for dual booting between the Apple OS X and Windows PC environment), you'll also need to get the CrossFire bridge:
http://www.amazon.com/HIS-CrossFire...1?ie=UTF8&s=electronics&qid=1217047612&sr=8-1
5. Beg, borrow or buy tin snips for modifying the internal frame of the case lid.
http://www.amazon.com/Bostitch-14-255-10-Inch-Aviation-Straight/dp/B003HGH462/
6. Finally, you'll want a SATA splitter to allow that 4-pin Molex to SATA cable enough length to connect back to the Mac Pro SATA cable assembly.
http://www.newegg.com/Product/Produ...68&cm_re=sata_splitter-_-12-200-468-_-Product
STEP BY STEP ASSEMBLY
Once you have all of the pieces and you're ready to assemble, follow these steps;-
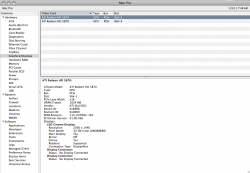
CrossFire works natively in Windows 7. No additional hacking required. Just install the latest ATI drivers and you're good-to-go. On the Mac side, utilizing a separate graphics card for each monitor, particularly when pushing 2560x1440 with the Apple LED 27" or Cinema Displays, you'll save a lot of overhead and get much stronger performance out of apps like Photoshop and After Effects. Anything GPU rendering in general will be much faster. I did not run prior benchmarks, but there is a big difference upgrading from my single 4770 to these dual 5870s. Good improvement.
TOTAL UPGRADE COST
Approximately $830 w/ ADC, $920 w/o ADC
Pre-requisites for these instructions; must be a 2009-2010 Mac Pro with only 1 optical drive. If you have more than one optical drive, you'll need to remove the second one (bottom bay). You're also going to need tin snips for modifying the internal frame of the Mac Pro case lid.
PARTS LIST
1. You're going to need to buy the ATI Radeon 5870 graphics cards from Apple or a reseller. I purchased x2 from Apple using my Apple OS developer's discount to save a few bucks. Total cost for x2 cards was $808.
http://store.apple.com/us/product/MC743ZM/A?mco=MTY3ODQ5OTY
2. You'll also need a 5.25" power supply to power the second card as each of the 5870's require x2 of the 6-pin 12V plugs. This is the one I purchased:
http://www.newegg.com/Product/Produ...1044&cm_re=modular_psu-_-17-101-044-_-Product
3. Next, you need a SATA power adapter to go from SATA to 4-pin molex. This is necessary to switch the 5.25" PSU on and off, as you turn on and off your Mac Pro using the main power switch. Without it, the PSU will not self-start.
http://www.newegg.com/Product/Produ...+and+gender+changers-_-Nippon+Labs-_-12816038
4. For CrossFire under Windows (I'd recommend Windows 7 and Boot Camp for dual booting between the Apple OS X and Windows PC environment), you'll also need to get the CrossFire bridge:
http://www.amazon.com/HIS-CrossFire...1?ie=UTF8&s=electronics&qid=1217047612&sr=8-1
5. Beg, borrow or buy tin snips for modifying the internal frame of the case lid.
http://www.amazon.com/Bostitch-14-255-10-Inch-Aviation-Straight/dp/B003HGH462/
6. Finally, you'll want a SATA splitter to allow that 4-pin Molex to SATA cable enough length to connect back to the Mac Pro SATA cable assembly.
http://www.newegg.com/Product/Produ...68&cm_re=sata_splitter-_-12-200-468-_-Product
STEP BY STEP ASSEMBLY
Once you have all of the pieces and you're ready to assemble, follow these steps;-
- Remove the side door of your Mac Pro
- Unplug x2 6-pin power cables from your existing graphics card. Slide the graphics card fan to the left to release the card. Unscrew the PCI slot guide frame (two screws). Reach past your graphics card and gently depress the graphics card release bar. Pull the graphics card towards you to remove it.
- With consistent pressure, pull on the optical drive bay chasis to remove it from the case. When the chasis has been pulled approximately 2" away from the case, reach around to the back of the optical drive and gently remove the SATA connection cable.
- If you have two optical drives installed, you will need to remove the 4 screws holding the bottom drive in place and then slide the drive out face first.
- Unpack your 5.25" PSU and find the two 6-pin 12V graphics card cables that connect to the black plugs. Slide the PSU into the optical drive chasis butt first. Do not screw in the PSU as the front-end heat sink is too large to fit inside the Mac Pro case, if aligned by screws. Instead, the PSU will need to securely "float" within the chasis.
- Align the PSU's face to be approximately 1/16" from the end of the chasis. Very snug fit to get these pieces together. You'll need to squeeze the PSU's face against the optical drive sliding door, while still allowing enough room for the required plugs in the rear.
- From the back, connect the 6-pin 12V graphics card cables to the PSU. Also connect the SATA to 4-pin Molex adapter and then connect the SATA power splitter to that and the other end of the SATA power splitter to the second slow of the existing Mac Pro SATA cable. Go ahead and snap off one side of the SATA splitter cable lock to make the fit. Just push hard with your thumb and it will easily pop.
- Fish the PSU power cable connect through the top PCI slot at the rear of the Mac Pro case. Guide the PSU power cable up to the PSU.
- Reconnect the optical drive SATA cable and then slide the combined chasis with optical drive and PSU back into the case. This is very snug and requires a bit of consistent but forceful pressure. There are half-sunk guide screws on the floor underneath the chasis carriage that help to align things but in general, you're going to be pushing and squeezing quite a bit here to make things fit. Be mindful of not breaking the Mac Pro SATA cable.
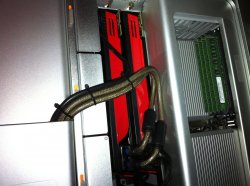
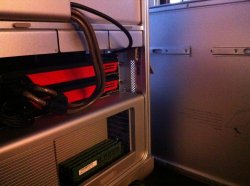
- Push the optical drive chasis back into the Mac Pro case as snugly as can bear. There will be a small gap in which the x2 6-pin 12V and the PSU power supply cable are pinching out. You'll now want to bundle these 3 wires as flatly as possible and then align to the right of the third (from left) HD securing lever. See my photo below.
- Unpack and insert the first 5870 into the bottom PCI-16 slot. Plug in the x2 original Mac Pro black 6-pin 12V power cables. Make sure the card is snug and secured into the logic board.
- Unpack and insert the second 5870 graphics card and now connect the x2 new 6-pin 12V power cables from the 5.25" PSU we added under the optical bay. Again, make sure the assembly is snug to the motherboard.
- Snap the graphics card fan back to the right to lock the graphics cards into place. Re-secure the PCI opening guide panel (two screws) and then bundle the triple wire assembly from the PSU.
- Next, unscrew all of the small screws that secure the lid inner frame. There are 2 screws hidden beneath rubberized feet. Instead of cutting off or peeling off the feet, simply aligned a phillips head screwdriver over the middle and begin digging for the screws. Much simpler that way. Easy to find the screws.
- Using tin snips, cut an approximately 2" notch out of the case lid inner frame, as aligned with the third drive's security lever. Again, see photo. Tin snips make this a simple job but you should still wear eye protection.
- Re-secure the inner case lid frame with the numerous small screws. Set aside the lid for now.
- Now to test. If you have one monitor, simply plug it into the primary/bottom graphics card and click the power button. If you have two monitors, connect a monitor cable to each graphics card treating the bottom card as your primary (probably left monitor) and the top card as your secondary (probably right monitor).
- If you are using two Apple LED monitors like I am (dual 27" Apple LEDs), connect your primary LED monitor to the right Mini DisplayPort connector on the primary graphics card (bottom) and your secondary LED monitor to the left Mini DisplayPort connector on the secondary graphics card (top).
- Click the power button and try booting up. If you've got power and picture on both monitors, you're in good shape. Go ahead and apply strong force to the case lid to properly secure back into place. Job finished and well done. If one or the other monitor does not turn on, expect power line to be the culprit and begin troubleshooting your connections working backwards from the graphics cards.
CrossFire works natively in Windows 7. No additional hacking required. Just install the latest ATI drivers and you're good-to-go. On the Mac side, utilizing a separate graphics card for each monitor, particularly when pushing 2560x1440 with the Apple LED 27" or Cinema Displays, you'll save a lot of overhead and get much stronger performance out of apps like Photoshop and After Effects. Anything GPU rendering in general will be much faster. I did not run prior benchmarks, but there is a big difference upgrading from my single 4770 to these dual 5870s. Good improvement.
TOTAL UPGRADE COST
Approximately $830 w/ ADC, $920 w/o ADC
Attachments

Last edited:
As an Amazon Associate, MacRumors earns a commission from qualifying purchases made through links in this post.
