Become a MacRumors Supporter for $50/year with no ads, ability to filter front page stories, and private forums.
Wow! I'm really loving the low-light performance with Wide - 1808p :)

I'm not too knowledgeable about cameras and stuff, but would it be possible to do "pixel binning" with stills in order to increase low-light performance? So maybe instead of using the entire sensor to capture stills, you would sacrifice a few pixels for less noise?

Dunno, haven't played with the stills hacking. If firmware-based pixel binning is supported at all (as is in Fujifilm's EXR point & shoot cameras), it'll take lower-res images (2.5 or 1.25 Mpixels). However, you can achieve almost the same effect by just downsizing your images in post processing by a factor of two.

BTW, I've done a lot of pretty advanced tests today (I'll publish a lot of ISO 12233 resolution chart framegrabs very soon). The new 1080p mode, while it's pixel-binned (meaning better low-light performance), seems to deliver an effective resolution of about 640*480 or just a little more. (Will also add an according picker item, which saves the 1080p input as VGA video to conserve storage / make post-processing and importing far easier and quicker.) That is, if you want the sharpest image (along with the best low-light performance), always go for "Full sensor" mode because now I'm absolutely sure the 1080p is way worse, resolution-wise. The situation seems to be exactly the same on the 3G S.
 
Last edited:
Dunno, haven't played with the stills hacking. If firmware-based pixel binning is supported at all (as is in Fujifilm's EXR point & shoot cameras), it'll take lower-res images (2.5 or 1.25 Mpixels). However, you can achieve almost the same effect by just downsizing your images in post processing by a factor of two.

BTW, I've done a lot of pretty advanced tests today (I'll publish a lot of ISO 12233 resolution chart framegrabs very soon). The new 1080p mode, while it's pixel-binned (meaning better low-light performance), seems to deliver an effective resolution of about 640*480 or just a little more. (Will also add an according picker item, which saves the 1080p input as VGA video to conserve storage / make post-processing and importing far easier and quicker.) That is, if you want the sharpest image (along with the best low-light performance), always go for "Full sensor" mode because now I'm absolutely sure the 1080p is way worse, resolution-wise. The situation seems to be exactly the same on the 3G S.

BTW, did you know the effective resolution of the iPhone 4 video is better than that of TIPA's Best 2011 Generic P&S Camera, the Nikon P300?

See my latest article: http://www.iphonelife.com/blog/87/d...ideo-better-tipas-best-2011-generic-ps-camera
 
New version released for both the iPhone 3G S and the iPhone 4. Change description and a LOT of resolution chart shots (both photos and original videos) at http://www.iphonelife.com/blog/87/iphone-3g-s-4-video-camera*************news . As you can see, I thoroughly examine all the different “hacks” the hacking community has produced.

Feedback is, as usual, more than welcome so that I can finalize the two projects and upload them to a common Cydia repo!
 
great app !!!! THANKS.

I know you have probably answered these questions in your write up.

Can you answer a few more in one or 2 sentences?

1. What is the diff between VGA and XGA? Which is better?

2. Full sensor I would take to mean the tweak will be maximizing the full potential of the sensor?

3. Whats data rate? Does it mean that full data rate would take up more space meaning result in a video of a bigger size but would contain .. more well data...? something like pixles.. u dont need alot of pixles but a picture file with more pixles would be useful if ur editing it....


THANKS
 
1. What is the diff between VGA and XGA? Which is better?

Generally, only the stream size. Of the two 1080p modes, I'd always prefer VGA (higher-res streams have NO more info, only harder-to-en/transcode bloat) but some users have explicitly asked for a XGA version too).

2. Full sensor I would take to mean the tweak will be maximizing the full potential of the sensor?

Yes; hence the vastly superior resolution. However, the 1080p modes also seem to do some kind of binning; this is why their low-light performance is also much better than that of the default 720p mode. It's just their effective resolution (VGA) that sucks.

3. Whats data rate? Does it mean that full data rate would take up more space meaning result in a video of a bigger size but would contain .. more well data...? something like pixles.. u dont need alot of pixles but a picture file with more pixles would be useful if ur editing it....

The higher the data rate, the better movements are encoded. With VGA 1080p mode, you can use substantially lower data rates than with high-res modes. I've dedicated the last section of my previous article to this question. See the section starting with "Finally, the two 1080p modes: one recorded at VGA and the other at the significantly larger (1024*768) XGA resolution." at http://www.iphonelife.com/blog/87/iphone-3g-s-4-video-camera*************news
 
Generally, only the stream size. Of the two 1080p modes, I'd always prefer VGA (higher-res streams have NO more info, only harder-to-en/transcode bloat) but some users have explicitly asked for a XGA version too).


Yes; hence the vastly superior resolution. However, the 1080p modes also seem to do some kind of binning; this is why their low-light performance is also much better than that of the default 720p mode. It's just their effective resolution (VGA) that sucks.


The higher the data rate, the better movements are encoded. With VGA 1080p mode, you can use substantially lower data rates than with high-res modes. I've dedicated the last section of my previous article to this question. See the section starting with "Finally, the two 1080p modes: one recorded at VGA and the other at the significantly larger (1024*768) XGA resolution." at http://www.iphonelife.com/blog/87/iphone-3g-s-4-video-camera*************news

Thanks for taking the time to explain I shall read the part you mentioned.
 
Thanks for taking the time to explain I shall read the part you mentioned.

OK, just keep us posted, I need all kinds of feedback (good and bad alike) before going official, finalizing the tool and uploading it to a major Cydia repo :)

Also, feel free to ask if you don't understand anything. I'll link to this thread (too) from the final documentation and my answers could help thousands of other people too. Therefore, the more questions, the better :)

BTW, I'm just working on another iteration; now, with advanced backup / restoration capabilities (and their explanation on the source code level).
 
New version, with vastly enhanced backup / restore capabilities, released to Cydia (of the iPhone 3G S version too). I've elaborated very thoroughly on the backup / restore algorithm. I also present some information on minimizing "clicking" using my live view-less 4.3.x Full Sensor mode by using 1.75 Mbps data rate.

Please see http://www.iphonelife.com/blog/87/i...es-and-restoring-them-iphone-3gs-4-video-came for the article. Feedback welcome!
 
New iPhone 4-specific app version (1.5) in Cydia. The major change is that I've moved permission setting in an install-time script (and the docs dir removal into deinstall-time one). Now, it doesn't require the root password to be “alpine” as these scripts are run as “root”, not as “mobile” (the restricted user Cydia apps are run). With deinstall-time directory deletion, I've also eliminated the need to manually tap the “Restore Original Configuration” button before deinstallation to remove the docs directory.

Will do the same to the 3G S version too; will also release the new sources + a full article on how install/deinstall-time scripting works in Cydia very soon! (And a lot of other, similar tricks.)
 
Will do the same to the 3G S version too; will also release the new sources + a full article on how install/deinstall-time scripting works in Cydia very soon! (And a lot of other, similar tricks.)

Please see http://www.iphonelife.com/blog/87/o...ks-new-iphone-3gs4-video-camera-enhancer-tool for more info (warning: highly technical info, mostly for programmers or hackers!)

NOTE: the article has TONS of Cydia-related hacks and tips and is a gold-mine for every (would-be) Cydia programmer!
 
Last edited:
would be great if this was available for the 4S when the JB comes out (hopefully soon). the ability to shoot 720p at 60 fps for example. :)
 
Since the author is still visiting MR, I have to ask again - is this going to get a release for iOS5?
 
There will be.

Here you are:

I've been constantly asked for the iOS5 version of my iPhone 4 Video Camera Enhancer, which, as with the 3G S-specific enhancer released earlier today still has some neat features the, otherwise, highly recommended CameraTweak doesn't let for setting; for example, the video bitrate.

(As with all these kinds of tools, the tweak requires jailbreaking. Don't blame me for the non-jailbroken iOS' being so closed and restricted...)

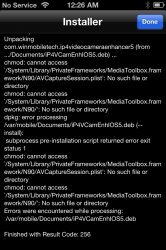
Currently, the tweak is available as freely compilable and deployable sources. You will be able to deploy it on your own iPhone 4 if you or some of your friends (ask them to deploy the app on your iPhone) have a paid ($99) dev account. This also means that, as with the iPhone 3G S tweak, you'll manually need to enable global writing support for /System/Library/PrivateFrameworks/MediaToolbox.framework/N90/AVCaptureSession.plist and its enclosing directory, /System/Library/PrivateFrameworks/MediaToolbox.framework/N90.

I'll definitely create a Cydia version later so that folks without any developer friends can also use it on their iPhones.

Basically, it's the same as the old, pre-iOS5 one with the following difference: I've added a new switch on the “Easy view” (default) tab. It allows for switching the state of TemporalNoiseReductionMode between 0 and 1. If (and only if) you encounter dropped frames in the “Wide, Full sensor” mode, you will want to switch it off to avoid constant framedrops. (Something I've elaborated on a lot in the iOS4-specific articles. Interestingly, under iOS5, I haven't encounter frame dropping using the same settings. I may have been wrong though; this is why I've decided to provide the switch so that you can experiment yourself.) In all other modes, you can safely leave it switched on.

As it has changed a lot since my last tutorial, let me present a new one.

First and foremost, the main aim of my tweak is as follows:

- to considerably widen the by default, pretty narrow (about 42-43mm equiv.) field-of-view (FoV)

- to add bitrate selection support and

- resolution selection support right in the stock, built-in Camera app, without having to turn to a third-party (and always) commercial camera app. All these are available with third-party apps if and only if you shoot at VGA resolution (it's the only way to achieve wide FoV) – but, again, that means the need for purchasing and using them instead of the stock Videos app. As far as current Cydia tweaks are concerned, as has been pointed out in the introduction, CameraTweak doesn't let for setting video bitrate – and the only way of wide-FoV recording is using the VGA resolution with it too.

After starting the app for the first time, you'll see this interface:


(as with all the shots in this article, click the thumbnail for the original-sized image!)

The topmost switch, “TemporalNoiseRed.Mo.”, allows for disabling TemporalNoiseReductionMode. You'll only want to disable it in the “Wide, Full sensor” mode, if at all. (Note that, as has already been stated, I haven't really encountered dropped frames when using the “Wide, Full sensor” mode – unlike back in the iOS4 times. Should you encounter them, make sure you give recording a try with disabled TemporalNoiseReductionMode to see whether it helps.)

The picker in the middle has two components. The first has the following items:

Narrow: this is the default 720p mode you only have access to without any tweaks or third-party apps. It has by far the best true resolution but has dismal low-light performance and, as has been pointed out, uses a narrow FoV not suited for a lot of shooting situations (e.g, landscape or architecture shooting), unlike genuinely wide camera phones like the, in video mode, 26mm(!) equiv, excellent Nokia 808 Pureview.

Wide, 1080p VGA: this is one of the most recommended modes if you want to have the widest possible FoV or the lowest possible bitrate for (comparatively) artefacting-less recording. (All non-narrow modes use the entire surface of the sensor; there is no FoV difference between them.) It, however, has slightly (but not much – see the tests below) lower true resolution than the other two, non-narrow modes.

Wide, 1080p XGA: this one records XGA-resolution (1024*768) footage. It delivers slightly, about 20% (but in no way 1024/640=1.6 times!) better resolution. Requires a higher nominal bitrate for recording.

Wide, Full Sensor: this is the, along with the VGA mode, another preferable mode. Generally, it has a little bit (but in no way considerably!) better resolution than the “Wide, 1080p XGA” mode.

An example of setting the latter mode (and also disabling TemporalNoiseReductionMode) and reducing the bitrate to half of the original; that is, around 6.5 Mbps:


After setting your preferred mode, tap the “Go” button at the bottom. You'll be shown a dialog with the fields modified:


Here, “AverageDataRate” is the value you set in the right part of the picker (“Half” corresponds to 6.5 Mbps), Sensor and Capture width / height depend on the left side of the picker and, finally, NR (shorthand for Noise Reduction) shows the switch value stored.

Always remember to kill the Camera app before (or after) changing these settings; otherwise, the new configuration won't be used by the app and it'll shoot with the old ones.

The Advanced View tab

Should you want to directly set the values in the previous confirmation dialog (and some other non-listed ones), you'll want to use the interface in the Advanced View tab:


This lists a handful of default settings by default; these all can be modified or, should you want to add your own ones without changing the default ones, just tap a “Default” at the bottom and change the fields you want to modify:


After finishing editing, tap the Save icon in the top right.

Resolution charts

Let me show you some resolution chart framegrabs in all the four main modes (default narrow / VGA / XGA / Wide Full) to see the resolution difference between them. The resolution in ascending order. These are framegrab links with the extinction point (the value of line per vertical/horizontal width where it's no longer possible to count the originally five lines):

VGA, 475x475
XGA: 500x500
Full sensor, NR: 1: 500x500
Full sensor, NR: 0: 500x500
Narrow: 600x600

(Warning, large – around 1.5 Mbytes each! - images!)

Low-light performance

The non-narrow modes seem to have approximately the same low-light performance – all of them are much better than that of the default 720p mode. The best are the VGA and the XGA mode – they are clearly cleaner than any of the Full sensor modes, let alone the default 720p one. Disabling TemporalNoiseReductionMode doesn't really result in a much worse (noisier) image in Full sensor mode.

All in all, should you want to shoot video in dark, use either the VGA or the XGA mode.

I haven't played with the “Binned” boolean in LiveSourceOptions; feel free to report back whether binned mode works and, if it does, does it deliver dramatically better low-light performance by sacrificing vertical and/or horizontal resolution, as is the case with the iPhone 4S binned mode actiwated by my 4S tweaks (see my 4S article).

The following links are full PNG (so that the original quality is in no way compromised by applying another recompression) framegrabs; feel free to compare the noise levels. (Large images!)

VGA
XGA
Full sensor, TemporalNoiseReductionMode = 0
Full sensor, TemporalNoiseReductionMode = 1
Default 720p

Sources

HERE are the sources. Feel free to use the tweak – hope you'll enjoy the much wider FoV and/or the settable bitrate and/or the much better low-light performance.
NOTE: make sure you do back up /System/Library/PrivateFrameworks/MediaToolbox.framework/N90/AVCaptureSession.plist before using the app, particularly if you want to directly modify the entries in the Advanced view tab. Sometimes (back in the iOS4 times) Camera (or its video mode) stopped working after some months and/or entering some extreme values in Advanced mode, necessiating restoring the original version of AVCaptureSession.plist.

----------

Since the author is still visiting MR, I have to ask again - is this going to get a release for iOS5?

See above :)

----------

would be great if this was available for the 4S when the JB comes out (hopefully soon). the ability to shoot 720p at 60 fps for example. :)

720p60 is already available via both CameraTweak and some other, commercial AppStore apps (SloPro, Better Camcorder etc.; see https://forums.macrumors.com/threads/1479551/ for the former. I can paste my review of SloPro and Better Camcorder running on the 4S and their ability to record >30p footage.).

While I also plan to release a 4S version (see my dedicated articles on enhancing the 4S video mode), I won't really provide anything drastically better than in the above-listed apps (CameraTweak etc.) as I can only provide 720p60 (with halved resolution) and bitrate setting but no tweaks like "full sensor usage", unlike with the iPhone 4. Unfortunately, it seems it's not possible to make use of the full sensor in the 4S other than switching to VGA recording with accordingly bad resolution.
 
I am eager to give this a try as I do videos on two different iPhones...although usually on an older iPhone 4 saving my 4s for photos and data stuff.
 
UPDATE (Some hours later): I couldn't sleep without thoroughly testing the above-mentioned, newly-discovered “Binned” directory entry. As I've found, it works in exactly the same way as on the iPhone 4S: when enabled, it halves the resolution in both(!) dimensions (both vertically and horizontally) but substantially improves the low-light capabilities. Binning (this way) doesn't have any effect on the frame-per-second recording speed.

Three test shots showing all this in practice (as usual, large, uncompressed, direct video framegrabs!):

720p mode resolution test, with binning enabled
720p mode low light test, with binning enabled
720p mode low light test, with binning disabled

Enabling it only works in the native, default 720p mode. Enabling it on non-720p modes (I've tested all the three: VGA, XGA and full sensor) has absolutely no effect on anything.

I've modified the “Easy view” tab to incorporate the switch – the source link now points to the new version. In the next screenshot, I've annotated the new switch. Just enable it if you want to test it:


Again, it'll only have any effect in the 720p mode and, as with the iPhone 4S, I don't really recommend it because of the far inferior resolution.
 
Directly installable versions of my iPhone 3GS and 4 Video Camera Enhancer tweaks out

I've created a directly deployable .deb installer file of my iPhone 3GS and 4 Video Camera Enhancer tweaks for iOS5+ (see #33 and #43/#45http://www.iphonelife.com/blog/87/my-iphone-4-video-enhancer-ios5-here-last, respectively, for an explanation, quick tutorial and sources). They allow for installing the tweaks without having to have access to a desktop Xcode. I've also made sure the installers themselves set the right write permissions of the configuration file (and its enclosing directory) they modify upon tweaking the video recording parameters. This means installing them has become orders of magnitude easier.

As is also explained in THIS article, installing these kinds of .deb files is very easy. Just transfer the deb file (THIS is for the iPhone 3GS and THIS for the iPhone 4) to your iPhone and start the excellent jailbreak file system tool iFile on it. (The non-registered version will work just fine.) Tap the .deb file from inside iFile and select “Installer” from the context menu.

A 3GS screenshot, with the annotated “Installer” menu item:
ip3gs-inst.PNG

An iPhone 4 shot (click for the original-sized image!):


The installer should immediately run and return 0 (last row):


Tap Done in the upper left corner.

After this, all you need to do is respringing your iPhone so that the icon of the just-installed app is shown. You can use the free and highly useful (you may need respringing in a lot of other cases) “Respring” app in Cydia, restart the phone (if you don't mind the longer reboot time) or uninstall / install another app (it can also be an AppStore one) on it.

Feel free to report back, any bugs etc. Note that I'm pretty much unlikely to alter / enhance the 3G S version (the model being that outdated); with the iPhone 4 one, however, you may have more luck.
 
I read everything right from the start .Amazing work, I never knew about this when I used my iPhone 4 regularly, now I'm using an iPhone 5 but I want to make my iPhone 4 a decent camera using your tweak.
Unfortunately I upgraded my iPhone 4 to ios6.1.2 and jailbroke ... And I'm not having any luck with the Cydia install or the .deb file either..
I get this .. I guess n90 isn't it anymore
 

Attachments

  • image.jpg
    image.jpg
    192.9 KB · Views: 136
I read everything right from the start .Amazing work, I never knew about this when I used my iPhone 4 regularly, now I'm using an iPhone 5 but I want to make my iPhone 4 a decent camera using your tweak.
Unfortunately I upgraded my iPhone 4 to ios6.1.2 and jailbroke ... And I'm not having any luck with the Cydia install or the .deb file either..
I get this .. I guess n90 isn't it anymore

Yup, changed. Will release an iOS6-compatible version sometime.
 
This is how you can make your iPhone 4 into a much more versatile video camera

Yup, changed. Will release an iOS6-compatible version sometime.

Thank you!
In the mean time what is the latest ios version it works on? And is that the one it works best on? If not which version is best?
 
Register on MacRumors! This sidebar will go away, and you'll see fewer ads.