I finally got round to wall-mounting my iMac G5 and took some pics of the process.
You need a VESA-compatible LCD wall mount and an iMac G5 VESA mount adapter kit (£19 from the Apple Store). Note that this will only work with an iMac G5 Rev A or B with a flat back. The Rev C (iSight) and Core Duo models have a curved back and therefore are not suitable for wall-mounting.
Here's the "before" shot, showing the iMac stand:
click on the thumbnail to see a larger image

What comprises the iMac G5 VESA mount adapter kit...
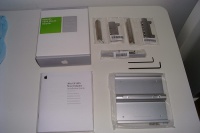
Clockwise from top left:
- the box
- lockout and tang for the 17" iMac G5
- lockout and tang for the 20" iMac G5
- bumpers and screws
- T8 Torx driver
- 3mm hex driver
- mount adapter
- installation instructions
Right, let's get to work then.
Step 1: Open up the iMac - same procedure as for RAM installation... just remove the 3 screws from the underside and pop the back cover off. Easy!
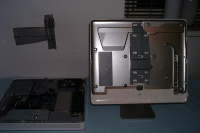
Step 2: Remove the hinge cover and set aside.
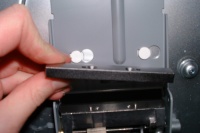
Step 3: Remove the four screws from the stand.
Step 4: Give it a little jiggle and remove the stand from the back cover.

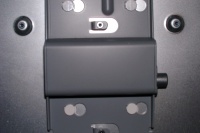
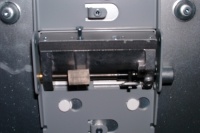
Step 5: Insert the lockout on the hinge, fitting it over the two posts.

Step 6: Insert the tang over the lockout.
Step 7: Screw the tang into place.

Step 8: Replace the hinge cover that was removed earlier.
(see picture in step 2).
You need a VESA-compatible LCD wall mount and an iMac G5 VESA mount adapter kit (£19 from the Apple Store). Note that this will only work with an iMac G5 Rev A or B with a flat back. The Rev C (iSight) and Core Duo models have a curved back and therefore are not suitable for wall-mounting.
Here's the "before" shot, showing the iMac stand:
click on the thumbnail to see a larger image

What comprises the iMac G5 VESA mount adapter kit...

Clockwise from top left:
- the box
- lockout and tang for the 17" iMac G5
- lockout and tang for the 20" iMac G5
- bumpers and screws
- T8 Torx driver
- 3mm hex driver
- mount adapter
- installation instructions
Right, let's get to work then.
Step 1: Open up the iMac - same procedure as for RAM installation... just remove the 3 screws from the underside and pop the back cover off. Easy!

Step 2: Remove the hinge cover and set aside.

Step 3: Remove the four screws from the stand.

Step 4: Give it a little jiggle and remove the stand from the back cover.

Step 5: Insert the lockout on the hinge, fitting it over the two posts.

Step 6: Insert the tang over the lockout.

Step 7: Screw the tang into place.

Step 8: Replace the hinge cover that was removed earlier.
(see picture in step 2).
 (it's the 2.0GHz 17" SuperDrive model (Rev B) in case you're wondering)


