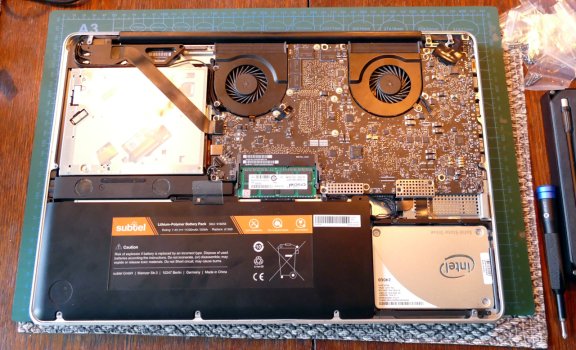
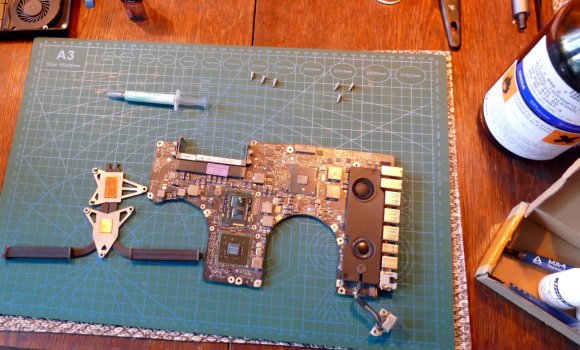
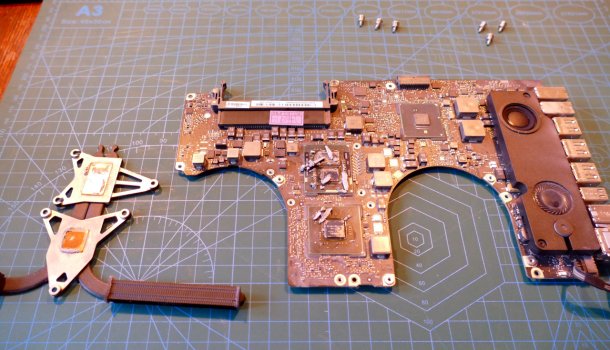
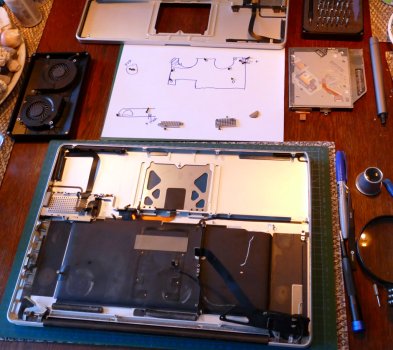
As I can't get a C2D E8600 for anything I'm prepared to pay, I have incoming an E8500. So I'll run the 10,1 iMac up to 1.333GHz bus speed, and upgrade the RAM to the same speed. It's a small tweak, but hey, why not? And gives me a reason to dive in an drenew the thermal paste. At the same time, I'll try and resurract the optial drive, as it will only occasionally recognise a disc. Probably full of fluff, as the rest of the machine was the first time I opened it.
Got a tip for us?
Let us know
Become a MacRumors Supporter for $50/year with no ads, ability to filter front page stories, and private forums.
What have you done with an early Intel recently?
- Thread starter Project Alice
- Start date
- Sort by reaction score
You are using an out of date browser. It may not display this or other websites correctly.
You should upgrade or use an alternative browser.
You should upgrade or use an alternative browser.
Today, with the help of this guide, I fixed a problem with Catalina on my 2010 11" C2D MBA failing to detect and connect to Wi-Fi networks. Through a process of elimination I'd been able to ascertain that it was a software problem and not a hardware one because Snow Leopard and Mojave were fine.
As per the guide, I navigated to /Library/Preferences/SystemConfiguration/ and deleted several files relating to networking and Wi-Fi connectivity.

After rebooting back into Catalina, the problem was fixed - I was able to connect to Wi-Fi networks at will.")
As per the guide, I navigated to /Library/Preferences/SystemConfiguration/ and deleted several files relating to networking and Wi-Fi connectivity.
After rebooting back into Catalina, the problem was fixed - I was able to connect to Wi-Fi networks at will.
You know what it reminds me of more than anything? The icebook keyboards, but backlit! They both let you see a little of the key mechanism below while staying extremely readable.This… turned out far different and far better than I ever would have expected using the white polycarbonate keys.
Until this proof-of-concept (which is really, really attractive, by the way), I always presumed the opacity of the white plastic would block all backlighting. Turns out that’s not the case at all. Beautiful and well done!


Today's workload included a 17" mid-2010 unibody MacBook Pro. At first it seemed to accept a charge but won't power on. I opened the back, getting ready to see if the battery or anything else needed removing, but I found out that many of the cables and such on the logic board were disconnected! So I reconnected all of them, including the battery, and hit the power button, and it sprang to life!

I felt a little like Dr. Frankenstein, bringing this back to life. Here I'm using my test High Sierra HDD so I can get the accurate specifications on this Pro. It's got a 2.66 GHz Core i7 processor. Even the battery was working fine and would charge! So among putting one of my cloned 500 GB hard drives with Sierra pre-installed into the Pro, I closed it up and labeled it as ready for us to list online!
I felt a little like Dr. Frankenstein, bringing this back to life. Here I'm using my test High Sierra HDD so I can get the accurate specifications on this Pro. It's got a 2.66 GHz Core i7 processor. Even the battery was working fine and would charge! So among putting one of my cloned 500 GB hard drives with Sierra pre-installed into the Pro, I closed it up and labeled it as ready for us to list online!
This arrived today

All original (250 GB, 5400 RPM HDD and 2 GB of RAM) and the battery has only 91 cycles on it.
All original (250 GB, 5400 RPM HDD and 2 GB of RAM) and the battery has only 91 cycles on it.
Got the last part I needed to declare these three finished!

New trackpad for the 2016 12” arrived and is working beautifully! Old one was definitely liquid damaged and scrubbing and cleaning didn’t fix it. But it’s now at least basically usable with the new one!
All in fixing these three up ended up costing me less than $100 which made this a very cost effective project!
2012 13" Unibody MacBook Pro - 2.9GHz i7, 16GB RAM, 240GB SSD - Fully functional. Needed new keyboard and display, had both in spare parts pile. $0
2014 13" Retina MacBook Pro - 2.7GHz i5, 8GB RAM, 256GB SSD - Fully functional. Needed new battery. $40
2016 12" Retina MacBook - 1.1GHz m3, 8GB RAM, 256GB SSD - Mostly functional. Needed new keyboard and trackpad,. $50. Battery health is bleh, USB port only charges.
Some day I may get a new USB port for the 12” but given that I don’t have any firm plans for it and that a new port is another $40 or so I’m holding off on that for now.
Last edited:
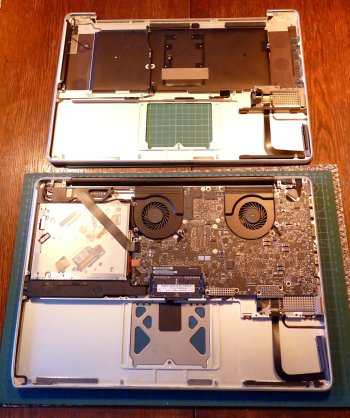
So I today tackled the transfer MBP 17" 2010 internals from damaged case to a new good case -project. Was quite straightforward, lots of screws and tiny cable connections. While I had the logic board out I scraped old thermal paste off and repasted. Then installed a SSD and did first boot from external drive, its alive! Lots of testing and everything seems to work, good times! 😍
Partitioned the internal drive to 2 partitions and installed High Sierra to first partition and Mint to the second. After all the updates and configuration it looks like this was a success. 😎
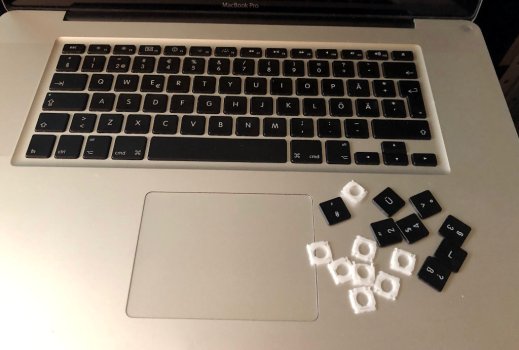
There is one more thing to do: swap few keycaps to localize the keyboard. I counted only 7 different ones. I'll swap those around and then its done. 👍🏻
Few pics along the way (EDIT: having trouble with pic order, trying to reupload them in reverse order to see if that fixes it, taking it apart should be first and neofetch pic the last one):
EDIT: typos
Partitioned the internal drive to 2 partitions and installed High Sierra to first partition and Mint to the second. After all the updates and configuration it looks like this was a success. 😎
There is one more thing to do: swap few keycaps to localize the keyboard. I counted only 7 different ones. I'll swap those around and then its done. 👍🏻
Few pics along the way (EDIT: having trouble with pic order, trying to reupload them in reverse order to see if that fixes it, taking it apart should be first and neofetch pic the last one):
EDIT: typos
Attachments
-
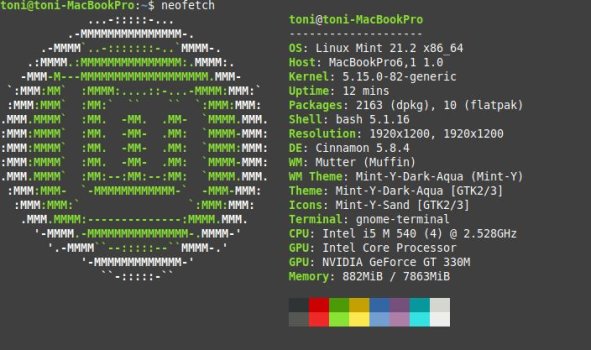 Neofetch MBP 17.jpg54.5 KB · Views: 62
 -
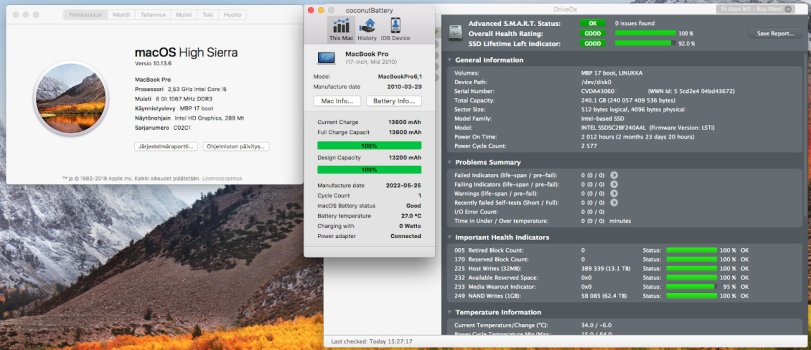 High Sierra running.jpg231.4 KB · Views: 55
 -
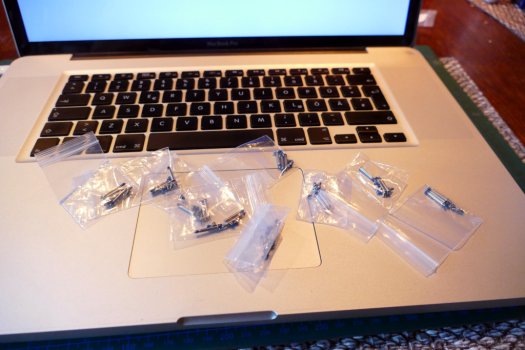 Finishing touch - new case screws.JPG268.2 KB · Views: 63
 -
 Transplant done with SSD too.JPG475 KB · Views: 68
 -
 Ready for repaste with Arctic MX6.JPG436.7 KB · Views: 67
 -
 Thermal paste has dried.JPG419.7 KB · Views: 68
 -
 Taking it apart.JPG327.6 KB · Views: 62
Last edited:
On the plus side, now I have a fun new decoration for the back of my secondary iMac on my desk at school - a first-gen Force Touch trackpad!

Swapped the keycaps to localize the kbd. First took of a keycap with the scissor mechanism but found it difficult to put the combo back with them together. Had to separate them and first install the mech alone using a loupe to get it snap in place. So, I figured that its smarter to take the the keycap off alone and then just press it back onto the mechanism on the other kbd. Much easier.
I did it this way: lift the key up on its lower edge so I can see the white mechanism and insert flat tool between the keycap and the mech. Press down gently on the tool and lift up right side of the keycap so it detaches, then click out the other side from the mech. Installation takes a second max.
Took few mechanisms off the old kbd for spares. If this kbd is screw attached (?) I could take out the whole working kbd and keep it as spares, the top case is probably scrap though.
BTW. I am now playing 1080P youtube video on the 2010 i5 MBP and its dropping very few frames, like 5 in the very beginning when I resized the window and none since in 20 minutes. Pretty good after all these years. 😎
Attachments
Last edited:
Looks much betterSwapped the keycaps to localize the kbd. First took of a keycap with the scissor mechanism but found it difficult to put the combo back with them together. Had to separate them and first install the mech alone using a loupe to get it snap in place. So, I figured that its smarter to take the the keycap off alone and then just press it back onto the mechanism on the other kbd. Much easier.
I did it this way: lift the key up on its lower edge so I can see the white mechanism and insert flat tool between the keycap and the mech. Press down gently on the tool and lift up right side of the keycap so it detaches, then click out the other side from the mech. Installation takes a second max.
Took few mechanisms off the old kbd for spares. If this kbd is screw attached (?) I could take out the whole working kbd and keep it as spares, the top case is probably scrap though.
BTW. I am now playing 1080P youtube video on the 2010 i5 MBP and its dropping very few frames, like 5 in the very beginning when I resized the window and none since in 20 minutes. Pretty good after all these years. 😎

Tack! 😉
Yes, percentual gains are respectful. And indeed, 720P would be better to this screen.
The touchpad feels super sensitive. Very easy to misclick something I wasn't trying to click. Needs adjustment.
install xserver-xorg-input-synaptics. Your trackpad issues will disappear. Libinput doesn’t play very nice with old MacBook trackpads, but synaptics will replace it for trackpad driving only, and libinput will handle all of the other inputs.
You know what it reminds me of more than anything? The icebook keyboards, but backlit! They both let you see a little of the key mechanism below while staying extremely readable.
View attachment 2251405
View attachment 2251406
You’re right! It kind of does.
As I’m no electrical engineer, I lack the know-how to kludge something together, but for years, I have pondered ways to, somehow, sandwich in a backlight sheet from, say, an aluminium PowerBook/MacBook Pro or unibody with the key lime iBook keyboard (which uses the same translucent white keys as the ice iBooks). [The construction of the unibody backlight might work a bit better, since it’s a separate piece from the keyboard assembly. Even so, that’s still a couple tenths of a millimetre and would be a very tight fit.]
If, somehow, I could get that to function (even if it meant it’s just on all the time with no rheostatic control, since the firmware or the board would know what to do with it otherwise, even if Tiger could), it’d be yet-another checkbox ticked in the never-ending project of “all the things you didn’t realize you could get a Rev. C clamshell iBook G3 to do (but you can).”
Last edited:
Just a heads up that antiX Linux 23 is out and working great on super old macs that are limited with 2GB-3GB RAM.
I modified the 64-bit iso to allow it to be installed on Macs with a 64–Bit CPU, but a 32-Bit EFI.
Works on:
iMac 5,1-5,2-6,1 (Late 06)
MacBook 2,1 (Late 06 EMC 2121)
MacBook Pro 2,1-2,2 (Late 06)
Mac Pro 1,1-2,1 (Late 06-BTO 07)
MacBook Air 1,1 (Early 08)
https://drive.google.com/file/d/1aTxzPmeLgyxtkSj5lUk2ATTGr1zCa4hf/view
Those unibody macbooks look really nice when they are in pristine condition. Cleaning them thoroughly inside and out, slight touch of magic eraser in some areas that needed it, finish it off with a tiny drop of pine sol on a microfiber cloth to wipe it down.This arrived today
View attachment 2252634
All original (250 GB, 5400 RPM HDD and 2 GB of RAM) and the battery has only 91 cycles on it.
Customers that needed repair or a battery/ssd install felt like they were receiving a factory refurbished machine.
Just a heads up that antiX Linux 23 is out and working great on super old macs that are limited with 2GB-3GB RAM.
I modified the 64-bit iso to allow it to be installed on Macs with a 64–Bit CPU, but a 32-Bit EFI.
Works on:
Mac Pro 1,1-2,1 (Late 06-BTO 07)
https://drive.google.com/file/d/1aTxzPmeLgyxtkSj5lUk2ATTGr1zCa4hf/view
I wasn't familiar with antiX but this largely positive review of #23 filled me in.
Thanks so much for modifying the ISO - it means that I can set up a triple boot with Mavericks, Windows and antiX 23 on my Mac Pro 1,1.
That's a good breakdown. The distro is so focused on conserving resources that the thing can boot into an old Pentium 4 machine I have laying around so it will absolutely fly on a Mac Pro 1,1! 😆I wasn't familiar with antiX but this largely positive review of #23 filled me in.
Thanks so much for modifying the ISO - it means that I can set up a triple boot with Mavericks, Windows and antiX 23 on my Mac Pro 1,1.
I used Matt Gadient's tool for those interested in trying antiX or any other linux distro out there. The images he has linked are a bit outdated at this point, but the tool itself is very useful till this day. (Option 2)
https://mattgadient.com/linux-dvd-images-and-how-to-for-32-bit-efi-macs-late-2006-models/
Last edited:
Streaming Dronezone (SOMA FM app) from my iPad to my MacPro via Airplay. iPad is a 6th Gen (2018) running iOS 17 Developer Beta.


Oh whoopsy-do, a third iMac has appeared! a mid-2011 base model 21.5", which I will upgrade to lots of RAM, anHigh Sierra installer, and all seemed well, theni7-2600S and a 750GB SSD I have already. For the moment, just making sure it's all working. Stuck in a High Sierra installer and all seemed to be going well. Then it made a sound like a foghorn. Logo appeared with a much thicker progress bar than usual. Just left it to carry on, and it seems to be OK now.
I now officially have too many iMacs.
I now officially have too many iMacs.
Forgot to mention that I paid £65 for this one, happy with that, and when I turned up to collect it, the keyboard and mouse had been added to the deal gratis. Result!
That foghorn and the different progress bar means the Mac firmaware was just upgraded (Apples do it while upgrading the OS, it doesn't ask or tell you anything, just does it). I pretty much get a heart attack every time it happens before the progress bar appears! 😫Oh whoopsy-do, a third iMac has appeared! a mid-2011 base model 21.5", which I will upgrade to lots of RAM, anHigh Sierra installer, and all seemed well, theni7-2600S and a 750GB SSD I have already. For the moment, just making sure it's all working. Stuck in a High Sierra installer and all seemed to be going well. Then it made a sound like a foghorn. Logo appeared with a much thicker progress bar than usual. Just left it to carry on, and it seems to be OK now.
I now officially have too many iMacs.
Dear Sir, you are mistaken. There is no such thing.I now officially have too many iMacs.
Last edited:
Same rule as Richie Sambora of Bon Jovi:Dear Sir, you are mistaken. There is no such thing
"A man can never have too many pairs of sunglasses, or too many guitars..."
Or basses. Or bicycles. Although I'm down to one of each of those!
Register on MacRumors! This sidebar will go away, and you'll see fewer ads.