I'm not a member, but i follow roytam's browser builds for XP. Their forums have sections for 2k/XP, etc.
Got a tip for us?
Let us know
Become a MacRumors Supporter for $50/year with no ads, ability to filter front page stories, and private forums.
What have you done with an early Intel recently?
- Thread starter Project Alice
- Start date
- Sort by reaction score
You are using an out of date browser. It may not display this or other websites correctly.
You should upgrade or use an alternative browser.
You should upgrade or use an alternative browser.
I did some more testing on my 2011 13" MBP with regards to scaled (HiDPI) modes on the HD 3000 and High Sierra today, with the results being quite encouraging in light of my previous results. It’s worth noting that the native resolution of the monitor (which is used as the base for scaled modes by default) makes a big difference, explaining why I didn’t get as far using the built-in 1280×800 display.
Using a 1600×1200 monitor, the largest usable framebuffer size is 2912×2184 for 1456×1092 in HiDPI. A 2928×2196 framebuffer causes flickering, going even higher eventually produces just a solid grey screen. The largest framebuffer SwitchResX accepts is 3040×2700 but it's not usable.
Using a 1920×1200 monitor, the largest usable framebuffer size is 3648×2280 for 1824×1140 in HiDPI. Larger values are rejected by SwitchResX. This is good to know because it suggests the same should be possible on a 2011 17" MBP with the standard 1920×1200 display.
Using a 2560×1600 or 2880×1800 monitor, the largest usable framebuffer size is 3824×2390 for 1912×1195 in HiDPI. Larger values are rejected by SwitchResX. This is good to know because it suggests the same should be possible on a theoretical 2011 13" or 15" MBP retrofitted with a "Retina Display".
")
Using a 1600×1200 monitor, the largest usable framebuffer size is 2912×2184 for 1456×1092 in HiDPI. A 2928×2196 framebuffer causes flickering, going even higher eventually produces just a solid grey screen. The largest framebuffer SwitchResX accepts is 3040×2700 but it's not usable.
Using a 1920×1200 monitor, the largest usable framebuffer size is 3648×2280 for 1824×1140 in HiDPI. Larger values are rejected by SwitchResX. This is good to know because it suggests the same should be possible on a 2011 17" MBP with the standard 1920×1200 display.
Using a 2560×1600 or 2880×1800 monitor, the largest usable framebuffer size is 3824×2390 for 1912×1195 in HiDPI. Larger values are rejected by SwitchResX. This is good to know because it suggests the same should be possible on a theoretical 2011 13" or 15" MBP retrofitted with a "Retina Display".
Last edited:
I did some more testing on my 2011 13" MBP…
Just checking for my own future posts, is it ok to generally discuss i5 2011 Macs in here? How about the 2006 Mac Pro?
Why would it not be?Just checking for my own future posts, is it ok to generally discuss i5 2011 Macs in here?
I’d say go ahead, since the dedicated subforum seems to deal with (slightly) newer models, at least primarily.How about the 2006 Mac Pro?
Last edited:
Yes, of course! It's a "late" early intel and pre-retina. That's what I've wished to be included in this subform all the time.Just checking for my own future posts, is it ok to generally discuss i5 2011 Macs in here? How about the 2006 Mac Pro?
The retina-models have to deal with all sorts of other problems, so it would be wise to give them another sub-forum.
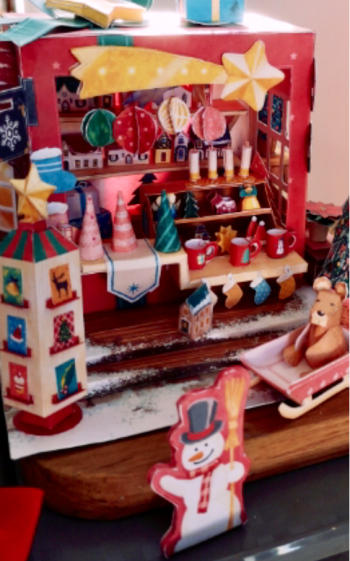
Not actual computing as such, but I used an 2009 imac and a 17 inch imac for printing and displaying instruction to create this Xmas Shop. Gave it as a gift. Found the download in Canons Creative Park. There some fantastic stuff in there..all free.
Oh..and some of you may remember a mosaic project I was working on a while back. Didn't finish that...was too busy making this and other Xmas things.
Oh..and some of you may remember a mosaic project I was working on a while back. Didn't finish that...was too busy making this and other Xmas things.
Attachments
Why would it not be?
I’d say go ahead, since the dedicated subforum seems to deal with (slightly) newer models, at least primarily.
Before this forum was launched, I argued how an early Intel Mac forum absolutely should include any Mac which natively could boot into Snow Leopard (and consequently, could also run Rosetta) — of which the Sandy Bridge i5/i7s would certainly qualify. Another reason I argued for this is Apple were still selling Core 2 Duo Macs (which automatically count as included here) alongside the Sandy Bridge Macs through 2012.
These days, probably even the Ivy Bridge Macs could be mentioned from time to time, if for no other reason beyond sharing the same form factor and parts modularity in the 13 and 15-inch 2012 unibody MacBook Pros as their Sandy Bridge and even Core 2 Duo forebears in the unibody line. A similar could be made for the 2012 Mac mini and 2012 Mac Pro, as well.
Last edited:
Using a 2560×1600 or 2880×1800 monitor, the largest usable framebuffer size is 3824×2390 for 1912×1195 in HiDPI. Larger values are rejected by SwitchResX. This is good to know because it suggests the same should be possible on a theoretical 2011 13" or 15" MBP retrofitted with a "Retina Display".
Remembering some of your past monitor testing results elsewhere, the framebuffer is the area inside which will actively display things like Finder windows and the mouse cursor, but outside of which they “vanish”, correct? Which could mean a 1600x1200 hidpi display mode might show the whole desktop background, but objects (i.e., Finder windows, etc.) beyond the 1912x1195 hidpi framebuffer realm would be “invisible” and/or inaccessible, correct?
The framebuffer is the area where everything is displayed. Leaving the framebuffer isn't possible unless you move to a different framebuffer (which will be on a different monitor).the framebuffer is the area inside which will actively display things like Finder windows and the mouse cursor,
While you can explicitly, say, move windows off-screen/off-framebuffer so that they (partially) vanish, this doesn't normally happen.but outside of which they “vanish”,
Consider a 1600×1200 monitor running a 1024×768 HiDPI mode: what macOS does is... it creates a framebuffer that is twice as wide and twice as tall as the HiDPI mode, i.e. 2048×1536 in this case. UI elements and text are then drawn using the HiDPI assets which are twice as wide and twice as tall as the regular non-HiDPI assets, so that you get the same real estate as on a non-HiDPI 1024×768 monitor, but a lot sharper.Which could mean a 1600x1200 hidpi display mode might show the whole desktop background, but objects (i.e., Finder windows, etc.) beyond the 1912x1195 hidpi framebuffer realm would be “invisible” and/or inaccessible, correct?
However, since a 2048×1536 framebuffer is larger than the monitor's actual resolution and won't fit, it has to be downscaled to 1600×1200 before it's displayed on the monitor. This downscaling ensures that everything on the framebuffer will be displayed and nothing is invisible or inaccessible, but makes things slightly blurry and also incurs additional GPU load.
macOS only has two sets of assets (100% size, i.e. non-HiDPI, and 200% size, i.e. HiDPI), so you cannot actually scale stuff by, say, 125% or 150% like you can on Windows. It will always use the 200% (HiDPI) assets and just adjust the size of the framebuffer accordingly, so the whole desktop will appear smaller or larger. This is apparent when taking a screenshot: it is twice as wide and twice as tall as the selected HiDPI mode, yet the size of UI elements and text themselves stays the same no matter what HiDPI mode is used.
The framebuffer is the area where everything is displayed. Leaving the framebuffer isn't possible unless you move to a different framebuffer (which will be on a different monitor).
While you can explicitly, say, move windows off-screen/off-framebuffer so that they (partially) vanish, this doesn't normally happen.
Consider a 1600×1200 monitor running a 1024×768 HiDPI mode: what macOS does is... it creates a framebuffer that is twice as wide and twice as tall as the HiDPI mode, i.e. 2048×1536 in this case. UI elements and text are then drawn using the HiDPI assets which are twice as wide and twice as tall as the regular non-HiDPI assets, so that you get the same real estate as on a non-HiDPI 1024×768 monitor, but a lot sharper.
However, since a 2048×1536 framebuffer is larger than the monitor's actual resolution and won't fit, it has to be downscaled to 1600×1200 before it's displayed on the monitor. This downscaling ensures that everything on the framebuffer will be displayed and nothing is invisible or inaccessible, but makes things slightly blurry and also incurs additional GPU load.
macOS only has two sets of assets (100% size, i.e. non-HiDPI, and 200% size, i.e. HiDPI), so you cannot actually scale stuff by, say, 125% or 150% like you can on Windows. It will always use the 200% (HiDPI) assets and just adjust the size of the framebuffer accordingly, so the whole desktop will appear smaller or larger. This is apparent when taking a screenshot: it is twice as wide and twice as tall as the selected HiDPI mode, yet the size of UI elements and text themselves stays the same no matter what HiDPI mode is used.
Thanks for that thorough explanation. I think I now understand what you were describing earlier.
That said, and if I understand it correctly, it seems somewhat disappointing to learn how true-HiDPI (without the described blurriness from interpolation) with the HD 3000 falls just shy on respective displays (i.e., how a 1920x1200 HiDPI display would only be able to present an 1824x1140 image).
(Or else maybe I misunderstand the math and geometry you’re describing here?)
The only HiDPI mode that doesn't have any blurriness is a quarter of the actual resolution. For a 1600×1200 display, this is 800×600; for a 1920×1200 display it's 960×600; and for a 2560×1600 display it's 1280x800. At these pixel-perfect modes, the framebuffer size matches the native resolution perfectly so there's no downscaling required.That said, and if I understand it correctly, it seems somewhat disappointing to learn how true-HiDPI (without the described blurriness from interpolation) with the HD 3000 falls just shy on respective displays (i.e., how a 1920x1200 HiDPI display would only be able to present an 1824x1140 image).
Using a 1920×1200 HiDPI mode on a 1920×1200 display implies downscaling a 3840×2400 framebuffer to a 1920×1200 display and, according to my testing, provides only a minimal improvement over the non-HiDPI 1920×1200 mode as far as the actual presentation on the display is concerned. You might still want this to take HiDPI screenshots (which look great on proper HiDPI displays) but it doesn't really make sense for anything else.
Where HiDPI makes sense is if you have a very high-PPI display, like a 13.3" 2560×1600 one where the native mode will make things way too small and upscaling a lower resolution will turn everything into a blurry mess. A 1280×800 HiDPI mode will make things perfectly readable and very sharp, as the display is running at its native resolution and the framebuffer for this mode is the exact same size, so there'd be no downscaling. However, if you want more screen estate than 1280×800, you'll have to run a higher HiDPI mode like 1440×900 which would imply downscaling a larger framebuffer to the display and incur slight blurriness again.
Another example: say you have a 2011 17" MBP but find things too small at 1920×1200. You could reduce the resolution to 1440×900 and have the system upscale it to the display's native resolution, but that will make everything horribly blurry. It would be better to run a 1440×900 HiDPI mode instead which downscales a 2880×1800 framebuffer to the 1920×1200 display. That also causes blurriness but the crucial thing is: it still looks noticeably better than the old-fashioned way.
You can scale stuff in macOS by fractional amounts but Apple removed the ability for the user to change this setting and apps are not usually tested by developers at anything other than 100% and 200% scaling.macOS only has two sets of assets (100% size, i.e. non-HiDPI, and 200% size, i.e. HiDPI), so you cannot actually scale stuff by, say, 125% or 150% like you can on Windows. It will always use the 200% (HiDPI) assets and just adjust the size of the framebuffer accordingly, so the whole desktop will appear smaller or larger. This is apparent when taking a screenshot: it is twice as wide and twice as tall as the selected HiDPI mode, yet the size of UI elements and text themselves stays the same no matter what HiDPI mode is used.
https://www.tonymacx86.com/threads/adding-using-hidpi-custom-resolutions.133254/page-95
https://forums.macrumors.com/threads/leopard-on-a-macpro-3-1.2283883/post-29588447
Some assets (bitmap images) only come in one or two sizes (at least two sizes for apps that are designed properly for HiDPI) so they may require non-integer scaling.
Vector based drawing (lines, circles, text) should have no problems with any scale (except for the expected sub-pixel or non-integer pixel issues)
@alex_free Nice! Are you going to patch Mojave+ on to it? I'm doing Mojave on my MacBook7,1 once my new RAM arrives.
Now that I've replaced a 2009 MacBookPro5,5 and a 2008 MacBook5,1 with a 2015 MacBookPro12,1 Retina and a 2017 MacBookAir7,2 respectively (family members), I've backed down both of these older 2009 and 2008 machines from Catalina to High Sierra.
The 2008 MacBook5,1 on Catalina was sluggish, and it's still sluggish on High Sierra, but better. Also, on Catalina there was some Chrome weirdness, with inconsistent launching. I tried Mojave but after updating the OS (even after repatching), I'd get kernel panics. No kernel panics on High Sierra, and I like the non-verbose boot. However, I can't install the last two security updates for some reason.
The 2009 MacBookPro5,5 on Catalina was also sluggish, but it's better on High Sierra, and actually is noticeably better than the 2008 MacBook5,1. I didn't think the 13% speed difference would be noticeable, but it is. Interestingly, I had no problems installing the security updates on this machine.
I don't think SSD differences can account for the difference in perceived speed. Both machines have full SATA II speeds with SSD. The MBP5,5 has a DRAM-endowed but old Samsung 840 EVO, and the MB5,1 has a DRAM-less but more recent Crucial BX100. Previously the MB5,1 had an ancient Intel 330 (SandForce) but that would only negotiate at SATA I speeds.
I'll definitely be keeping the MBP5,5:

I think I may try to re-home the MB5,1 if any local friend can actually make use of it, but I'm not optimistic since everyone has more modern machines already. I bought it about 3-4 years ago or so for $180 CAD, or about $140 US (at today's conversion rate). It was basically non-functional with 2 GB RAM, hard drive, and sticky trackpad. However, with additional RAM, cheap SSD, and a screwdriver to adjust the trackpad click, it was all working great in short order. It's served me well, and it's had a good run, but it's time for re-homing or retirement.
Meanwhile, my iMac11,3 with High Sierra feels like a modern machine in terms of speed. Too bad the OS is stuck at High Sierra. (I'm not willing to go for the super-hacked Big Sur installs.)
My youngest will likely be needing a machine in a couple of years, maybe 2023. If my extra desktop Macs - iMac11,3 and Macmini7,1 - are not suitable, then I'll look for say a used MacBookAir9,1 i3 or a refurb MacBookAir10,1 M1, or perhaps a refurb MacBookAir11,1 M2.
The 2008 MacBook5,1 on Catalina was sluggish, and it's still sluggish on High Sierra, but better. Also, on Catalina there was some Chrome weirdness, with inconsistent launching. I tried Mojave but after updating the OS (even after repatching), I'd get kernel panics. No kernel panics on High Sierra, and I like the non-verbose boot. However, I can't install the last two security updates for some reason.
The 2009 MacBookPro5,5 on Catalina was also sluggish, but it's better on High Sierra, and actually is noticeably better than the 2008 MacBook5,1. I didn't think the 13% speed difference would be noticeable, but it is. Interestingly, I had no problems installing the security updates on this machine.
I don't think SSD differences can account for the difference in perceived speed. Both machines have full SATA II speeds with SSD. The MBP5,5 has a DRAM-endowed but old Samsung 840 EVO, and the MB5,1 has a DRAM-less but more recent Crucial BX100. Previously the MB5,1 had an ancient Intel 330 (SandForce) but that would only negotiate at SATA I speeds.
I'll definitely be keeping the MBP5,5:
I think I may try to re-home the MB5,1 if any local friend can actually make use of it, but I'm not optimistic since everyone has more modern machines already. I bought it about 3-4 years ago or so for $180 CAD, or about $140 US (at today's conversion rate). It was basically non-functional with 2 GB RAM, hard drive, and sticky trackpad. However, with additional RAM, cheap SSD, and a screwdriver to adjust the trackpad click, it was all working great in short order. It's served me well, and it's had a good run, but it's time for re-homing or retirement.
Meanwhile, my iMac11,3 with High Sierra feels like a modern machine in terms of speed. Too bad the OS is stuck at High Sierra. (I'm not willing to go for the super-hacked Big Sur installs.)
My youngest will likely be needing a machine in a couple of years, maybe 2023. If my extra desktop Macs - iMac11,3 and Macmini7,1 - are not suitable, then I'll look for say a used MacBookAir9,1 i3 or a refurb MacBookAir10,1 M1, or perhaps a refurb MacBookAir11,1 M2.
Managed to recently score this from work:

A mid-2009 13" white MacBook! It has the Core 2 Duo 2.13 GHz processor and NVIDIA GeForce 9400M graphics chip (a BIG step up from the Intel GMA X3100 it previously had). This is the model I got as my first Intel Mac back in 2011! I upgraded the RAM from 2 to 4 GB, gave it a good replacement battery and popped in a 512 GB SSD to install Mac OS X 10.11 El Capitan on (by the time Mac OS dropped support for that model with Sierra, I was already using a 2012 quad-core i7 Mac Mini desktop.) I did have to replace the SuperDrive, but that process went pretty well, once I finally got the right drive!

Transferring my documents from another Mac via FireWire and Target Disk Mode. As many of you may know, this was the last Mac to have a 6-pin FireWire 400 port, as by this point most Macs would now come with a 9-pin FireWire 800 port (and then by 2012 Apple came out with that FireWire-to-Thunderbolt adapter in conjunction with the Retina MacBook Pro, with Thunderbolt now replacing FireWire in addition to DVI/MiniDisplay.)
Don't worry about that line on the screen; it's just a reflection from my iPhone's camera flash.

The "About This Mac" screen. I soon want to max out the RAM to 8 GB (this model CAN support it, but it requires that you are running at least Mac OS X 10.7 Lion or something), but the required RAM modules are surprisingly expensive online for such an older RAM standard... (Two of those 4 GB PC2-6400 DDR2 RAM modules bought together can cost around $80 - $130!)

Running the final version of iPhoto on El Capitan. I think on my old white MacBook, by the time I upgraded it to El Capitan in 2015 I had migrated my iPhoto library to the then-recent Photos application, as it does have far better editing features than iPhoto did.

When I first got this Mac in 2011, I was excited that I could run iMovie '11 on it as well! This was the third and final version of the redesigned Randy Ubillos, and the best one of them, IMO. (Besides bringing back detailed rubberband audio editing, the trailer creator was also really cool, and some of the new effects were useful and the horizontal timeline-like interface you could use (which became the norm when iMovie 10 came out.) Back then, when iMovie 10 was new I could even run it on that MacBook, but I haven't installed it there because I can just use it on my M1 MacBook Air or 2012 15" unibody MacBook Pro!

I even got Final Cut Express installed on it. I barely used FCE on this type of MacBook when it was my first (and initially only) Intel Mac, because I was largely using iMovie '11, Final Cut Pro X and Adobe Premiere (initially Elements, then Pro).
A mid-2009 13" white MacBook! It has the Core 2 Duo 2.13 GHz processor and NVIDIA GeForce 9400M graphics chip (a BIG step up from the Intel GMA X3100 it previously had). This is the model I got as my first Intel Mac back in 2011! I upgraded the RAM from 2 to 4 GB, gave it a good replacement battery and popped in a 512 GB SSD to install Mac OS X 10.11 El Capitan on (by the time Mac OS dropped support for that model with Sierra, I was already using a 2012 quad-core i7 Mac Mini desktop.) I did have to replace the SuperDrive, but that process went pretty well, once I finally got the right drive!
Transferring my documents from another Mac via FireWire and Target Disk Mode. As many of you may know, this was the last Mac to have a 6-pin FireWire 400 port, as by this point most Macs would now come with a 9-pin FireWire 800 port (and then by 2012 Apple came out with that FireWire-to-Thunderbolt adapter in conjunction with the Retina MacBook Pro, with Thunderbolt now replacing FireWire in addition to DVI/MiniDisplay.)
Don't worry about that line on the screen; it's just a reflection from my iPhone's camera flash.
The "About This Mac" screen. I soon want to max out the RAM to 8 GB (this model CAN support it, but it requires that you are running at least Mac OS X 10.7 Lion or something), but the required RAM modules are surprisingly expensive online for such an older RAM standard... (Two of those 4 GB PC2-6400 DDR2 RAM modules bought together can cost around $80 - $130!)
Running the final version of iPhoto on El Capitan. I think on my old white MacBook, by the time I upgraded it to El Capitan in 2015 I had migrated my iPhoto library to the then-recent Photos application, as it does have far better editing features than iPhoto did.
When I first got this Mac in 2011, I was excited that I could run iMovie '11 on it as well! This was the third and final version of the redesigned Randy Ubillos, and the best one of them, IMO. (Besides bringing back detailed rubberband audio editing, the trailer creator was also really cool, and some of the new effects were useful and the horizontal timeline-like interface you could use (which became the norm when iMovie 10 came out.) Back then, when iMovie 10 was new I could even run it on that MacBook, but I haven't installed it there because I can just use it on my M1 MacBook Air or 2012 15" unibody MacBook Pro!
I even got Final Cut Express installed on it. I barely used FCE on this type of MacBook when it was my first (and initially only) Intel Mac, because I was largely using iMovie '11, Final Cut Pro X and Adobe Premiere (initially Elements, then Pro).
Final Cut Express brings back so many memories for me, it was the video editor we used in high school, and the editor that made my first videos, I used it to death until 2011 I think, then I switched to Final Cut Pro X. Now I'm moving to Resolve, I doubt it would run on a 2009 MacBook though
"What have you done with an early Intel recently?"
Looking back to 2021: nearly all of my work, that had to be done, happened on my Early-2008 17"MBP4,1 /w MojavePatch (HFS+/32bit-support)
BTW: gave my favorite 2014 11"MBA to my son as an xmas-present, since he will be have more use&fun of it than me.
Looking back to 2021: nearly all of my work, that had to be done, happened on my Early-2008 17"MBP4,1 /w MojavePatch (HFS+/32bit-support)
BTW: gave my favorite 2014 11"MBA to my son as an xmas-present, since he will be have more use&fun of it than me.
Last edited:
Added some links to some icon utilities.I have a script at VolumeIconUtil.sh containing commands to dump the contents of an icon, check the compatibility of an icon, or build an icon from parts of another. Some of the features use my fork of osxiconutils .
Installed Debian 11 & 10.6 on the late 2009 maxed out MacBook, so far this is some Apple level it just works wow.
Story #1: on my 2006 MBP running Snow Leopard…

Seeing as it's my only Intel Mac with Tuxera NTFS installed, I put it to use transferring the PVR recordings from one NTFS partition to another on an external USB 3.0 HDD. Whenever I use my Humax device extensively, this has to be carried out periodically because annoyingly it cannot see all of the partitions on many external drives and so I need to use a computer to move everything around in order to free up space on the partitions that it can recognise.
This took the better part of 16 hours - due to the MBP being limited to USB 2.0 (I really should invest in a USB 3.0 Expresscard for it) and Tuxera NTFS suffering from notoriously poor read/write performance with NTFS. If anyone can suggest a better alternative, please put me out of my misery. I'm willing to pay for the software if needs be!
Story #2, involving my 2011 MBP running High Sierra. I filmed myself repairing an iPhone and then transferred the footage to the MBP and used VLC to produce a series of stills. Here's a couple of examples:


I then loaded the stills into the GIMP and created a photo story (using the ubiquitous Impact Bold font) that documented the various stages of the repair, which I could then share with my friends who are always enthralled by my electronic endeavours.*
I'm going to spare you the entire set and instead will subject you to the final image in the photo story.

*(One of my best friends recounted to me that during a book group discussion, the participants lamented that a large amount of people no longer understand how and why technology works, to which she proudly trumpeted that she knows someone who does! It's very touching for her to hold me in such high esteem but this state of affairs is a sad indictment on our society.)
Seeing as it's my only Intel Mac with Tuxera NTFS installed, I put it to use transferring the PVR recordings from one NTFS partition to another on an external USB 3.0 HDD. Whenever I use my Humax device extensively, this has to be carried out periodically because annoyingly it cannot see all of the partitions on many external drives and so I need to use a computer to move everything around in order to free up space on the partitions that it can recognise.
This took the better part of 16 hours - due to the MBP being limited to USB 2.0 (I really should invest in a USB 3.0 Expresscard for it) and Tuxera NTFS suffering from notoriously poor read/write performance with NTFS. If anyone can suggest a better alternative, please put me out of my misery. I'm willing to pay for the software if needs be!
Story #2, involving my 2011 MBP running High Sierra. I filmed myself repairing an iPhone and then transferred the footage to the MBP and used VLC to produce a series of stills. Here's a couple of examples:
I then loaded the stills into the GIMP and created a photo story (using the ubiquitous Impact Bold font) that documented the various stages of the repair, which I could then share with my friends who are always enthralled by my electronic endeavours.*
I'm going to spare you the entire set and instead will subject you to the final image in the photo story.
*(One of my best friends recounted to me that during a book group discussion, the participants lamented that a large amount of people no longer understand how and why technology works, to which she proudly trumpeted that she knows someone who does! It's very touching for her to hold me in such high esteem but this state of affairs is a sad indictment on our society.)
This took the better part of 16 hours - due to the MBP being limited to USB 2.0 (I really should invest in a USB 3.0 Expresscard for it) and Tuxera NTFS suffering from notoriously poor read/write performance with NTFS. If anyone can suggest a better alternative, please put me out of my misery. I'm willing to pay for the software if needs be!
NTFS-3G - Wikipedia
It's an old macOS so the version of macFUSE and NTFS-3g is probably old.
macFUSE + NTFS-3g is interesting because it will recognize the macOS Volume Icon I pasted onto my Windows volumes but regular macOS does not. I guess the regular macOS NTFS driver is looking for Finder flags (specifically, the custom folder icon flag) in a different place or not at all.
I think for NTFS on macOS, the Paragon Software driver is the one people go to? There may be some other options.
Dan..interesting looking model railway in one of your pics..is that yours?
Timer.. is that an iphone mini youve repaired?
Timer.. is that an iphone mini youve repaired?
I think for NTFS on macOS, the Paragon Software driver is the one people go to? There may be some other options.
Thanks, I'll have a look at Paragon. Anything has to be better than my current arrangement!
Timer.. is that an iphone mini youve repaired?
It's a 16GB iPhone 6. I found it in the spares/repairs section of eBay and quite helpfully, the seller had identified the battery as faulty so I knew which component I'd need to replace.
Register on MacRumors! This sidebar will go away, and you'll see fewer ads.