Become a MacRumors Supporter for $50/year with no ads, ability to filter front page stories, and private forums.
Status
The first post of this thread is a WikiPost and can be edited by anyone with the appropiate permissions. Your edits will be public.
** NVIDIA Geforce GTX880M Mac Edition ROM **
** NVIDIA Geforce GTX870M Mac Edition ROM **
** NVIDIA Geforce GTX860M Mac Edition ROM **

Genuine Native Boot Screen & Brightness Control


View attachment 942200

I got so far with this, but seem to have hit a brick wall. I was able to install the GTX870M into my 2011 27" imac, modded the heat sink no problem, successfully upgraded the BIOS using Linux over SSH and the diagnostic LED on the logic board shows the GPU is now recognised. I thought I'd done the hard part, but I just can't get it to boot into High Sierra. The boot-screen loading bar gets about half way and it hangs, if I try to boot from the recovery disk the same thing happens. If I try to boot from internet recovery, it downloads what it needs, but on the next screen it also hangs about half way along the progress bar. I've reset the SMC and the PRAM several times. Am I missing something obvious?
 
I got so far with this, but seem to have hit a brick wall. I was able to install the GTX870M into my 2011 27" imac, modded the heat sink no problem, successfully upgraded the BIOS using Linux over SSH and the diagnostic LED on the logic board shows the GPU is now recognised. I thought I'd done the hard part, but I just can't get it to boot into High Sierra. The boot-screen loading bar gets about half way and it hangs, if I try to boot from the recovery disk the same thing happens. If I try to boot from internet recovery, it downloads what it needs, but on the next screen it also hangs about half way along the progress bar. I've reset the SMC and the PRAM several times. Am I missing something obvious?

Read page1/post1 for getting through a boot, I can't recall getting there without using one of the Loaders... but even then I'm not sure what is happening, been having issues getting into High Sierra (but I'm booting successfully into Catalina, so I'm not stressing).

You can boot to verbose mode and see where the system hangs... CMD V (hold this boot key combination to get you into verbose mode)
 
Last edited:
Read page1/post1 for getting through a boot, I can't recall getting there without using one of the Loaders... but even then I'm not sure what is happening, been having issues getting into High Sierra (but I'm booting successfully into Catalina, so I'm not stressing).

You can boot to verbose mode and see where the system hangs... CMD V (hold this boot key combination to get you into verbose mode)

Thanks for your reply! I have been going over and over page one, but can't see what I'm missing - I've been unable to find loaders for High Sierra. In verbose mode the last thing I see is "macx_swapon SUCCESS" before I get a white screen for a while, then final a message saying "Your computer restarted because of a problem. Press a key or wait a few seconds to continue starting up". Then, of course I'm back to it restarting and hanging :/
 
By which way did you install El Capitan to high sierra? single click Combo update? (10.11.0 to 10.13.6) if that then no, you may need to install step by step, like from to 10.11.0 to 10.11.1>10.11.2>10.11.3>.... and so on...

I went from 10.11.x (whichever official version Apple still has on their site) to 10.13.6, via App Store auto install.

Hardware thing, an example possible this can be the new nVidia GPU you installed may prevent your iMac to get update firmware.

When I first got the machine, it had no HDD. So I dropped in a SSD, started with 10.13.6 then got the 2020-005 update. This was all the the original GPU and hardware. I just updated the GPU a few days ago.
 
Last edited:
Why? The Catalina Loader is for Mojave and Catalina.


This software is only needed for Nvidia K610M, K1100M and K2100M to get native brightness control and for all AMD cards using the GOP or EFI BIOS getting a boot screen emulation and enabling 4k HEVC and 4K H.264 GPU acceleration.

When we use the phrase Catalina Loader and OpenCore at the same time it is because the Catalina Loader is a piece of software based on OpenCore. To use this software to get brightness control or a boot picker just download the latest image based on OC version 0.6.2, copy it to an USB memory or SD card, boot from it and that it is! You will find a short documentation attached to the post. There is no more need for a manual configuration. You just need to rename the config.plist file in the EFI/OC folder on the SD card according to your GPU. Follow this docs attached at the post linked above.
 
  • Like
Reactions: Ausdauersportler
Hello,

I installed the Nvidia GTX765M on a Mac 2011 27" with success, using the "ssh--method" from Xanderon.

However, I installed it with a 3-pipe heatsink but noticed that the card had some physical contact with the ALU-base of the heatsink, could overcome this only partially using some spacers.
How could the contact affect the performance of the card? Should I try to remove some aluminum of the card or use some extra spacers?

A second question: the GTX765M disabled bright control and boot-screen with the firmware shipped with the "ssh-flasher". Is there a firmware available for the GTX765M which does enable one of these features?

Thanks in advance for any ideas!
Again, take a look at the first post and read there first before starting this entire operation! Short: Yes and No!
 
Last edited:
Still with that problem. You can get my attention if it's on the first page. ;) I swear I looked and didn't find the solution.

• iMac 27" Mid 2011 - i7 - 3.4GHz - GPU Nvidia GTX 770M - Flashed (Nick[D]vB + xanderon method) macOS Catalina - SSD 240GB + HD 1TB - 16GB RAM.

Also let me know if this post is in the wrong place.

Thank you.
 

Attachments

  • Captura de Tela 2020-10-26 às 06.19.51.png
    Captura de Tela 2020-10-26 às 06.19.51.png
    442.5 KB · Views: 300
Last edited:
When I look at this, for a year, my tears flow.
cry.PNG

I really want two plus signs to appear there.
Sorry, if this is offtopic.
 
  • Like
Reactions: pappl
When I look at this, for a year, my tears flow.
View attachment 974391
I really want two plus signs to appear there.
Sorry, if this is offtopic.
I know, I cannot stop these kind of (useless) posts, but the few developers we have working here asked for this line below on the first post. You may respect this.

Please do not harass the BIOS developers to go faster, release a particular BIOS, etc. Please do not clog up the thread with useless posts asking if your specific card will get a new BIOS.
 
  • Like
Reactions: FlorisVN
so guys, I have a little gift for you to give back after such an incredible thread :D
hope you like it, the headaches to get it running were immens for me as a newb.

I couldn't stand it to use fckin windows to flash the cards and so I prepared this ~350mb drive

I created a Linux Live USB (based on grml.org) Thumb Drive with nvflash_linux and Nicks Bioses preloaded. and its booting by itself so you can work blind with a new unpatched nvidia card plugged in. Also, its starting a ssh daemon and using DHCP to get an IP so you can remote login :)

Steps

Download

14 days left to download, uploaded here: https://www.mediafire.com/file/cztz4xqj2sru9gj/2011_imac_usb.zip/file

mirror by NOTNICE, thnx: https://cloud.notnlce.com/index.php/s/xkJP34GD6a9WziE/download


Prepare USB Drive or SD Card
so, you take a small usb thumb drive, partition it with disk utility on a Mac: GPT + FAT32
and just unzip the files structure onto the drive, no dd or etcher or something. just copy paste it. folder structure see attached screenshot. (you can remove the .roms I downloaded and download itself if you want to be sure about the correct file size. I did not verify them at all. use/flash at your own risk please)

Test & Try
test your thumb drive with a more or less working GPU/ external Screen or just have faith in me

Swap Hardware
swap your GPU to NVIDIA and (!) disconnect every SSD/HDD, makes it easier to boot blindly from one USB or SD Card, connect the ETH Cable (!)

Find IP
let the iMac boot, everything is black, the boot loader is waiting 20s before booting, so give the whole process 1min time, then head over to your Router Page and find the right IP that the iMac got through DHCP

SSH to the iMac
now fire up your terminal on a Win/Mac/Linux Machine of your choice and ssh to your iMac with
ssh root@YOURIP
Password: flash
Confirm the ssh id with yes and you should be in your iMac

Working Directory
cd /lib/live/mount/medium/flash

read the RADME in there… I will enjoy my brand new k2000m in my 27" 2011 iMac with Catalina 10.15.3
… and because this is so easy, I rebuild it to a K1100M and flashed that also :D :D :)

(someone could write some fancy scripts but I thought its saver that everyone is doing it command by command and don't stop thinking and trusting some scripts)
This should be added to the 1st page Sticky - Brilliant! Thanks!
 
  • Like
Reactions: pappl
This should be added to the 1st page Sticky - Brilliant! Thanks!
Again, as Ausdauersportler has often said, read the 1st post. ;)
This SSH USB linux flashing method is well linked under Q&A on how to flash the vbios.

However, it won't work in those with protected bios, especially some of the blue HP cards, though you can still use the ch341a programmer with a bios chip clip for direct flashing. But flashing the bios is only half the thing, getting the card to work depends on a no. of things that we can't control nor fully understand at the moment.
 
Last edited:
  • Like
Reactions: FlorisVN
The following is a vbios ROM for: Nvidia Quadro K610M

K610M:
The chip I used to develop the ROM is: N15M-Q2-B-A1
MXM-A (3.0) bus interface, low powered card at TDP 30W.
It is a drop-in fit for the 21.5" iMac and 27” iMac heatsinks.
It is based on the GK208 GPU Kepler 2.0 architecture.
Metal supported.


I put this together only because there are now a few members on here that have one and it is relatively cheap to purchase for the moment.
It is based on Nick [D]vB's ROMs. All credit to him.
I have not had a chance to test it fully, but I can confirm brightness control will work with Opencore implementation on High Sierra 10.13.6.
Bootpicker menu is also available ofcourse.

This card should be added to our database of working GPUs.
Enjoy.

addendum:
7/15/2020
- working on Catalina 10.15.3 2011 iMac 21.5"
- no internet recovery
- working on Catalina 10.15.X 2009 iMac 27" (Ausdauersportler)
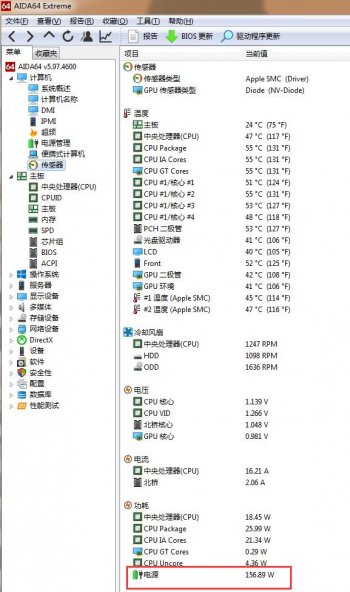
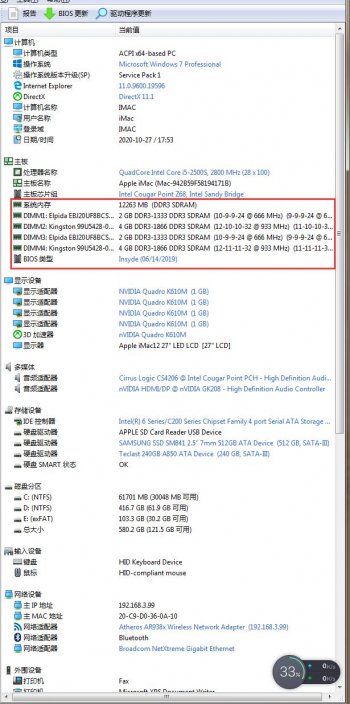
How can k610m use the windows10 windows7 system to realize the brightness increase of the native system system?
The monitor screen displays 130W in standby mode and generally uses 150W lightly. If the screen is turned off and standby is about 45W, the power consumption of the screen display alone is about 100W. It runs at maximum brightness and generates a lot of heat. How can we achieve the native brightness adjustment of windows10 and windows7 to reduce the screen The calorific value.
 

Attachments

  • QQ截图20201027175728.jpg
    QQ截图20201027175728.jpg
    85.1 KB · Views: 233
  • QQ截图20201027175559.jpg
    QQ截图20201027175559.jpg
    119.9 KB · Views: 255
How can k610m use the windows10 windows7 system to realize the brightness increase of the native system system?
The monitor screen displays 130W in standby mode and generally uses 150W lightly. If the screen is turned off and standby is about 45W, the power consumption of the screen display alone is about 100W. It runs at maximum brightness and generates a lot of heat. How can we achieve the native brightness adjustment of windows10 and windows7 to reduce the screen The calorific value.
https://forums.macrumors.com/threads/2011-imac-graphics-card-upgrade.1596614/post-28728009 try this. I Can't recall at the moment if the k610m is an OpenCore dependent card or not. You're mainly interested in the RegEdit part.
 
Using the flashrom software on your Mac
It is not the first post about this. This software has a command line interface only. You need at least some knowledge how to handle this. Installation is quite easy (content copied for this external post).

Installing the software:

  1. Press Command+Space and type Terminal and press enter/return key.
  2. Run in Terminal app (enter this line of command code):
    ruby -e "$(curl -fsSL https://raw.githubusercontent.com/Homebrew/install/master/install)" < /dev/null 2> /dev/null or on Monterey /bin/bash -c "$(curl -fsSL https://raw.githubusercontent.com/Homebrew/install/HEAD/install.sh)"
    and press enter/return key.
    If the screen prompts you to enter a password, please enter your Mac's user password to continue. When you type the password, it won't be displayed on screen, but the system would accept it. So just type your password and press ENTER/RETURN key. Then wait for the command to finish.
  3. Run in the terminal:
    brew install flashrom
Using the software:
  1. Press Command+Space and type Terminal and press enter/return key.
  2. Run in Terminal app (enter this line of command code to read from you BIOS the content and store it into the file named ORIG.ROM):
    flashrom --programmer ch341a_spi -r ORIG.ROM
    and press enter/return key.
  3. To write the content of the file named K1100.ROM into your BIOS:
    flashrom --programmer ch341a_spi -w K1100.ROM

Caveats:

Using nvflash on Linux and Windows to read the contents of a video BIOS ends up in a file with a smaller content size. The software reads only non zero bytes and stops after reaching the EOF (End OF File) marker.

Unfortunately the clip can only write full size files, i.e. if the chip has a size of 512K and the file is smaller you have to enlarge the file with ZERO bytes. This is done in the terminal app, too. Enter brew install truncate to install another command line utility and to enlarge a small-file.rom to the size of 512K (524288 = 1024x512) enter this command truncate -s 524288 small-file.rom . It expands a smaller BIOS file named small-file.rom (in place) to the full size padding with zero. truncate needs brew, so do not try the second step after the first installing brew. First make a copy of the smaller file just in case something goes wrong.

Most NVIDIA cards have 256K, most AMD cards 512K BIOS chips.
 
Last edited:
about the K610M being PCIE x8 i found out after some digging the K610M is indeed a PCIE x8 GPU so there is no error.
View attachment 974900
Yes, I told you before.
This is a hardware feature of this card. Some AMD cards have it two. Obviously the x8 PCI is fast enough to handle the traffic.

Only the ASD will complain that it has only x8 - when I start this hardware test with the K610M or some AMD cards I simply disable this test.
 
Last edited:
  • Like
Reactions: OnawaAfrica
Caveats:

Using nvflash on Linux and Windows to read the contents of a video BIOS ends up in a file with a smaller content size. The software reads only non zero bytes and stops after reaching the EOF (End OF File) marker.

Unfortunately the clip can only write full size files, i.e. if the chip has a size of 512K and the files is smaller you have to enlarge the file with ZERO bytes. This is done in the terminal app, too. Enter brew install truncate to install another command line utility and to enlarge a small-file.rom to the size of 512K (524288 = 1024x512) enter this command truncate -s 524288 small-file.rom . It expands a smaller BIOS file named small-file.rom (in place) to the full size padding with zero. truncate needs brew, so do not try the second step after the first installing brew. First make a copy of the smaller file just in case something goes wrong.
You're probably the savior of my K610M
now all I have to do is find the card and the programmer
hopefully i've not throwing them in garbage after failure flashing......
 
  • Like
Reactions: Ausdauersportler
Chicken or Egg Dilemma with (some) Nvidia cards
and late iMac 27 2009

Yesterday I tried to install a K4100M in my late 2009 and made the following experience. On boot system came up with working internal LCD, however after a PRAM reset the internal LCD remained dark and only three LED came up.

After connecting an external display I got the boot screen on alt/option only on the external display, the internal remained dark. Booting into Catalina or High Sierra worked fine. The internal LCD did not work.

After installing the patched AGC and after booting into the MacOS with the patched AGC the internal LCD came up and stayed in function. Even after a power off and power on. After deleting the PRAM I got the same not working internal LCD, again.

So users with the iMac 27 2009 may face the Chicken and Egg Dilemma. Without a working display no MacOS installation with the patched AGC possible.

You need an external display or a second Apple system to prepare a MacOS installation having the patched AGC. Possibly one can prepare such an bootable MacOS on an 32GB SD card only for this purpose.


Notes:
Did not test this with different Nvidia cards and currently not on an 2010 system.
Did no checks on the NVRAM contents right now.
Patched AGC - see post #1 for the black screen issue.

Question: Who can confirm this behaviour?

Please report back system and card type and please, please add a signature to your account showing hardware and OS, too (if not already done).
Hello,

I had the same situation on my iMac late 2009 27 with the Nvidia GTX 780 M.
 
  • Like
Reactions: Ausdauersportler
Hello,

I had the same situation on my iMac late 2009 27 with the Nvidia GTX 780 M.
Today I added a not the first post regarding all ++ cards. This is in fact an iMac firmware issue only visible with the late 2009 systems. The current solution is really to have an external display for the setup and later the AGC installed.
 
  • Like
Reactions: iPlasm
I reread the first post many times, but I still haven't found a solution to my problem. I also read "The / my incomplete list to the most common (hardware) issues". My problem is similar to hardware # 6 boot-chime-boot-chime

My Imac worked successfully with a GTX 780M, but there was no sleep mode in MAC OS Mojave. I decided to use the highvoltage12v method. I did part 1, rebooted and got sleep mode successfully. I skipped part 2 and just worked for a while. Later my Imac froze and I reloaded it, but the screen was black and GONG was 3 times. After that, a black screen.
I tried PRAM Reset, SMC reset ... But nothing helps

Now I have disconnected the hard drives and connected with ssh
successfully. I thought the problem was in the video card, but the firmware version is the newest, exactly the one I installed. I guess I got it wrong with the Intel HD 3000. I ask for help, how should I be?
 
Last edited:
  • Like
Reactions: iPlasm
Register on MacRumors! This sidebar will go away, and you'll see fewer ads.