Become a MacRumors Supporter for $50/year with no ads, ability to filter front page stories, and private forums.

srkirt

Suspended
Apr 12, 2020
257
179
Barcelona
[QUOTE = "kinchee87, publicación: 28421112, miembro: 95006"]
Este ha sido un viaje de ingeniería increíble que no habría sucedido si [USER = 1213089] @Jordi Padreny [/ USER] no quitó el disipador de calor de su MacBook Air. Aquellos que posteriormente hicieron el mod de disipador de calor también me dieron algo de confianza para probarlo también:RE

Voy a editar mis fotos del disipador de calor ahora, ¡así que espero que pronto obtengan algunas mediciones aproximadas!
[/CITAR]
[automerge]1588275376[/automerge]
Thankful you acknowledge my audacity with a 2019 MBA purchased only two weeks ago, to achieve superior performance with home-made materials by virus confinement.
Any questions about the wind tunnel by private.
Greetings from Barcelona !!!
 

Loog

macrumors regular
Apr 14, 2020
164
167
This has been an awesome engineering journey that wouldn't have happened if @Jordi Padreny didn't take the heat sink off his MacBook Air. Those who subsequently did the heat sink mod also gave me some confidence to try it out too :D

I'm going to edit my photos of the heat sink now, so hopefully you'll get some rough measurements soon!

@Jordi Padreny has done some great research on this, I'm sure there are plenty of people within the community which will be thankful, me included. According to my research I anticipate that the shim would need to be circa 16.5mm x 22mm. Actual dimensions would be greatly appreciated. I've purchased some machine time and will be getting 5 sample units pre production so hope to have something to test which should be drop in.
 

kinchee87

macrumors 6502
Jan 9, 2007
289
212
New Zealand
MacBook Air 2020: i7/16GB/1TB

[EDIT]
My blog posts on the three types of mods I have done
  1. Wind channel mod
  2. Heat sink mod
  3. Heat pad mod (update)
[/EDIT]

Finally, here are pictures of what was underneath my heat sink!


Processor
The "2 cm" marking is aligned to the inner edge of the heatsink padding:

1588279277766.jpeg


I should have aligned the "3 cm" marking to the inner edge of the heat sink padding:

1588279413302.jpeg


Heat Sink
Underside of the heat sink, featuring a very shallow rounded-rectangle cutout (might be around 0.2 mm in depth):

1588279579039.jpeg
1588279929425.jpeg


The cutout relative to a 15x15 mm copper shim:

1588280012489.jpeg
1588280162625.jpeg


The "2 cm" marking is aligned to the long edge of the cutout:

1588280412848.jpeg


The "3 cm" marking is aligned to the short edge of the cutout:

1588280427569.jpeg


To gauge how thick the shims needed to be, I prototyped various shims with paper of different thicknesses. I found that the thickness of a business card was quite good. Unfortunately, the shims I bought were 0.6 mm thick, so I had to spend a few hours slowly filing them down 🤦🏻 In the end, they were thicker than needed, but thin enough for me to screw the heat sink down. The screws are incredibly small and the threaded ends are only around 2 mm in length.

I spread a thin layer of thermal paste onto the heat sink and "pasted" the shims on. This way, I know that the shims will be positioned properly when I lay the heat sink back onto the processor (with another layer of thermal paste).

1588280587330.jpeg
 
Last edited:

Loog

macrumors regular
Apr 14, 2020
164
167
MacBook Air 2020: i7/16GB/1TB

Finally, here are pictures of what was underneath my heat sink!


Processor
The "2 cm" marking is aligned to the inner edge of the heatsink padding:

View attachment 910956


I should have aligned the "3 cm" marking to the inner edge of the heat sink padding:

View attachment 910957


Heat Sink
Underside of the heat sink, featuring a very shallow rounded-rectangle cutout (might be around 0.2 mm in depth):

View attachment 910959 View attachment 910960


The cutout relative to a 15x15 mm copper shim:

View attachment 910961 View attachment 910962


The "2 cm" marking is aligned to the long edge of the cutout:

View attachment 910964


The "3 cm" marking is aligned to the short edge of the cutout:

View attachment 910965


To gauge how thick the shims needed to be, I prototyped various shims with paper of different thicknesses. I found that the thickness of a business card was quite good. Unfortunately, the shims I bought were 0.6 mm thick, so I had to spend a few hours slowly filing them down 🤦🏻 In the end, they were thicker than needed, but thin enough for me to screw the heat sink down. The screws are incredibly small and the threaded ends are only around 2 mm in length.

I spread a thin layer of thermal paste onto the heat sink and "pasted" the shims on. This way, I know that the shims will be positioned properly when I lay the heat sink back onto the processor (with another layer of thermal paste).

View attachment 910966

Thanks for the details and walk through @kinchee87, this is really helpful.

Is the heatsink made of copper or is this just a copper coating. This seems very different to the 2018 which is Aluminium or a derivative thereof. I guess titanium was too expensive for these machines LOL
 

srkirt

Suspended
Apr 12, 2020
257
179
Barcelona
[QUOTE = "vyruzreaper, publicación: 28421635, miembro: 980628"]
Estoy recibiendo mis golosinas 5/5 -> será mi turno pronto. [USER = 95006] @ kinchee87 [/ USER] Estaba planeando usar varias cuñas (cortadas a medida) y unirlas como lo hiciste para maximizar el área de superficie cubierta
[/CITAR]
Soldered with tin that melts more than 200º.

I will make my own heat sink all in copper. And then I'll take a tube to the small radiator before the turbine of the same laminate on top of the CPU.
 

hmhmmhmmm?

macrumors newbie
Apr 23, 2020
28
42
MacBook Air 2020: i7/16GB/1TB

Finally, here are pictures of what was underneath my heat sink!


Processor
The "2 cm" marking is aligned to the inner edge of the heatsink padding:

View attachment 910956


I should have aligned the "3 cm" marking to the inner edge of the heat sink padding:

View attachment 910957


Heat Sink
Underside of the heat sink, featuring a very shallow rounded-rectangle cutout (might be around 0.2 mm in depth):

View attachment 910959 View attachment 910960


The cutout relative to a 15x15 mm copper shim:

View attachment 910961 View attachment 910962


The "2 cm" marking is aligned to the long edge of the cutout:

View attachment 910964


The "3 cm" marking is aligned to the short edge of the cutout:

View attachment 910965


To gauge how thick the shims needed to be, I prototyped various shims with paper of different thicknesses. I found that the thickness of a business card was quite good. Unfortunately, the shims I bought were 0.6 mm thick, so I had to spend a few hours slowly filing them down 🤦🏻 In the end, they were thicker than needed, but thin enough for me to screw the heat sink down. The screws are incredibly small and the threaded ends are only around 2 mm in length.

I spread a thin layer of thermal paste onto the heat sink and "pasted" the shims on. This way, I know that the shims will be positioned properly when I lay the heat sink back onto the processor (with another layer of thermal paste).

View attachment 910966
Is there a reason why you used 2 separate shims instead of one single, other than that’s why you had available?
 

kinchee87

macrumors 6502
Jan 9, 2007
289
212
New Zealand
Thanks for the details and walk through @kinchee87, this is really helpful.

Is the heatsink made of copper or is this just a copper coating. This seems very different to the 2018 which is Aluminium or a derivative thereof. I guess titanium was too expensive for these machines LOL
You're welcome! I'm not sure what the bulk of the heat sink is made from, but it felt very light. So probably aluminium if that's been used in previous heat sinks from Apple.


I'm getting my goodies 5/5 -> it will be my turn soon. @kinchee87 I was planning on using multiple shims (cut to size) and piecing them together like you did to maximize surface area covered
Good luck and enjoy!


Is there a reason why you used 2 separate shims instead of one single, other than that’s why you had available?
That was the reason :p I wasn't able to find larger shims that could be delivered to a collection point. I have to instruct some classes online, and I didn't want to risk being interrupted by a delivery to my place.
 

kinchee87

macrumors 6502
Jan 9, 2007
289
212
New Zealand
MacBook Air 2020: i7/16GB/1TB with wind channel and heat sink mod

Here are more benchmark results to supplement my previous ones. I always ran the benchmarks with the MacBook Air fully charged and plugged in, and always waited for the CPU to cool down to around 42 ℃ before running the next benchmark. Each benchmark was executed at least three times and I averaged the results.


Geekbench 5
The single-core and graphics performance are only slightly better. I think it's because thermal throttling didn't happen much for those tests with the original heat sink. Multi-core performance, however, is about 20% higher. Click on a Mod result to view the best that I got.

Test TypeOriginal (Points)Mod (Points)Improvement
CPU (Single-core)
1,214​
4.8%​
CPU (Multi-core)
2,992​
22.5%​
Compute (OpenCL)
3,825​
3.1%​
Compute (Metal)
4,285​
4.8%​


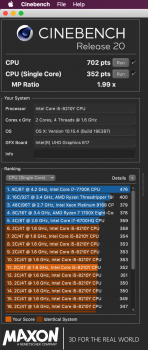
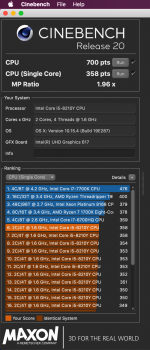
Cinebench R20
Single-core and multi-core performance both improved by about the same amount, unlike the large performance improvement gap seen with Geekbench.

Test TypeOriginal (Points)Mod (Points)Improvement
CPU (Multi-core)
979​
1,110​
13.5%​
CPU (Single-core)
353​
390​
10.5%​
MP Ratio
2.77​
2.84​
2.7%​

View attachment 910875


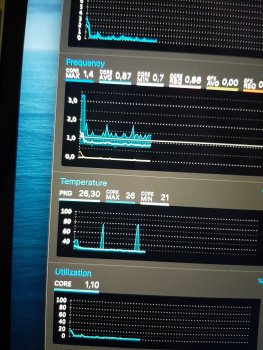
Intel Power Gadget 3.7.0
Lastly, I did some plain-old stress tests, which show about 20% improvement in sustained CPU and GPU performance.

Test TypeOriginal (GHz)Mod (GHz)Improvement
CPU (All Thread Frequency, Scalar)
2.25​
2.70​
20.0%​
CPU (All Thread Frequency, AVX-256)
2.12​
2.59​
22.2%​
CPU (All Thread Frequency, AVX-512)
2.00​
2.40​
20.0%​
Intel Graphics Test (Max Frequency)
0.90​
1.10​
22.2%​

View attachment 910904 View attachment 910905 View attachment 910906 View attachment 910907

I don't remember if my MacBook Air was originally able to sustain max Turbo Boost for single-core.
View attachment 910927
Just realised that I switched the single-core/multi-core labels for the Cinebench results. I've now updated the table and commentary.
 
  • Like
Reactions: RiaKoobcam

Loog

macrumors regular
Apr 14, 2020
164
167
you guys are nuts but in a good way. thoroughly enjoying watching this thread and seeing what ya come up with even though I won't attempt it myself.

@thadoggfather I won't lie... there are risks, but also rewards. Guess it depends how you use your machine. Glad you're liking the thread, its kinda got me hooked and invested as well !
 

srkirt

Suspended
Apr 12, 2020
257
179
Barcelona
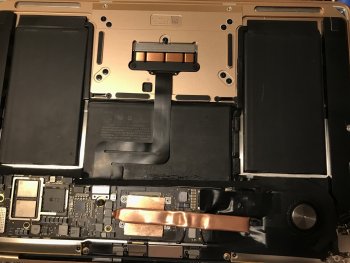
I still have to refine the theme of the tube ... filled with oil but without fins around it the air passes too quickly ... I will have it a few days so that the Artic dries and while I touch up the original heatsink until I find one pure copper.
 

Attachments

  • Captura de pantalla 2020-05-02 a las 0.22.12.png
    Captura de pantalla 2020-05-02 a las 0.22.12.png
    383.9 KB · Views: 334

BoneHead001

macrumors 6502a
Nov 13, 2013
526
243
Livonia,MI
I appreciate the tenacity of all the effort here, but why would you want to void the warranty? These laptops are $1000+ after tax. You shouldn’t have to do all this — just buy a different laptop.
 
  • Like
Reactions: srkirt

srkirt

Suspended
Apr 12, 2020
257
179
Barcelona
[QUOTE = "BoneHead001, publicación: 28427490, miembro: 860499"]
Aprecio la tenacidad de todo el esfuerzo aquí, pero ¿por qué querría anular la garantía? Estas computadoras portátiles cuestan más de $ 1000 después de impuestos. No debería tener que hacer todo esto, solo compre una computadora portátil diferente.
[/CITAR]
The coronavirus has affected my brain ... hahahaha
 

srkirt

Suspended
Apr 12, 2020
257
179
Barcelona
At the moment here ... now with time to design my own heatsink entirely in copper. It has been days since I have seen again 100º nor forcing it and at rest right now writing 33º.
 

Attachments

  • Captura de pantalla 2020-05-02 a las 23.26.09.png
    Captura de pantalla 2020-05-02 a las 23.26.09.png
    387.1 KB · Views: 305
  • Captura de pantalla 2020-05-03 a las 0.09.17.png
    Captura de pantalla 2020-05-03 a las 0.09.17.png
    755.4 KB · Views: 309

Loog

macrumors regular
Apr 14, 2020
164
167
I appreciate the tenacity of all the effort here, but why would you want to void the warranty? These laptops are $1000+ after tax. You shouldn’t have to do all this — just buy a different laptop.
I agree ... however there are many reasons why you may wish to do this, some love the format of the MBA over the MBP, others may be constrained by cost. Why do some people chip their cars? Most who do aren't intending them to be sports cars after, generally they just want them to drive a little better, be more fuel efficient and have a little bit more power when they need to over take. Similar analogy here I suspect.

There are some questionable decision by Apple on the cooling of this device which do limit its performance and general usability. These have been seen by people who are not 'power users', but having purchased a £1000+ device for basic tasks which struggle to use simple applications like video conference without reaching full heat or running out of steam when having a few web browser tabs open. Everyone's use profile differs. Perhaps these may be software issue, perhaps the MBA 2020 has hit the limit of what you can do with a 10w CPU in what is effectively a non directly cooled system, perhaps there is an inherit design flaw.

These mods don't change the fundamental performance of the machine, it does however seem to slow the heat build up, allow for the device to effectively use turbo boost more readily and reduce the use of the fans. All this seems to make the MBA run more efficiently, cooler and use a little less power overall.

It is sad that these benefits seen by the mods aren't there on day 1 of purchase, we may see the design change overtime like we have with the butterfly keyboard. Its still very early days and I'm sure more will unfold for this wonderful laptop.

Yes you will void your warranty by doing this and that's a personal decision.

These experiments have certainly been tense to undertake while also being lots of fun.
 

ARJR84

macrumors member
Apr 16, 2020
32
29
I appreciate the tenacity of all the effort here, but why would you want to void the warranty? These laptops are $1000+ after tax. You shouldn’t have to do all this — just buy a different laptop.
I think the point is that some of these mods are nondestructive. The heatsink on the air is just a few screws holding down a heatsink plate, not an elaborate system as it is on other machines. So repasting or adding a copper shim shouldn't be noticeable and should the machine need to be sent in, you could just remove your mods.

Some mods are destructive and would irreconcilably void the warranty.
 

guiguigui

macrumors newbie
Apr 13, 2020
27
23
I think the point is that some of these mods are nondestructive. The heatsink on the air is just a few screws holding down a heatsink plate, not an elaborate system as it is on other machines. So repasting or adding a copper shim shouldn't be noticeable and should the machine need to be sent in, you could just remove your mods.

Some mods are destructive and would irreconcilably void the warranty.

Exactly, I also think the copper shim mod shouldn't void the warranty.
If, for any reason, you have to send the machine, just remove the shim and they have no way to check if the case had been opened or not. The only things would be if you
- scratch somehow the black screws of the heatsink with the screwdriver (anyone who did it had this happening?)
- leave some thermal paste/dirt around (just be careful and clean lol)
 
  • Like
Reactions: srkirt
Register on MacRumors! This sidebar will go away, and you'll see fewer ads.