Become a MacRumors Supporter for $50/year with no ads, ability to filter front page stories, and private forums.

fcracer

macrumors regular
Jun 15, 2017
134
277
Assuming I'm successful in the shim installation, I'll report back on any improvements. The ideal situation would be to replicate your increase in performance (+100-200) and get a consistent 3,600 when warm and 4000 when cold with the smaller pad and the shim mod. Perhaps I can even consider dumping the pad to keep my thighs nice and cool...

I'm now in the 4,000+ MC club! As promised, here are the results of adding the shim to my i7/16/1TB machine:

Average of five runsSingle-coreMulti-coreCPU Util %Avg Frequency (GHz)Avg Req Frequency (GHz)Avg Temperature (C)Average Power (W)Power Consumed (J)Power Consumed (mWh)Time to Complete (s)
Before Modifications1117290151.22.043.0993.68.81462406166.5
Arctic 1.5MM Pad (small coverage)1181345947.42.273.0190.410.41546430149.3
After 1.5MM Pad (small coverage) + 0.3MM Shim + Kryonaut Paste1249398845.82.412.4576.111.41635454143.3
12%37%-11%18%-21%-19%30%12%12%-14%

Thank you to IngerMan for the excellent instructions he provided and to all the other trailblazers who provided their valuable insight on their R&D. I'm very pleased with the results, especially since I'm using a small pad on the heatsink which transfers far less heat to the bottom case than when I had the entire heatsink covered.

Putting the shim and thermal paste in was easy. My two i7's didn't have anywhere near the thermal paste as others have shown here, and I would argue that the shim was not needed. However, since I already had the shims, I figured I would feel more confident knowing the CPU/GPU will make contact with the heatsink with the shim in place.

Prior to installing the shim, my i7 with the blue Arctic Pad 1.5MM installed (sized so that each corner just touches the outer area of the screw hole for the heatsink) was idling at 47C in a 25C room. You can see the Geekbench results above with an average temperature of 90.4C.

After installing the shim and Kryonaut paste, the idle temperature dropped to 36C in a 26C room, so about a 10C drop. The drop in average temperature on Geekbench was a more substantial 14.3C. The same trend, but to a lesser extent, was observed in Cinebench, with temperature fluctuating 5-10C cooler (between 85-90C) because the computer hits a hard limit of 1.9GHz/1.8GHz in a perfect square wave.

The Geekbench runs above are from a five run average back to back without letting the computer cool. A typical run looks like this. From a cold start, my computer did a 1263 SC and 4075 MC (link). For those who want to keep their bottom cover cool, for my second i7, I used only the shim and paste and the results are 1250 SC and 3400 MC in back to back runs, and 1250 SC and 3900 MC from a cold start.

Finally, to put this all into practice, I used the same test I shared on my MacBook Air for Travel Photography review where I export 125 Fujifilm GFX50R images in Capture One Pro. Shorter times are better:

MacBook Air 2020 i7/16/1tb Stock: 20m 38s
MacBook Air 2020 i7/16/1tb + Arctic 1.5MM Pad: 19m 24s
MacBook Air 2020 i7/16/1tb + Arctic 1.5MM Pad + 20mm x 16mm x 0.3mm copper shim + Kryonaut: 18m 27s

As a comparison, a MacBook Pro 2018 13" i7/16/1tb Stock does it in: 12m 56s

Saving over two minutes in real life use is a great result, and I'm very happy with the modifications. Changing the paste was super easy and there are tons of youtube videos on how to apply the paste. The best part is that all of this performance doesn't come with a high cost. The fan rarely comes on, the bottom cover gets a bit hotter, and you'll use more battery to go along with the better performance, but it's a reasonable trade off for a ~35% improvement in MC performance.

TLDR:

1. The shim and paste modification is worth it on the i7 and it's easy to do; you will get MC score above 4,000 in GB and a cooler running computer
2. You don't need to cover the whole heat sink to have repeatable back to back 3,950 MC runs and 4,000+ MC runs from cold
3. If you only do the shim and paste and no pad, you will get 1250 SC and 3400 MC scores back to back, and 1250 SC and 3900 MC from cold
4. You will need Arctic Blue 50MM x 50MM x 1.5MM pad, Torx T3 and Pentalobe P5 screwdrivers (I used an iFixit kit), Kryonaut 1G, and 20MM x 16MM x 0.3MM copper shim (I used 20MM x 20MM x 0.3MM and cut one side)

Good luck with your MacBook Air 2020 modifications! Let me know if you have any questions.
 

eidrunner247

macrumors 6502
Jul 4, 2006
310
5
I’m curious what effect that these modifications will have on battery life. Aside from “I can see/notice the difference” posts, have there been any measurable tests done?
 

Stefano90

macrumors newbie
Mar 25, 2020
2
1
Has anyone with this configuration (i5-8gb) reached 4000 points in Geekbench 5? My best score (copper shim with Arctic MX2 paste and Arctic 1.5 mm thermal pad) was 1198 in single core and 3848 in multi core. With Kryonaut paste (or liquid metal?) and Grizzly Thermal pad I could touch 4000 points or is the improvement not worth the expense?
 
  • Like
Reactions: TommyYOyoyo

adrianstuartt

macrumors member
Jun 12, 2020
53
54
Has anyone with this configuration (i5-8gb) reached 4000 points in Geekbench 5? My best score (copper shim with Arctic MX2 paste and Arctic 1.5 mm thermal pad) was 1198 in single core and 3848 in multi core. With Kryonaut paste (or liquid metal?) and Grizzly Thermal pad I could touch 4000 points or is the improvement not worth the expense?
i think once you are running both the shim and the thermalpad, you're likely only being held back by a combination of silicon lottery and the power limits.
 

Loog

macrumors regular
Apr 14, 2020
164
167
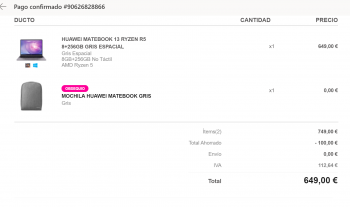
I am going to return the Huawei 13 2K intel to buy the fresh out of the oven Huawei 13 2K AMD Ryzen ™ 5 3500U with the same power of the Intel 8 Generation, for only 649 € !!! Ohhhh mama !!! More power than a 2020 MBA Less heat and half the price !!! It is difficult after weeks testing this brand, that I spend money on a MacBook ...

@srkirt ... I see you have come around to my way of thinking. Before you do buy from the EU, check out other Skews from around the world as there is a 16GB ones https://www.aliexpress.com/i/4000836961668.html
 
  • Love
Reactions: srkirt

srkirt

Suspended
Apr 12, 2020
257
179
Barcelona
@srkirt ... I see you have come around to my way of thinking. Before you do buy from the EU, check out other Skews from around the world as there is a 16GB ones https://www.aliexpress.com/i/4000836961668.html
I have already bought it in Huawei Barcelona and the other one returns to Amazon ... With MX4 paste ... hahahahaha
Fed up with INTEL and its heater ... Now they only sell processors to servers because AMD Ryzen is much colder and 12nm instead of 14nm from Intel ... less heat and more process and autonomy. Do not buy anything from Intel ... from here a couple of years will not be worth anything more than to cook ... hahahahaha Because AMD has been prohibited from starting to mount the 4000 series on laptops ... and you will see what a bomb !!! !
 

Attachments

  • Captura.PNG
    Captura.PNG
    117.7 KB · Views: 151
Last edited:

IngerMan

macrumors 68020
Feb 21, 2011
2,016
905
Michigan
My machine has been pretty constant with the Paste and Shim and Pad. Here are some GB5 scores over time. I ran all these tests on a cool machine from idle with no other programs running.

Update. I wanted to see what it does being warm consistent. I ran 5 GB5 runs in a row immediately one after the other. The first run was still warm. Im impressed. I had it on my bare knees most the time and it never felt warm. never broke 80C on the CPU

Excuse my spelling on immediate I was a little excited lol

So then I decide to run Cinebench R20 3 consecutive times and this is crazy I got the exact same score all 3 times 1216.

I thought I forgot to restart it the 2nd time but I knew I did because I walked off for a few minutes and came back it was done and the same score. Restarted again and same score again as I watched the entire thing. This machine is thermal perfect.

Screen Shot 2020-06-27 at 6.29.44 PM.png Screen Shot 2020-06-27 at 6.30.37 PM.png MBA back to back GB5.png
 
Last edited:
  • Like
Reactions: agaskew and fcracer

Supra Mac

macrumors 6502
Jan 5, 2012
302
143
Texas
Alright, I'm up and running. Some stock numbers on fresh install nothing brought over.

2020 i3/8/256

Geekbench run average:
single 1088, multi 2251
max fan during test 4000 rpm @100C

Ran another with fans at full blast:
single 1095, multi 2360

Cinebench R20 run average:
multi 685
max fan during test 7700 rpm @100C

With fan at full blast:
multi 722

Will follow up with some observations after more daily usage.

Parts came in early! Did the shim and happy with the results I am seeing for the i3. The pad is still on its way.

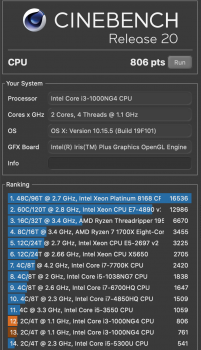
So I'm seeing a 8.6% increase in Geekbench multicore and 11% increase in Cinebench, this was done with the system managing the fan. Running test with fan full blast didn't change Geekbench but on Cinebench was able to pull off 806.

Shim Geekbench run:
single 1099, multi 2446
max fan during test 3200 rpm @95C

Ran another with fans at full blast:
single 1098, multi 2433

Shim Cinebench R20 run:
multi 761
max fan during test 6300 rpm @100C

With fan at full blast:
multi 806

Liking the reduction in temps. Laptop idle is now 35C before it was around 48C. Idle hook up with monitor is now 56C with no fan when before it was 65C with fan on and off.

I have all the data for the spreadsheet, is this something I can input myself or is someone managing it?

Screen Shot 2020-06-27 at 7.10.49 PM.png
 

Attachments

  • Screen Shot 2020-06-27 at 8.42.00 PM.png
    Screen Shot 2020-06-27 at 8.42.00 PM.png
    224.3 KB · Views: 123

adrianstuartt

macrumors member
Jun 12, 2020
53
54
Parts came in early! Did the shim and happy with the results I am seeing for the i3. The pad is still on its way.

So I'm seeing a 8.6% increase in Geekbench multicore and 11% increase in Cinebench, this was done with the system managing the fan. Running test with fan full blast didn't change Geekbench but on Cinebench was able to pull off 806.

Shim Geekbench run:
single 1099, multi 2446
max fan during test 3200 rpm @95C

Ran another with fans at full blast:
single 1098, multi 2433

Shim Cinebench R20 run:
multi 761
max fan during test 6300 rpm @100C

With fan at full blast:
multi 806

Liking the reduction in temps. Laptop idle is now 35C before it was around 48C. Idle hook up with monitor is now 56C with no fan when before it was 65C with fan on and off.

I have all the data for the spreadsheet, is this something I can input myself or is someone managing it?

View attachment 928602

very nice. the spreadsheet is publicly editable, go ahead
 

IngerMan

macrumors 68020
Feb 21, 2011
2,016
905
Michigan
I came back to the CB R20 and wanted to screen capture the runs. I just did back to back runs and the 2nd run was the exact same as the first run. That is incredible in my opinion.

MBA i7 16 256SSD .3mm 16x20 shim MX4 paste, Artic 1.5mm Pad full heat sink coverage.

MBA CBR20 2nd run 420.png MBA CBR20 1st run 415PM.png
 

fcracer

macrumors regular
Jun 15, 2017
134
277
I'm now in the 4,000+ MC club! As promised, here are the results of adding the shim to my i7/16/1TB machine:

Average of five runsSingle-coreMulti-coreCPU Util %Avg Frequency (GHz)Avg Req Frequency (GHz)Avg Temperature (C)Average Power (W)Power Consumed (J)Power Consumed (mWh)Time to Complete (s)
Before Modifications1117290151.22.043.0993.68.81462406166.5
Arctic 1.5MM Pad (small coverage)1181345947.42.273.0190.410.41546430149.3
After 1.5MM Pad (small coverage) + 0.3MM Shim + Kryonaut Paste1249398845.82.412.4576.111.41635454143.3
12%37%-11%18%-21%-19%30%12%12%-14%

Thank you to IngerMan for the excellent instructions he provided and to all the other trailblazers who provided their valuable insight on their R&D. I'm very pleased with the results, especially since I'm using a small pad on the heatsink which transfers far less heat to the bottom case than when I had the entire heatsink covered.

Putting the shim and thermal paste in was easy. My two i7's didn't have anywhere near the thermal paste as others have shown here, and I would argue that the shim was not needed. However, since I already had the shims, I figured I would feel more confident knowing the CPU/GPU will make contact with the heatsink with the shim in place.

Prior to installing the shim, my i7 with the blue Arctic Pad 1.5MM installed (sized so that each corner just touches the outer area of the screw hole for the heatsink) was idling at 47C in a 25C room. You can see the Geekbench results above with an average temperature of 90.4C.

After installing the shim and Kryonaut paste, the idle temperature dropped to 36C in a 26C room, so about a 10C drop. The drop in average temperature on Geekbench was a more substantial 14.3C. The same trend, but to a lesser extent, was observed in Cinebench, with temperature fluctuating 5-10C cooler (between 85-90C) because the computer hits a hard limit of 1.9GHz/1.8GHz in a perfect square wave.

The Geekbench runs above are from a five run average back to back without letting the computer cool. A typical run looks like this. From a cold start, my computer did a 1263 SC and 4075 MC (link). For those who want to keep their bottom cover cool, for my second i7, I used only the shim and paste and the results are 1250 SC and 3400 MC in back to back runs, and 1250 SC and 3900 MC from a cold start.

I've been using the MBA 2020 i7 for a few days now since the shim and paste mod and I love the performance gain and the quiet fan, however, I didn't like the bottom case temperature. While editing images in Capture One Pro, the bottom case got hot enough to be uncomfortable.

Being OCD, I went out and bought an IR temperature gun and decided to measure the bottom case with various setups. The results are a bit surprising and should serve as a caution to those thinking of doing all the modifications.

All temperature measurements were taken with an IR gun that is stated to be accurate to +/- 1C. I tried different benchmarks and also image exporting, but Cinebench R20 produced the hottest temperatures; I left it continuously running and recorded the highest sustained temperature from the bottom cover near where the CPU is located (near the model information text).

SetupHighest Temperature (C)Safe For Skin Contact?GeekBench MC Score
Stock i738CYes~2900
i7 + Shim + Paste38CYes~3400
i7 + Shim + Paste + 1.5MM Arctic Pad covering only the centre of the heat sink48CNo~3950
i7 + Shim + Paste + 1.5MM Arctic Pad covering the whole heat sink50CNo~4100
i7 + Shim + Paste + 1.0MM Arctice Pad covering the whole heat sink45CYes (barely)~4100
i7 MBP 13" 2018 for reference44CYes (barely)~4050

If you're considering doing the modification, I highly recommend you consider going for no thermal pad or use the 1MM thick pad instead. I'm not sure why it produces the great performance with a lower case temperature.

The thinner pad is definitely engaging with the bottom cover as evidenced by the higher measured temperature, however one theory is that the pad doesn't fully engage with the bottom case, but provides sufficient air blockage such that the fan drawn air is forced to flow around and through the heat sink air channels.

As an aside, the heat sink with the shim and paste reaches 80C and is pretty consistent across the heat sink surface under heavy loads. That's a lot of heat in a small place.

In summary, if you've completed the 1.5MM or 2MM pad modification, you may want to check the temperatures on the bottom case under heavy loads as anything higher than 46C can burn skin during the time a laptop is used on your thighs in a typical work session. You can switch to a 1MM pad and keep the benefit with lower case temperatures.

Hope the above was helpful and saves you some time doing the same measurements.
 

silvia_18

macrumors member
May 24, 2020
47
45
I've been using the MBA 2020 i7 for a few days now since the shim and paste mod and I love the performance gain and the quiet fan, however, I didn't like the bottom case temperature. While editing images in Capture One Pro, the bottom case got hot enough to be uncomfortable.

Being OCD, I went out and bought an IR temperature gun and decided to measure the bottom case with various setups. The results are a bit surprising and should serve as a caution to those thinking of doing all the modifications.

All temperature measurements were taken with an IR gun that is stated to be accurate to +/- 1C. I tried different benchmarks and also image exporting, but Cinebench R20 produced the hottest temperatures; I left it continuously running and recorded the highest sustained temperature from the bottom cover near where the CPU is located (near the model information text).

SetupHighest Temperature (C)Safe For Skin Contact?GeekBench MC Score
Stock i738CYes~2900
i7 + Shim + Paste38CYes~3400
i7 + Shim + Paste + 1.5MM Arctic Pad covering only the centre of the heat sink48CNo~3950
i7 + Shim + Paste + 1.5MM Arctic Pad covering the whole heat sink50CNo~4100
i7 + Shim + Paste + 1.0MM Arctice Pad covering the whole heat sink45CYes (barely)~4100
i7 MBP 13" 2018 for reference44CYes (barely)~4050

If you're considering doing the modification, I highly recommend you consider going for no thermal pad or use the 1MM thick pad instead. I'm not sure why it produces the great performance with a lower case temperature.

The thinner pad is definitely engaging with the bottom cover as evidenced by the higher measured temperature, however one theory is that the pad doesn't fully engage with the bottom case, but provides sufficient air blockage such that the fan drawn air is forced to flow around and through the heat sink air channels.

As an aside, the heat sink with the shim and paste reaches 80C and is pretty consistent across the heat sink surface under heavy loads. That's a lot of heat in a small place.

In summary, if you've completed the 1.5MM or 2MM pad modification, you may want to check the temperatures on the bottom case under heavy loads as anything higher than 46C can burn skin during the time a laptop is used on your thighs in a typical work session. You can switch to a 1MM pad and keep the benefit with lower case temperatures.

Hope the above was helpful and saves you some time doing the same measurements.

Interesting! I've been considering removing the 1.5mm pad I'm using, as the case gets a bit hot when VC on my lap. I think I'll try a 1mm pad instead. Thanks!
 

Tenkaykev

macrumors 6502
Jun 29, 2020
385
427
I started at the beginning of the thread and have arrived at the end. Some extremely useful information, many thanks for the photos and benchmark results.
I have one question, I may well have missed the answer but I have read every page. Looking at shim application there appears to be two parts do the processor die, and people are trimming a second piece of copper shim to fit on the smaller of the two dies. Is there a reason that a larger 0.3mm copper shim, cut to fit into the recess of the heatsink and so spanning both dies would not work? I'm thinking there would be a (slightly) larger area of copper to transfer the heat to the heatsink.
I'm probably missing something obvious so I'd be grateful for someone to enlighten me while I await the arrival of my copper shim.
 

Bones13

macrumors regular
Oct 7, 2008
144
62
Did the pad only mod, computer continues to perform well enough for most purposes, and scores were ok (posted before on this, but don't have it written down)

Was bored today, and finally found and installed intel power management. I have had issues trying to get fanny and iStat to actually work.

Running Cinebench causes my temp to right up to 100, and fast, and stay pegged there, as the power starts high, and gradually trends down.

I need to break down and do the shim/kryonaut mod. I have the stuff, but was holding off. I will have some teleconferencing coming up, and I don't know if my machine will handle it in its current status.
 

adrianstuartt

macrumors member
Jun 12, 2020
53
54
I started at the beginning of the thread and have arrived at the end. Some extremely useful information, many thanks for the photos and benchmark results.
I have one question, I may well have missed the answer but I have read every page. Looking at shim application there appears to be two parts do the processor die, and people are trimming a second piece of copper shim to fit on the smaller of the two dies. Is there a reason that a larger 0.3mm copper shim, cut to fit into the recess of the heatsink and so spanning both dies would not work? I'm thinking there would be a (slightly) larger area of copper to transfer the heat to the heatsink.
I'm probably missing something obvious so I'd be grateful for someone to enlighten me while I await the arrival of my copper shim.

Yeah, this would be the ideal solution. Some of us just already had the 15x15mm shims or were easier to source. the difference is negligible.
 

Loog

macrumors regular
Apr 14, 2020
164
167
Interesting! I've been considering removing the 1.5mm pad I'm using, as the case gets a bit hot when VC on my lap. I think I'll try a 1mm pad instead. Thanks!
Excellent feedback @silvia_18, this was the exact reason I backed off the thermal pad and just stuck with the shim and re-paste.
[automerge]1593464379[/automerge]
I started at the beginning of the thread and have arrived at the end. Some extremely useful information, many thanks for the photos and benchmark results.
I have one question, I may well have missed the answer but I have read every page. Looking at shim application there appears to be two parts do the processor die, and people are trimming a second piece of copper shim to fit on the smaller of the two dies. Is there a reason that a larger 0.3mm copper shim, cut to fit into the recess of the heatsink and so spanning both dies would not work? I'm thinking there would be a (slightly) larger area of copper to transfer the heat to the heatsink.
I'm probably missing something obvious so I'd be grateful for someone to enlighten me while I await the arrival of my copper shim.
@Tenkaykev ... you must have overlooked posts of my custom shims that are one piece and 22mm x 16.5mm. Most of the stock units from Amazon/ebay are 20mm x 20mm or 15mm x 15mm. If you'd dropped me a line I would have pop you one in the post, I only have 0.5mm left, these are suitable for both generations of retina MacBooks. @DanSilov was kind enough and tried both from me and also did a review.
 
Last edited:
  • Like
Reactions: silvia_18

doctor_evil

macrumors newbie
Jun 30, 2020
2
3
WARNING: The heat sink screws on the i5 2020 Air are T3, not T4!

I followed some quite terrible advice that they were T4, and ended up stripping one of the screw heads without getting it off (wow, the metal those screws are made of is butter soft). Now I have a laptop I was unable to mod, and I am assuming has a voided warranty (if Apple were to open it they would see the stripped heatsink screw and assume modification).

If anybody has a lead on a replacement T3 heatsink screw, let me know, it would be nice to have one on hand in case the laptop ever needs to go in for warranty work, perhaps if I somehow replaced it it would still be under warranty.
 
Last edited:

Tenkaykev

macrumors 6502
Jun 29, 2020
385
427
Excellent feedback @silvia_18, this was the exact reason I backed off the thermal pad and just stuck with the shim and re-paste.
[automerge]1593464379[/automerge]
@Tenkaykev ... you must have overlooked posts of my custom shims that are one piece and 22mm x 16.5mm. Most of the stock units from Amazon/ebay are 20mm x 20mm or 15mm x 15mm. If you'd dropped me a line I would have pop you one in the post, I only have 0.5mm left, these are suitable for both generations of retina MacBooks. @DanSilov was kind enough and tried both from me and also did a review.

Hello Loog,
I saw your posts and had bookmarked them. I thought that they were an excellent idea. I'm late to this thread, and as I mentioned I read through every message right to the end on page 83!
I saw the your post re the shims and would certainly have been in the market for one and more than happy to contribute towards your costs. The problem was I was late to the thread, and as I read it I thought that they had all gone, with just ten left that you were going to post out on a first come first served basis.

Today I'll be doing some benchmarks on my stock i5/8.256. I've fully charged the battery and taken it off charge, shut everything down apart from Geekbench, Macs fan Control ( sitting in the top bar ) and Intel Power Gadget.

I've got a couple of 20x20 copper shims on the way via Ebay ( the irony of this is when I was working I used to use Copper winding wire and rolls of copper tape in various thicknesses, the copper tape came in 50 metre x 5cm rolls!)
Many thanks for your helpful input.

EDIT: Just a thought...Has anyone thought to apply the copper shim directly into the recess in the heatsink making it an exact fit? The thermal paste could then be applied to the top of the processor dies as normal.
Further Edit: Forgive me, I'm being a bit thick today, It would seem that's probably the correct way to apply in anyway.
 
Last edited:

excelsior.ink

macrumors regular
Apr 15, 2020
134
78
WARNING: The heat sink screws on the i5 2020 Air are T3, not T4!
Some of us, me including, mentioned it is a T3. See post #1,722

For the others I found this in the description of a copper shim:

"This Copper Shims thermal conductivity up to 401w / mk, and ordinary copper thermal conductivity is only 20-30w / mk"


So my question is if this is really true and if so if anyone used this improved thermal conductivity copper shim.
 

fcracer

macrumors regular
Jun 15, 2017
134
277
So my question is if this is really true and if so if anyone used this improved thermal conductivity copper shim.

Copper is copper, so I don’t see how they can make that claim. Copper has a known thermal conductivity at ~400W/m-K between 0-100C which is our operating range. Don’t overthink it, it’s just 0.3MM of copper. I bet all the shims come from the same factory in China.
 

nill1234

macrumors 6502
Dec 22, 2012
311
215
So one bottom screw didn't catch the thread. These small screws only have 2-3 rounds to catch on, that's really bad. So I bought the small screws from the MacBook Pro which are 3 mm long and replaced the two middle / side screws (left and right) with the longer one. Those fit perfectly and are way better and secure. Its only a way of time if a bad machined thread strips, so longer screws help.
[automerge]1593528899[/automerge]
WARNING: The heat sink screws on the i5 2020 Air are T3, not T4!

I followed some quite terrible advice that they were T4, and ended up stripping one of the screw heads without getting it off (wow, the metal those screws are made of is butter soft). Now I have a laptop I was unable to mod, and I am assuming has a voided warranty (if Apple were to open it they would see the stripped heatsink screw and assume modification).

If anybody has a lead on a replacement T3 heatsink screw, let me know, it would be nice to have one on hand in case the laptop ever needs to go in for warranty work, perhaps if I somehow replaced it it would still be under warranty.
Have you tried a T4 and some epoxy or other glue? I think with epoxy you can mold a T3 in. I didn't found a source yet. They are 1.2mm width and have a flat head. BTW. I had the same Problem.
 
  • Like
Reactions: Tenkaykev

Tenkaykev

macrumors 6502
Jun 29, 2020
385
427
So one bottom screw didn't catch the thread. These small screws only have 2-3 rounds to catch on, that's really bad. So I bought the small screws from the MacBook Pro which are 3 mm long and replaced the two middle / side screws (left and right) with the longer one. Those fit perfectly and are way better and secure. Its only a way of time if a bad machined thread strips, so longer screws help.

I don't know how easy it was to get hold of them or what the cost was. Perhaps these slightly longer screws would make the fitting of a 0.5mm copper shim more practicable. Be interesting to see if the increase in copper mass had any affect on benchmarks / temperature.
 
Register on MacRumors! This sidebar will go away, and you'll see fewer ads.